Manual
Page 5
Chapter 3 Drivers Installation 49 3-1 Install Chipset Drivers 49 3-2 SoftwareApplications 50 3-3 Driver CD Information 50 3-4 Hardware Information 51 3-5 Contact Us ...51 Chapter 4 Appendix ...53 4-1 Unique Software Utility 53 4-1-1 Xpress Recovery2 Introduction 53 4-1-2 BIOS Flash Method Introduction 55 4-1-3 Serial ATA BIOS Setting Utility Introduction 64 4-1-4 2 / 4 / 6 Channel Audio Function Introduction 71 4-2 Troubleshooting 79 - 5 -
Chapter 3 Drivers Installation 49 3-1 Install Chipset Drivers 49 3-2 SoftwareApplications 50 3-3 Driver CD Information 50 3-4 Hardware Information 51 3-5 Contact Us ...51 Chapter 4 Appendix ...53 4-1 Unique Software Utility 53 4-1-1 Xpress Recovery2 Introduction 53 4-1-2 BIOS Flash Method Introduction 55 4-1-3 Serial ATA BIOS Setting Utility Introduction 64 4-1-4 2 / 4 / 6 Channel Audio Function Introduction 71 4-2 Troubleshooting 79 - 5 -
Manual
Page 21
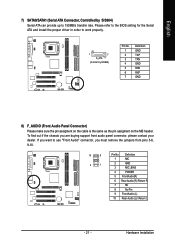
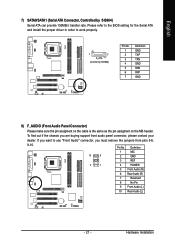
Please refer to the BIOS setting for the Serial ATA and install the proper driver in order to 150MB/s transfer rate. Hardware Installation English 7) SATA0/SATA1 (Serial ATA Connector, Controlled by SiS964) Serial ATA can provide up to work properly. 1 7 ...S_ATA (Control by SiS964) Pin No. 1 2 3 4 5 6 7 Definition GND TXP TXN GND RXN RXP GND 8) F_AUDIO (Front Audio Panel Connector) Please make sure the pin assigment on the cable is the same as the pin assigment on the MB header. Definition 1 MIC 2 GND...
Please refer to the BIOS setting for the Serial ATA and install the proper driver in order to 150MB/s transfer rate. Hardware Installation English 7) SATA0/SATA1 (Serial ATA Connector, Controlled by SiS964) Serial ATA can provide up to work properly. 1 7 ...S_ATA (Control by SiS964) Pin No. 1 2 3 4 5 6 7 Definition GND TXP TXN GND RXN RXP GND 8) F_AUDIO (Front Audio Panel Connector) Please make sure the pin assigment on the cable is the same as the pin assigment on the MB header. Definition 1 MIC 2 GND...

Manual
Page 71
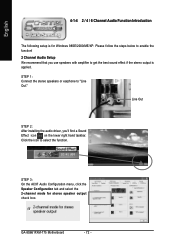
... menu, click the Speaker Configuration tab and select the 2-channel mode for Windows 98SE/2000/ME/XP. Line Out STEP 2: After installing the audio driver, you use speakers with amplifier to get the best sound effect if the stereo output is for stereo speaker output check box. - 71 - Appendix Click... the icon to "Line Out." Please follow the steps below to enable the function! 2 Channel Audio Setup We recommend that you 'll find a Sound Effect icon on the lower right hand taskbar. English 4-1-4 2 / 4 / 6 Channel...
... menu, click the Speaker Configuration tab and select the 2-channel mode for Windows 98SE/2000/ME/XP. Line Out STEP 2: After installing the audio driver, you use speakers with amplifier to get the best sound effect if the stereo output is for stereo speaker output check box. - 71 - Appendix Click... the icon to "Line Out." Please follow the steps below to enable the function! 2 Channel Audio Setup We recommend that you 'll find a Sound Effect icon on the lower right hand taskbar. English 4-1-4 2 / 4 / 6 Channel...
Manual
Page 72
STEP 2: After installing the audio driver, you'll find a Sound Effect icon on the lower right hand taskbar. Please select other settings (ex: Living Room) for 4 speaker output check box. GA-8S661FXM-775 Motherboard - 72 - Line Out Line In When the Environment setting is None, the... sound would be performed as stereo mode (2-channel output). STEP 3: On the AC97 Audio Configuration menu, click the Speaker Configuration tab and...
STEP 2: After installing the audio driver, you'll find a Sound Effect icon on the lower right hand taskbar. Please select other settings (ex: Living Room) for 4 speaker output check box. GA-8S661FXM-775 Motherboard - 72 - Line Out Line In When the Environment setting is None, the... sound would be performed as stereo mode (2-channel output). STEP 3: On the AC97 Audio Configuration menu, click the Speaker Configuration tab and...
Manual
Page 73
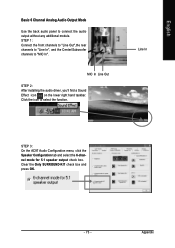
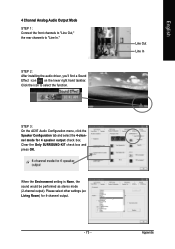
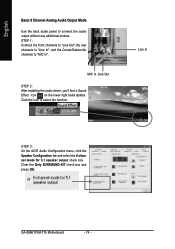
... the Only SURROUND-KIT check box and press OK. - 73 - English Basic 6 Channel Analog Audio Output Mode Use the back audio panel to select the function. MIC In Line Out STEP 2: After installing the audio driver, you'll find a Sound Effect icon on the lower right hand taskbar. Click the icon to... connect the audio output without any additional module. STEP 1: Connect the front channels to "Line Out",the rear channels to "...
... the Only SURROUND-KIT check box and press OK. - 73 - English Basic 6 Channel Analog Audio Output Mode Use the back audio panel to select the function. MIC In Line Out STEP 2: After installing the audio driver, you'll find a Sound Effect icon on the lower right hand taskbar. Click the icon to... connect the audio output without any additional module. STEP 1: Connect the front channels to "Line Out",the rear channels to "...
Manual
Page 75
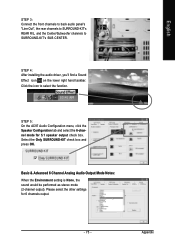
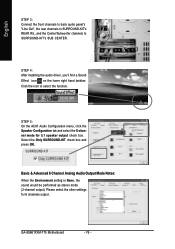
... "Line Out", the rear channels to SURROUND-KIT's REAR R/L, and the Center/Subwoofer channels to select the function. STEP 4: After installing the audio driver, you'll find a Sound Effect icon on the lower right hand taskbar. Appendix Click the icon to SURROUND-KIT's SUB CENTER. Select the ...Only SURROUND-KIT check box and press OK. Please select the other settings for 5.1 speaker output check box. Basic & Advanced 6 Channel Analog Audio Output Mode Notes: When the Environment setting is None, the sound would be performed as stereo mode (2-channel output). STEP 5: On the AC97...
... "Line Out", the rear channels to SURROUND-KIT's REAR R/L, and the Center/Subwoofer channels to select the function. STEP 4: After installing the audio driver, you'll find a Sound Effect icon on the lower right hand taskbar. Appendix Click the icon to SURROUND-KIT's SUB CENTER. Select the ...Only SURROUND-KIT check box and press OK. Please select the other settings for 5.1 speaker output check box. Basic & Advanced 6 Channel Analog Audio Output Mode Notes: When the Environment setting is None, the sound would be performed as stereo mode (2-channel output). STEP 5: On the AC97...
Manual
Page 21
...transfer rate. Hardware Installation English 7) SATA0/SATA1 (Serial ATA Connector, Controlled by SiS964) Pin No. 1 2 3 4 5 6 7 Definition GND TXP TXN GND RXN RXP GND 8) F_AUDIO (Front Audio Panel Connector) Please make sure the pin assigment on the cable is the same as the pin assigment on the MB header. Please refer to... the BIOS setting for the Serial ATA and install the proper driver in order to use "Front Audio" connector, you must remove the jumpers from pins 5-6, 9-10. If you are buying support front...
...transfer rate. Hardware Installation English 7) SATA0/SATA1 (Serial ATA Connector, Controlled by SiS964) Pin No. 1 2 3 4 5 6 7 Definition GND TXP TXN GND RXN RXP GND 8) F_AUDIO (Front Audio Panel Connector) Please make sure the pin assigment on the cable is the same as the pin assigment on the MB header. Please refer to... the BIOS setting for the Serial ATA and install the proper driver in order to use "Front Audio" connector, you must remove the jumpers from pins 5-6, 9-10. If you are buying support front...
Manual
Page 72
GA-8S661FXM-775 Motherboard - 72 - Line Out STEP 2: After installing the audio driver, you use speakers with amplifier to enable the function! 2 Channel Audio Setup We recommend that you 'll find a Sound Effect icon on the lower right hand taskbar. Click the icon to "Line Out." ...follow the steps below to get the best sound effect if the stereo output is for stereo speaker output check box. English 4-1-4 2 / 4 / 6 Channel Audio Function Introduction The following setup is applied. STEP 1: Connect the stereo speakers or earphone to select the function. STEP 3: On the AC97...
GA-8S661FXM-775 Motherboard - 72 - Line Out STEP 2: After installing the audio driver, you use speakers with amplifier to enable the function! 2 Channel Audio Setup We recommend that you 'll find a Sound Effect icon on the lower right hand taskbar. Click the icon to "Line Out." ...follow the steps below to get the best sound effect if the stereo output is for stereo speaker output check box. English 4-1-4 2 / 4 / 6 Channel Audio Function Introduction The following setup is applied. STEP 1: Connect the stereo speakers or earphone to select the function. STEP 3: On the AC97...
Manual
Page 73
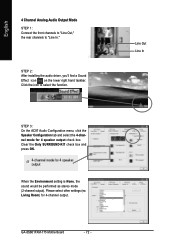
...None, the sound would be performed as stereo mode (2-channel output). STEP 2: After installing the audio driver, you'll find a Sound Effect icon on the lower right hand taskbar. STEP 3: On the AC97 Audio Configuration menu, click the Speaker Configuration tab and select the 4-channel mode for 4-channel output....73 - Please select other settings (ex: Living Room) for 4 speaker output check box. Line Out Line In Appendix English 4 Channel Analog Audio Output Mode STEP 1: Connect the front channels to "Line Out," the rear channels to select the function. Click the icon to "Line In."
...None, the sound would be performed as stereo mode (2-channel output). STEP 2: After installing the audio driver, you'll find a Sound Effect icon on the lower right hand taskbar. STEP 3: On the AC97 Audio Configuration menu, click the Speaker Configuration tab and select the 4-channel mode for 4-channel output....73 - Please select other settings (ex: Living Room) for 4 speaker output check box. Line Out Line In Appendix English 4 Channel Analog Audio Output Mode STEP 1: Connect the front channels to "Line Out," the rear channels to select the function. Click the icon to "Line In."
Manual
Page 74
... Out",the rear channels to "Line In", and the Center/Subwoofer channels to select the function. Line In STEP 3: On the AC97 Audio Configuration menu, click the Speaker Configuration tab and select the 6-channel mode for 5.1 speaker output check box. Click the icon to "MIC...-KIT check box and press OK. English Basic 6 Channel Analog Audio Output Mode Use the back audio panel to connect the audio output without any additional module. GA-8S661FXM-775 Motherboard - 74 - MIC In Line Out STEP 2: After installing the audio driver, you'll find a Sound Effect icon on the lower right hand...
... Out",the rear channels to "Line In", and the Center/Subwoofer channels to select the function. Line In STEP 3: On the AC97 Audio Configuration menu, click the Speaker Configuration tab and select the 6-channel mode for 5.1 speaker output check box. Click the icon to "MIC...-KIT check box and press OK. English Basic 6 Channel Analog Audio Output Mode Use the back audio panel to connect the audio output without any additional module. GA-8S661FXM-775 Motherboard - 74 - MIC In Line Out STEP 2: After installing the audio driver, you'll find a Sound Effect icon on the lower right hand...
Manual
Page 76
...select the 6-channel mode for 6 channels output. Please select the other settings for 5.1 speaker output check box. STEP 4: After installing the audio driver, you'll find a Sound Effect icon on the lower right hand taskbar. Select the Only SURROUND-KIT check box and press OK. Basic... & Advanced 6 Channel Analog Audio Output Mode Notes: When the Environment setting is None, the sound would be performed as stereo mode (2-channel output). Click the icon to SURROUND-KIT's SUB CENTER. GA-8S661FXM-775 Motherboard - 76 -
...select the 6-channel mode for 6 channels output. Please select the other settings for 5.1 speaker output check box. STEP 4: After installing the audio driver, you'll find a Sound Effect icon on the lower right hand taskbar. Select the Only SURROUND-KIT check box and press OK. Basic... & Advanced 6 Channel Analog Audio Output Mode Notes: When the Environment setting is None, the sound would be performed as stereo mode (2-channel output). Click the icon to SURROUND-KIT's SUB CENTER. GA-8S661FXM-775 Motherboard - 76 -


