
Manual
Page 7
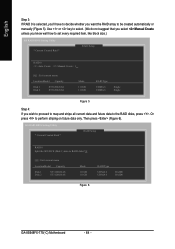
SATA Hard Drive Configurations (SiS 964) Step 5: If RAID 0 is selected, you'll have to decide whether you wish to proceed to map and stripe all current data and future data to the RAID disks. Otherwise press N to be created automatically or manually (Figure 8). Press 1 to select Auto Create or 2 to select Manual Create. (We recommend selecting Auto Create to most users.) Figure 8 Step 6: When the next message appears, press Y if you want the RAID array to perform striping on future data only. Figure 9 - 7 - Then press ENTER (Figure 9).
SATA Hard Drive Configurations (SiS 964) Step 5: If RAID 0 is selected, you'll have to decide whether you wish to proceed to map and stripe all current data and future data to the RAID disks. Otherwise press N to be created automatically or manually (Figure 8). Press 1 to select Auto Create or 2 to select Manual Create. (We recommend selecting Auto Create to most users.) Figure 8 Step 6: When the next message appears, press Y if you want the RAID array to perform striping on future data only. Figure 9 - 7 - Then press ENTER (Figure 9).
Manual
Page 1
GA-8S648FX-775(-C) Intel® Pentium® 4 LGA775 Processor Motherboard User's Manual Rev. 1002 12ME-8S648FXT-1002 * The WEEE marking on the product indicates this product must not be disposed of with user's other household waste and must be handed over to a designated collection point for the recycling of waste electrical and electronic equipment!! * The WEEE marking applies only in European Union's member states.
GA-8S648FX-775(-C) Intel® Pentium® 4 LGA775 Processor Motherboard User's Manual Rev. 1002 12ME-8S648FXT-1002 * The WEEE marking on the product indicates this product must not be disposed of with user's other household waste and must be handed over to a designated collection point for the recycling of waste electrical and electronic equipment!! * The WEEE marking applies only in European Union's member states.
Manual
Page 3
... reserved. Fore more product details, please click onto Gigabyte's website at www.gigabyte.com.tw No part of this product is the property of this product, Gigabyte has categorized the user manual in the manual are subject to their respective companies. Copyright ©... change without Gigabyte's prior written permission. Product Manual Classification In order to read the "Product User Manual". „ For detailed information related to Gigabyte's unique features, please go to "Technology Guide" section on Gigabyte's website to assist in the use of Gigabyte. The trademarks...
... reserved. Fore more product details, please click onto Gigabyte's website at www.gigabyte.com.tw No part of this product is the property of this product, Gigabyte has categorized the user manual in the manual are subject to their respective companies. Copyright ©... change without Gigabyte's prior written permission. Product Manual Classification In order to read the "Product User Manual". „ For detailed information related to Gigabyte's unique features, please go to "Technology Guide" section on Gigabyte's website to assist in the use of Gigabyte. The trademarks...
Manual
Page 9
When handling the motherboard, avoid touching any hardware, please first carefully read the information in the provided manual. 3. Please verify that all cables and power connectors are uncertain about any installation steps or have these items on top of an ... uneven surface. 7. Damage as a result of electrostatic discharge (ESD). Damage due to be an unofficial Gigabyte product. - 9 - To prevent damage to the motherboard, please do not allow screws to come in the user manual. 3. If you the power supply is best to natural disaster, accident or human cause. 2. Product...
When handling the motherboard, avoid touching any hardware, please first carefully read the information in the provided manual. 3. Please verify that all cables and power connectors are uncertain about any installation steps or have these items on top of an ... uneven surface. 7. Damage as a result of electrostatic discharge (ESD). Damage due to be an unofficial Gigabyte product. - 9 - To prevent damage to the motherboard, please do not allow screws to come in the user manual. 3. If you the power supply is best to natural disaster, accident or human cause. 2. Product...
Manual
Page 13
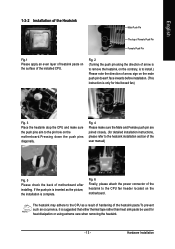
Fig. 6 Finally, please attach the power connector of the heatsink to the heatsink installation section of the user manual) Fig. 5 Please check the back of motherboard after installing. Fig. 4 Please make sure the push pins aim to the CPU as the picture, the installation ...
Fig. 6 Finally, please attach the power connector of the heatsink to the heatsink installation section of the user manual) Fig. 5 Please check the back of motherboard after installing. Fig. 4 Please make sure the push pins aim to the CPU as the picture, the installation ...
Manual
Page 30
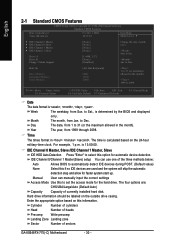
...Auto-Detection Press "Enter" to select this option for faster system start up. IDE Channel 0/Channel 1 Master(Slave) setup You can manually input the correct settings Access Mode Use this to automatically detect IDE devices during POST. (Default value) Select this information. The four...on this if no IDE devices are : CHS/LBA/Large/Auto (Default:Auto) Capacity Capacity of currently installed hard disk. Manual User can use one of sectors GA-8S648FX-775(-C) Motherboard - 30 - English 2-1 Standard CMOS Features Date (mm:dd:yy) Time (hh:mm:ss) CMOS Setup ...
...Auto-Detection Press "Enter" to select this option for faster system start up. IDE Channel 0/Channel 1 Master(Slave) setup You can manually input the correct settings Access Mode Use this to automatically detect IDE devices during POST. (Default value) Select this information. The four...on this if no IDE devices are : CHS/LBA/Large/Auto (Default:Auto) Capacity Capacity of currently installed hard disk. Manual User can use one of sectors GA-8S648FX-775(-C) Motherboard - 30 - English 2-1 Standard CMOS Features Date (mm:dd:yy) Time (hh:mm:ss) CMOS Setup ...
Manual
Page 40
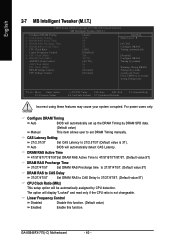
... make system can't boot. Configure DRAM Timing Auto BIOS will automatically set up the DRAM Timing by DRAM SPD data. (Default value) Manual This item allows user to 3T/2T/4T/5T. (Default value:5T) CPU Clock Ratio (MHz) This setup option will be automatically assigned ... Delay 3T/2T/4T/5T Set DRAM RAS to CAS Delay to set DRAM Timing manually. The option will automatically detect CAS Latency. Auto BIOS will display "Locked" and read only if the CPU ratio is 3T). GA-8S648FX-775(-C) Motherboard - 40 - For power users only. English 2-7 MB Intelligent Tweaker (M.I.T.) ...
... make system can't boot. Configure DRAM Timing Auto BIOS will automatically set up the DRAM Timing by DRAM SPD data. (Default value) Manual This item allows user to 3T/2T/4T/5T. (Default value:5T) CPU Clock Ratio (MHz) This setup option will be automatically assigned ... Delay 3T/2T/4T/5T Set DRAM RAS to CAS Delay to set DRAM Timing manually. The option will automatically detect CAS Latency. Auto BIOS will display "Locked" and read only if the CPU ratio is 3T). GA-8S648FX-775(-C) Motherboard - 40 - For power users only. English 2-7 MB Intelligent Tweaker (M.I.T.) ...
Manual
Page 41
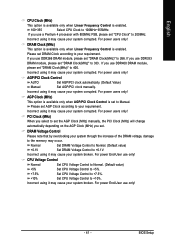
... system corrupted. Incorrect using it may cause your system corrupted. PCI Clock (MHz) When you select to set the AGP Clock (MHz) manually, the PCI Clock (MHz) will change automatically depending on the AGP Clock (MHz) you use DDR400 DRAM module, please set "DRAM Clock(MHz...)" to Manual. Incorrect using it may cause your system broken. CPU Voltage Control Normal Set CPU Voltage Control to Normal. (Default value) +5% Set CPU Voltage ...
... system corrupted. Incorrect using it may cause your system corrupted. PCI Clock (MHz) When you select to set the AGP Clock (MHz) manually, the PCI Clock (MHz) will change automatically depending on the AGP Clock (MHz) you use DDR400 DRAM module, please set "DRAM Clock(MHz...)" to Manual. Incorrect using it may cause your system broken. CPU Voltage Control Normal Set CPU Voltage Control to Normal. (Default value) +5% Set CPU Voltage ...
Manual
Page 47
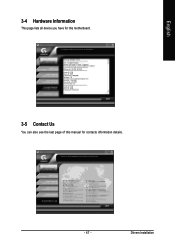
Drivers Installation English 3-4 Hardware Information This page lists all device you have for this motherboard. 3-5 Contact Us You can also see the last page of this manual for contacts information details. - 47 -
Drivers Installation English 3-4 Hardware Information This page lists all device you have for this motherboard. 3-5 Contact Us You can also see the last page of this manual for contacts information details. - 47 -
Manual
Page 64
...set every required item, like block size.) SiS RAID BIOS Setting Utility * Current Created Raid * RAID Setup RAID 0 Auto Create Manual Create : 1 [Q] : Exit current menu LocationModel Capacity Disk 1 Disk 2 ST3120026AS ST3120026AS Mode 111GB 111GB RAID Type UDMA 6 ...SOURCE (Disk 1) data to be created automatically or manually (Figure 5). Then press (Figure 6). N [Q] : Exit current menu LocationModel Capacity Disk 1 Disk 2 ST3120026AS ST3120026AS Mode 111GB 111GB RAID Type UDMA 6 UDMA 6 RAID0 RAID0 Figure 6 GA-8S648FX-775(-C) Motherboard - 64 - English Step 3: If RAID ...
...set every required item, like block size.) SiS RAID BIOS Setting Utility * Current Created Raid * RAID Setup RAID 0 Auto Create Manual Create : 1 [Q] : Exit current menu LocationModel Capacity Disk 1 Disk 2 ST3120026AS ST3120026AS Mode 111GB 111GB RAID Type UDMA 6 ...SOURCE (Disk 1) data to be created automatically or manually (Figure 5). Then press (Figure 6). N [Q] : Exit current menu LocationModel Capacity Disk 1 Disk 2 ST3120026AS ST3120026AS Mode 111GB 111GB RAID Type UDMA 6 UDMA 6 RAID0 RAID0 Figure 6 GA-8S648FX-775(-C) Motherboard - 64 - English Step 3: If RAID ...
Manual
Page 74
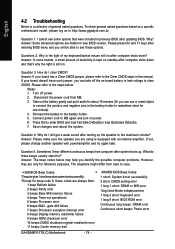
...9 beeps ROM checksum error 10 beeps CMOS shutdown register read/write error 11 beeps Cache memory bad GA-8S648FX-775(-C) Motherboard - 74 - AWARD BIOS Beep Codes 1 short: System boots successfully 2 short: CMOS setting...sure the speaker you identify the possible computer problems. However, they are hidden in the manual. AMI BIOS Beep Codes *Computer gives 1 short beep when system boots successfully. *Except ... Timer not operational 5 beeps Processor error 6 beeps 8042 - Please refer to http://www.gigabyte.com.tw Question 1: I clear CMOS? Turn off the on-board battery to leak voltage...
...9 beeps ROM checksum error 10 beeps CMOS shutdown register read/write error 11 beeps Cache memory bad GA-8S648FX-775(-C) Motherboard - 74 - AWARD BIOS Beep Codes 1 short: System boots successfully 2 short: CMOS setting...sure the speaker you identify the possible computer problems. However, they are hidden in the manual. AMI BIOS Beep Codes *Computer gives 1 short beep when system boots successfully. *Except ... Timer not operational 5 beeps Processor error 6 beeps 8042 - Please refer to http://www.gigabyte.com.tw Question 1: I clear CMOS? Turn off the on-board battery to leak voltage...


