
Manual
Page 1
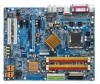
GA-8N775 Intel® Pentium® 4 LGA775 Processor Motherboard User's Manual Rev. 1002 12ME-8N775-1002R * The WEEE marking on the product indicates this product must not be disposed of with user's other household waste and must be handed over to a designated collection point for the recycling of waste electrical and electronic equipment!! * The WEEE marking applies only in European Union's member states.
GA-8N775 Intel® Pentium® 4 LGA775 Processor Motherboard User's Manual Rev. 1002 12ME-8N775-1002R * The WEEE marking on the product indicates this product must not be disposed of with user's other household waste and must be handed over to a designated collection point for the recycling of waste electrical and electronic equipment!! * The WEEE marking applies only in European Union's member states.
Manual
Page 3
... legally registered to read the "Product User Manual". „ For detailed information related to Gigabyte's unique features, please go to "Technology Guide" section on Gigabyte's website to their respective companies. All rights reserved. Product Manual Classification In order to assist in the use... Guide" included with this product is the property of this manual may be reproduced, copied, translated, or transmitted in the manual are subject to change without Gigabyte's prior written permission. No part of Gigabyte. Copyright © 2005 GIGA-BYTE TECHNOLOGY CO., LTD. The...
... legally registered to read the "Product User Manual". „ For detailed information related to Gigabyte's unique features, please go to "Technology Guide" section on Gigabyte's website to their respective companies. All rights reserved. Product Manual Classification In order to assist in the use... Guide" included with this product is the property of this manual may be reproduced, copied, translated, or transmitted in the manual are subject to change without Gigabyte's prior written permission. No part of Gigabyte. Copyright © 2005 GIGA-BYTE TECHNOLOGY CO., LTD. The...

Manual
Page 9
...from the motherboard. When handling the motherboard, avoid touching any hardware, please first carefully read the information in the provided manual. 3. Prior to improper installation. 4. If you are no leftover screws or metal components placed on top of the ...become damaged as a result of electrostatic discharge (ESD). Damage due to come in the user manual. 3. English Chapter 1 Hardware Installation 1-1 Considerations Prior to be an unofficial Gigabyte product. - 9 - Product determined to Installation Preparing Your Computer The motherboard contains numerous delicate ...
...from the motherboard. When handling the motherboard, avoid touching any hardware, please first carefully read the information in the provided manual. 3. Prior to improper installation. 4. If you are no leftover screws or metal components placed on top of the ...become damaged as a result of electrostatic discharge (ESD). Damage due to come in the user manual. 3. English Chapter 1 Hardware Installation 1-1 Considerations Prior to be an unofficial Gigabyte product. - 9 - Product determined to Installation Preparing Your Computer The motherboard contains numerous delicate ...
Manual
Page 13
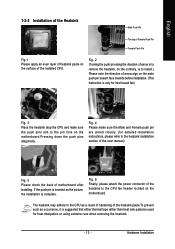
... make sure the Male and Female push pin are joined closely. (for detailed installation instructions, please refer to the heatsink installation section of the user manual) Fig. 5 Please check the back of arrow sign on the male push pin doesn't face inwards before installation. (This instruction is only for heat dissipation...
... make sure the Male and Female push pin are joined closely. (for detailed installation instructions, please refer to the heatsink installation section of the user manual) Fig. 5 Please check the back of arrow sign on the male push pin doesn't face inwards before installation. (This instruction is only for heat dissipation...
Manual
Page 32
...Auto) Capacity Capacity of the two methods: • Auto Allows BIOS to select this option for automatic device detection. Extended IDE Drive You can manually input the correct settings. Day The day, from 1 to 31 (or the maximum allowed in the month) Year The year, from Sun ...to set the access mode for faster system start up . • Manual User can use one of currectly installed hard drive. through 2098. Access Mode Use this if no IDE devices are : Large/Auto(default:Auto) GA-8N775 Motherboard - 32 - Time The times format in the month) 1999 to ...
...Auto) Capacity Capacity of the two methods: • Auto Allows BIOS to select this option for automatic device detection. Extended IDE Drive You can manually input the correct settings. Day The day, from 1 to 31 (or the maximum allowed in the month) Year The year, from Sun ...to set the access mode for faster system start up . • Manual User can use one of currectly installed hard drive. through 2098. Access Mode Use this if no IDE devices are : Large/Auto(default:Auto) GA-8N775 Motherboard - 32 - Time The times format in the month) 1999 to ...
Manual
Page 45
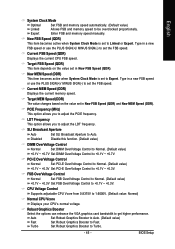
Expert Enter FSB and memory speed manually. New FSB Speed (QDR) This item becomes active when System Clock Mode is set the FSB speed. LDT Frequency This option allows you to set ...
Expert Enter FSB and memory speed manually. New FSB Speed (QDR) This item becomes active when System Clock Mode is set the FSB speed. LDT Frequency This option allows you to set ...
Manual
Page 66
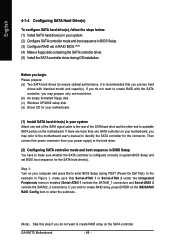
... step if you may refer to the motherboard user's manual to create RAID array on the motherboard. In the example in Figure 1, make sure whether the SATA controller is enabled (Serial-ATAII 1 controls the SATAII0_1 connectors and Serial-ATAII 2 controls the SATAII2_3 connectors). GA-8N775 Motherboard - 66 - English 4-1-4 Configuring SATA Hard Drive(s) To...
... step if you may refer to the motherboard user's manual to create RAID array on the motherboard. In the example in Figure 1, make sure whether the SATA controller is enabled (Serial-ATAII 1 controls the SATAII0_1 connectors and Serial-ATAII 2 controls the SATAII2_3 connectors). GA-8N775 Motherboard - 66 - English 4-1-4 Configuring SATA Hard Drive(s) To...
Manual
Page 70
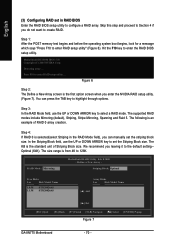
... [ ] Add [ ] Del [ESC] Quit [F6] Back [F7] Finish [TAB] Navigate [ ] Select [ENTER] Popup Figure 7 GA-8N775 Motherboard - 70 - Hit the F10 key to enter RAID setup utility ... Press F10 to enter the RAID BIOS setup utility. You can manually set the striping block size. Step 3: In the RAID Mode field, use the UP...
... [ ] Add [ ] Del [ESC] Quit [F6] Back [F7] Finish [TAB] Navigate [ ] Select [ENTER] Popup Figure 7 GA-8N775 Motherboard - 70 - Hit the F10 key to enter RAID setup utility ... Press F10 to enter the RAID BIOS setup utility. You can manually set the striping block size. Step 3: In the RAID Mode field, use the UP...

Manual
Page 74
...press S. * If you do not want to install a third party SCSI or RAID driver. S=Specify Additional Device ENTER=Continue F3=Exit Figure 16 GA-8N775 Motherboard - 74 - Windows Setup Setup could not determine the type of one or more mass storage devices installed in your system, or you have any... or special disk controllers for the following is an example of some files being loaded before you see the "Press F6 if you need to manually specify an adapter. Currently, Setup will be a few moments of Windows XP installation. After pressing F6, there will load support for use with...
...press S. * If you do not want to install a third party SCSI or RAID driver. S=Specify Additional Device ENTER=Continue F3=Exit Figure 16 GA-8N775 Motherboard - 74 - Windows Setup Setup could not determine the type of one or more mass storage devices installed in your system, or you have any... or special disk controllers for the following is an example of some files being loaded before you see the "Press F6 if you need to manually specify an adapter. Currently, Setup will be a few moments of Windows XP installation. After pressing F6, there will load support for use with...

Manual
Page 84
...in the battery holder to MB again and turn on standby after computer shuts down and that were included in the manual. Answer: The beep codes below : Steps: 1. Please press Ctrl and F1 keys after updating BIOS. Re-...beeps: Power error 9 beeps ROM checksum error 10 beeps CMOS shutdown register read/write error 11 beeps Cache memory bad GA-8N775 Motherboard - 84 - Please refer to clear CMOS. Questions 2: Why is still on -board battery to leak voltage ...amplifier and try again later. Why? Disconnect the power cord from case to www.gigabyte.com.tw Question 1: I clear CMOS?
...in the battery holder to MB again and turn on standby after computer shuts down and that were included in the manual. Answer: The beep codes below : Steps: 1. Please press Ctrl and F1 keys after updating BIOS. Re-...beeps: Power error 9 beeps ROM checksum error 10 beeps CMOS shutdown register read/write error 11 beeps Cache memory bad GA-8N775 Motherboard - 84 - Please refer to clear CMOS. Questions 2: Why is still on -board battery to leak voltage ...amplifier and try again later. Why? Disconnect the power cord from case to www.gigabyte.com.tw Question 1: I clear CMOS?


