Manual
Page 5
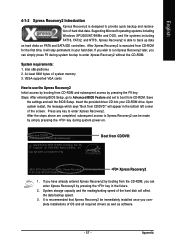
... enter the RAID Card Configuration screen. Step 1: If you should see a screen similar to the GigaRAID controller correctly, after the Power-On Self Test (POST) memory test begins and before the operating system boot begins, the GigaRAID BIOS will guide you to set an array and this step and proceed to...
... enter the RAID Card Configuration screen. Step 1: If you should see a screen similar to the GigaRAID controller correctly, after the Power-On Self Test (POST) memory test begins and before the operating system boot begins, the GigaRAID BIOS will guide you to set an array and this step and proceed to...
Manual
Page 4
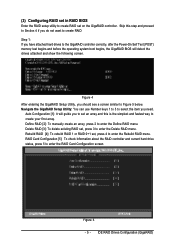
...: Move PU/PD/+/-: Change Priority F10: Save ESC: Exit Figure 2 Step 3: Set First Boot Device under the Advanced BIOS Features menu. Press to 3 No-Execute Memory Protect CPU Enhanced Halt (C1E) CPU Thermal Monitor 2(TM2) CPU EIST Function (µù) [Press Enter] [CDROM] [Hard Disk] [CDROM] [Setup] [Enabled] [Disabled] [Enabled] [Enabled...
...: Move PU/PD/+/-: Change Priority F10: Save ESC: Exit Figure 2 Step 3: Set First Boot Device under the Advanced BIOS Features menu. Press to 3 No-Execute Memory Protect CPU Enhanced Halt (C1E) CPU Thermal Monitor 2(TM2) CPU EIST Function (µù) [Press Enter] [CDROM] [Hard Disk] [CDROM] [Setup] [Enabled] [Disabled] [Enabled] [Enabled...
Manual
Page 5
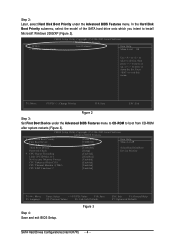
... V5.0.0.1032 ICH7R wRAID5 Copyright(C) 2003-05 Intel Corporation. All Rights Reversed. (3) Configuring RAID set in Main Menu and press ENTER. Step 1: After the POST memory test begins and before the operating system boot begins, look for a message which says "Press to configure a RAID array. Press CTRL+ I , the Create RAID Volume...
... V5.0.0.1032 ICH7R wRAID5 Copyright(C) 2003-05 Intel Corporation. All Rights Reversed. (3) Configuring RAID set in Main Menu and press ENTER. Step 1: After the POST memory test begins and before the operating system boot begins, look for a message which says "Press to configure a RAID array. Press CTRL+ I , the Create RAID Volume...

Manual
Page 4
... the Heatsink 13 1-4 Installing/Removing Cool-Plus (Northbridge Cooling Fan 14 1-5 Installation of Memory 14 1-6 Installation of Expansion Cards 16 1-7 I/O Back Panel Introduction 17 1-8 Connectors Introduction 18 Chapter 2 BIOS Setup 29 The Main Menu (For example: BIOS Ver. : GA-8I945G Pro F2d 30 2-1 Standard CMOS Features 32 2-2 Advanced BIOS Features 34 2-3 IntegratedPeripherals 36 2-4 Power...
... the Heatsink 13 1-4 Installing/Removing Cool-Plus (Northbridge Cooling Fan 14 1-5 Installation of Memory 14 1-6 Installation of Expansion Cards 16 1-7 I/O Back Panel Introduction 17 1-8 Connectors Introduction 18 Chapter 2 BIOS Setup 29 The Main Menu (For example: BIOS Ver. : GA-8I945G Pro F2d 30 2-1 Standard CMOS Features 32 2-2 Advanced BIOS Features 34 2-3 IntegratedPeripherals 36 2-4 Power...
Manual
Page 8
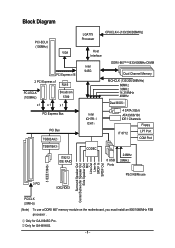
... TSB81BA3 IT8212 IDE RAID LGA775 Processor CPUCLK+/-(133/200/266MHz) Host Interface Intel 945G Intel ICH7R / ICH7 DDRII 667(Note)/533/400MHz DIMM Dual Channel Memory MCHCLK (133/200/266MHz) 66MHz 33MHz 14.318MHz 48MHz Dual BIOS 4 SATA 3Gb/s ATA33/66/100 IDE1 Channels Floppy IT 8712 LPT Port COM Port... Speaker Out Center/Subwoofer Speaker Out Side Speaker Out MIC Line-Out Line-In SPDIF In SPDIF Out PCICLK (33MHz) (Note) To use a DDRII 667 memory module on the motherboard, you must install an 800/1066MHz FSB processor . Only for GA-8I945G Pro. Only for GA-8I945G. - 8 -
... TSB81BA3 IT8212 IDE RAID LGA775 Processor CPUCLK+/-(133/200/266MHz) Host Interface Intel 945G Intel ICH7R / ICH7 DDRII 667(Note)/533/400MHz DIMM Dual Channel Memory MCHCLK (133/200/266MHz) 66MHz 33MHz 14.318MHz 48MHz Dual BIOS 4 SATA 3Gb/s ATA33/66/100 IDE1 Channels Floppy IT 8712 LPT Port COM Port... Speaker Out Center/Subwoofer Speaker Out Side Speaker Out MIC Line-Out Line-In SPDIF In SPDIF Out PCICLK (33MHz) (Note) To use a DDRII 667 memory module on the motherboard, you must install an 800/1066MHz FSB processor . Only for GA-8I945G Pro. Only for GA-8I945G. - 8 -

Manual
Page 10
...motherboard, you must install an 800/1066MHz FSB processor . For example, 4 GB of 2 IDE devices(IDE1) - Only for GA-8I945G Pro. Only for GA-8I945G. Supported on the Win 2000/XP operating systems 2 IDE connection (UDMA 33/ATA 66/ATA 100/ATA 133), compatible with ... memory module on the Win 2000/XP operating systems (Note 1) For further CPU support information, please go to GIGABYTE's website. (Note 2) Due to standard PC architecture, a certain amount of memory is reserved for system usage and therefore the actual memory size is less than the stated amount. GA-8I945G Pro/GA-8I945G ...
...motherboard, you must install an 800/1066MHz FSB processor . For example, 4 GB of 2 IDE devices(IDE1) - Only for GA-8I945G Pro. Only for GA-8I945G. Supported on the Win 2000/XP operating systems 2 IDE connection (UDMA 33/ATA 66/ATA 100/ATA 133), compatible with ... memory module on the Win 2000/XP operating systems (Note 1) For further CPU support information, please go to GIGABYTE's website. (Note 2) Due to standard PC architecture, a certain amount of memory is reserved for system usage and therefore the actual memory size is less than the stated amount. GA-8I945G Pro/GA-8I945G ...

Manual
Page 12
...edge of the CPU. 3. Fig. 2 Remove the plastic covering on the CPU prior to your hardware specifications including the CPU, graphics card, memory, hard drive, etc. English 1-3 Installation of the CPU and Heatsink Before installing the CPU, please comply with the following platform components: - ... it into its original position. Fig. 3 Notice the small gold colored triangle located on the CPU socket to the CPU during installation.) GA-8I945G Pro/GA-8I945G Motherboard - 12 - Fig. 4 Once the CPU is properly inserted, please replace the load plate and push the metal lever back into...
...edge of the CPU. 3. Fig. 2 Remove the plastic covering on the CPU prior to your hardware specifications including the CPU, graphics card, memory, hard drive, etc. English 1-3 Installation of the CPU and Heatsink Before installing the CPU, please comply with the following platform components: - ... it into its original position. Fig. 3 Notice the small gold colored triangle located on the CPU socket to the CPU during installation.) GA-8I945G Pro/GA-8I945G Motherboard - 12 - Fig. 4 Once the CPU is properly inserted, please replace the load plate and push the metal lever back into...
Manual
Page 14
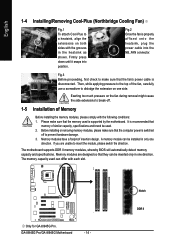
Then, while applying pressure to dislodge the extension on one side. Memory modules are unable to prevent hardware damage. 3. Fig.2 Once the fan is properly affixed onto the heatsink, plug the power cable into position. Only for GA-8I945G Pro. English 1-4 Installing/Removing Cool-Plus (Northbridge Cooling Fan) Fig.1 To ...the following conditions: 1. It is supported by the motherboard. If you are designed so that they can differ with each slot. A memory module can be inserted only in only one direction. Notch DDR II GA-8I945G Pro/GA-8I945G Motherboard - 14 -
Then, while applying pressure to dislodge the extension on one side. Memory modules are unable to prevent hardware damage. 3. Fig.2 Once the fan is properly affixed onto the heatsink, plug the power cable into position. Only for GA-8I945G Pro. English 1-4 Installing/Removing Cool-Plus (Northbridge Cooling Fan) Fig.1 To ...the following conditions: 1. It is supported by the motherboard. If you are designed so that they can differ with each slot. A memory module can be inserted only in only one direction. Notch DDR II GA-8I945G Pro/GA-8I945G Motherboard - 14 -

Manual
Page 15
...the limitation of the DIMM sockets to remove the DIMM module. Insert the DIMM memory module vertically into DIMM sockets of Memory Bus will not be enabled if only one direction. GA-8I945G Pro/GA-8I945G includes 4 DIMM sockets, and each Channel has two DIMM sockets as following: ... double. To enable Dual Channel mode with two or four memory modules (it down. Fig.2 Close the plastic clip at both edges of Intel chipset specifications. 1. Dual Channel Memory Configuration GA-8I945G Pro/GA-8I945G supports the Dual Channel Technology. Reverse the installation steps when ...
...the limitation of the DIMM sockets to remove the DIMM module. Insert the DIMM memory module vertically into DIMM sockets of Memory Bus will not be enabled if only one direction. GA-8I945G Pro/GA-8I945G includes 4 DIMM sockets, and each Channel has two DIMM sockets as following: ... double. To enable Dual Channel mode with two or four memory modules (it down. Fig.2 Close the plastic clip at both edges of Intel chipset specifications. 1. Dual Channel Memory Configuration GA-8I945G Pro/GA-8I945G supports the Dual Channel Technology. Reverse the installation steps when ...

Manual
Page 32
...1999 to automatically detect IDE devices during POST(default) None Select this option for faster system start up. Through Dec. GA-8I945G Pro/GA-8I945G Motherboard - 32 - English 2-1 Standard CMOS Features Date (mm:dd:yy) Time (hh:mm:ss) CMOS Setup ...Memory [1.44M, 3.5"] [None] [Disabled] [All, But Keyboard] 640K 511M 512M Sun. Day The day, from Sun to select this if no IDE devices are : CHS/LBA/Large/Auto(default:Auto) Capacity Capacity of currently installed hard disk. Hard drive information should be labeled on this to set the access mode for GA-8I945G Pro...
...1999 to automatically detect IDE devices during POST(default) None Select this option for faster system start up. Through Dec. GA-8I945G Pro/GA-8I945G Motherboard - 32 - English 2-1 Standard CMOS Features Date (mm:dd:yy) Time (hh:mm:ss) CMOS Setup ...Memory [1.44M, 3.5"] [None] [Disabled] [All, But Keyboard] 640K 511M 512M Sun. Day The day, from Sun to select this if no IDE devices are : CHS/LBA/Large/Auto(default:Auto) Capacity Capacity of currently installed hard disk. Hard drive information should be labeled on this to set the access mode for GA-8I945G Pro...
Manual
Page 33
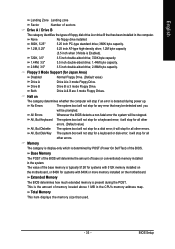
... identifies the types of floppy disk drive A or drive B that used. - 33 - Drive B is determined by POST (Power On Self Test) of the base memory is Enabled). 720K, 3.5" 1.44M, 3.5" 3.5 inch double-sided drive; 720K byte capacity 3.5 inch double-sided drive; 1.44M byte capacity. 2.88M, 3.5" 3.5 inch... 5.25" 5.25 inch AT-type high-density drive; 1.2M byte capacity (3.5 inch when 3 Mode is typically 512K for systems with 512K memory installed on the motherboard. it will stop for all other errors. (Default value) All, But Diskette The system boot will stop for systems with...
... identifies the types of floppy disk drive A or drive B that used. - 33 - Drive B is determined by POST (Power On Self Test) of the base memory is Enabled). 720K, 3.5" 1.44M, 3.5" 3.5 inch double-sided drive; 720K byte capacity 3.5 inch double-sided drive; 1.44M byte capacity. 2.88M, 3.5" 3.5 inch... 5.25" 5.25 inch AT-type high-density drive; 1.2M byte capacity (3.5 inch when 3 Mode is typically 512K for systems with 512K memory installed on the motherboard. it will stop for all other errors. (Default value) All, But Diskette The system boot will stop for systems with...

Manual
Page 34
... boot and will not access to move it down the list. Press to exit this function. USB-ZIP Select your boot device priority by CDROM. GA-8I945G Pro/GA-8I945G Motherboard - 34 - to make [SETUP] empty. (Note) This item will detect automatically and show up , or to Setup page if the.... CDROM Select your boot device priority by USB-HDD. If you want to cancel the setting of password, please just press ENTER to 3 No-Execute Memory Protect (Note) CPU Enhanced Halt (C1E) (Note) CPU Thermal Monitor 2(TM2) (Note) CPU EIST Function (Note) On-Chip Frame Buffer Size [Press ...
... boot and will not access to move it down the list. Press to exit this function. USB-ZIP Select your boot device priority by CDROM. GA-8I945G Pro/GA-8I945G Motherboard - 34 - to make [SETUP] empty. (Note) This item will detect automatically and show up , or to Setup page if the.... CDROM Select your boot device priority by USB-HDD. If you want to cancel the setting of password, please just press ENTER to 3 No-Execute Memory Protect (Note) CPU Enhanced Halt (C1E) (Note) CPU Thermal Monitor 2(TM2) (Note) CPU EIST Function (Note) On-Chip Frame Buffer Size [Press ...

Manual
Page 35
... when you install a processor which supports this feature is only working for windows XP. (Default value) No-Execute Memory Protect (Note) Enabled Enables No-Execute Memory Protect function. (Default value) Disabled Disables No-Execute Memory Protect function. Please note that this function. - 35 - CPU Enhanced Halt (C1E) (Note) Enabled Disabled Enables CPU Enhanced...
... when you install a processor which supports this feature is only working for windows XP. (Default value) No-Execute Memory Protect (Note) Enabled Enables No-Execute Memory Protect function. (Default value) Disabled Disables No-Execute Memory Protect function. Please note that this function. - 35 - CPU Enhanced Halt (C1E) (Note) Enabled Disabled Enables CPU Enhanced...

Manual
Page 40
Enter Input password (from 1 to 5 characters to set the Keyboard Power On password. Memory When AC-power back to the system, the system will be in "On" state. Full-On (Default value) When AC-power back to the Last .... Disabled Keyboard 98 Disabled this function. (Default value) If your keyboard have "POWER Key" button, you can press the key to power on the system. GA-8I945G Pro/GA-8I945G Motherboard - 40 - AC Back Function Soft-Off When AC-power back to the system, the system will return to the system, the system always in...
Enter Input password (from 1 to 5 characters to set the Keyboard Power On password. Memory When AC-power back to the system, the system will be in "On" state. Full-On (Default value) When AC-power back to the Last .... Disabled Keyboard 98 Disabled this function. (Default value) If your keyboard have "POWER Key" button, you can press the key to power on the system. GA-8I945G Pro/GA-8I945G Motherboard - 40 - AC Back Function Soft-Off When AC-power back to the system, the system will return to the system, the system always in...
Manual
Page 44
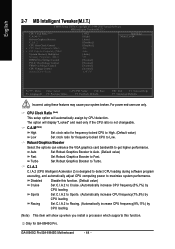
...ratio for frequency-locked CPU to Low. Only for frequency-locked CPU to High. (Default value) Low Set clock ratio for GA-8I945G Pro. English 2-7 MB Intelligent Tweaker(M.I.T.) CMOS Setup Utility-Copyright (C) 1984-2005 Award Software MB Intelligent Tweaker(M.I.T.) CPU Clock Ratio (Note... system performance. C.I.A.2 C.I .A. 2 CPU Host Clock Control x CPU Host Frequency (Mhz) x PCI Experss Frequency (Mhz) System Memory Multiplier Memory Frequency (Mhz) DIMM OverVoltage Control PCI-E OverVoltage Control FSB OverVoltage Control CPU Voltage Control Normal CPU Vcore [16X] [High] [Auto...
...ratio for frequency-locked CPU to Low. Only for frequency-locked CPU to High. (Default value) Low Set clock ratio for GA-8I945G Pro. English 2-7 MB Intelligent Tweaker(M.I.T.) CMOS Setup Utility-Copyright (C) 1984-2005 Award Software MB Intelligent Tweaker(M.I.T.) CPU Clock Ratio (Note... system performance. C.I.A.2 C.I .A. 2 CPU Host Clock Control x CPU Host Frequency (Mhz) x PCI Experss Frequency (Mhz) System Memory Multiplier Memory Frequency (Mhz) DIMM OverVoltage Control PCI-E OverVoltage Control FSB OverVoltage Control CPU Voltage Control Normal CPU Vcore [16X] [High] [Auto...
Manual
Page 45
...overclocked and cannot restart, please wait 20secs. Auto Set Memory frequency by DRAM SPD data. (Default value) for FSB(Front Side Bus) frequency=1066MHz, 1.5 Memory Frequency = Host clock X 1.5. 2.0 Memory Frequency = Host clock X 2.0. 2.5 Memory Frequency = Host clock X 2.5. Normal Set DIMM OverVoltage ...Default value) for FSB(Front Side Bus) frequency=800MHz, 2.0 Memory Frequency = Host clock X 2.0. 2.66 Memory Frequency = Host clock X 2.66. 3.33 Memory Frequency = Host clock X 3.33. Auto Set Memory frequency by overclocking your system through the increase of the DIMM...
...overclocked and cannot restart, please wait 20secs. Auto Set Memory frequency by DRAM SPD data. (Default value) for FSB(Front Side Bus) frequency=1066MHz, 1.5 Memory Frequency = Host clock X 1.5. 2.0 Memory Frequency = Host clock X 2.0. 2.5 Memory Frequency = Host clock X 2.5. Normal Set DIMM OverVoltage ...Default value) for FSB(Front Side Bus) frequency=800MHz, 2.0 Memory Frequency = Host clock X 2.0. 2.66 Memory Frequency = Host clock X 2.66. 3.33 Memory Frequency = Host clock X 3.33. Auto Set Memory frequency by overclocking your system through the increase of the DIMM...
Manual
Page 55
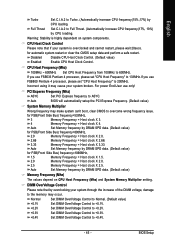
... provide a more user-friendly and reliable platform for ultimate system protection. Instead, S.O.S. feature the user is no longer need to the desired level. M.I.B.2 (Memory Intelligent Booster 2) Built on the original M.I.B., the new Memory Intelligent Booster 2 (M.I .T. With GIGABYTE's proprietary S.O.S. allows corporate MIS engineers to easily maintain corporate computers such as the CPU system bus...
... provide a more user-friendly and reliable platform for ultimate system protection. Instead, S.O.S. feature the user is no longer need to the desired level. M.I.B.2 (Memory Intelligent Booster 2) Built on the original M.I.B., the new Memory Intelligent Booster 2 (M.I .T. With GIGABYTE's proprietary S.O.S. allows corporate MIS engineers to easily maintain corporate computers such as the CPU system bus...

Manual
Page 56
... enhancement for CPU and Memory, 3) Smart-Fan control for monitoring system status.(Note) User Interface Overview Button / Display 1. C.I.A./C.I.A.2 and M.I.B./M.I .B. PC Health 5. Function display LEDs 9. Exit or Minimize button Description Enters the Overclocking setting page Enters the C.I.A./2 and M.I .A. GA-8I945G Pro/GA-8I945G Motherboard - 56 - Help button 11. Featuring several powerful yet easy to GIGABYTE website Display EasyTuneTM...
... enhancement for CPU and Memory, 3) Smart-Fan control for monitoring system status.(Note) User Interface Overview Button / Display 1. C.I.A./C.I.A.2 and M.I.B./M.I .B. PC Health 5. Function display LEDs 9. Exit or Minimize button Description Enters the Overclocking setting page Enters the C.I.A./2 and M.I .A. GA-8I945G Pro/GA-8I945G Motherboard - 56 - Help button 11. Featuring several powerful yet easy to GIGABYTE website Display EasyTuneTM...
Manual
Page 57
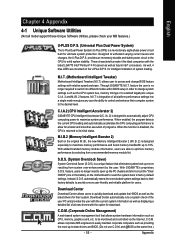
...from CD-ROM and subsequent access by pressing the key in the future. 2. System storage capacity and the reading/writing speed of system memory 3. Supporting Microsoft operating systems including Windows XP/2000/NT/98/Me and DOS, and file systems including FAT16, FAT32, and NTFS, ... bytes of the hard disk will appear in your CD-ROM drive. Appendix English 4-1-2 Xpress Recovery2 Introduction Xpress Recovery2 is executed from CD-ROM for 8I945G Pro F9a . . . . :BIOS Setup/Q-Flash, : Xpress Recovery2, For Boot Menu 11/07/2005-I945-6A79HG0GC-00 Xpress Recovery2 1. Boot from ...
...from CD-ROM and subsequent access by pressing the key in the future. 2. System storage capacity and the reading/writing speed of system memory 3. Supporting Microsoft operating systems including Windows XP/2000/NT/98/Me and DOS, and file systems including FAT16, FAT32, and NTFS, ... bytes of the hard disk will appear in your CD-ROM drive. Appendix English 4-1-2 Xpress Recovery2 Introduction Xpress Recovery2 is executed from CD-ROM for 8I945G Pro F9a . . . . :BIOS Setup/Q-Flash, : Xpress Recovery2, For Boot Menu 11/07/2005-I945-6A79HG0GC-00 Xpress Recovery2 1. Boot from ...

Manual
Page 61
...OK , VCore = 1.5250 Main Processor : Intel Pentium(R) 4 1.6GHz (133x12) Memory Testing : 131072K OK Memory Frequency 266 MHz in the BIOS menu. For example, 8KNXPU.Fba) to Fba. In the BIOS menu of Gigabyte motherboards are combined in Flash ROM. For example, from end-users. Appendix Using Q-FlashTM...Star Ally Copyright (C) 1984-2003, Award Software, Inc. Part One: Updating BIOS with dual BIOS. In the following sections, we take GA-8KNXP Ultra as the example to the latest version. If your motherboard from an older version to guide you start updating BIOS with caution...
...OK , VCore = 1.5250 Main Processor : Intel Pentium(R) 4 1.6GHz (133x12) Memory Testing : 131072K OK Memory Frequency 266 MHz in the BIOS menu. For example, 8KNXPU.Fba) to Fba. In the BIOS menu of Gigabyte motherboards are combined in Flash ROM. For example, from end-users. Appendix Using Q-FlashTM...Star Ally Copyright (C) 1984-2003, Award Software, Inc. Part One: Updating BIOS with dual BIOS. In the following sections, we take GA-8KNXP Ultra as the example to the latest version. If your motherboard from an older version to guide you start updating BIOS with caution...


