Manual
Page 1
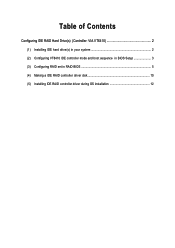
Table of Contents Configuring IDE RAID Hard Drive(s) (Controller: VIA VT6410 2 (1) Installing IDE hard drive(s) in your system 2 (2) Configuring VT6410 IDE controller mode and boot sequence in BIOS Setup 3 (3) Configuring RAID set in RAID BIOS 5 (4) Making a IDE RAID controller driver disk 10 (5) Installing IDE RAID controller driver during OS installation 12
Table of Contents Configuring IDE RAID Hard Drive(s) (Controller: VIA VT6410 2 (1) Installing IDE hard drive(s) in your system 2 (2) Configuring VT6410 IDE controller mode and boot sequence in BIOS Setup 3 (3) Configuring RAID set in RAID BIOS 5 (4) Making a IDE RAID controller driver disk 10 (5) Installing IDE RAID controller driver during OS installation 12
Manual
Page 2
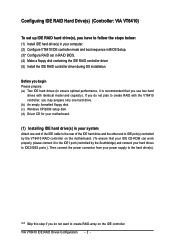
... drives with the VT6410 controller, you may prepare only one hard drive. (b) An empty formatted floppy disk. (c) Windows XP/2000 setup disk. (d) Driver CD for your motherboard. (1) Installing IDE hard drive(s) in RAID BIOS. (4) Make a floppy disk containing the IDE RAID controller... driver (5) Install the IDE RAID controller driver during OS installation. If you do not want to ensure optimal performance, it to the IDE1 port (controlled by the VT6410 RAID ...
... drives with the VT6410 controller, you may prepare only one hard drive. (b) An empty formatted floppy disk. (c) Windows XP/2000 setup disk. (d) Driver CD for your motherboard. (1) Installing IDE hard drive(s) in RAID BIOS. (4) Make a floppy disk containing the IDE RAID controller... driver (5) Install the IDE RAID controller driver during OS installation. If you do not want to ensure optimal performance, it to the IDE1 port (controlled by the VT6410 RAID ...
Manual
Page 10
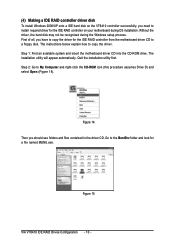
... D) and select Open (Figure 14). Quit the installation utility first. First of all, you should see folders and files contained in the driver CD. The installation utility will appear automatically. Step 2: Go to the BootDrv folder and look for a file named MENU.exe. Figure 15... - 10 - The instructions below explain how to copy the driver. Figure 14 Then you have to copy the driver for the IDE RAID controller from the motherboard driver CD to ¤å a floppy disk. Without the ¤¤ driver, the hard disk may not be recognized during OS installation. ...
... D) and select Open (Figure 14). Quit the installation utility first. First of all, you should see folders and files contained in the driver CD. The installation utility will appear automatically. Step 2: Go to the BootDrv folder and look for a file named MENU.exe. Figure 15... - 10 - The instructions below explain how to copy the driver. Figure 14 Then you have to copy the driver for the IDE RAID controller from the motherboard driver CD to ¤å a floppy disk. Without the ¤¤ driver, the hard disk may not be recognized during OS installation. ...
Manual
Page 11
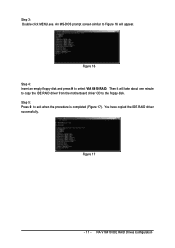
Step 5: Press 0 to select VIA 6410 RAID. You have copied the IDE RAID driver successfully. VIA VT6410 IDE RAID Drives Configuration Step 3: Double-click MENU.exe. Figure 16 Step 4: Insert an empty floppy disk and press H to exit when the procedure is completed (Figure 17). Figure 17 - 11 - Then it will appear. An MS-DOS prompt screen similar to Figure 16 will take about one minute to copy the IDE RAID driver from the motherboard driver CD to the floppy disk.
Step 5: Press 0 to select VIA 6410 RAID. You have copied the IDE RAID driver successfully. VIA VT6410 IDE RAID Drives Configuration Step 3: Double-click MENU.exe. Figure 16 Step 4: Insert an empty floppy disk and press H to exit when the procedure is completed (Figure 17). Figure 17 - 11 - Then it will appear. An MS-DOS prompt screen similar to Figure 16 will take about one minute to copy the IDE RAID driver from the motherboard driver CD to the floppy disk.

Manual
Page 12
... IDE RAID controller on your motherboard. Figure 18 Step 2: When a screen similar to that you have prepared a floppy disk with the IDE RAID driver and adjusted BIOS settings, you can begin to install Windows 2000/XP onto your system, or you have any device support disks from a mass storage...Setup could not determine the type of some files being loaded before you see a message which you need to install a 3rd party SCSI or RAID driver." Windows Setup Press F6 if you have a device support disk from a mass storage device manufacturer, or do not have chosen to manually specify an...
... IDE RAID controller on your motherboard. Figure 18 Step 2: When a screen similar to that you have prepared a floppy disk with the IDE RAID driver and adjusted BIOS settings, you can begin to install Windows 2000/XP onto your system, or you have any device support disks from a mass storage...Setup could not determine the type of some files being loaded before you see a message which you need to install a 3rd party SCSI or RAID driver." Windows Setup Press F6 if you have a device support disk from a mass storage device manufacturer, or do not have chosen to manually specify an...
Manual
Page 13
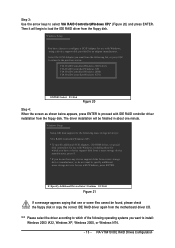
...) ENTER=Select F3=Exit Figure 20 Step 4: When the screen as shown below appears, press ENTER to proceed with IDE RAID controller driver installation from the following operating systems you do not want to the previous screen. VIA VT6410 IDE RAID Drives Configuration S=Specify Additional Device ... press ESC to return to install: Windows 2003 IA32, Windows XP, Windows 2000, or Windows NT4. - 13 - The driver installation will begin to load the IDE RAID driver from a mass storage device manufacturer, or do not have chosen to select VIA RAID Controller(Windows XP)* (Figure 20) and...
...) ENTER=Select F3=Exit Figure 20 Step 4: When the screen as shown below appears, press ENTER to proceed with IDE RAID controller driver installation from the following operating systems you do not want to the previous screen. VIA VT6410 IDE RAID Drives Configuration S=Specify Additional Device ... press ESC to return to install: Windows 2003 IA32, Windows XP, Windows 2000, or Windows NT4. - 13 - The driver installation will begin to load the IDE RAID driver from a mass storage device manufacturer, or do not have chosen to select VIA RAID Controller(Windows XP)* (Figure 20) and...
Manual
Page 14
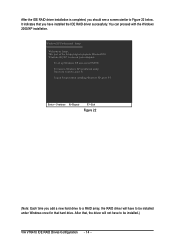
... to run on your computer. Enter= Continue R=Repair F3=Exit Figure 22 (Note: Each time you add a new hard drive to a RAID array, the RAID driver will not have to Figure 22 below. This port of the Setup program prepares Microsoft(R) Windows (R) XP to Setup. After that, the... driver will have to be installed under Windows once for that you should see a screen similar to be installed.) VIA VT6410 IDE RAID Drives Configuration - 14 - ...
... to run on your computer. Enter= Continue R=Repair F3=Exit Figure 22 (Note: Each time you add a new hard drive to a RAID array, the RAID driver will not have to Figure 22 below. This port of the Setup program prepares Microsoft(R) Windows (R) XP to Setup. After that, the... driver will have to be installed under Windows once for that you should see a screen similar to be installed.) VIA VT6410 IDE RAID Drives Configuration - 14 - ...

Manual
Page 1
Table of Contents Configuring SATA Hard Drive(s) (Controller Intel ICH6R 2 (1) Installing SATA hard drive(s) in your computer 2 (2) Configuring SATA controller mode and boot sequence in BIOS Setup 3 (3) Configuring RAID set in RAID BIOS 5 (4) Making a SATA Driver Disk ...9 (5) Installing SATA controller driver during OS installation 11
Table of Contents Configuring SATA Hard Drive(s) (Controller Intel ICH6R 2 (1) Installing SATA hard drive(s) in your computer 2 (2) Configuring SATA controller mode and boot sequence in BIOS Setup 3 (3) Configuring RAID set in RAID BIOS 5 (4) Making a SATA Driver Disk ...9 (5) Installing SATA controller driver during OS installation 11
Manual
Page 2
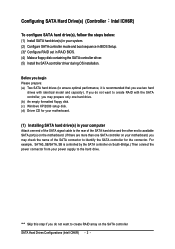
...the steps below: ¤å (1) Install SATA hard drive(s) in RAID BIOS. (4) Make a floppy disk containing the SATA controller driver. (5) Install the SATA controller driver during OS installation. "*" Skip this step if you may prepare only one hard drive. (b) An empty formatted floppy disk. (c) Windows... XP/2000 setup disk. (d) Driver CD for the connector. Before you begin Please prepare: (a) Two SATA hard drives (to identify the SATA controller for your motherboard. (1) ...
...the steps below: ¤å (1) Install SATA hard drive(s) in RAID BIOS. (4) Make a floppy disk containing the SATA controller driver. (5) Install the SATA controller driver during OS installation. "*" Skip this step if you may prepare only one hard drive. (b) An empty formatted floppy disk. (c) Windows... XP/2000 setup disk. (d) Driver CD for the connector. Before you begin Please prepare: (a) Two SATA hard drives (to identify the SATA controller for your motherboard. (1) ...
Manual
Page 8
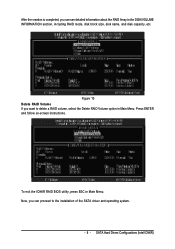
After the creation is completed, you can see detailed information about the RAID Array in Main Menu. Now, you can proceed to delete a RAID volume, select the Delete RAID Volume option in Main Menu. KL To exit the ICH6R RAID BIOS utility, press ESC in the DISK/VOLUME INFORMATION section, including RAID mode, disk block size, disk name, and disk capacity, etc. Press ENTER and follow on-screen instructions. KL Figure 10 Delete RAID Volume If you want to the installation of the SATA driver and operating system. - 8 - SATA Hard Drives Configurations (Intel ICH6R)
After the creation is completed, you can see detailed information about the RAID Array in Main Menu. Now, you can proceed to delete a RAID volume, select the Delete RAID Volume option in Main Menu. KL To exit the ICH6R RAID BIOS utility, press ESC in the DISK/VOLUME INFORMATION section, including RAID mode, disk block size, disk name, and disk capacity, etc. Press ENTER and follow on-screen instructions. KL Figure 10 Delete RAID Volume If you want to the installation of the SATA driver and operating system. - 8 - SATA Hard Drives Configurations (Intel ICH6R)
Manual
Page 9
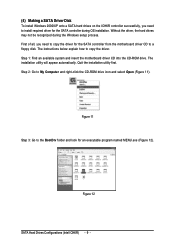
... into the CD-ROM drive. Figure 11 Step 3: Go to the BootDrv folder and look for the SATA controller from the motherboard driver CD to a floppy disk. The instructions below explain how to My Computer and right-click the CD-ROM drive icon and select Open ...(Figure 11). Quit the installation utility first. Without the driver, the hard drives ¤¤ may not be recognized during OS installation. Step 2: Go to copy the driver. Figure 12 SATA Hard Drives Configurations (Intel ICH6R) - 9 - Ác (4) Making a SATA Driver Disk Åé To install Windows 2000/XP onto a...
... into the CD-ROM drive. Figure 11 Step 3: Go to the BootDrv folder and look for the SATA controller from the motherboard driver CD to a floppy disk. The instructions below explain how to My Computer and right-click the CD-ROM drive icon and select Open ...(Figure 11). Quit the installation utility first. Without the driver, the hard drives ¤¤ may not be recognized during OS installation. Step 2: Go to copy the driver. Figure 12 SATA Hard Drives Configurations (Intel ICH6R) - 9 - Ác (4) Making a SATA Driver Disk Åé To install Windows 2000/XP onto a...
Manual
Page 10
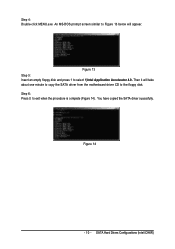
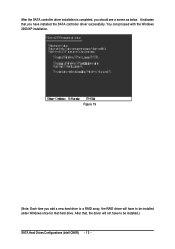
Step 6: Press 0 to select 1)Intel Application Accelerator 4.0. Figure 14 - 10 - Step 4: Double-click MENU.exe. An MS-DOS prompt screen similar to Figure 13 below will take about one minute to copy the SATA driver from the motherboard driver CD to the floppy disk. Then it will appear. You have copied the SATA driver sucessfully. SATA Hard Drives Configurations (Intel ICH6R) Figure 13 Step 5: Insert an empty floppy disk and press 1 to exit when the procedure is complete (Figure 14).
Step 6: Press 0 to select 1)Intel Application Accelerator 4.0. Figure 14 - 10 - Step 4: Double-click MENU.exe. An MS-DOS prompt screen similar to Figure 13 below will take about one minute to copy the SATA driver from the motherboard driver CD to the floppy disk. Then it will appear. You have copied the SATA driver sucessfully. SATA Hard Drives Configurations (Intel ICH6R) Figure 13 Step 5: Insert an empty floppy disk and press 1 to exit when the procedure is complete (Figure 14).
Manual
Page 11
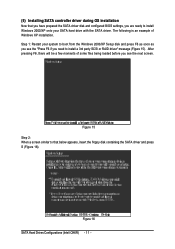
... is an example of some files being loaded before you see the "Press F6 if you are ready to install a 3rd party SCSI or RAID driver" message (Figure 15). Figure 16 SATA Hard Drives Configurations (Intel ICH6R) - 11 - After pressing F6, there will be a few moments of ¤¤ Windows XP... disk and press F6 as soon as you see the next screen. Figure 15 Step 2: When a screen similar to that you have prepared the SATA driver disk and configured BIOS settings, you need to install Windows 2000/XP onto your SATA hard drive with the SATA...
... is an example of some files being loaded before you see the "Press F6 if you are ready to install a 3rd party SCSI or RAID driver" message (Figure 15). Figure 16 SATA Hard Drives Configurations (Intel ICH6R) - 11 - After pressing F6, there will be a few moments of ¤¤ Windows XP... disk and press F6 as soon as you see the next screen. Figure 15 Step 2: When a screen similar to that you have prepared the SATA driver disk and configured BIOS settings, you need to install Windows 2000/XP onto your SATA hard drive with the SATA...

Manual
Page 12
... southbridge is ICH5R, select Intel(R) 82801ER (ICH5R). - 12 - Step 4: When the screen as shown below will begin to load the SATA driver from the floppy disk. Figure 17 If a message appears saying one or some file(s) cannot be finished in the floppy disk, a controller menu... ENTER to select Intel(R) 82801FR SATA RAID Controller* and press ENTER. Step 3: If Setup correctly recognizes the driver in about one minute. Use the ARROW keys to continue the SATA driver installation from the floppy disk. Figure 18 "*" If your southbridge is ICH6R, select Intel(R) 82801FR (ICH6R).
... southbridge is ICH5R, select Intel(R) 82801ER (ICH5R). - 12 - Step 4: When the screen as shown below will begin to load the SATA driver from the floppy disk. Figure 17 If a message appears saying one or some file(s) cannot be finished in the floppy disk, a controller menu... ENTER to select Intel(R) 82801FR SATA RAID Controller* and press ENTER. Step 3: If Setup correctly recognizes the driver in about one minute. Use the ARROW keys to continue the SATA driver installation from the floppy disk. Figure 18 "*" If your southbridge is ICH6R, select Intel(R) 82801FR (ICH6R).
Manual
Page 13
It indicates that you have to be installed under Windows once for that , the driver will have to a RAID array, the RAID driver will not have installed the SATA controller driver successfully. After that hard drive. You can proceed with the Windows Åé 2000/XP installation. ¤¤ ¤å Figure 19 (Note: Each time you should see a screen as below. Ác After the SATA controller driver installation is completed, you add a new hard drive to be installed.) SATA Hard Drives Configurations (Intel ICH6R) - 13 -
It indicates that you have to be installed under Windows once for that , the driver will have to a RAID array, the RAID driver will not have installed the SATA controller driver successfully. After that hard drive. You can proceed with the Windows Åé 2000/XP installation. ¤¤ ¤å Figure 19 (Note: Each time you should see a screen as below. Ác After the SATA controller driver installation is completed, you add a new hard drive to be installed.) SATA Hard Drives Configurations (Intel ICH6R) - 13 -
Manual
Page 5
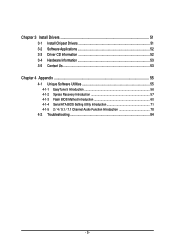
Chapter 3 Install Drivers 51 3-1 Install Chipset Drivers 51 3-2 Software Applications 52 3-3 Driver CD Information 52 3-4 Hardware Information 53 3-5 Contact Us ...53 Chapter 4 Appendix 55 4-1 Unique Software Utilities 55 4-1-1 EasyTune 5 Introduction 56 4-1-2 Xpress Recovery Introduction 57 4-1-3 Flash BIOS Method Introduction 60 4-1-4 Serial ATA BIOS Setting Utility Introduction 71 4-1-5 2 / 4 / 5.1 / 7.1 Channel Audio Function Introduction 78 4-2 Troubleshooting 84 - 5 -
Chapter 3 Install Drivers 51 3-1 Install Chipset Drivers 51 3-2 Software Applications 52 3-3 Driver CD Information 52 3-4 Hardware Information 53 3-5 Contact Us ...53 Chapter 4 Appendix 55 4-1 Unique Software Utilities 55 4-1-1 EasyTune 5 Introduction 56 4-1-2 Xpress Recovery Introduction 57 4-1-3 Flash BIOS Method Introduction 60 4-1-4 Serial ATA BIOS Setting Utility Introduction 71 4-1-5 2 / 4 / 5.1 / 7.1 Channel Audio Function Introduction 78 4-2 Troubleshooting 84 - 5 -
Manual
Page 16
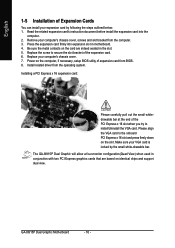
Please align the VGA card to install/Uninstall the VGA card. The GA-8I915P Dual Graphic will allow a four-monitor configuration(Quad View) when used in conjunction with two PCI Express graphics cards that are indeed seated in motherboard. 4. Install related driver from BIOS. 8. Installing a PCI Express x 16 expansion card: Please carefully pull out the small whitedrawable...
Please align the VGA card to install/Uninstall the VGA card. The GA-8I915P Dual Graphic will allow a four-monitor configuration(Quad View) when used in conjunction with two PCI Express graphics cards that are indeed seated in motherboard. 4. Install related driver from BIOS. 8. Installing a PCI Express x 16 expansion card: Please carefully pull out the small whitedrawable...
Manual
Page 18
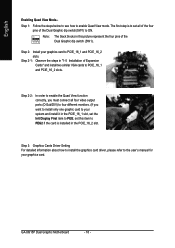
... function correctly, you must connect all of the four pins of the Dual Graphic dip switch(SW1) to enable Quad View mode. GA-8I915P Dual Graphic Motherboard - 18 - set this picture represent the four pins of Expansion... Cards" and install two similar VGA cards to PCIE_16_1 and PCIE_16_2 slots. The first step is installed in "1-5 Installation of the Dual Graphic dip switch (SW1). 1 234 Step 2: Install your graphics card to PCIE_16_1 and PCIE_16_2 slots. Step 3: Graphics Cards Driver...
... function correctly, you must connect all of the four pins of the Dual Graphic dip switch(SW1) to enable Quad View mode. GA-8I915P Dual Graphic Motherboard - 18 - set this picture represent the four pins of Expansion... Cards" and install two similar VGA cards to PCIE_16_1 and PCIE_16_2 slots. The first step is installed in "1-5 Installation of the Dual Graphic dip switch (SW1). 1 234 Step 2: Install your graphics card to PCIE_16_1 and PCIE_16_2 slots. Step 3: Graphics Cards Driver...
Manual
Page 19
... function. have a standard USB interface. For more information please contact your OS does not support USB controller, please contact OS vendor for possible patch or driver upgrade. can be connected to this connector. Hardware Installation English 1-7 I/O Back Panel Introduction PS/2 Keyboard and PS/2 Mouse Connector To install a PS/2 port keyboard and...
... function. have a standard USB interface. For more information please contact your OS does not support USB controller, please contact OS vendor for possible patch or driver upgrade. can be connected to this connector. Hardware Installation English 1-7 I/O Back Panel Introduction PS/2 Keyboard and PS/2 Mouse Connector To install a PS/2 port keyboard and...
Manual
Page 24
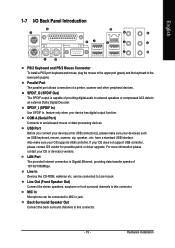
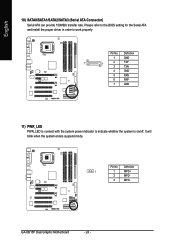
Pin No. Definition 1 GND 7 1 2 TXP 3 TXN 4 GND 5 RXN 6 RXP 7 GND 11) PWR_LED PWR_LED is on/off. GA-8I915P Dual Graphic Motherboard - 24 - It will blink when the system enters suspend mode. English 10) SATA0/SATA1/SATA2/SATA3 (Serial ATA Connector) Serial ATA can provide 150MB/s transfer rate. Definition 1 1 MPD+ 2 MPD- 3 MPD- Pin No. Please refer to the BIOS setting for the Serial ATA and install the proper driver in order to indicate whether the system is connect with the system power indicator to work properly.
Pin No. Definition 1 GND 7 1 2 TXP 3 TXN 4 GND 5 RXN 6 RXP 7 GND 11) PWR_LED PWR_LED is on/off. GA-8I915P Dual Graphic Motherboard - 24 - It will blink when the system enters suspend mode. English 10) SATA0/SATA1/SATA2/SATA3 (Serial ATA Connector) Serial ATA can provide 150MB/s transfer rate. Definition 1 1 MPD+ 2 MPD- 3 MPD- Pin No. Please refer to the BIOS setting for the Serial ATA and install the proper driver in order to indicate whether the system is connect with the system power indicator to work properly.


