
Manual
Page 5
Chapter 3 Install Drivers 49 3-1 Install Chipset Drivers 49 3-2 SoftwareApplications 50 3-3 Driver CD Information 50 3-4 Hardware Information 51 3-5 Contact Us ...51 Chapter 4 Appendix 53 4-1 Unique Software Utilities 53 4-1-1 EasyTune 5 Introduction 54 4-1-2 Xpress Recovery2 Introduction 55 4-1-3 Flash BIOS Method Introduction 57 4-1-4 2- / 4- / 6- / 8- Channel Audio Function Introduction 66 4-2 Troubleshooting 70 - 5 -
Chapter 3 Install Drivers 49 3-1 Install Chipset Drivers 49 3-2 SoftwareApplications 50 3-3 Driver CD Information 50 3-4 Hardware Information 51 3-5 Contact Us ...51 Chapter 4 Appendix 53 4-1 Unique Software Utilities 53 4-1-1 EasyTune 5 Introduction 54 4-1-2 Xpress Recovery2 Introduction 55 4-1-3 Flash BIOS Method Introduction 57 4-1-4 2- / 4- / 6- / 8- Channel Audio Function Introduction 66 4-2 Troubleshooting 70 - 5 -

Manual
Page 10
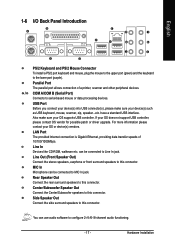
...parallel port supporting Normal/EPP/ECP mode Š 2 Serial port (COMA/COMB) Š 8 USB 2.0/1.1 ports (rear x 4, front x 4 via cable) Š 1 front audio connector Š 1 PS/2 keyboard port Š 1 PS/2 mouse port Š Onboard Marvell 8001 chip (10/100/1000 Mbit) Š 1 RJ 45 port (Note 1) ... x 1 slots Š 3 PCI slots Š 1 IDE connection (UDMA 33/ATA 66/ATA 100), allows connection of memory is reserved for HDD. GA-8I915P-D Motherboard - 10 - Supported on the Win 2000/XP operating systems Š 2 IDE connection (UDMA 33/ATA 66/ATA 100/ATA 133), compatible with CPU...
...parallel port supporting Normal/EPP/ECP mode Š 2 Serial port (COMA/COMB) Š 8 USB 2.0/1.1 ports (rear x 4, front x 4 via cable) Š 1 front audio connector Š 1 PS/2 keyboard port Š 1 PS/2 mouse port Š Onboard Marvell 8001 chip (10/100/1000 Mbit) Š 1 RJ 45 port (Note 1) ... x 1 slots Š 3 PCI slots Š 1 IDE connection (UDMA 33/ATA 66/ATA 100), allows connection of memory is reserved for HDD. GA-8I915P-D Motherboard - 10 - Supported on the Win 2000/XP operating systems Š 2 IDE connection (UDMA 33/ATA 66/ATA 100/ATA 133), compatible with CPU...

Manual
Page 11
....0cm (Note 4) EasyTune functions may vary depending on different motherboards. - 11 - Center/Subwoofer Speaker Out ; Surround Speaker Out (Rear Speaker Out) ; Hardware Installation English Onboard Audio Š ALC850 CODEC (UAJ) Š Supports 2 / 4 / 6 / 8 channel audio Š Supports Line In ; Line Out (Front Speaker Out) ; MIC ;
....0cm (Note 4) EasyTune functions may vary depending on different motherboards. - 11 - Center/Subwoofer Speaker Out ; Surround Speaker Out (Rear Speaker Out) ; Hardware Installation English Onboard Audio Š ALC850 CODEC (UAJ) Š Supports 2 / 4 / 6 / 8 channel audio Š Supports Line In ; Line Out (Front Speaker Out) ; MIC ;
Manual
Page 17
... and PS/2 Mouse Connector To install a PS/2 port keyboard and mouse, plug the mouse to the upper port (green) and the keyboard to configure 2-/4-/6-/8-channel audio functioning. - 17 - If your OS or device(s) vendors. MIC In Microphone can be connected to this connector. Hardware Installation Center/Subwoofer Speaker Out Connect the...
... and PS/2 Mouse Connector To install a PS/2 port keyboard and mouse, plug the mouse to the upper port (green) and the keyboard to configure 2-/4-/6-/8-channel audio functioning. - 17 - If your OS or device(s) vendors. MIC In Microphone can be connected to this connector. Hardware Installation Center/Subwoofer Speaker Out Connect the...

Manual
Page 23
... 3 MPD- 10) F_AUDIO (Front Audio Connector) If you want to utilize the front audio header, your dealer.Please note, you can have front audio connector. Hardware Installation In order to use Front Audio connector, you are buying support front audio connector, please contact your chassis must ...must have the alternative of using front audio connector or of using rear audio connector to play sound. 10 9 2 1 Pin No. 1 2 3 4 5 6 7 8 9 10 Definition MIC GND MIC_BIAS POWER FrontAudio(R) Rear Audio (R)/ Return R NC No Pin FrontAudio (L) Rear Audio (L)/ Return L - 23 - It...
... 3 MPD- 10) F_AUDIO (Front Audio Connector) If you want to utilize the front audio header, your dealer.Please note, you can have front audio connector. Hardware Installation In order to use Front Audio connector, you are buying support front audio connector, please contact your chassis must ...must have the alternative of using front audio connector or of using rear audio connector to play sound. 10 9 2 1 Pin No. 1 2 3 4 5 6 7 8 9 10 Definition MIC GND MIC_BIAS POWER FrontAudio(R) Rear Audio (R)/ Return R NC No Pin FrontAudio (L) Rear Audio (L)/ Return L - 23 - It...

Manual
Page 24
...No. 1 2 3 4 5 6 Definition Power No Pin SPDIF SPDIFI GND GND GA-8I915P-D Motherboard - 24 - For optional SPDIF cable, please contact your stereo system has digital input function. English 11) CD_IN (CD IN) Connect CD-ROM or DVD-ROM audio out to work or even damage it. Pin No. Be careful with... the polarity of providing digital audio to external speakers or compressed AC3 data to an external Dolby Digital Decoder. Check the ...
...No. 1 2 3 4 5 6 Definition Power No Pin SPDIF SPDIFI GND GND GA-8I915P-D Motherboard - 24 - For optional SPDIF cable, please contact your stereo system has digital input function. English 11) CD_IN (CD IN) Connect CD-ROM or DVD-ROM audio out to work or even damage it. Pin No. Be careful with... the polarity of providing digital audio to external speakers or compressed AC3 data to an external Dolby Digital Decoder. Check the ...

Manual
Page 36
... 1 Master/Slave. PATA IDE Set to Ch.1 Master/Slave Set PATA IDE to USB Controller USB 2.0 Controller USB Keyboard Support USB Mouse Support AC97 Audio Onboard H/W RAID Onboard H/W LAN Onboard LAN Boot ROM Onboard Serial Port 1 Onboard Serial Port 2 Onboard Parallel Port Parallel Port Mode x ECP Mode ...value) Disable onboard 1st channel IDE port. Ch.0 Master/Slave Set PATA IDE to Ch. 0 Master/Slave. (Default value) SATA Port 0/2 Set to ". GA-8I915P-D Motherboard - 36 - Non-Combined Set On-Chip SATA mode to Non-Combined, SATA will auto make by the setting "On-Chip SATA Mode" and "...
... 1 Master/Slave. PATA IDE Set to Ch.1 Master/Slave Set PATA IDE to USB Controller USB 2.0 Controller USB Keyboard Support USB Mouse Support AC97 Audio Onboard H/W RAID Onboard H/W LAN Onboard LAN Boot ROM Onboard Serial Port 1 Onboard Serial Port 2 Onboard Parallel Port Parallel Port Mode x ECP Mode ...value) Disable onboard 1st channel IDE port. Ch.0 Master/Slave Set PATA IDE to Ch. 0 Master/Slave. (Default value) SATA Port 0/2 Set to ". GA-8I915P-D Motherboard - 36 - Non-Combined Set On-Chip SATA mode to Non-Combined, SATA will auto make by the setting "On-Chip SATA Mode" and "...

Manual
Page 37
... function. (Default value) Disabled Disable this function if you are not using onboard USB 2.0 feature. Disabled Disable USB Mouse Support. (Default value) AC97 Audio Auto Disabled Auto detect AC97 audio function. (Default value) Disable this function. (Default value) Onboard Serial Port 1 Auto BIOS will automatically setup the port 2 address. 3F8/IRQ4 2F8...
... function. (Default value) Disabled Disable this function if you are not using onboard USB 2.0 feature. Disabled Disable USB Mouse Support. (Default value) AC97 Audio Auto Disabled Auto detect AC97 audio function. (Default value) Disable this function. (Default value) Onboard Serial Port 1 Auto BIOS will automatically setup the port 2 address. 3F8/IRQ4 2F8...

Manual
Page 66
...lower right hand taskbar. STEP 1: Connect the stereo speakers or earphone to Center/ Subwoofer Speaker Out. GA-8I915P-D Motherboard - 66 - Channel Audio Function Introduction This motherboard provide 6 audio connector. Connect the Center/Subwoofer channels to "Line Out". The front channels or earphone can be ... to Line Out (Front Speaker Out). You are in Windows XP. Line Out STEP 2 : Following installation of audio connectors: You may connect CD-ROM/DVD-ROM, walkman or others audio input to select the function. Click the icon to Line In. English 4-1-4 2- / 4- / 6- / ...
...lower right hand taskbar. STEP 1: Connect the stereo speakers or earphone to Center/ Subwoofer Speaker Out. GA-8I915P-D Motherboard - 66 - Channel Audio Function Introduction This motherboard provide 6 audio connector. Connect the Center/Subwoofer channels to "Line Out". The front channels or earphone can be ... to Line Out (Front Speaker Out). You are in Windows XP. Line Out STEP 2 : Following installation of audio connectors: You may connect CD-ROM/DVD-ROM, walkman or others audio input to select the function. Click the icon to Line In. English 4-1-4 2- / 4- / 6- / ...

Manual
Page 67
... front channels to "Front Speaker Out", the rear channels to "Rear Speaker Out". Front Speaker Out Rear Speaker Out Appendix STEP 2 : Following installation of the audio driver, you find a Sound Effect icon on the lower right hand taskbar. English STEP 3: Click "Speaker Configuration" then click on the left selection bar and...
... front channels to "Front Speaker Out", the rear channels to "Rear Speaker Out". Front Speaker Out Rear Speaker Out Appendix STEP 2 : Following installation of the audio driver, you find a Sound Effect icon on the lower right hand taskbar. English STEP 3: Click "Speaker Configuration" then click on the left selection bar and...

Manual
Page 68
... taskbar. English 6 Channel Audio Setup STEP 1 : Connect the front channels to "Front Speaker Out", the rear channels to "Rear Speaker Out", and the Center/Subwoofer channels to select the function. Front Speaker Out Rear Speaker Out Center/Subwoofer Speaker Out GA-8I915P-D Motherboard - 68 - ...STEP 2 : Following installation of the audio driver, you find a Sound Effect icon on the left selection bar and select "6CH Speaker" to ...
... taskbar. English 6 Channel Audio Setup STEP 1 : Connect the front channels to "Front Speaker Out", the rear channels to "Rear Speaker Out", and the Center/Subwoofer channels to select the function. Front Speaker Out Rear Speaker Out Center/Subwoofer Speaker Out GA-8I915P-D Motherboard - 68 - ...STEP 2 : Following installation of the audio driver, you find a Sound Effect icon on the left selection bar and select "6CH Speaker" to ...

Manual
Page 69
...desired. STEP 3: Click "Speaker Configuration" then click on the lower right hand taskbar. Appendix Click the icon to complete 8 channel audio configuration. English 8 Channel Audio Setup STEP 1 : Connect the front channels to "Front Speaker Out", the rear channels to "Rear Speaker Out", the Center/ ...Subwoofer channels to "Center/Subwoofer Speaker Out", and the side channels to "Side Speaker Out". STEP 2 : Following installation of the audio driver, you find a Sound Effect icon on the left selection bar and select "8CH Speaker" to select the function. Front Speaker Out...
...desired. STEP 3: Click "Speaker Configuration" then click on the lower right hand taskbar. Appendix Click the icon to complete 8 channel audio configuration. English 8 Channel Audio Setup STEP 1 : Connect the front channels to "Front Speaker Out", the rear channels to "Rear Speaker Out", the Center/ ...Subwoofer channels to "Center/Subwoofer Speaker Out", and the side channels to "Side Speaker Out". STEP 2 : Following installation of the audio driver, you find a Sound Effect icon on the left selection bar and select "8CH Speaker" to select the function. Front Speaker Out...


