Manual
Page 3
Specifications and features are legally registered to their respective companies. No part of Gigabyte. Notice The written content provided with this product, Gigabyte has categorized the user manual in any form or by any means without prior notice. The ...Guide" section on Gigabyte's website to change without Gigabyte's prior written permission. All rights reserved. For more product details, please click onto Gigabyte's website at www.gigabyte.com.tw Product Manual Classification In order to assist in the manual are subject to read or download the information you need...
Specifications and features are legally registered to their respective companies. No part of Gigabyte. Notice The written content provided with this product, Gigabyte has categorized the user manual in any form or by any means without prior notice. The ...Guide" section on Gigabyte's website to change without Gigabyte's prior written permission. All rights reserved. For more product details, please click onto Gigabyte's website at www.gigabyte.com.tw Product Manual Classification In order to assist in the manual are subject to read or download the information you need...
Manual
Page 29
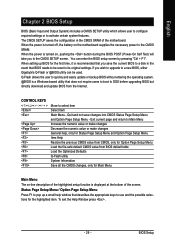
...into CMOS Status Page Setup Menu and Option Page Setup Menu - Quit and not save the current BIOS to DOS before upgrading BIOS but directly download and update BIOS from BIOS default table Load the Optimized Defaults Q-Flash utility System Information Save all the CMOS changes, only for the first ...BIOS is turned on, pushing the button during the BIOS POST (Power-On Self Test) will take you wish to upgrade to a new BIOS, either Gigabyte's Q-Flash or @BIOS utility can enter the BIOS setup screen by pressing "Ctrl + F1". The CMOS SETUP saves the configuration in the event that describes...
...into CMOS Status Page Setup Menu and Option Page Setup Menu - Quit and not save the current BIOS to DOS before upgrading BIOS but directly download and update BIOS from BIOS default table Load the Optimized Defaults Q-Flash utility System Information Save all the CMOS changes, only for the first ...BIOS is turned on, pushing the button during the BIOS POST (Power-On Self Test) will take you wish to upgrade to a new BIOS, either Gigabyte's Q-Flash or @BIOS utility can enter the BIOS setup screen by pressing "Ctrl + F1". The CMOS SETUP saves the configuration in the event that describes...
Manual
Page 51
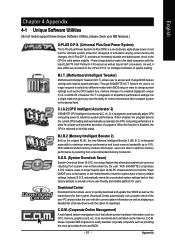
... to provide a more user-friendly and reliable platform for users. Download Center automatically runs a system check of the user PC and provides the user with the current system information as well as the CPU system bus, memory timings or to enabled Gigabyte's unique C.I.A. 2 and M.I .B. 2) is no longer need to open up -to...
... to provide a more user-friendly and reliable platform for users. Download Center automatically runs a system check of the user PC and provides the user with the current system information as well as the CPU system bus, memory timings or to enabled Gigabyte's unique C.I.A. 2 and M.I .B. 2) is no longer need to open up -to...
Manual
Page 55
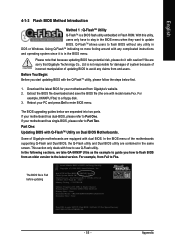
... latest BIOS for your PC and press Del to Fba. Extract the BIOS file downloaded and save the BIOS file (the one with Q-FlashTM Utility on Dual BIOS Motherboards. In the BIOS menu of Gigabyte motherboards are separated into two parts. For example, from end-users. Q-FlashTM allows users to ...utility are sorry that because updating BIOS has potential risk, please do it is in DOS or Windows. In the following sections, we take GA-8KNXP Ultra as the example to guide you start updating BIOS with the Q-FlashTM utility, please follow the steps below are equipped with any ...
... latest BIOS for your PC and press Del to Fba. Extract the BIOS file downloaded and save the BIOS file (the one with Q-FlashTM Utility on Dual BIOS Motherboards. In the BIOS menu of Gigabyte motherboards are separated into two parts. For example, from end-users. Q-FlashTM allows users to ...utility are sorry that because updating BIOS has potential risk, please do it is in DOS or Windows. In the following sections, we take GA-8KNXP Ultra as the example to guide you start updating BIOS with the Q-FlashTM utility, please follow the steps below are equipped with any ...
Manual
Page 57
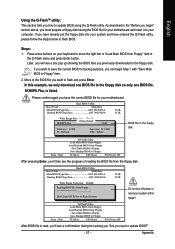
... Wide Range Protection Disable R>>ea>d>in the floppy disk. In this stage!! If you want to save the current BIOS for backup purpose, you previously downloaded to your keyboard to move the light bar to Floppy Enter : Run :Move ESC:Reset F10:Power Off BIOS file in >g>>B>IAO>Hu>Sat>olBft... Off Do not trun off power or reset your system and have already put the floppy disk into your system at this example, we only download one BIOS file, 8KNXPU.Fba, is read, you'll see the progress of reading the BIOS file from Floppy" item in the "Before you begin...
... Wide Range Protection Disable R>>ea>d>in the floppy disk. In this stage!! If you want to save the current BIOS for backup purpose, you previously downloaded to your keyboard to move the light bar to Floppy Enter : Run :Move ESC:Reset F10:Power Off BIOS file in >g>>B>IAO>Hu>Sat>olBft... Off Do not trun off power or reset your system and have already put the floppy disk into your system at this example, we only download one BIOS file, 8KNXPU.Fba, is read, you'll see the progress of reading the BIOS file from Floppy" item in the "Before you begin...

Manual
Page 60
Blocking a task and pressing Enter key on your keyboards to perform these actions. Later, you will see a confirmation dialog box asking you "Are you previously downloaded to the floppy disk. Please confirm again you have the correct BIOS file for your motherboard and insert it begins flashing BIOS. After BIOS file ... Floppy Save BIOS to Floppy :Move ESC:Reset F10:Power Off Action bar Task menu for backup purpose, you want to flash and press Enter. GA-8I915G-MF/GA-8I915GM Motherboard - 60 - Action bar: Contains the names of the following key components.
Blocking a task and pressing Enter key on your keyboards to perform these actions. Later, you will see a confirmation dialog box asking you "Are you previously downloaded to the floppy disk. Please confirm again you have the correct BIOS file for your motherboard and insert it begins flashing BIOS. After BIOS file ... Floppy Save BIOS to Floppy :Move ESC:Reset F10:Power Off Action bar Task menu for backup purpose, you want to flash and press Enter. GA-8I915G-MF/GA-8I915GM Motherboard - 60 - Action bar: Contains the names of the following key components.
Manual
Page 62
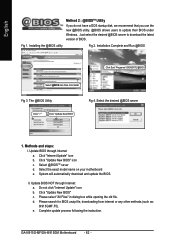
... and steps: I. Update BIOS NOT through Internet a. GA-8I915G-MF/GA-8I915GM Motherboard - 62 - Do not click "Internet Update" icon b. System will automatically download and update the BIOS. The @BIOS Utility Click " " Click "Update New BIOS" Fig 4. Select @BIOSTM sever d. Installation Complete and Run @BIOS Click Sart/ Programs/ GIGABYTE/@BIOS Select @BIOS item than click Install... 2. English Method 2 : @BIOSTM Utility If you do not have a DOS startup disk, we recommend that you use the new @BIOS utility. @BIOS allows users to download the latest version of BIOS. Fig 1.
... and steps: I. Update BIOS NOT through Internet a. GA-8I915G-MF/GA-8I915GM Motherboard - 62 - Do not click "Internet Update" icon b. System will automatically download and update the BIOS. The @BIOS Utility Click " " Click "Update New BIOS" Fig 4. Select @BIOSTM sever d. Installation Complete and Run @BIOS Click Sart/ Programs/ GIGABYTE/@BIOS Select @BIOS item than click Install... 2. English Method 2 : @BIOSTM Utility If you do not have a DOS startup disk, we recommend that you use the new @BIOS utility. @BIOS allows users to download the latest version of BIOS. Fig 1.

Manual
Page 63
... out supported motherboard and Flash ROM: In the very beginning, there is "Save Current BIOS" icon shown in @BIOSTM server, please go onto Gigabyte's web site for downloading and updating it shows two or more motherboard's model names to save the current BIOS version. It means to be selected, please make sure...
... out supported motherboard and Flash ROM: In the very beginning, there is "Save Current BIOS" icon shown in @BIOSTM server, please go onto Gigabyte's web site for downloading and updating it shows two or more motherboard's model names to save the current BIOS version. It means to be selected, please make sure...

