Manual
Page 1
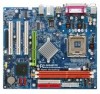
GA-8I865GME-775 Intel® Pentium® 4 LGA775 Processor Motherboard User's Manual Rev. 1002 12ME-865GMET-1002R * The WEEE marking on the product indicates this product must not be disposed of with user's other household waste and must be handed over to a designated collection point for the recycling of waste electrical and electronic equipment!! * The WEEE marking applies only in European Union's member states.
GA-8I865GME-775 Intel® Pentium® 4 LGA775 Processor Motherboard User's Manual Rev. 1002 12ME-865GMET-1002R * The WEEE marking on the product indicates this product must not be disposed of with user's other household waste and must be handed over to a designated collection point for the recycling of waste electrical and electronic equipment!! * The WEEE marking applies only in European Union's member states.
Manual
Page 3
... be reproduced, copied, translated, or transmitted in the following: „ For detailed product information and specifications, please carefully read the "User's Manual." „ For detailed information related to Gigabyte's unique features, please go to the "Technology Guide" section on Gigabyte's website to their respective companies. Notice The written content provided with this product...
... be reproduced, copied, translated, or transmitted in the following: „ For detailed product information and specifications, please carefully read the "User's Manual." „ For detailed information related to Gigabyte's unique features, please go to the "Technology Guide" section on Gigabyte's website to their respective companies. Notice The written content provided with this product...
Manual
Page 9
... container. 5. Prior to the installation of the motherboard or any hardware, please first carefully read the information in the user manual. 3. Damage due to use exceeding the permitted parameters. 6. Hardware Installation These stickers are uncertain about any metal leads or connectors...the product, please consult a certified computer technician. If you are required for warranty validation. 2. Damage due to be an unofficial Gigabyte product. - 9 - Please turn off before unplugging the power supply connector from the motherboard. To prevent damage to the motherboard...
... container. 5. Prior to the installation of the motherboard or any hardware, please first carefully read the information in the user manual. 3. Damage due to use exceeding the permitted parameters. 6. Hardware Installation These stickers are uncertain about any metal leads or connectors...the product, please consult a certified computer technician. If you are required for warranty validation. 2. Damage due to be an unofficial Gigabyte product. - 9 - Please turn off before unplugging the power supply connector from the motherboard. To prevent damage to the motherboard...
Manual
Page 13
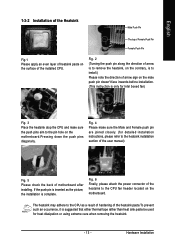
... note the direction of motherboard after installing. Fig. 6 Finally, please attach the power connector of the heatsink to the heatsink installation section of the user manual) Fig. 5 Please check the back of arrow sign on the motherboard. If the push pin is inserted as a result of hardening of the installed CPU...
... note the direction of motherboard after installing. Fig. 6 Finally, please attach the power connector of the heatsink to the heatsink installation section of the user manual) Fig. 5 Please check the back of arrow sign on the motherboard. If the push pin is inserted as a result of hardening of the installed CPU...
Manual
Page 30
...13:00:00. time clock. Through Dec. For example, 1 p.m. IDE Channel 0 Master/Slave ; The four options are : Large/Auto(default:Auto) GA-8I865GME-775 Motherboard - 30 - IDE Channel 2/3 Master IDE HDD Auto-Detection Press "Enter" to select this option for automatic device detection. Jan. IDE Channel 1 Master... IDE devices are used and the system will skip the automatic detection step and allow for faster system start up . • Manual User can use one of currectly installed hard drive. The two options are : CHS/LBA/Large/Auto(default:Auto) Capacity Capacity ...
...13:00:00. time clock. Through Dec. For example, 1 p.m. IDE Channel 0 Master/Slave ; The four options are : Large/Auto(default:Auto) GA-8I865GME-775 Motherboard - 30 - IDE Channel 2/3 Master IDE HDD Auto-Detection Press "Enter" to select this option for automatic device detection. Jan. IDE Channel 1 Master... IDE devices are used and the system will skip the automatic detection step and allow for faster system start up . • Manual User can use one of currectly installed hard drive. The two options are : CHS/LBA/Large/Auto(default:Auto) Capacity Capacity ...
Manual
Page 34
... mode - This mode is only supported by Windows XP or later. (Default value) SATA Port1 Set SATA controller to IDE controller. (Default value) Manual Set SATA mode manually from "SATA Port0 configure as" item. Slave Set SATA controller to compatible mode. Master Set SATA controller to compatible mode. SATA Port 1). This mode... onboard Seria ATA function. IDE Sec. This mode will remap SATA Port 0 to IDE Secondary Slave. This mode will remap SATA Port 0 to compatible mode. GA-8I865GME-775 Motherboard - 34 -
... mode - This mode is only supported by Windows XP or later. (Default value) SATA Port1 Set SATA controller to IDE controller. (Default value) Manual Set SATA mode manually from "SATA Port0 configure as" item. Slave Set SATA controller to compatible mode. Master Set SATA controller to compatible mode. SATA Port 1). This mode... onboard Seria ATA function. IDE Sec. This mode will remap SATA Port 0 to IDE Secondary Slave. This mode will remap SATA Port 0 to compatible mode. GA-8I865GME-775 Motherboard - 34 -
Manual
Page 49
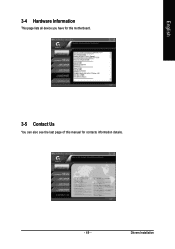
English 3-4 Hardware Information This page lists all device you have for this motherboard. 3-5 Contact Us You can also see the last page of this manual for contacts information details. - 49 - Drivers Installation
English 3-4 Hardware Information This page lists all device you have for this motherboard. 3-5 Contact Us You can also see the last page of this manual for contacts information details. - 49 - Drivers Installation
Manual
Page 67
...: Power error - 67 - Press Del to the steps below may help you can use a metal object to connect the positive and negative pins in the manual. Save changes and reboot the system. If not, please change another speaker with an internal amplifier. Answer: If your board doesn't have such jumper, you... beep when system boots successfully. *Except for beep code 8, these codes are only for about 10 minutes (Or you will be able to http://www.gigabyte.com.tw Question 1: I clear CMOS? Why?
...: Power error - 67 - Press Del to the steps below may help you can use a metal object to connect the positive and negative pins in the manual. Save changes and reboot the system. If not, please change another speaker with an internal amplifier. Answer: If your board doesn't have such jumper, you... beep when system boots successfully. *Except for beep code 8, these codes are only for about 10 minutes (Or you will be able to http://www.gigabyte.com.tw Question 1: I clear CMOS? Why?


