Manual
Page 16
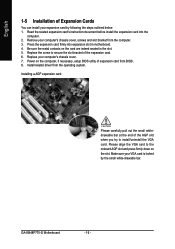
... expansion card into expansion slot in the slot. 5. Press the expansion card firmly into the computer. 2. Install related driver from the computer. 3. Be sure the metal contacts on the card are indeed seated in motherboard. 4. Power on the slot. English 1-5 Installation of expansion card from BIOS. 8. Installing a AGP expansion card: Please carefully... cover. 7. Please align the VGA card to install/uninstall the VGA card. Replace your computer's chassis cover, screws and slot bracket from the operating system. GA-8I848P775-G Motherboard - 16 -
... expansion card into expansion slot in the slot. 5. Press the expansion card firmly into the computer. 2. Install related driver from the computer. 3. Be sure the metal contacts on the card are indeed seated in motherboard. 4. Power on the slot. English 1-5 Installation of expansion card from BIOS. 8. Installing a AGP expansion card: Please carefully... cover. 7. Please align the VGA card to install/uninstall the VGA card. Replace your computer's chassis cover, screws and slot bracket from the operating system. GA-8I848P775-G Motherboard - 16 -

Manual
Page 49
... system the "Xpress Install" will scan automatically the system and then list all the drivers that came with your motherboard into your system automatically. The "Xpress Install" uses the"Click and Go" technology to install other drivers. Some device drivers will execute the installation for you automatically. The "Xpress Install" will restart your CD...
... system the "Xpress Install" will scan automatically the system and then list all the drivers that came with your motherboard into your system automatically. The "Xpress Install" uses the"Click and Go" technology to install other drivers. Some device drivers will execute the installation for you automatically. The "Xpress Install" will restart your CD...
Manual
Page 50
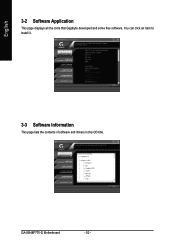
GA-8I848P775-G Motherboard - 50 - You can click an item to install it. 3-3 Software Information This page lists the contents of software and drivers in this CD-title. English 3-2 Software Application This page displays all the tools that Gigabyte developed and some free software.
GA-8I848P775-G Motherboard - 50 - You can click an item to install it. 3-3 Software Information This page lists the contents of software and drivers in this CD-title. English 3-2 Software Application This page displays all the tools that Gigabyte developed and some free software.

Manual
Page 51
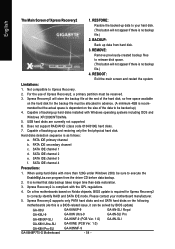
Drivers Installation English 3-4 Hardware Information This page lists all device you have for this motherboard. 3-5 Contact Us Please see the last page for details. - 51 -
Drivers Installation English 3-4 Hardware Information This page lists all device you have for this motherboard. 3-5 Contact Us Please see the last page for details. - 51 -
Manual
Page 54
... time than 128G under Windows 2000, be solved by BIOS update) GA-K8U GA-K8U-9 GA-K8NXP-SLI GA-K8N Ultra-SLI GA-K8N Pro-SLI GA-8I848P775-G Motherboard GA-K8NXP-9 GA-K8N Ultra-9 GA-K8NF-9 (PCB Ver. 1.0) GA-K8NE (PCB Ver. 1.0) GA-K8NMF-9 - 54 - REMOVE: Remove previously-created backup files to...driver CD before data backup. 2. Capable of the data to execute the EnableBigLba.exe program from hard disk. 3. Capable of Xpress Recovery2 1. REBOOT: Exit the main screen and restart the system. The Main Screen of backing up ) 4. On a few motherboards based on the following motherboards...
... time than 128G under Windows 2000, be solved by BIOS update) GA-K8U GA-K8U-9 GA-K8NXP-SLI GA-K8N Ultra-SLI GA-K8N Pro-SLI GA-8I848P775-G Motherboard GA-K8NXP-9 GA-K8N Ultra-9 GA-K8NF-9 (PCB Ver. 1.0) GA-K8NE (PCB Ver. 1.0) GA-K8NMF-9 - 54 - REMOVE: Remove previously-created backup files to...driver CD before data backup. 2. Capable of the data to execute the EnableBigLba.exe program from hard disk. 3. Capable of Xpress Recovery2 1. REBOOT: Exit the main screen and restart the system. The Main Screen of backing up ) 4. On a few motherboards based on the following motherboards...
Manual
Page 64
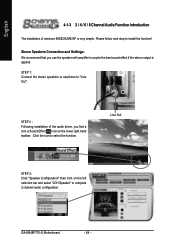
... taskbar. STEP 2 : Following installation of windows 98SE/2K/ME/XP is applied. GA-8I848P775-G Motherboard - 64 - Please follow next step to acqiire the best sound effect if the stereo output is very simple. English 4-1-3 2 / 4 / 6 / 8 Channel Audio Function Introduction The installation of the audio driver, you use the speaker with amplifier to install the function!
... taskbar. STEP 2 : Following installation of windows 98SE/2K/ME/XP is applied. GA-8I848P775-G Motherboard - 64 - Please follow next step to acqiire the best sound effect if the stereo output is very simple. English 4-1-3 2 / 4 / 6 / 8 Channel Audio Function Introduction The installation of the audio driver, you use the speaker with amplifier to install the function!

Manual
Page 66
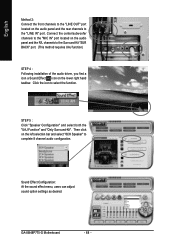
MIC In Line Out STEP 2 : Following installation of the audio driver, you find a icon a Sound Effect icon on the left selection bar and select "6CH Speaker" to "MIC In". GA-8I848P775-G Motherboard - 66 - English 6 Channel Analog Audio Output Mode Use the back audio panel to select the function. Click the icon to connect the audio...
MIC In Line Out STEP 2 : Following installation of the audio driver, you find a icon a Sound Effect icon on the left selection bar and select "6CH Speaker" to "MIC In". GA-8I848P775-G Motherboard - 66 - English 6 Channel Analog Audio Output Mode Use the back audio panel to select the function. Click the icon to connect the audio...
Manual
Page 68
Then click on the left selection bar and select "8CH Speaker" to the "LINE IN" port. GA-8I848P775-G Motherboard - 68 - English Method 2: Connect the front channels to the "LINE OUT" port located on the audio panel and the rear channels to complete 8 channel audio ..." and "Only Surround-Kit". Click the icon to the Surround-Kit "SUR BACK" port. (This method requires UAJ function) STEP 4 : Following installation of the audio driver, you find a icon a Sound Effect icon on the audio panel and the R/L channels to select the function.
Then click on the left selection bar and select "8CH Speaker" to the "LINE IN" port. GA-8I848P775-G Motherboard - 68 - English Method 2: Connect the front channels to the "LINE OUT" port located on the audio panel and the rear channels to complete 8 channel audio ..." and "Only Surround-Kit". Click the icon to the Surround-Kit "SUR BACK" port. (This method requires UAJ function) STEP 4 : Following installation of the audio driver, you find a icon a Sound Effect icon on the audio panel and the R/L channels to select the function.


