Manual
Page 37
...) during the POST. When the power is turned off, the battery on the motherboard supplies the necessary power to the CMOS to boot. To upgrade the BIOS, use either the GIGABYTE Q-Flash or @BIOS utility. • Q-Flash allows the user to prevent system instability or other unexpected results. Refer to Chapter 5, "Troubleshooting...
...) during the POST. When the power is turned off, the battery on the motherboard supplies the necessary power to the CMOS to boot. To upgrade the BIOS, use either the GIGABYTE Q-Flash or @BIOS utility. • Q-Flash allows the user to prevent system instability or other unexpected results. Refer to Chapter 5, "Troubleshooting...
Manual
Page 38
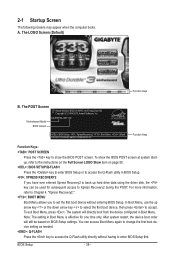
...page 50. : BIOS SETUP\Q-FLASH Press the key to enter BIOS Setup or to enter BIOS Setup first. Motherboard Model BIOS Version GA-890FXA-UD7 DC . . . . : BIOS Setup : XpressRecovery2 : Boot Menu : Qflash 03/24/2010-RD890-SB850-7A66DG03C-00 Function Keys Function Keys: : POST SCREEN Press the key to show the BIOS...refer to the instructions on the Full Screen LOGO Show item on BIOS Setup settings. For more information, refer to Chapter 4, "Xpress Recovery2." : BOOT MENU Boot Menu allows you have ever entered Xpress Recovery2 to back up arrow key or the down arrow key to select the first...
...page 50. : BIOS SETUP\Q-FLASH Press the key to enter BIOS Setup or to enter BIOS Setup first. Motherboard Model BIOS Version GA-890FXA-UD7 DC . . . . : BIOS Setup : XpressRecovery2 : Boot Menu : Qflash 03/24/2010-RD890-SB850-7A66DG03C-00 Function Keys Function Keys: : POST SCREEN Press the key to show the BIOS...refer to the instructions on the Full Screen LOGO Show item on BIOS Setup settings. For more information, refer to Chapter 4, "Xpress Recovery2." : BOOT MENU Boot Menu allows you have ever entered Xpress Recovery2 to back up arrow key or the down arrow key to select the first...

Manual
Page 40
... time and date, hard drive types, floppy disk drive types, and the type of errors that stop the system boot, etc. Advanced BIOS Features Use this menu to configure the device boot order, advanced features available on the CPU, and the primary display adapter. Integrated Peripherals Use this menu to...
... time and date, hard drive types, floppy disk drive types, and the type of errors that stop the system boot, etc. Advanced BIOS Features Use this menu to configure the device boot order, advanced features available on the CPU, and the primary display adapter. Integrated Peripherals Use this menu to...
Manual
Page 41
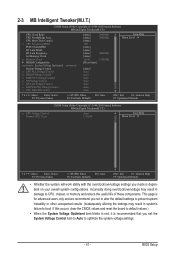
... in system's failure to CPU, chipset, or memory and reduce the useful life of these components. Incorrectly doing overclock/overvoltage may result in damage to boot. 2-3 MB Intelligent Tweaker(M.I.T.) CMOS Setup Utility-Copyright (C) 1984-2010 Award Software MB Intelligent Tweaker(M.I .T.) x CPU Voltage Control Normal CPU Vcore Auto 1.3250V Item Help Menu...
... in system's failure to CPU, chipset, or memory and reduce the useful life of these components. Incorrectly doing overclock/overvoltage may result in damage to boot. 2-3 MB Intelligent Tweaker(M.I.T.) CMOS Setup Utility-Copyright (C) 1984-2010 Award Software MB Intelligent Tweaker(M.I .T.) x CPU Voltage Control Normal CPU Vcore Auto 1.3250V Item Help Menu...

Manual
Page 42
... you to Manual. Auto lets BIOS automatically set the width for the HT Link between the CPU and chipset. Note: If your system fails to boot after overclocking, please wait for 20 seconds to allow for automated system reboot, or clear the CMOS values to reset the board to be set...
... you to Manual. Auto lets BIOS automatically set the width for the HT Link between the CPU and chipset. Note: If your system fails to boot after overclocking, please wait for 20 seconds to allow for automated system reboot, or clear the CMOS values to reset the board to be set...

Manual
Page 48
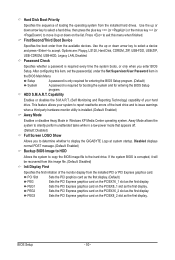
...following fields display your system. Head Number of the currently installed hard drive. All Errors Whenever the BIOS detects a non-fatal error the system boot will not stop . Memory These fields are read-only and are determined by using one of the two methods below: • Auto Lets ... hard drive specifications. Extended IDE Drive Configure your IDE/SATA devices by the BIOS POST. Landing Zone Landing zone. No Errors The system boot will stop for any error. If you to the information on this item to None. Typically, 640 KB will be reserved for the...
...following fields display your system. Head Number of the currently installed hard drive. All Errors Whenever the BIOS detects a non-fatal error the system boot will not stop . Memory These fields are read-only and are determined by using one of the two methods below: • Auto Lets ... hard drive specifications. Extended IDE Drive Configure your IDE/SATA devices by the BIOS POST. Landing Zone Landing zone. No Errors The system boot will stop for any error. If you to the information on this item to None. Typically, 640 KB will be reserved for the...
Manual
Page 49
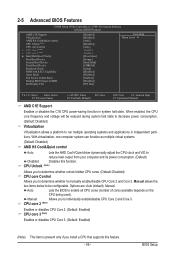
... C1E Support Virtualization AMD K8 Cool&Quiet control CPU Unlock (Note) CPU core Control x CPU core 2 (Note) x CPU core 3 (Note) } Hard Disk Boot Priority First Boot Device Second Boot Device Third Boot Device Password Check HDD S.M.A.R.T. Manual allows the two items below to be reduced during system halt state to decrease power consumption. (Default...
... C1E Support Virtualization AMD K8 Cool&Quiet control CPU Unlock (Note) CPU core Control x CPU core 2 (Note) x CPU core 3 (Note) } Hard Disk Boot Priority First Boot Device Second Boot Device Third Boot Device Password Check HDD S.M.A.R.T. Manual allows the two items below to be reduced during system halt state to decrease power consumption. (Default...
Manual
Page 50
... corrupted, it up or down on the list. PEG1 Sets the PCI Express graphics card on the PCIEX16_2 slot as the first display. Hard Disk Boot Priority Specifies the sequence of loading the operating system from the available devices. Use the up or down arrow key to select a hard drive, then... feature allows your hard drive. Away Mode allows the system to issue warnings when a third party hardware monitor utility is required every time the system boots, or only when you to determine whether to display the GIGABYTE Logo at system startup.
... corrupted, it up or down on the list. PEG1 Sets the PCI Express graphics card on the PCIEX16_2 slot as the first display. Hard Disk Boot Priority Specifies the sequence of loading the operating system from the available devices. Use the up or down arrow key to select a hard drive, then... feature allows your hard drive. Away Mode allows the system to issue warnings when a third party hardware monitor utility is required every time the system boots, or only when you to determine whether to display the GIGABYTE Logo at system startup.

Manual
Page 52
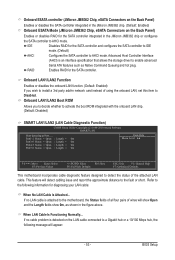
...Onboard GSATA Mode Onboard ESATA controller Onboard ESATA Mode [Enabled] [IDE] [Enabled] [IDE] Onboard LAN1 Function Onboard LAN1 Boot ROM } SMART LAN1 Onboard LAN2 Function Onboard LAN2 Boot ROM } SMART LAN2 [Enabled] [Disabled] [Press Enter] [Enabled] [Disabled] [Press Enter] Move Enter: Select...to IDE mode. (Default) AHCI Configures the SATA controller to AHCI mode. the IDE controller still operates in the GIGABYTE SATA2 chip or configures the SATA controller to AHCI mode. Auto Lets the BIOS automatically configure this setting depending on ...
...Onboard GSATA Mode Onboard ESATA controller Onboard ESATA Mode [Enabled] [IDE] [Enabled] [IDE] Onboard LAN1 Function Onboard LAN1 Boot ROM } SMART LAN1 Onboard LAN2 Function Onboard LAN2 Boot ROM } SMART LAN2 [Enabled] [Disabled] [Press Enter] [Enabled] [Disabled] [Press Enter] Move Enter: Select...to IDE mode. (Default) AHCI Configures the SATA controller to AHCI mode. the IDE controller still operates in the GIGABYTE SATA2 chip or configures the SATA controller to AHCI mode. Auto Lets the BIOS automatically configure this setting depending on ...
Manual
Page 53
... above. This feature will show Open and the Length fields show 0m, as Native Command Queuing and hot plug. Onboard LAN1/LAN2 Boot ROM Allows you wish to install a 3rd party add-in network card instead of wires will detect cabling issue and report the approximate... RAID Enables RAID for the SATA controller and configures the SATA controller to IDE mode. (Default) AHCI Configures the SATA controller to activate the boot ROM integrated with the onboard LAN chip. (Default: Disabled) SMART LAN1/LAN2 (LAN Cable Diagnostic Function) CMOS Setup Utility-Copyright (C) 1984-2010...
... above. This feature will show Open and the Length fields show 0m, as Native Command Queuing and hot plug. Onboard LAN1/LAN2 Boot ROM Allows you wish to install a 3rd party add-in network card instead of wires will detect cabling issue and report the approximate... RAID Enables RAID for the SATA controller and configures the SATA controller to IDE mode. (Default) AHCI Configures the SATA controller to activate the boot ROM integrated with the onboard LAN chip. (Default: Disabled) SMART LAN1/LAN2 (LAN Cable Diagnostic Function) CMOS Setup Utility-Copyright (C) 1984-2010...

Manual
Page 54
Note: The Gigabit hub will only operate at a normal speed of 10/100 Mbps in Windows mode or when the LAN Boot ROM is activated. it will show Open, and the length shown is set this item to ECP or ECP+EPP mode. Options are : SPP (Standard ...
Note: The Gigabit hub will only operate at a normal speed of 10/100 Mbps in Windows mode or when the LAN Boot ROM is activated. it will show Open, and the length shown is set this item to ECP or ECP+EPP mode. Options are : SPP (Standard ...

Manual
Page 57
... Defaults Hardware Thermal Control Enables or disables the CPU overheating protection function. When enabled, the CPU core voltage and ratio will show "No" at next boot. (Default: Disabled) Case Opened Displays the detection status of previous chassis intrusion status. Enabled clears the record of previous chassis intrusion status and the Case...
... Defaults Hardware Thermal Control Enables or disables the CPU overheating protection function. When enabled, the CPU core voltage and ratio will show "No" at next boot. (Default: Disabled) Case Opened Displays the detection status of previous chassis intrusion status. Enabled clears the record of previous chassis intrusion status and the Case...

Manual
Page 60
... password. When the Password Check item is set to System, you must enter the supervisor password (or user password) at system startup to continue system boot. BIOS Setup - 60 - The BIOS Setup program allows you to specify two separate passwords: Supervisor Password When a system password is set and the Password Check...
... password. When the Password Check item is set to System, you must enter the supervisor password (or user password) at system startup to continue system boot. BIOS Setup - 60 - The BIOS Setup program allows you to specify two separate passwords: Supervisor Password When a system password is set and the Password Check...

Manual
Page 67
... is the first physical drive. Installing Windows Vista and Partitioning the Hard Drive Step 1: Click Drive options. Xpress Recovery2 can back up your system to boot from the Windows Vista setup disk. Step 2: Click New. (Note) Xpress Recovery2 checks the first physical hard drive in advanced (10 GB or more is...
... is the first physical drive. Installing Windows Vista and Partitioning the Hard Drive Step 1: Click Drive options. Xpress Recovery2 can back up your system to boot from the Windows Vista setup disk. Step 2: Click New. (Note) Xpress Recovery2 checks the first physical hard drive in advanced (10 GB or more is...

Manual
Page 68
... save the backup file. Accessing Xpress Recovery2 1. Step 5: Xpress Recovery2 will automatically create a new partition to enter Xpress Recovery2 later, simply press during the POST. Boot from the motherboard driver disk to start backing up your hard drive data. Unique Features - 68 - Step 2: When finished, go to Disk Management to check...
... save the backup file. Accessing Xpress Recovery2 1. Step 5: Xpress Recovery2 will automatically create a new partition to enter Xpress Recovery2 later, simply press during the POST. Boot from the motherboard driver disk to start backing up your hard drive data. Unique Features - 68 - Step 2: When finished, go to Disk Management to check...
Manual
Page 70
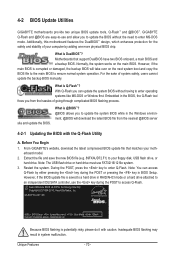
GIGABYTE Q-Flash and @BIOS are easy-to-use and allow you can access Q-Flash by adding one more physical BIOS chip. Normally, the system works on the next system boot and copy the BIOS file to the main BIOS to enter Q-Flash. With Q-Flash you...12 file system. 3. GA-890FXA-UD7 DC . . . . : BIOS Setup : XpressRecovery2 : Boot Menu : Qflash 03/24/2010-RD890-SB850-7A66DG03C-00 Because BIOS flashing is Q-Flash™? What is potentially risky, please do it with the Q-Flash Utility A. Restart the system. 4-2 BIOS Update Utilities GIGABYTE motherboards provide two unique ...
GIGABYTE Q-Flash and @BIOS are easy-to-use and allow you can access Q-Flash by adding one more physical BIOS chip. Normally, the system works on the next system boot and copy the BIOS file to the main BIOS to enter Q-Flash. With Q-Flash you...12 file system. 3. GA-890FXA-UD7 DC . . . . : BIOS Setup : XpressRecovery2 : Boot Menu : Qflash 03/24/2010-RD890-SB850-7A66DG03C-00 Because BIOS flashing is Q-Flash™? What is potentially risky, please do it with the Q-Flash Utility A. Restart the system. 4-2 BIOS Update Utilities GIGABYTE motherboards provide two unique ...

Manual
Page 72
... from BIOS Press to load BIOS defaults Step 6: Select Save & Exit Setup and then press to save settings to enter BIOS Setup. As the system boots, you should see the new BIOS version is complete after a BIOS update, so we recommend that you reload BIOS defaults.
... from BIOS Press to load BIOS defaults Step 6: Select Save & Exit Setup and then press to save settings to enter BIOS Setup. As the system boots, you should see the new BIOS version is complete after a BIOS update, so we recommend that you reload BIOS defaults.

Manual
Page 73
... interrupt the Internet connection (for your motherboard is not present on the @BIOS server site, please manually download the BIOS update file from GIGABYTE's website and follow the instructions in a corrupted BIOS or a system that is unable to be flashed matches your motherboard model. Update the... start. 3. After Updating the BIOS Restart your system after the system restarts. Save the Current BIOS File: Click Save Current BIOS to File to boot. - 73 - If the BIOS update file for example, avoid a power loss or switching off the Internet). Make sure that matches your motherboard ...
... interrupt the Internet connection (for your motherboard is not present on the @BIOS server site, please manually download the BIOS update file from GIGABYTE's website and follow the instructions in a corrupted BIOS or a system that is unable to be flashed matches your motherboard model. Update the... start. 3. After Updating the BIOS Restart your system after the system restarts. Save the Current BIOS File: Click Save Current BIOS to File to boot. - 73 - If the BIOS update file for example, avoid a power loss or switching off the Internet). Make sure that matches your motherboard ...

Manual
Page 78
... 1) or copy files from a backup: To browse through your backups made at different time, select a backup time using the time scroll bar on the next boot. We recommend that has been modified, deleted, or newly added since the last backup. Unique Features - 78 - Instructions: In the main menu, click the Config...
... 1) or copy files from a backup: To browse through your backups made at different time, select a backup time using the time scroll bar on the next boot. We recommend that has been modified, deleted, or newly added since the last backup. Unique Features - 78 - Instructions: In the main menu, click the Config...

Manual
Page 83
... window. To create an array, press to enter the View Drive Assignments window. Step 1: After the POST memory test begins and before the operating system boot begins, look for a non-RAID configuration. Figure 2 Step 2: Main Menu This is defined.. Appendix To view controller settings, press to Select Option Figure 3 [ESC] Exit...
... window. To create an array, press to enter the View Drive Assignments window. Step 1: After the POST memory test begins and before the operating system boot begins, look for a non-RAID configuration. Figure 2 Step 2: Main Menu This is defined.. Appendix To view controller settings, press to Select Option Figure 3 [ESC] Exit...


