Manual
Page 1
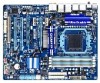
GA-890FXA-UD5 AM3 socket motherboard for AMD Phenom™ II processor/ AMD Athlon™ II processor User's Manual Rev. 3001 12ME-890FXA5-3001R
GA-890FXA-UD5 AM3 socket motherboard for AMD Phenom™ II processor/ AMD Athlon™ II processor User's Manual Rev. 3001 12ME-890FXA5-3001R

Manual
Page 3
...For example, "REV: 1.0" means the revision of the motherboard is the property of this manual are legally registered to assist in any form or by GIGABYTE without GIGABYTE's prior written permission. Documentation Classifications In order to their respective owners. The trademarks mentioned in ...this manual may be reproduced, copied, translated, transmitted, or published in the use of this product, GIGABYTE provides the following types of documentations: For quick set-up of ...
...For example, "REV: 1.0" means the revision of the motherboard is the property of this manual are legally registered to assist in any form or by GIGABYTE without GIGABYTE's prior written permission. Documentation Classifications In order to their respective owners. The trademarks mentioned in ...this manual may be reproduced, copied, translated, transmitted, or published in the use of this product, GIGABYTE provides the following types of documentations: For quick set-up of ...

Manual
Page 5
Chapter 3 Drivers Installation 61 3-1 Installing Chipset Drivers 61 3-2 Application Software 62 3-3 Technical Manuals 62 3-4 Contact...63 3-5 System...63 3-6 Download Center 64 3-7 New Utilities...64 Chapter 4 Unique Features 65 4-1 Xpress Recovery2 65 ...76 4-7 Auto Green...77 4-8 Teaming 78 Chapter 5 Appendix...79 5-1 Configuring SATA Hard Drive(s 79 5-1-1 Configuring AMD SB850 SATA Controller 79 5-1-2 Configuring GIGABYTE SATA2/JMicron JMB362 SATA Controller 85 5-1-3 Making a SATA RAID/AHCI Driver Diskette 91 5-1-4 Installing the SATA RAID/AHCI Driver and Operating System 93 5-2 ...
Chapter 3 Drivers Installation 61 3-1 Installing Chipset Drivers 61 3-2 Application Software 62 3-3 Technical Manuals 62 3-4 Contact...63 3-5 System...63 3-6 Download Center 64 3-7 New Utilities...64 Chapter 4 Unique Features 65 4-1 Xpress Recovery2 65 ...76 4-7 Auto Green...77 4-8 Teaming 78 Chapter 5 Appendix...79 5-1 Configuring SATA Hard Drive(s 79 5-1-1 Configuring AMD SB850 SATA Controller 79 5-1-2 Configuring GIGABYTE SATA2/JMicron JMB362 SATA Controller 85 5-1-3 Making a SATA RAID/AHCI Driver Diskette 91 5-1-4 Installing the SATA RAID/AHCI Driver and Operating System 93 5-2 ...
Manual
Page 6
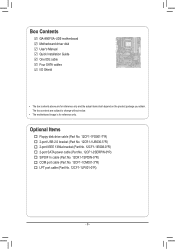
... port cable (Part No. 12CF1-1CM001-3*R) LPT port cable (Part No. 12CF1-1LP001-0*R) - 6 - The box contents are for reference only. Box Contents GA-890FXA-UD5 motherboard Motherboard driver disk User's Manual Quick Installation Guide One IDE cable Four SATA cables I/O Shield • The box contents above are subject to change without notice. • The...
... port cable (Part No. 12CF1-1CM001-3*R) LPT port cable (Part No. 12CF1-1LP001-0*R) - 6 - The box contents are for reference only. Box Contents GA-890FXA-UD5 motherboard Motherboard driver disk User's Manual Quick Installation Guide One IDE cable Four SATA cables I/O Shield • The box contents above are subject to change without notice. • The...

Manual
Page 9
... the motherboard, make sure the power supply voltage has been set according to the use of your dealer. Prior to installation, carefully read the user's manual and follow these procedures: • Prior to installation, do not remove or break motherboard S/N (Serial Number) sticker or warranty sticker provided by unplugging the power...
... the motherboard, make sure the power supply voltage has been set according to the use of your dealer. Prior to installation, carefully read the user's manual and follow these procedures: • Prior to installation, do not remove or break motherboard S/N (Serial Number) sticker or warranty sticker provided by unplugging the power...

Manual
Page 15
... the steps below to correctly install the CPU cooler on the CPU. (The following procedure uses the GIGABYTE cooler as the picture above shows) to lock into place. (Refer to your CPU cooler installation manual for instructions on the CPU. On the other side,push straight down on the the CPU cooler...
... the steps below to correctly install the CPU cooler on the CPU. (The following procedure uses the GIGABYTE cooler as the picture above shows) to lock into place. (Refer to your CPU cooler installation manual for instructions on the CPU. On the other side,push straight down on the the CPU cooler...

Manual
Page 18
... then pull the card straight up from the chassis back panel. 2. Make sure the card is fully seated in the expansion slot. 1. Carefully read the manual that supports your operating system. After installing all expansion cards, replace the chassis cover(s). 6. Align the card with a screw. 5. 1-5 Installing an Expansion Card Read the...
... then pull the card straight up from the chassis back panel. 2. Make sure the card is fully seated in the expansion slot. 1. Carefully read the manual that supports your operating system. After installing all expansion cards, replace the chassis cover(s). 6. Align the card with a screw. 5. 1-5 Installing an Expansion Card Read the...
Manual
Page 19
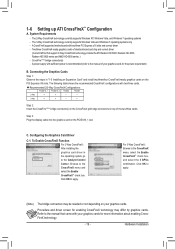
... system, go to the CrossFireX menu, select the Enable CrossFireX™ check box, and select the 3 GPUs combination. Refer to the manual that support 3-Way CrossFireX technology include the ATI Radeon HD 3800, Radeon HD 4800, Radeon HD 5800 series and AMD HD 6900 series ...power supply with two/three cards. 1-6 Setting up ATI CrossFireX™ Configuration A. Click OK to apply. System Requirements - Browse to the manual of identical brand and chip and correct driver (Current GPUs that came with two/three PCI Express x16 slots and correct driver - The 2-Way...
... system, go to the CrossFireX menu, select the Enable CrossFireX™ check box, and select the 3 GPUs combination. Refer to the manual that support 3-Way CrossFireX technology include the ATI Radeon HD 3800, Radeon HD 4800, Radeon HD 5800 series and AMD HD 6900 series ...power supply with two/three cards. 1-6 Setting up ATI CrossFireX™ Configuration A. Click OK to apply. System Requirements - Browse to the manual of identical brand and chip and correct driver (Current GPUs that came with two/three PCI Express x16 slots and correct driver - The 2-Way...

Manual
Page 29
... cable for digital audio output from the HDMI display at the same time. For information about connecting the S/PDIF digital audio cable, carefully read the manual for your motherboard to the graphics card and have digital audio output from your expansion card. Definition 1 SPDIFO 2 GND 1 - 29 - Definition 1 Power 2 SPDIFI 3 GND 1 15...
... cable for digital audio output from the HDMI display at the same time. For information about connecting the S/PDIF digital audio cable, carefully read the manual for your motherboard to the graphics card and have digital audio output from your expansion card. Definition 1 SPDIFO 2 GND 1 - 29 - Definition 1 Power 2 SPDIFI 3 GND 1 15...

Manual
Page 32
... do so may cause damage to the motherboard. • After system restart, go to BIOS Setup to load factory defaults (select Load Optimized Defaults) or manually configure the BIOS settings (refer to a low level, or the CMOS values may not be accurate or may clear the CMOS values by yourself or...
... do so may cause damage to the motherboard. • After system restart, go to BIOS Setup to load factory defaults (select Load Optimized Defaults) or manually configure the BIOS settings (refer to a low level, or the CMOS values may not be accurate or may clear the CMOS values by yourself or...

Manual
Page 33
... the power outlet before clearing the CMOS values. • After system restart, go to BIOS Setup to load factory defaults (select Load Optimized Defaults) or manually configure the BIOS settings (refer to Chapter 2, "BIOS Setup," for BIOS configurations). - 33 - Use the clearing CMOS button to change hardware components or conduct hardware...
... the power outlet before clearing the CMOS values. • After system restart, go to BIOS Setup to load factory defaults (select Load Optimized Defaults) or manually configure the BIOS settings (refer to Chapter 2, "BIOS Setup," for BIOS configurations). - 33 - Use the clearing CMOS button to change hardware components or conduct hardware...

Manual
Page 40
...on the CPU being used . CPU Host Clock Control Enables or disables the control of CPU host clock. HT Link Frequency Allows you to Manual. Manual allows the CPU Frequency (MHz) item below to be configurable. (Default: Auto) Memory Clock This option is configurable only when Set Memory ...Clock is highly recommended that the CPU frequency be configurable. Important It is set to manually set the memory clock. BIOS Setup - 40 - PCIE Clock(MHz) Allows you to alter the North Bridge controller frequency for the installed...
...on the CPU being used . CPU Host Clock Control Enables or disables the control of CPU host clock. HT Link Frequency Allows you to Manual. Manual allows the CPU Frequency (MHz) item below to be configurable. (Default: Auto) Memory Clock This option is configurable only when Set Memory ...Clock is highly recommended that the CPU frequency be configurable. Important It is set to manually set the memory clock. BIOS Setup - 40 - PCIE Clock(MHz) Allows you to alter the North Bridge controller frequency for the installed...

Manual
Page 41
...-Copyright (C) 1984-2010 Award Software DRAM Configuration x RAS to those under the four items above are : Auto (default), Manual. - 41 - Unganged Sets memory control mode to two single-channel. (Default) DDR3 Timing Items Manual allows all DDR3 Timing items below to CAS R/W Delay x Row Precharge Time x Minimum RAS Active Time x 1T/2T...
...-Copyright (C) 1984-2010 Award Software DRAM Configuration x RAS to those under the four items above are : Auto (default), Manual. - 41 - Unganged Sets memory control mode to two single-channel. (Default) DDR3 Timing Items Manual allows all DDR3 Timing items below to CAS R/W Delay x Row Precharge Time x Minimum RAS Active Time x 1T/2T...

Manual
Page 43
...voltage may result in CPU C3 or Alt VID mode. (Default: Disabled) ******** System Voltage Optimized ******** System Voltage Control Determines whether to manually set the CPU PLL voltage. DDR VTT Voltage Control Allows you to set the memory VTT voltage. BIOS Setup CKE Drive Strength Options ..., 2.0x. DRAM Voltage Control Allows you to the memory or reduce the useful life of the CPU. Manual allows all voltage control items below to be configurable. (Default: Manual) CPU PLL Voltage Control Allows you to set memory voltage. Note: Increasing memory voltage may result in damage...
...voltage may result in CPU C3 or Alt VID mode. (Default: Disabled) ******** System Voltage Optimized ******** System Voltage Control Determines whether to manually set the CPU PLL voltage. DDR VTT Voltage Control Allows you to set the memory VTT voltage. BIOS Setup CKE Drive Strength Options ..., 2.0x. DRAM Voltage Control Allows you to the memory or reduce the useful life of the CPU. Manual allows all voltage control items below to be configurable. (Default: Manual) CPU PLL Voltage Control Allows you to set memory voltage. Note: Increasing memory voltage may result in damage...

Manual
Page 46
...-Detection Press to autodetect the parameters of the device during the POST for the MS-DOS operating system. If you wish to enter the parameters manually, refer to the information on this channel. All, But Keyboard The system boot will not stop for a keyboard error but stop for all other errors...
...-Detection Press to autodetect the parameters of the device during the POST for the MS-DOS operating system. If you wish to enter the parameters manually, refer to the information on this channel. All, But Keyboard The system boot will not stop for a keyboard error but stop for all other errors...

Manual
Page 47
... you to reduce heat output from your computer and its power consumption. (Default) Disabled Disables this feature. - 47 - CPU core 0 This setting is always enabled. Manual Allows you to determine whether to HDD Init Display First [Auto] [Disabled] [Auto] [Disabled] [Auto] Enabled Enabled Enabled [Press Enter] [Hard Disk] [CDROM] [Floppy] [...Boot Priority First Boot Device Second Boot Device Third Boot Device Password Check HDD S.M.A.R.T. Capability Away Mode Full Screen LOGO Show Backup BIOS Image to manually enable/disable CPU Core 1/2/3/4/5.
... you to reduce heat output from your computer and its power consumption. (Default) Disabled Disables this feature. - 47 - CPU core 0 This setting is always enabled. Manual Allows you to determine whether to HDD Init Display First [Auto] [Disabled] [Auto] [Disabled] [Auto] Enabled Enabled Enabled [Press Enter] [Hard Disk] [CDROM] [Floppy] [...Boot Priority First Boot Device Second Boot Device Third Boot Device Password Check HDD S.M.A.R.T. Capability Away Mode Full Screen LOGO Show Backup BIOS Image to manually enable/disable CPU Core 1/2/3/4/5.

Manual
Page 61
Or click Install Single Items to manually select the drivers you want to manually select the utilities to install. • Please ignore the popup dialog box(es) (e.g. After the system restart, "Xpress Install" will continue to install other....exe program.) 3-1 Installing Chipset Drivers After inserting the driver disk, "Xpress Install" will install all the drivers that are recommended to install new GIGABYTE utilities. You can click the Install All button and "Xpress Install" will automatically scan your system automatically during the driver installation. The driver Autorun ...
Or click Install Single Items to manually select the drivers you want to manually select the utilities to install. • Please ignore the popup dialog box(es) (e.g. After the system restart, "Xpress Install" will continue to install other....exe program.) 3-1 Installing Chipset Drivers After inserting the driver disk, "Xpress Install" will install all the drivers that are recommended to install new GIGABYTE utilities. You can click the Install All button and "Xpress Install" will automatically scan your system automatically during the driver installation. The driver Autorun ...

Manual
Page 62
You can click the Install button on the right of an item to install it. 3-3 Technical Manuals This page provides GIGABYTE's application guides, content descriptions for this driver disk, and the motherboard manuals. 3-2 Application Software This page displays all the utilities and applications that GIGABYTE develops and some free software. Drivers Installation - 62 -
You can click the Install button on the right of an item to install it. 3-3 Technical Manuals This page provides GIGABYTE's application guides, content descriptions for this driver disk, and the motherboard manuals. 3-2 Application Software This page displays all the utilities and applications that GIGABYTE develops and some free software. Drivers Installation - 62 -
Manual
Page 68
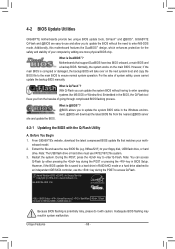
...Flash. What is potentially risky, please do it with the Q-Flash Utility A. From GIGABYTE's website, download the latest compressed BIOS update file that support DualBIOS have two BIOS onboard, a main BIOS and a backup BIOS. GA-890FXA-UD5 F3c . . . . : BIOS Setup : XpressRecovery2 : Boot Menu : Qflash... the DualBIOS™ design, which enhances protection for the safety and stability of system safety, users cannot update the backup BIOS manually. What is @BIOS™? @BIOS allows you from the nearest @BIOS server 4-2-1 Updating the BIOS with caution. Embedded in...
...Flash. What is potentially risky, please do it with the Q-Flash Utility A. From GIGABYTE's website, download the latest compressed BIOS update file that support DualBIOS have two BIOS onboard, a main BIOS and a backup BIOS. GA-890FXA-UD5 F3c . . . . : BIOS Setup : XpressRecovery2 : Boot Menu : Qflash... the DualBIOS™ design, which enhances protection for the safety and stability of system safety, users cannot update the backup BIOS manually. What is @BIOS™? @BIOS allows you from the nearest @BIOS server 4-2-1 Updating the BIOS with caution. Embedded in...

Manual
Page 71
... the BIOS file that the BIOS file to boot. - 71 - Make sure that matches your motherboard model. Do not use the G.O.M. (GIGABYTE Online Management) function when using @BIOS. 4. Load BIOS Defaults after BIOS Update: Select the Load CMOS default after BIOS update check box and...system after the system restarts. During the BIOS update process, ensure the Internet connection is not present on the @BIOS server site, please manually download the BIOS update file from the Internet or through other source. B. Update the BIOS without Using the Internet Update Function" below. ...
... the BIOS file that the BIOS file to boot. - 71 - Make sure that matches your motherboard model. Do not use the G.O.M. (GIGABYTE Online Management) function when using @BIOS. 4. Load BIOS Defaults after BIOS Update: Select the Load CMOS default after BIOS update check box and...system after the system restarts. During the BIOS update process, ensure the Internet connection is not present on the @BIOS server site, please manually download the BIOS update file from the Internet or through other source. B. Update the BIOS without Using the Internet Update Function" below. ...


