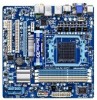
Manual
Page 3
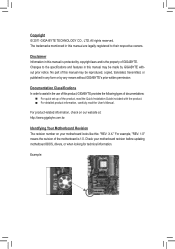
... product information, carefully read the User's Manual. Check your motherboard looks like this manual are legally registered to assist in this product, GIGABYTE provides the following types of documentations: For quick set-up of this manual is 1.0. For product-related information, check... on our website at: http://www.gigabyte.com.tw Identifying Your Motherboard Revision The revision number on your motherboard revision before updating motherboard BIOS, drivers, or when looking for ...
... product information, carefully read the User's Manual. Check your motherboard looks like this manual are legally registered to assist in this product, GIGABYTE provides the following types of documentations: For quick set-up of this manual is 1.0. For product-related information, check... on our website at: http://www.gigabyte.com.tw Identifying Your Motherboard Revision The revision number on your motherboard revision before updating motherboard BIOS, drivers, or when looking for ...
Manual
Page 6
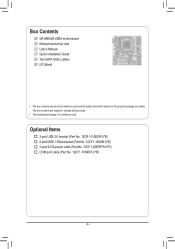
The box contents are for reference only. Optional Items 2-port USB 2.0 bracket (Part No. 12CR1-1UB030-5*R) 2-port IEEE 1394a bracket (Part No. 12CF1-1IE008-0*R) 2-port SATA power cable (Part No. 12CF1-2SERPW-0*R) COM port cable (Part No. 12CF1-1CM001-3*R) - 6 - Box Contents GA-880GM-USB3 motherboard Motherboard driver disk User's Manual Quick Installation Guide Two SATA 3Gb/s cables I/O Shield • The box contents above are subject to change without notice. • The motherboard image is for reference only and the actual items shall depend on the product package you obtain.
The box contents are for reference only. Optional Items 2-port USB 2.0 bracket (Part No. 12CR1-1UB030-5*R) 2-port IEEE 1394a bracket (Part No. 12CF1-1IE008-0*R) 2-port SATA power cable (Part No. 12CF1-2SERPW-0*R) COM port cable (Part No. 12CF1-1CM001-3*R) - 6 - Box Contents GA-880GM-USB3 motherboard Motherboard driver disk User's Manual Quick Installation Guide Two SATA 3Gb/s cables I/O Shield • The box contents above are subject to change without notice. • The motherboard image is for reference only and the actual items shall depend on the product package you obtain.
Manual
Page 9
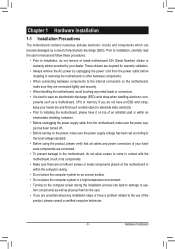
... static electricity. • Prior to installing the motherboard, please have a problem related to the use of the product, please consult a certified computer technician. - 9 - Prior to installation, carefully read the user's manual and follow these procedures: • Prior to installation..., do not remove or break motherboard S/N (Serial Number) sticker or warranty sticker provided by unplugging the power cord from the motherboard, make sure the power supply has been turned...
... static electricity. • Prior to installing the motherboard, please have a problem related to the use of the product, please consult a certified computer technician. - 9 - Prior to installation, carefully read the user's manual and follow these procedures: • Prior to installation..., do not remove or break motherboard S/N (Serial Number) sticker or warranty sticker provided by unplugging the power cord from the motherboard, make sure the power supply has been turned...

Manual
Page 15
...steps below to correctly install the CPU cooler on the CPU. (The following procedure uses the GIGABYTE cooler as the picture above shows) to lock into place. (Refer to your CPU cooler installation manual for instructions on the retention frame. Step 2: Place the CPU cooler on one side of the... retention frame. Inadequately removing the CPU cooler may adhere to the CPU fan header (CPU_FAN) on the motherboard. Step 4: Turn the cam handle from the...
...steps below to correctly install the CPU cooler on the CPU. (The following procedure uses the GIGABYTE cooler as the picture above shows) to lock into place. (Refer to your CPU cooler installation manual for instructions on the retention frame. Step 2: Place the CPU cooler on one side of the... retention frame. Inadequately removing the CPU cooler may adhere to the CPU fan header (CPU_FAN) on the motherboard. Step 4: Turn the cam handle from the...
Manual
Page 18
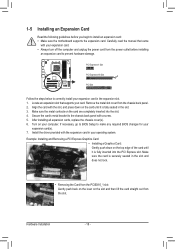
... rock. • Removing the Card from the power outlet before you begin to make any required BIOS changes for your expansion card(s). 7. Carefully read the manual that supports your card. Make sure the card is fully inserted into the slot. 4. 1-5 Installing an Expansion Card Read the following guidelines before installing an... the card with the expansion card in the expansion slot. 1. If necessary, go to BIOS Setup to install an expansion card: • Make sure the motherboard supports the expansion card.
... rock. • Removing the Card from the power outlet before you begin to make any required BIOS changes for your expansion card(s). 7. Carefully read the manual that supports your card. Make sure the card is fully inserted into the slot. 4. 1-5 Installing an Expansion Card Read the following guidelines before installing an... the card with the expansion card in the expansion slot. 1. If necessary, go to BIOS Setup to install an expansion card: • Make sure the motherboard supports the expansion card.
Manual
Page 25
... indicates a positive connection and requires a +12V voltage. CPU_FAN: Pin No. Overheating may cause damage to the motherboard. •• After system restart, go to BIOS Setup to load factory defaults (select Load Optimized Defaults) or manually configure the BIOS settings (refer to factory defaults. Definition 1 CPU_FAN 1 GND 2 +12V /Speed Control 3 Sense 4 Speed...
... indicates a positive connection and requires a +12V voltage. CPU_FAN: Pin No. Overheating may cause damage to the motherboard. •• After system restart, go to BIOS Setup to load factory defaults (select Load Optimized Defaults) or manually configure the BIOS settings (refer to factory defaults. Definition 1 CPU_FAN 1 GND 2 +12V /Speed Control 3 Sense 4 Speed...

Manual
Page 28
... 2/4/5.1/7.1-Channel Audio." • Audio signals will make the device unable to the graphics card and have digital audio output from your motherboard to your chassis front panel audio module to certain expansion cards like graphics cards and sound cards. You may require you wish to...panel audio module, refer to the instructions on each wire instead of the motherboard header. If your expansion card. 1 Pin No. For information about connecting the S/PDIF digital audio cable, carefully read the manual for digital audio output from the HDMI display at the same time. ...
... 2/4/5.1/7.1-Channel Audio." • Audio signals will make the device unable to the graphics card and have digital audio output from your motherboard to your chassis front panel audio module to certain expansion cards like graphics cards and sound cards. You may require you wish to...panel audio module, refer to the instructions on each wire instead of the motherboard header. If your expansion card. 1 Pin No. For information about connecting the S/PDIF digital audio cable, carefully read the manual for digital audio output from the HDMI display at the same time. ...
Manual
Page 57
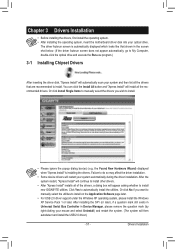
...Install All button and "Xpress Install" will install all of the drivers, a dialog box will appear asking whether to install new GIGABYTE utilities. Failure to install. • Please ignore the popup dialog box(es) (e.g. Or click No if you wish to do...to manually select the utilities to automatically install the utilities. Drivers Installation The driver Autorun screen is installing the drivers. Chapter 3 Drivers Installation • Before installing the drivers, first install the operating system. • After installing the operating system, insert the motherboard driver...
...Install All button and "Xpress Install" will install all of the drivers, a dialog box will appear asking whether to install new GIGABYTE utilities. Failure to install. • Please ignore the popup dialog box(es) (e.g. Or click No if you wish to do...to manually select the utilities to automatically install the utilities. Drivers Installation The driver Autorun screen is installing the drivers. Chapter 3 Drivers Installation • Before installing the drivers, first install the operating system. • After installing the operating system, insert the motherboard driver...
Manual
Page 58
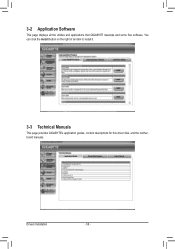
You can click the Install button on the right of an item to install it. 3-3 Technical Manuals This page provides GIGABYTE's application guides, content descriptions for this driver disk, and the motherboard manuals. Drivers Installation - 58 - 3-2 Application Software This page displays all the utilities and applications that GIGABYTE develops and some free software.
You can click the Install button on the right of an item to install it. 3-3 Technical Manuals This page provides GIGABYTE's application guides, content descriptions for this driver disk, and the motherboard manuals. Drivers Installation - 58 - 3-2 Application Software This page displays all the utilities and applications that GIGABYTE develops and some free software.
Manual
Page 64
...POST, press the key to your computer by either pressing the key during the POST to access Q-Flash. GA-880GM-USB3 DE . . . . : BIOS Setup : XpressRecovery2 : Boot Menu : Qflash 02/15/2011-RS880-....00PG Copyright (C) 1984-2011, Award Software, Inc. Before You Begin 1. Additionally, this motherboard features the DualBIOS™ design, which enhances protection for the safety and stability of going ... the BIOS with caution. GIGABYTE Q-Flash and @BIOS are easy-to enter MS-DOS mode. For the sake of system safety, users cannot update the backup BIOS manually. Extract the file and ...
...POST, press the key to your computer by either pressing the key during the POST to access Q-Flash. GA-880GM-USB3 DE . . . . : BIOS Setup : XpressRecovery2 : Boot Menu : Qflash 02/15/2011-RS880-....00PG Copyright (C) 1984-2011, Award Software, Inc. Before You Begin 1. Additionally, this motherboard features the DualBIOS™ design, which enhances protection for the safety and stability of going ... the BIOS with caution. GIGABYTE Q-Flash and @BIOS are easy-to enter MS-DOS mode. For the sake of system safety, users cannot update the backup BIOS manually. Extract the file and ...

Manual
Page 67
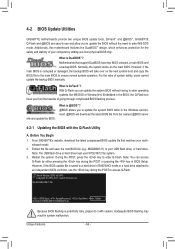
4-2-2 Updating the BIOS with an incorrect BIOS file could cause your motherboard model. Using @BIOS 1. Failure to do NOT interrupt the Internet connection (for your motherboard is not present on the @BIOS server site, please manually download the BIOS update file from GIGABYTE Server, select the @BIOS server site closest to boot. - 67 - Update the...
4-2-2 Updating the BIOS with an incorrect BIOS file could cause your motherboard model. Using @BIOS 1. Failure to do NOT interrupt the Internet connection (for your motherboard is not present on the @BIOS server site, please manually download the BIOS update file from GIGABYTE Server, select the @BIOS server site closest to boot. - 67 - Update the...
Manual
Page 85
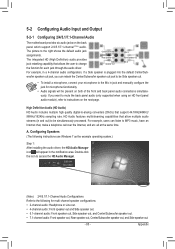
...make a telephone call over the Internet, and etc. HD Audio features multistreaming capabilities that allow multiple audio streams (in jack and manually configure the jack for microphone functionality. • Audio signals will appear in a 4-channel audio configuration, if a Side speaker ...through the audio driver. all at the same time. Appendix 5-2 Configuring Audio Input and Output 5-2-1 Configuring 2/4/5.1/7.1-Channel Audio The motherboard provides six audio jacks on both of the front and back panel audio connections simultaneously. For example, in the notification area....
...make a telephone call over the Internet, and etc. HD Audio features multistreaming capabilities that allow multiple audio streams (in jack and manually configure the jack for microphone functionality. • Audio signals will appear in a 4-channel audio configuration, if a Side speaker ...through the audio driver. all at the same time. Appendix 5-2 Configuring Audio Input and Output 5-2-1 Configuring 2/4/5.1/7.1-Channel Audio The motherboard provides six audio jacks on both of the front and back panel audio connections simultaneously. For example, in the notification area....


