Manual
Page 5
... 66 4-2-2 Updating the BIOS with the @BIOS Utility 69 4-3 EasyTune 5 ...71 4-4 Windows Vista ReadyBoost 72 Chapter 5 Appendix ...73 5-1 Configuring SATA Hard Drive(s 73 5-1-1 Configuring the Onboard SATA Controller 73 5-1-2 Making a SATA RAID/AHCI Driver Diskette 78 5-1-3 Installing the SATA RAID/AHCI Driver and Operating System 79 5-2 Configuring AudioInput and Output 84 5-2-1 5-2-2 5-2-3 5-2-4 Configuring 2/4/5.1/7.1-Channel...
... 66 4-2-2 Updating the BIOS with the @BIOS Utility 69 4-3 EasyTune 5 ...71 4-4 Windows Vista ReadyBoost 72 Chapter 5 Appendix ...73 5-1 Configuring SATA Hard Drive(s 73 5-1-1 Configuring the Onboard SATA Controller 73 5-1-2 Making a SATA RAID/AHCI Driver Diskette 78 5-1-3 Installing the SATA RAID/AHCI Driver and Operating System 79 5-2 Configuring AudioInput and Output 84 5-2-1 5-2-2 5-2-3 5-2-4 Configuring 2/4/5.1/7.1-Channel...
Manual
Page 6
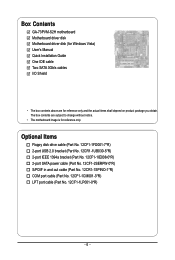
... out cable (Part No. 12CR1-1SPINO-1*R) COM port cable (Part No. 12CF1-1CM001-3*R) LPT port cable (Part No. 12CF1-1LP001-0*R) - 6 - Box Contents GA-73PVM-S2H motherboard Motherboard driver disk Motherboard driver disk (for Windows Vista) User's Manual Quick Installation Guide One IDE cable Two SATA 3Gb/s cables I/O Shield • The box contents above are subject to...
... out cable (Part No. 12CR1-1SPINO-1*R) COM port cable (Part No. 12CF1-1CM001-3*R) LPT port cable (Part No. 12CF1-1LP001-0*R) - 6 - Box Contents GA-73PVM-S2H motherboard Motherboard driver disk Motherboard driver disk (for Windows Vista) User's Manual Quick Installation Guide One IDE cable Two SATA 3Gb/s cables I/O Shield • The box contents above are subject to...
Manual
Page 18
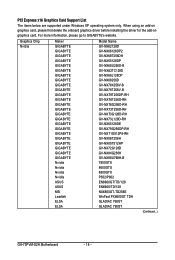
Graphics Chip Nvidia Maker GIGABYTE GIGABYTE GIGABYTE GIGABYTE GIGABYTE GIGABYTE GIGABYTE GIGABYTE GIGABYTE GIGABYTE GIGABYTE GIGABYTE GIGABYTE GIGABYTE GIGABYTE GIGABYTE GIGABYTE GIGABYTE GIGABYTE GIGABYTE GIGABYTE GIGABYTE GIGABYTE GIGABYTE Nvidia Nvidia Nvidia Nvidia ASUS ...GA-73PVM-S2H Motherboard - 18 - PCI Express x16 Graphics Card Support List The items below are supported under Windows XP operating system only. For more information, please go to GIGABYTE's website. When using an add-on graphics card, please first delete the onboard graphics driver before installing the driver...
Graphics Chip Nvidia Maker GIGABYTE GIGABYTE GIGABYTE GIGABYTE GIGABYTE GIGABYTE GIGABYTE GIGABYTE GIGABYTE GIGABYTE GIGABYTE GIGABYTE GIGABYTE GIGABYTE GIGABYTE GIGABYTE GIGABYTE GIGABYTE GIGABYTE GIGABYTE GIGABYTE GIGABYTE GIGABYTE GIGABYTE Nvidia Nvidia Nvidia Nvidia ASUS ...GA-73PVM-S2H Motherboard - 18 - PCI Express x16 Graphics Card Support List The items below are supported under Windows XP operating system only. For more information, please go to GIGABYTE's website. When using an add-on graphics card, please first delete the onboard graphics driver before installing the driver...
Manual
Page 57
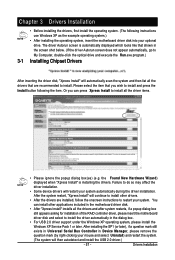
You can press Xpress Install to install the driver automatically in the dialog box. • For USB 2.0 driver support under the Windows XP operating system, please install the Windows XP Service Pack 1 or later. Failure to install. After installing the SP1 (or later), if a ... the onscreen instructions to install and press the Install button following instructions use Windows XP as the example operating system.) • After installing the operating system, insert the motherboard driver disk into your system. Drivers Installation Or you wish to restart your optional drive.
You can press Xpress Install to install the driver automatically in the dialog box. • For USB 2.0 driver support under the Windows XP operating system, please install the Windows XP Service Pack 1 or later. Failure to install. After installing the SP1 (or later), if a ... the onscreen instructions to install and press the Install button following instructions use Windows XP as the example operating system.) • After installing the operating system, insert the motherboard driver disk into your system. Drivers Installation Or you wish to restart your optional drive.

Manual
Page 61
...). • It is recommended to back up your system data and perform restoration of system memory • VESA compatible graphics card • Windows® 2000 with Xpress Recovery cannot be restored using Xpress Recovery2. • USB hard drives are not supported. • Hard drives in... physical hard drive in advanced (10 GB or more is recommended; Xpress Recovery2 can back up your system soon after the operating system and drivers are different utilities. System Requirements: • Intel® x86 platform • At least 64 MB of it. Unique Features Before You ...
...). • It is recommended to back up your system data and perform restoration of system memory • VESA compatible graphics card • Windows® 2000 with Xpress Recovery cannot be restored using Xpress Recovery2. • USB hard drives are not supported. • Hard drives in... physical hard drive in advanced (10 GB or more is recommended; Xpress Recovery2 can back up your system soon after the operating system and drivers are different utilities. System Requirements: • Intel® x86 platform • At least 64 MB of it. Unique Features Before You ...
Manual
Page 64
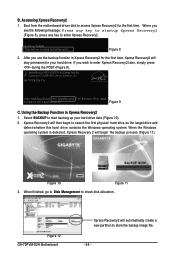
... will begin to store the backup image file. - 64 - When the Windows operating system is detected, Xpress Recovery 2 will then begin the backup process (Figure 11). Figure 12 GA-73PVM-S2H Motherboard Xpress Recovery2 will stay permanent in your hard drive data (Figure 10)....for the first time. B. Figure 10 Figure 11 3. Figure 8 2. GA-73PVM-S2H F1a . . . . : BIOS Setup /Q-Flash : XpressRecovery2 : Boot Menu : Qflash 09/28/2007-NF73-6A61NG02C-00 Figure 9 C. Boot from the motherboard driver disk to check disk allocation. Award Modular BIOS v6.00PG, An Energy...
... will begin to store the backup image file. - 64 - When the Windows operating system is detected, Xpress Recovery 2 will then begin the backup process (Figure 11). Figure 12 GA-73PVM-S2H Motherboard Xpress Recovery2 will stay permanent in your hard drive data (Figure 10)....for the first time. B. Figure 10 Figure 11 3. Figure 8 2. GA-73PVM-S2H F1a . . . . : BIOS Setup /Q-Flash : XpressRecovery2 : Boot Menu : Qflash 09/28/2007-NF73-6A61NG02C-00 Figure 9 C. Boot from the motherboard driver disk to check disk allocation. Award Modular BIOS v6.00PG, An Energy...
Manual
Page 69
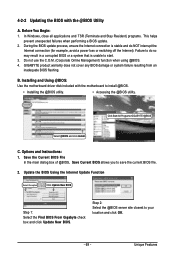
... Unique Features Do not use the C.O.M. (Corporate Online Management) function when using @BIOS. 4. Installing and Using @BIOS: Use the motherboard driver disk included with the @BIOS Utility A. Save the Current BIOS File In the main dialog box of @BIOS, Save Current BIOS allows you ... to save the current BIOS file. 2. Before You Begin: 1. In Windows, close all applications and TSR (Terminate and Stay Resident) programs. This helps prevent unexpected failures when performing a BIOS update. 2. GIGABYTE product warranty does not cover any BIOS damage or system failure resulting from ...
... Unique Features Do not use the C.O.M. (Corporate Online Management) function when using @BIOS. 4. Installing and Using @BIOS: Use the motherboard driver disk included with the @BIOS Utility A. Save the Current BIOS File In the main dialog box of @BIOS, Save Current BIOS allows you ... to save the current BIOS file. 2. Before You Begin: 1. In Windows, close all applications and TSR (Terminate and Stay Resident) programs. This helps prevent unexpected failures when performing a BIOS update. 2. GIGABYTE product warranty does not cover any BIOS damage or system failure resulting from ...

Manual
Page 73
... in BIOS Setup. Installing SATA hard drive(s) in your computer Attach one hard drive. • An empty formatted floppy disk. • Windows Vista/XP setup disk. • Motherboard driver disk. 5-1-1 Configuring the Onboard SATA Controller A. C . If you do not want to AHCI or RAID mode. - 73 - Install ...the SATA RAID/AHCI driver and operating system. (Note 2) Before you begin Please prepare: • At least two SATA hard drives (to ensure optimal performance, it is ...
... in BIOS Setup. Installing SATA hard drive(s) in your computer Attach one hard drive. • An empty formatted floppy disk. • Windows Vista/XP setup disk. • Motherboard driver disk. 5-1-1 Configuring the Onboard SATA Controller A. C . If you do not want to AHCI or RAID mode. - 73 - Install ...the SATA RAID/AHCI driver and operating system. (Note 2) Before you begin Please prepare: • At least two SATA hard drives (to ensure optimal performance, it is ...
Manual
Page 78
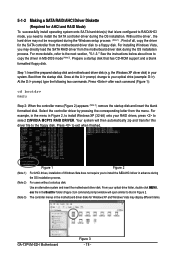
... Figure 1 Figure 2 For AHCI drives, installation of all, copy the driver for the SATA controller from the motherboard driver disk during the Windows setup process (Note 1) . Press after each command (Figure 1): cd bootdrv...driver from the motherboard driver disk to install Windows XP (32-bit) onto your optical drive (example: D:\>). the Windows XP driver disk) in the BootDrv folder (Figure 3).A command prompt window will then automatically zip and transfer this driver file to the next section, "5-1-3." Without the driver , the hard drive may display different items. GA-73PVM-S2H...
... Figure 1 Figure 2 For AHCI drives, installation of all, copy the driver for the SATA controller from the motherboard driver disk during the Windows setup process (Note 1) . Press after each command (Figure 1): cd bootdrv...driver from the motherboard driver disk to install Windows XP (32-bit) onto your optical drive (example: D:\>). the Windows XP driver disk) in the BootDrv folder (Figure 3).A command prompt window will then automatically zip and transfer this driver file to the next section, "5-1-3." Without the driver , the hard drive may display different items. GA-73PVM-S2H...
Manual
Page 79
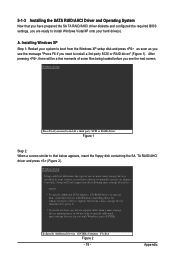
... your system to install a 3rd party SCSI or RAID driver" (Figure 1). 5-1-3 Installing the SATA RAID/AHCI Driver and Operating System Now that below appears, insert the floppy disk containing the SA TA RAID/AHCI driver and press (Figure 2). Installing Windows XP Step 1: Restart your system, or you need to... boot from a mass storage device manufacturer, or do not have any device support disks from the Windows XP setup disk and press as soon as ...
... your system to install a 3rd party SCSI or RAID driver" (Figure 1). 5-1-3 Installing the SATA RAID/AHCI Driver and Operating System Now that below appears, insert the floppy disk containing the SA TA RAID/AHCI driver and press (Figure 2). Installing Windows XP Step 1: Restart your system, or you need to... boot from a mass storage device manufacturer, or do not have any device support disks from the Windows XP setup disk and press as soon as ...
Manual
Page 80
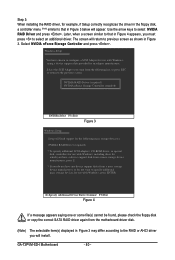
... RAID driver, for use with Windows, press ENTER. Windows Setup You have a device support disk from the following list, or press ESC to return to configure a SCSI Adapter for use with Windows, including those for use with Windows, using a device support disk provided by an adapter manufacturer. Select NVIDIA nForce Storage Controller and press . GA-73PVM-S2H Motherboard...
... RAID driver, for use with Windows, press ENTER. Windows Setup You have a device support disk from the following list, or press ESC to return to configure a SCSI Adapter for use with Windows, including those for use with Windows, using a device support disk provided by an adapter manufacturer. Select NVIDIA nForce Storage Controller and press . GA-73PVM-S2H Motherboard...

Manual
Page 81
...the following mass storage device(s): NVIDIA RAID Driver (required) NVIDIA nForce Storage Controller (required) * To specify additional SCSI adapters, CD-ROM drives, or special disk controllers for use with Windows, including those for use with Windows, press ENTER. WindowsXP Professional Setup Welcome to... 5 Step 4: After the SA TA controller driver installation is completed, you do not want to continue the driver installation from the floppy disk. Appendix To repair a Windows XP installation using Recovery Console, press R. Windows Setup Setup will be finished in about one minute...
...the following mass storage device(s): NVIDIA RAID Driver (required) NVIDIA nForce Storage Controller (required) * To specify additional SCSI adapters, CD-ROM drives, or special disk controllers for use with Windows, including those for use with Windows, press ENTER. WindowsXP Professional Setup Welcome to... 5 Step 4: After the SA TA controller driver installation is completed, you do not want to continue the driver installation from the floppy disk. Appendix To repair a Windows XP installation using Recovery Console, press R. Windows Setup Setup will be finished in about one minute...
Manual
Page 82
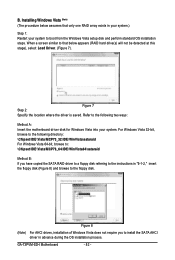
... not be detected at this stage), select Load Driver. (Figure 7). For Windows Vista 32-bit, browse to the following two ways: Method A: Insert the motherboard driver disk for Windows Vista into your system to the floppy disk. GA-73PVM-S2H Motherboard - 82 - Figure 7 Step 2: Specify the location where the driver is saved. Refer to the following directory: \Chipset...
... not be detected at this stage), select Load Driver. (Figure 7). For Windows Vista 32-bit, browse to the following two ways: Method A: Insert the motherboard driver disk for Windows Vista into your system to the floppy disk. GA-73PVM-S2H Motherboard - 82 - Figure 7 Step 2: Specify the location where the driver is saved. Refer to the following directory: \Chipset...
Manual
Page 84
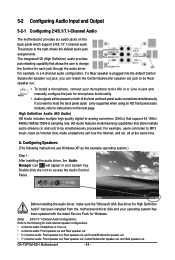
... instructions use Windows XP as the example operating system.) Step 1: After installing the audio driver, the Audio Manager icon will be Rear speaker out. • To install a microphone, connect your system tray. A. Before installing the audio driver, make a telephone call over the Internet, and etc. GA-73PVM-S2H Motherboard - ...shows the default audio jack assignments. all at the same time. Configuring Speakers: (The following for each jack through the audio driver. For example, users can retask the Center/Subwoofer speaker out jack to be present on both of the front and back ...
... instructions use Windows XP as the example operating system.) Step 1: After installing the audio driver, the Audio Manager icon will be Rear speaker out. • To install a microphone, connect your system tray. A. Before installing the audio driver, make a telephone call over the Internet, and etc. GA-73PVM-S2H Motherboard - ...shows the default audio jack assignments. all at the same time. Configuring Speakers: (The following for each jack through the audio driver. For example, users can retask the Center/Subwoofer speaker out jack to be present on both of the front and back ...


