Manual
Page 3
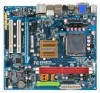
... information on/from the Support\Motherboard\Technology Guide page on your motherboard revision before updating motherboard BIOS, drivers, or when looking for technical information. No part of GIGABYTE. Changes to assist in this manual may be made by GIGABYTE without GIGABYTE's prior written permission. Documentation Classifications In order to the specifications and features in any...
... information on/from the Support\Motherboard\Technology Guide page on your motherboard revision before updating motherboard BIOS, drivers, or when looking for technical information. No part of GIGABYTE. Changes to assist in this manual may be made by GIGABYTE without GIGABYTE's prior written permission. Documentation Classifications In order to the specifications and features in any...
Manual
Page 5
... 3-2 Software Applications 58 3-3 Driver CD Information 58 3-4 Hardware Information 59 3-5 Contact Us ...59 Chapter 4 Unique Features 61 4-1 Xpress Recovery2 61 4-2 BIOS Update Utilities 66 4-2-1 Updating the BIOS with the Q-Flash Utility 66 4-2-2 Updating the BIOS with the @BIOS Utility 69 4-3 EasyTune 5 ...71 4-4 Windows Vista ReadyBoost 72 Chapter 5 Appendix ...73 5-1 Configuring SATA Hard Drive(s 73 5-1-1 Configuring the Onboard...
... 3-2 Software Applications 58 3-3 Driver CD Information 58 3-4 Hardware Information 59 3-5 Contact Us ...59 Chapter 4 Unique Features 61 4-1 Xpress Recovery2 61 4-2 BIOS Update Utilities 66 4-2-1 Updating the BIOS with the Q-Flash Utility 66 4-2-2 Updating the BIOS with the @BIOS Utility 69 4-3 EasyTune 5 ...71 4-4 Windows Vista ReadyBoost 72 Chapter 5 Appendix ...73 5-1 Configuring SATA Hard Drive(s 73 5-1-1 Configuring the Onboard...
Manual
Page 35
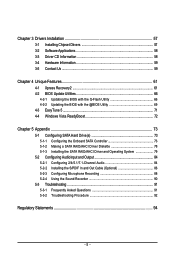
... recommended that you not flash the BIOS. Inadequate BIOS flashing may result in system's failure to boot. To flash the BIOS, do not encounter problems using the current version of BIOS, it with caution. To upgrade the BIOS, use either the GIGABYTE Q-Flash or @BIOS utility . • Q-Flash allows...and Output System) records hardware parameters of the system in the CMOS on using the Q-Flash and @BIOS utilities, refer to Chapter 4, "BIOS Update Utilities." • Because BIOS flashing is potentially risky, if you do it is recommended that you not alter the default settings (...
... recommended that you not flash the BIOS. Inadequate BIOS flashing may result in system's failure to boot. To flash the BIOS, do not encounter problems using the current version of BIOS, it with caution. To upgrade the BIOS, use either the GIGABYTE Q-Flash or @BIOS utility . • Q-Flash allows...and Output System) records hardware parameters of the system in the CMOS on using the Q-Flash and @BIOS utilities, refer to Chapter 4, "BIOS Update Utilities." • Because BIOS flashing is potentially risky, if you do it is recommended that you not alter the default settings (...

Manual
Page 54
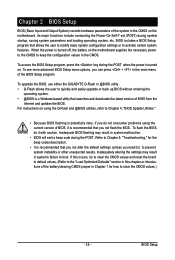
...Save & Exit Setup Load Optimized Defaults (Y/N)? GA-73PVM-S2H Motherboard - 54 - 2-10 Load Fail-Safe Defaults CMOS Setup Utility-Copyright (C) 1984-2007 Award Software Standard CMOS Features Load Fail-Safe Defaults Advanced BIOS Features Load Optimized Defaults Integrated ...PnP/PCI Configurations PC Health Status Save & Exit Setup Load Fail-Safe Defaults (Y/N)? Always load the Optimized defaults after updating the BIOS or after clearing the CMOS values. N Exit Without Saving MB Intelligent Tweaker(M.I .T.) Esc: Quit F8: Q-Flash...
...Save & Exit Setup Load Optimized Defaults (Y/N)? GA-73PVM-S2H Motherboard - 54 - 2-10 Load Fail-Safe Defaults CMOS Setup Utility-Copyright (C) 1984-2007 Award Software Standard CMOS Features Load Fail-Safe Defaults Advanced BIOS Features Load Optimized Defaults Integrated ...PnP/PCI Configurations PC Health Status Save & Exit Setup Load Fail-Safe Defaults (Y/N)? Always load the Optimized defaults after updating the BIOS or after clearing the CMOS values. N Exit Without Saving MB Intelligent Tweaker(M.I .T.) Esc: Quit F8: Q-Flash...
Manual
Page 66
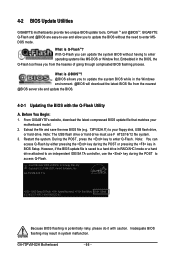
... Q-Flash. With Q-Flash you from the nearest @BIOS server site and update the BIOS. 4-2-1 Updating the BIOS with caution. GA-73PVM-S2H Motherboard - 66 - Before You Begin: 1. What is potentially risky, please do it with the Q-Flash Utility A. 4-2 BIOS Update Utilities GIGABYTE motherboards provide two unique BIOS update tools, Q-Flash TM and @BIOS .TM GIGABYTE Q-Flash and @BIOS are easy-to-use F AT32/16/12 file...
... Q-Flash. With Q-Flash you from the nearest @BIOS server site and update the BIOS. 4-2-1 Updating the BIOS with caution. GA-73PVM-S2H Motherboard - 66 - Before You Begin: 1. What is potentially risky, please do it with the Q-Flash Utility A. 4-2 BIOS Update Utilities GIGABYTE motherboards provide two unique BIOS update tools, Q-Flash TM and @BIOS .TM GIGABYTE Q-Flash and @BIOS are easy-to-use F AT32/16/12 file...
Manual
Page 67
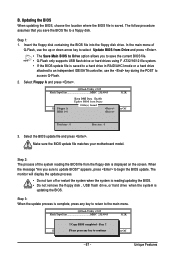
.../Size MXIC 25L4005 512K EnteFr l:oRppuyn A HDD 0-0 Keep DMI Data Enable Update BIOS from the floppy disk is updating the BIOS. Select the BIOS update file and press . The monitor will display the update process. • Do not turn off or restart the system when the ... to begin the BIOS update. Step 3: When the update process is saved. Unique Features Make sure the BIOS update file matches your motherboard model. appears, press to update BIOS?" Select Floppy A and press . B. Updating the BIOS When updating the BIOS, choose the location where the BIOS file is complete,...
.../Size MXIC 25L4005 512K EnteFr l:oRppuyn A HDD 0-0 Keep DMI Data Enable Update BIOS from the floppy disk is updating the BIOS. Select the BIOS update file and press . The monitor will display the update process. • Do not turn off or restart the system when the ... to begin the BIOS update. Step 3: When the update process is saved. Unique Features Make sure the BIOS update file matches your motherboard model. appears, press to update BIOS?" Select Floppy A and press . B. Updating the BIOS When updating the BIOS, choose the location where the BIOS file is complete,...

Manual
Page 68
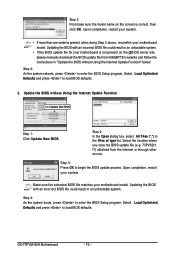
... will re-detect all peripherals devices after the system restarts. GA-73PVM-S2H Motherboard - 68 - CMOS Setup Utility-Copyright (C) 1984-2007 Award Software Standard CMOS Features Load Fail-Safe Defaults Advanced BIOS Features Load Optimized Defaults Integrated Peripherals Set Supervisor Password...procedure is complete after a BIOS update, so we recommend that you should see the new BIOS version is present on the POST screen. As the system boots, you reload BIOS defaults. Step 5: During the POST, press to CMOS and exit BIOS Setup. Y Exit Without ...
... will re-detect all peripherals devices after the system restarts. GA-73PVM-S2H Motherboard - 68 - CMOS Setup Utility-Copyright (C) 1984-2007 Award Software Standard CMOS Features Load Fail-Safe Defaults Advanced BIOS Features Load Optimized Defaults Integrated Peripherals Set Supervisor Password...procedure is complete after a BIOS update, so we recommend that you should see the new BIOS version is present on the POST screen. As the system boots, you reload BIOS defaults. Step 5: During the POST, press to CMOS and exit BIOS Setup. Y Exit Without ...
Manual
Page 69
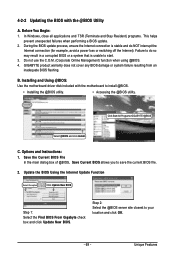
... failure resulting from an inadequate BIOS flashing. Update the BIOS Using the Internet Update Function Select this option Click Update New BIOS Step 1: Select the Find BIOS From Gigabyte check box and click Update New BIOS. In Windows, close all applications and TSR (Terminate and Stay Resident) programs. This helps prevent unexpected failures when performing a BIOS update. 2. 4-2-2 Updating the BIOS with the motherboard to...
... failure resulting from an inadequate BIOS flashing. Update the BIOS Using the Internet Update Function Select this option Click Update New BIOS Step 1: Select the Find BIOS From Gigabyte check box and click Update New BIOS. In Windows, close all applications and TSR (Terminate and Stay Resident) programs. This helps prevent unexpected failures when performing a BIOS update. 2. 4-2-2 Updating the BIOS with the motherboard to...
Manual
Page 70
... the Files of type list. Step 4: As the system reboots, press to enter the BIOS Setup program. Select the location where you save the BIOS update file (e.g. 73PVS2H. Make sure the extracted BIOS file matches your motherboard is not present on the screen is present when doing Step 3 above, recomfirm your system. GA-73PVM-S2H Motherboard - 70 -
... the Files of type list. Step 4: As the system reboots, press to enter the BIOS Setup program. Select the location where you save the BIOS update file (e.g. 73PVS2H. Make sure the extracted BIOS file matches your motherboard is not present on the screen is present when doing Step 3 above, recomfirm your system. GA-73PVM-S2H Motherboard - 70 -


