
Manual
Page 33
... system features. BIOS Setup To see more advanced BIOS Setup menu options, you not flash the BIOS. BIOS includes a BIOS Setup program that you not alter the default settings (unless you do it is recommended that allows the user to modify basic system configuration settings... not encounter problems using the current version of BIOS, it with caution. If this chapter or introductions of the BIOS Setup program. To upgrade the BIOS, use either the GIGABYTE Q-Flash or @BIOS utility. • Q-Flash allows the user to Chapter 4, "BIOS Update Utilities." • Because ...
... system features. BIOS Setup To see more advanced BIOS Setup menu options, you not flash the BIOS. BIOS includes a BIOS Setup program that you not alter the default settings (unless you do it is recommended that allows the user to modify basic system configuration settings... not encounter problems using the current version of BIOS, it with caution. If this chapter or introductions of the BIOS Setup program. To upgrade the BIOS, use either the GIGABYTE Q-Flash or @BIOS utility. • Q-Flash allows the user to Chapter 4, "BIOS Update Utilities." • Because ...

Manual
Page 35
...; When the system is displayed on the right side of the submenu. • If you do not find the settings you enter the BIOS Setup program, the Main Menu (as usual, select the Load Optimized Defaults item to set your system to display a help screen. Press to BIOS Load CMOS ... Keys Move the selection bar to select an item Execute command or enter the submenu Main Menu: Exit the BIOS Setup program Submenus: Exit current submenu Increase the numeric value or make changes Decrease the numeric value or make changes Show descriptions of the function keys Move...
...; When the system is displayed on the right side of the submenu. • If you do not find the settings you enter the BIOS Setup program, the Main Menu (as usual, select the Load Optimized Defaults item to set your system to display a help screen. Press to BIOS Load CMOS ... Keys Move the selection bar to select an item Execute command or enter the submenu Main Menu: Exit the BIOS Setup program Submenus: Exit current submenu Increase the numeric value or make changes Decrease the numeric value or make changes Show descriptions of the function keys Move...
Manual
Page 36
... to the system and BIOS Setup. It allows you to make changes. Save & Exit Setup Save all the changes made in the BIOS Setup program to the CMOS and exit BIOS Setup. (Pressing can create up to 8 profiles (Profile 1-8) and name each profile. First select the profile you to restrict...
... to the system and BIOS Setup. It allows you to make changes. Save & Exit Setup Save all the changes made in the BIOS Setup program to the CMOS and exit BIOS Setup. (Pressing can create up to 8 profiles (Profile 1-8) and name each profile. First select the profile you to restrict...
Manual
Page 49
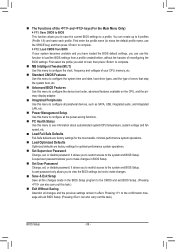
.../DVD Boot Option First Boot Device Second Boot Device Third Boot Device Password Check HDD S.M.A.R.T. Setup A password is only required for entering the BIOS Setup program. (Default) System A password is present only when you install. (Default: Auto) First/Second/Third Boot Device Specifies the boot order from the installed hard ..., such as Windows 7 64bit and Windows Server 2003 64-bit. Make sure the operating system to deliver greater efficiency for entering the BIOS Setup program. (Note) This item is required for booting the system and for daily use.
.../DVD Boot Option First Boot Device Second Boot Device Third Boot Device Password Check HDD S.M.A.R.T. Setup A password is only required for entering the BIOS Setup program. (Default) System A password is present only when you install. (Default: Auto) First/Second/Third Boot Device Specifies the boot order from the installed hard ..., such as Windows 7 64bit and Windows Server 2003 64-bit. Make sure the operating system to deliver greater efficiency for entering the BIOS Setup program. (Note) This item is required for booting the system and for daily use.

Manual
Page 58
The BIOS Setup program allows you to specify two separate passwords: Supervisor Password When a system password is set and the Password Check item in Advanced BIOS Features is set ...
The BIOS Setup program allows you to specify two separate passwords: Supervisor Password When a system password is set and the Password Check item in Advanced BIOS Features is set ...

Manual
Page 59
... changes to the CMOS. This exits the BIOS Setup without saving the changes made in BIOS Setup to the CMOS and exits the BIOS Setup program. Press or to return to the BIOS Setup Main Menu. 2-13 Exit Without Saving CMOS Setup Utility-Copyright (C) 1984-2011 Award Software MB Intelligent...
... changes to the CMOS. This exits the BIOS Setup without saving the changes made in BIOS Setup to the CMOS and exits the BIOS Setup program. Press or to return to the BIOS Setup Main Menu. 2-13 Exit Without Saving CMOS Setup Utility-Copyright (C) 1984-2011 Award Software MB Intelligent...
Manual
Page 61
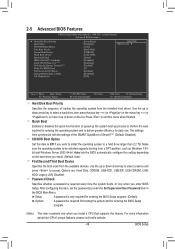
... (If the driver Autorun screen does not appear automatically, go to My Computer, double-click the optical drive and execute the Run.exe program.) 3-1 Installing Chipset Drivers After inserting the driver disk, "Xpress Install" will automatically scan your mouse and select Uninstall) and restart the ... operating system, please install the Windows XP Service Pack 1 or later. Drivers Installation Or click No if you wish to install new GIGABYTE utilities. Failure to do so may affect the driver installation. • Some device drivers will appear asking whether to install. •...
... (If the driver Autorun screen does not appear automatically, go to My Computer, double-click the optical drive and execute the Run.exe program.) 3-1 Installing Chipset Drivers After inserting the driver disk, "Xpress Install" will automatically scan your mouse and select Uninstall) and restart the ... operating system, please install the Windows XP Service Pack 1 or later. Drivers Installation Or click No if you wish to install new GIGABYTE utilities. Failure to do so may affect the driver installation. • Some device drivers will appear asking whether to install. •...

Manual
Page 71
...BIOS file that matches your motherboard model. Make sure that is not present on -screen instructions to save the BIOS update file obtained from GIGABYTE's website and follow the instructions in a corrupted BIOS or a system that the BIOS file to start. 3. In Windows, close all ...applications and TSR (Terminate and Stay Resident) programs. This helps prevent unexpected failures when performing a BIOS update. 2. Failure to do NOT interrupt the Internet connection (for your motherboard is unable to...
...BIOS file that matches your motherboard model. Make sure that is not present on -screen instructions to save the BIOS update file obtained from GIGABYTE's website and follow the instructions in a corrupted BIOS or a system that the BIOS file to start. 3. In Windows, close all ...applications and TSR (Terminate and Stay Resident) programs. This helps prevent unexpected failures when performing a BIOS update. 2. Failure to do NOT interrupt the Internet connection (for your motherboard is unable to...

Manual
Page 74
.... (Note 1) Before using the Dynamic Energy Saver™ 2 function, make sure the CPU Enhanced Halt (C1E) and CPU EIST Function items in the BIOS Setup program are able to Enabled. (Note 2) 1: Smart FAN/CPU (default); 2: Smart FAN/CPU/VGA/HDD; 3: Smart FAN/CPU/VGA/HDD/Chipset/ Memory. (Note 3) The total amount...
.... (Note 1) Before using the Dynamic Energy Saver™ 2 function, make sure the CPU Enhanced Halt (C1E) and CPU EIST Function items in the BIOS Setup program are able to Enabled. (Note 2) 1: Smart FAN/CPU (default); 2: Smart FAN/CPU/VGA/HDD; 3: Smart FAN/CPU/VGA/HDD/Chipset/ Memory. (Note 3) The total amount...

Manual
Page 75
... share your data with data sharing enabled Enables data sharing Disables data sharing Accesses the shared data folder Changes the data folder to Start>All Programs>GIGABYTE>Q-Share. Open Incoming Folder : C:\Q-ShareFolder Change Incoming Folder : C:\Q-ShareFolder Update Q-Share ... Directions for using Q-Share After installing Q-Share from the motherboard driver disk, go to...
... share your data with data sharing enabled Enables data sharing Disables data sharing Accesses the shared data folder Changes the data folder to Start>All Programs>GIGABYTE>Q-Share. Open Incoming Folder : C:\Q-ShareFolder Change Incoming Folder : C:\Q-ShareFolder Update Q-Share ... Directions for using Q-Share After installing Q-Share from the motherboard driver disk, go to...
Manual
Page 78
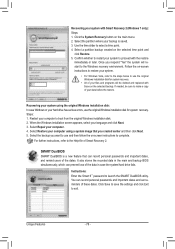
..., be deleted and replaced with those on -screen instructions to use the original Windows installation disk for system recovery. • All of your files and programs will restart to proceed with Smart Recovery 2 (Windows 7 only): Steps: 1. Recovering your language and click Next. 3. SMART DualBIOS SMART DualBIOS is saved. 3. You can prevent...
..., be deleted and replaced with those on -screen instructions to use the original Windows installation disk for system recovery. • All of your files and programs will restart to proceed with Smart Recovery 2 (Windows 7 only): Steps: 1. Recovering your language and click Next. 3. SMART DualBIOS SMART DualBIOS is saved. 3. You can prevent...

Manual
Page 79
... on/off time or files copying. Set the time when a user can or cannot use the "Safely Remove Hardware" feature in the system BIOS Setup program to an external storage device (Note 2). This password is required before you make changes to the previous settings. You will request you want to make...
... on/off time or files copying. Set the time when a user can or cannot use the "Safely Remove Hardware" feature in the system BIOS Setup program to an external storage device (Note 2). This password is required before you make changes to the previous settings. You will request you want to make...
Manual
Page 81
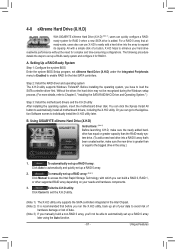
... (For more details, refer to individually install the X.H.D utility later. Using GIGABYTE eXtreme Hard Drive (X.H.D) Instructions: (Note 2) Before launching X.H.D, make sure the new drive is added. 4-8 eXtreme Hard Drive (X.H.D) With GIGABYTE eXtreme Hard Drive (X.H.D) (Note 1), users can quickly configure a RAIDready system for... system, insert the motherboard driver disk. Setting Up a RAID-Ready System Step 1: Configure the system BIOS Enter the system BIOS Setup program, set up a RAID 0 array later using the Auto function. - 81 - Step 2: Install the RAID driver and operating system ...
... (For more details, refer to individually install the X.H.D utility later. Using GIGABYTE eXtreme Hard Drive (X.H.D) Instructions: (Note 2) Before launching X.H.D, make sure the new drive is added. 4-8 eXtreme Hard Drive (X.H.D) With GIGABYTE eXtreme Hard Drive (X.H.D) (Note 1), users can quickly configure a RAIDready system for... system, insert the motherboard driver disk. Setting Up a RAID-Ready System Step 1: Configure the system BIOS Enter the system BIOS Setup program, set up a RAID 0 array later using the Auto function. - 81 - Step 2: Install the RAID driver and operating system ...
Manual
Page 109
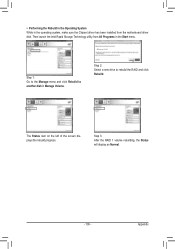
... Start menu. • Performing the Rebuild in the Operating System While in the operating system, make sure the Chipset driver has been installed from All Programs in Manage Volume. Step 3: After the RAID 1 volume rebuilding, the Status will display as Normal. - 109 - Step 1: Go to the Manage menu and click Rebuild...
... Start menu. • Performing the Rebuild in the Operating System While in the operating system, make sure the Chipset driver has been installed from All Programs in Manage Volume. Step 3: After the RAID 1 volume rebuilding, the Status will display as Normal. - 109 - Step 1: Go to the Manage menu and click Rebuild...

Manual
Page 112
.... Select Rebuild Raid. (Or click the Rebuild icon in the operating system Make sure the JMicron JMB362 SATA controller driver has been installed from All Programs in the RAID LIST block. Step 6: When finished, restart your system. Step 4: Click Finish to rebuild the array and click Next. Step 5: The rebuilding progress... displayed at the bottom of the screen. • Rebuilding in the tool bar.) Step 2: When the Rebuilding RAID Wizard appears, click Next. Step 1: In the GIGABYTE RAID CONFIGURER screen, right-click on the array to be rebuilt in the Start menu. Launch the...
.... Select Rebuild Raid. (Or click the Rebuild icon in the operating system Make sure the JMicron JMB362 SATA controller driver has been installed from All Programs in the RAID LIST block. Step 6: When finished, restart your system. Step 4: Click Finish to rebuild the array and click Next. Step 5: The rebuilding progress... displayed at the bottom of the screen. • Rebuilding in the tool bar.) Step 2: When the Rebuilding RAID Wizard appears, click Next. Step 1: In the GIGABYTE RAID CONFIGURER screen, right-click on the array to be rebuilt in the Start menu. Launch the...

Manual
Page 114
Step 3: Make sure you have installed the Marvell RAID driver and Marvell Storage Utility from Start\All Programs\Marvell Storage Utility\Marvell Tray, right-click on the icon in the notification area, and select Open MSU. Under Virtual Disk 0, the Property tab displays ...
Step 3: Make sure you have installed the Marvell RAID driver and Marvell Storage Utility from Start\All Programs\Marvell Storage Utility\Marvell Tray, right-click on the icon in the notification area, and select Open MSU. Under Virtual Disk 0, the Property tab displays ...
Manual
Page 115
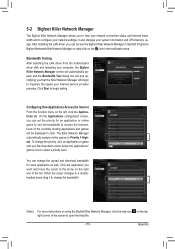
... will automatically appear and the Bandwidth Test dialog box will pop up, notifying you that the Killer Network Manager will be displayed in Start\All Programs\ Bigfoot Networks\Killer Network Manager or right-click on the left, click the Applications tab. After installing the LAN driver, you can access the Bigfoot...
... will automatically appear and the Bandwidth Test dialog box will pop up, notifying you that the Killer Network Manager will be displayed in Start\All Programs\ Bigfoot Networks\Killer Network Manager or right-click on the left, click the Applications tab. After installing the LAN driver, you can access the Bigfoot...
Manual
Page 118
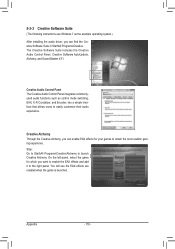
... example operating system.) After installing the audio driver, you can enable EAX effects for which you can find the Creative Software Suite in Start\All Programs\Creative. You will see the EAX effects are enabled when the game is launched. Step: Go to Start\All... Programs\Creative\Alchemy to obtain the most realistic gaming experience. Creative Alchemy Through the Creative Alchemy, you want to enable the EAX effects and add it ...
... example operating system.) After installing the audio driver, you can enable EAX effects for which you can find the Creative Software Suite in Start\All Programs\Creative. You will see the EAX effects are enabled when the game is launched. Step: Go to Start\All... Programs\Creative\Alchemy to obtain the most realistic gaming experience. Creative Alchemy Through the Creative Alchemy, you want to enable the EAX effects and add it ...
Manual
Page 119
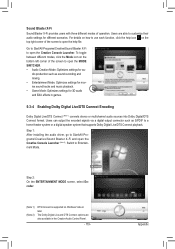
Go to Start\All Programs\Creative\Sound Blaster X-Fi to Entertainment Mode. Switch to open the help file. Step 2: On the ENTERTAINMENT MODE screen, select Encoder. (Note 1) (Note 2) DTS Connect ... Mode icon on Windows Vista or later. Sound Blaster X-Fi Sound Blaster X-Fi provides users with three different modes of the screen to Start\All Programs\Creative\Sound Blaster X-Fi and open the MODE SWITCHER. • Audio Creation Mode: Optimizes settings for 3D audio and EAX effects in the Creative Audio...
Go to Start\All Programs\Creative\Sound Blaster X-Fi to Entertainment Mode. Switch to open the help file. Step 2: On the ENTERTAINMENT MODE screen, select Encoder. (Note 1) (Note 2) DTS Connect ... Mode icon on Windows Vista or later. Sound Blaster X-Fi Sound Blaster X-Fi provides users with three different modes of the screen to Start\All Programs\Creative\Sound Blaster X-Fi and open the MODE SWITCHER. • Audio Creation Mode: Optimizes settings for 3D audio and EAX effects in the Creative Audio...
Manual
Page 121
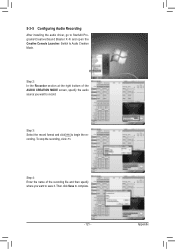
To stop the recording, click to complete. - 121 - Then click Save to begin the re. Step 2: In the Recorder section at the right bottom of the recording file and then specify where you want to record. Step 3: Select the record format and click cording. Appendix Step 4: Enter the name of the AUDIO CREATION MODE screen, specify the audio source you want to save it. 5-3-5 Configuring Audio Recording After installing the audio driver, go to Audio Creation Mode. Switch to Start\All Programs\Creative\Sound Blaster X-Fi and open the Creative Console Launcher.
To stop the recording, click to complete. - 121 - Then click Save to begin the re. Step 2: In the Recorder section at the right bottom of the recording file and then specify where you want to record. Step 3: Select the record format and click cording. Appendix Step 4: Enter the name of the AUDIO CREATION MODE screen, specify the audio source you want to save it. 5-3-5 Configuring Audio Recording After installing the audio driver, go to Audio Creation Mode. Switch to Start\All Programs\Creative\Sound Blaster X-Fi and open the Creative Console Launcher.