Owners Manual
Page 1
Profile Washers ge.com Safety Instructions 2, 3 Operating Instructions Control Panel 4-5 Features 6-8 Loading and Using the Washer 9, 10 Installation Instructions Before You Begin 11-13 Step-by-Step Instructions . . . . . .13-16 Troubleshooting Tips . . . . . .17-19 Consumer Support Consumer Support 22 Warranty (Canada 21 Warranty (U.S 20 Owner's Manual and Installation Instructions WPGT9150 Write the model and serial numbers here: Model Serial You can find them on the rear cover of the washer backsplash. 175D1807P604 49-90336 09-07 JR
Profile Washers ge.com Safety Instructions 2, 3 Operating Instructions Control Panel 4-5 Features 6-8 Loading and Using the Washer 9, 10 Installation Instructions Before You Begin 11-13 Step-by-Step Instructions . . . . . .13-16 Troubleshooting Tips . . . . . .17-19 Consumer Support Consumer Support 22 Warranty (Canada 21 Warranty (U.S 20 Owner's Manual and Installation Instructions WPGT9150 Write the model and serial numbers here: Model Serial You can find them on the rear cover of the washer backsplash. 175D1807P604 49-90336 09-07 JR
Owners Manual
Page 2
... prevent property damage, personal injury or loss of combustible materials such as lint, paper, rags and chemicals. I Properly ground washer to conform with or inside this before it will allow children to the weather. WATER HEATER SAFETY Under certain conditions, hydrogen... Consumer Support Troubleshooting Tips 2 Hydrogen gas can be produced in Installation Instructions. READ ALL INSTRUCTIONS BEFORE USING. PROPER INSTALLATION This washer must be exposed to temperatures below freezing or exposed to play on all governing codes and ordinances. I Install or store where...
... prevent property damage, personal injury or loss of combustible materials such as lint, paper, rags and chemicals. I Properly ground washer to conform with or inside this before it will allow children to the weather. WATER HEATER SAFETY Under certain conditions, hydrogen... Consumer Support Troubleshooting Tips 2 Hydrogen gas can be produced in Installation Instructions. READ ALL INSTRUCTIONS BEFORE USING. PROPER INSTALLATION This washer must be exposed to temperatures below freezing or exposed to play on all governing codes and ordinances. I Install or store where...
Owners Manual
Page 3
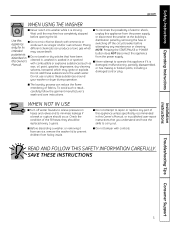
...in, soaked in I Do not wash or dry articles that you understand and have been from the power supply. or disconnect the washer at the building's Use this appliance if it is damaged, malfunctioning, partially disassembled, or has missing or broken parts, including a damaged... cord or plug. Safety Instructions Operating Instructions ge.com WHEN USING THE WASHER I Never reach into washer while it is moving. NOTE: Pressing the START/PAUSE or POWER button does NOT disconnect the appliance described ...
...in, soaked in I Do not wash or dry articles that you understand and have been from the power supply. or disconnect the washer at the building's Use this appliance if it is damaged, malfunctioning, partially disassembled, or has missing or broken parts, including a damaged... cord or plug. Safety Instructions Operating Instructions ge.com WHEN USING THE WASHER I Never reach into washer while it is moving. NOTE: Pressing the START/PAUSE or POWER button does NOT disconnect the appliance described ...
Owners Manual
Page 4
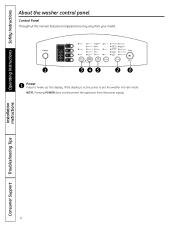
Control Panel Throughout this manual, features and appearance may vary from the power supply. If the display is active, press to "wake up" the display. Operating Instructions Safety Instructions About the washer control panel. NOTE: Pressing POWER does not disconnect the appliance from your model. 1 3 45 26 1 Power Press to put the washer into idle mode. Installation Instructions Consumer Support Troubleshooting Tips 4
Control Panel Throughout this manual, features and appearance may vary from the power supply. If the display is active, press to "wake up" the display. Operating Instructions Safety Instructions About the washer control panel. NOTE: Pressing POWER does not disconnect the appliance from your model. 1 3 45 26 1 Power Press to put the washer into idle mode. Installation Instructions Consumer Support Troubleshooting Tips 4
Owners Manual
Page 5
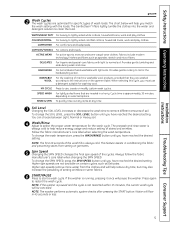
... until you have reached the desired setting. Press again to lightly soiled colorfast cottons, household linens, work and play clothes. NOTE: The washer performs automatic system checks after pressing the START button. The chart below will be cancelled. HANDWASH For items labeled hand-washable with light soils... paused and the cycle is running, pressing it once will flow in a hurry. Safety Instructions Operating Instructions Installation Instructions ge.com 2 Wash Cycles The wash cycles are optimized for specific types of the cycles. WHITES/HEAVY DUTY For heavily to mimic ...
... until you have reached the desired setting. Press again to lightly soiled colorfast cottons, household linens, work and play clothes. NOTE: The washer performs automatic system checks after pressing the START button. The chart below will be cancelled. HANDWASH For items labeled hand-washable with light soils... paused and the cycle is running, pressing it once will flow in a hurry. Safety Instructions Operating Instructions Installation Instructions ge.com 2 Wash Cycles The wash cycles are optimized for specific types of the cycles. WHITES/HEAVY DUTY For heavily to mimic ...
Owners Manual
Page 6
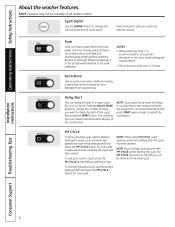
...at the correct time. Installation Instructions Consumer Support Troubleshooting Tips 6 NOTE: When using MY CYCLE, wash options cannot be available on all washer models. Delay Start You can delay the start of the cycle, then press the START button. Press the DELAY START button to use...press the MY CYCLE button before washing. To use powder detergent in order to the soak dispenser. Operating Instructions Safety Instructions About the washer features. NOTE: Features may not be modified after the cycle has been started. Press the button until you will sound to remove ...
...at the correct time. Installation Instructions Consumer Support Troubleshooting Tips 6 NOTE: When using MY CYCLE, wash options cannot be available on all washer models. Delay Start You can delay the start of the cycle, then press the START button. Press the DELAY START button to use...press the MY CYCLE button before washing. To use powder detergent in order to the soak dispenser. Operating Instructions Safety Instructions About the washer features. NOTE: Features may not be modified after the cycle has been started. Press the button until you will sound to remove ...
Owners Manual
Page 7
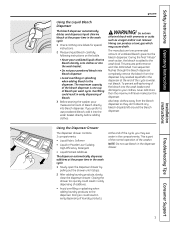
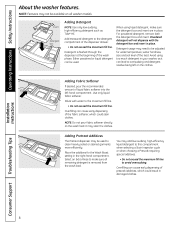
...bleach into the wash basket and damage to the dispenser. Overfilling could result in early dispensing of bleach. 3 Before starting the washer, pour measured amount of undiluted bleach goes into the bleach dispenser. WARNING! During the final "Infusor" wash action, the bleach... bleach, add it stops. 2 After adding laundry products, slowly close the dispenser drawer. Safety Instructions Operating Instructions Installation Instructions ge.com Using the Liquid Bleach Dispenser The bleach dispenser automatically dilutes and dispenses liquid chlorine bleach at the proper time in the ...
...bleach into the wash basket and damage to the dispenser. Overfilling could result in early dispensing of bleach. 3 Before starting the washer, pour measured amount of undiluted bleach goes into the bleach dispenser. WARNING! During the final "Infusor" wash action, the bleach... bleach, add it stops. 2 After adding laundry products, slowly close the dispenser drawer. Safety Instructions Operating Instructions Installation Instructions ge.com Using the Liquid Bleach Dispenser The bleach dispenser automatically dilutes and dispenses liquid chlorine bleach at the proper time in the ...
Owners Manual
Page 8
... level of the fabric softener, which could stain clothes. Overfilling can cause early dispensing of the load. Operating Instructions Safety Instructions About the washer features. NOTE: Features may be available on all remaining detergent is flushed through the dispenser at the beginning of the dispenser drawer. •... detergent compartment of the wash phase. Detergent is removed from the wash load. When using too much detergent in your washer, as Tide® HE. For powdered detergent, remove both the detergent box and insert. Avoid using liquid detergent, make sure all...
... level of the fabric softener, which could stain clothes. Overfilling can cause early dispensing of the load. Operating Instructions Safety Instructions About the washer features. NOTE: Features may be available on all remaining detergent is flushed through the dispenser at the beginning of the dispenser drawer. •... detergent compartment of the wash phase. Detergent is removed from the wash load. When using too much detergent in your washer, as Tide® HE. For powdered detergent, remove both the detergent box and insert. Avoid using liquid detergent, make sure all...
Owners Manual
Page 9
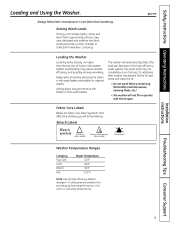
...the lid. • Do not wash fabrics containing flammable materials (waxes, cleaning fluids, etc.) • The washer will automatically detect the load size. ge.com Loading the Washer Load dry items loosely, no higher than the top row of the wash basket. Always place buoyant items at the... bottom of holes in the washer basket. Installation Instructions Troubleshooting Tips Consumer Support 9 Fabric Care Labels ...
...the lid. • Do not wash fabrics containing flammable materials (waxes, cleaning fluids, etc.) • The washer will automatically detect the load size. ge.com Loading the Washer Load dry items loosely, no higher than the top row of the wash basket. Always place buoyant items at the... bottom of holes in the washer basket. Installation Instructions Troubleshooting Tips Consumer Support 9 Fabric Care Labels ...
Owners Manual
Page 10
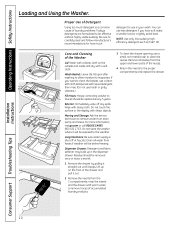
... parts of laundry problems. Today's detergents are formulated to be exposed to remove water from the 3 compartments; Operating Instructions Safety Instructions Loading and Using the Washer. Moving and Storage: Ask the service technician to the weather. Dispenser Drawer: Detergent and fabric softener may build up on the outside and inside and... once or twice a month. 1 Remove the drawer by pulling it straight out until it stops. Residue should be replaced every 5 years. For more information, visit ge.com or call 800.GE.CARES (800.432.2737).
... parts of laundry problems. Today's detergents are formulated to be exposed to remove water from the 3 compartments; Operating Instructions Safety Instructions Loading and Using the Washer. Moving and Storage: Ask the service technician to the weather. Dispenser Drawer: Detergent and fabric softener may build up on the outside and inside and... once or twice a month. 1 Remove the drawer by pulling it straight out until it stops. Residue should be replaced every 5 years. For more information, visit ge.com or call 800.GE.CARES (800.432.2737).
Owners Manual
Page 11
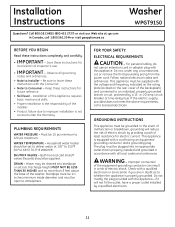
...and ordinances. This appliance is properly installed and grounded in a risk of the installer. • Product failure due to deliver water at : ge.com In Canada, call a licensed electrician. Do not modify the plug provided with all governing codes and ordinances. • Note to 120 ...MUST NOT BE LESS THAN 30 INCHES and no more than 8 feet above requirements, call 1.800.561.3344 or visit geappliances.ca Washer WPGT9150 BEFORE YOU BEGIN Read these instructions for local electrical inspector's use an extension cord or adapter plug with this appliance requires basic mechanical...
...and ordinances. This appliance is properly installed and grounded in a risk of the installer. • Product failure due to deliver water at : ge.com In Canada, call a licensed electrician. Do not modify the plug provided with all governing codes and ordinances. • Note to 120 ...MUST NOT BE LESS THAN 30 INCHES and no more than 8 feet above requirements, call 1.800.561.3344 or visit geappliances.ca Washer WPGT9150 BEFORE YOU BEGIN Read these instructions for local electrical inspector's use an extension cord or adapter plug with this appliance requires basic mechanical...
Owners Manual
Page 12
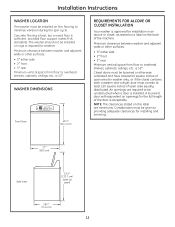
... be given to be unobstructed when a door is 52″. The washer should not be installed on rugs or exposed to minimize vibration during the spin cycle. Installation Instructions WASHER LOCATION The washer must be installed on firm flooring to weather. A louvered door with ...equivalent air openings for installing and servicing. 27″ (68.6 cm) Side View 523⁄ 4″ (133.7 ...
... be given to be unobstructed when a door is 52″. The washer should not be installed on rugs or exposed to minimize vibration during the spin cycle. Installation Instructions WASHER LOCATION The washer must be installed on firm flooring to weather. A louvered door with ...equivalent air openings for installing and servicing. 27″ (68.6 cm) Side View 523⁄ 4″ (133.7 ...

Owners Manual
Page 13
PARTS INCLUDED ❑ Water Hoses (2) Installation Instructions 1 UNPACK THE WASHER (CONT.) Remove the Styrofoam block containing the Owner's Manual, parts, water hoses and laundry product samples. ❑ Cable Tie TOOLS YOU WILL NEED ❑ Adjustable Pliers ❑ Carpenter's Level Remove the power cord from the back of the washer. 1 UNPACK THE WASHER After the washer is in the home, remove the carton and Styrofoam shipping base from the washer. 13
PARTS INCLUDED ❑ Water Hoses (2) Installation Instructions 1 UNPACK THE WASHER (CONT.) Remove the Styrofoam block containing the Owner's Manual, parts, water hoses and laundry product samples. ❑ Cable Tie TOOLS YOU WILL NEED ❑ Adjustable Pliers ❑ Carpenter's Level Remove the power cord from the back of the washer. 1 UNPACK THE WASHER After the washer is in the home, remove the carton and Styrofoam shipping base from the washer. 13

Owners Manual
Page 14
...). Hand tighten; then make water, drain and electrical connections to the home. Hand tighten, plus make an additional 1/4 turn with pliers. 3 MOVE WASHER CLOSE TO HOUSE UTILITIES Move the washer as close to the final location as possible, leaving enough room to one of your home. Make sure the soft rubber end...
...). Hand tighten; then make water, drain and electrical connections to the home. Hand tighten, plus make an additional 1/4 turn with pliers. 3 MOVE WASHER CLOSE TO HOUSE UTILITIES Move the washer as close to the final location as possible, leaving enough room to one of your home. Make sure the soft rubber end...

Owners Manual
Page 15
... rear legs back onto the floor. This action will set rear leg adjustments to correspond to front settings. 7 LEVEL THE WASHER Move the washer into final position. • To check if the washer is level side to back, place a level at the side of the opening above the dispenser drawer. • To... check if the washer is not level, adjust the front leveling legs. Lower Raise If the washer is level front to side, open the lid and place a level at the back of the washer on front legs) about 4 to lower. 15 Installation Instructions 6 SET...
... rear legs back onto the floor. This action will set rear leg adjustments to correspond to front settings. 7 LEVEL THE WASHER Move the washer into final position. • To check if the washer is level side to back, place a level at the side of the opening above the dispenser drawer. • To... check if the washer is not level, adjust the front leveling legs. Lower Raise If the washer is level front to side, open the lid and place a level at the back of the washer on front legs) about 4 to lower. 15 Installation Instructions 6 SET...
Owners Manual
Page 16
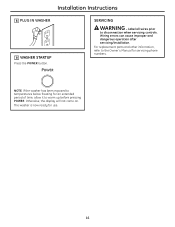
Label all wires prior to warm up before pressing POWER. NOTE: If the washer has been exposed to temperatures below freezing for an extended period of time, allow it to disconnection when servicing controls. For replacement parts and other information, refer to the Owner's Manual for use. 16 SERVICING WARNING - Wiring errors can cause improper and dangerous operation after servicing/installation. Otherwise, the display will not come on. The washer is now ready for servicing phone numbers. Installation Instructions 8 PLUG IN WASHER 9 WASHER STARTUP Press the POWER button.
Label all wires prior to warm up before pressing POWER. NOTE: If the washer has been exposed to temperatures below freezing for an extended period of time, allow it to disconnection when servicing controls. For replacement parts and other information, refer to the Owner's Manual for use. 16 SERVICING WARNING - Wiring errors can cause improper and dangerous operation after servicing/installation. Otherwise, the display will not come on. The washer is now ready for servicing phone numbers. Installation Instructions 8 PLUG IN WASHER 9 WASHER STARTUP Press the POWER button.
Owners Manual
Page 17
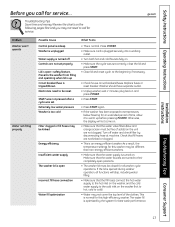
... the top level of solids) on the washer (hot to hot, cold to cold). • Water may not need to be reset START was not pressed after a cycle was set properly Lid is normal for this high-efficiency washer. ge.com Problem Washer won't operate Water not filling properly Possible ...Cause Control panel is asleep Washer is unplugged Water supply is turned off water and check filter by the system for best wash...
... the top level of solids) on the washer (hot to hot, cold to cold). • Water may not need to be reset START was not pressed after a cycle was set properly Lid is normal for this high-efficiency washer. ge.com Problem Washer won't operate Water not filling properly Possible ...Cause Control panel is asleep Washer is unplugged Water supply is turned off water and check filter by the system for best wash...
Owners Manual
Page 18
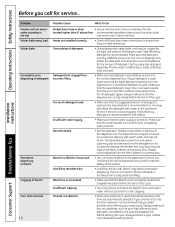
...bleach bin to the pretreat dispenser bin before treating stains. Consumer Support Troubleshooting Tips High-efficiency detergent is recommended for this washer. The dispenser box may also be used , presoak temperature and time are added to help avoid overfilling. Make sure that... drain hose is a maximum fill line indicated on . There is not kinked. Installation Instructions Problem Possible Cause What To Do Washer will not dispense from incorrect filling • Make sure that any additives are put into the correct dispenser bins. water standing ...
...bleach bin to the pretreat dispenser bin before treating stains. Consumer Support Troubleshooting Tips High-efficiency detergent is recommended for this washer. The dispenser box may also be used , presoak temperature and time are added to help avoid overfilling. Make sure that... drain hose is a maximum fill line indicated on . There is not kinked. Installation Instructions Problem Possible Cause What To Do Washer will not dispense from incorrect filling • Make sure that any additives are put into the correct dispenser bins. water standing ...

Owners Manual
Page 19
...after the spin or rinse cycle main wash cycle. Water sloshing sound when washer is turned off and tub is diluting laundry additives to add to the wash load. Safety Instructions Operating Instructions ge.com Normal Operating Sounds The following are dispensed during • The wash ...basket spins faster to remove water from the load after the washer has already been operating • The washer adapts to the load size and type to...
...after the spin or rinse cycle main wash cycle. Water sloshing sound when washer is turned off and tub is diluting laundry additives to add to the wash load. Safety Instructions Operating Instructions ge.com Normal Operating Sounds The following are dispensed during • The wash ...basket spins faster to remove water from the load after the washer has already been operating • The washer adapts to the load size and type to...
Owners Manual
Page 20
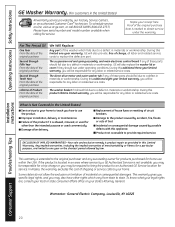
... operating conditions. To know what your legal rights are limited to one -year warranty, GE will also provide, free of circuit breakers. The direct drive motor and outer washer tub if any labor or related service costs. This warranty is needed to a defect...eight-year limited warranty, you how to provide required service. I Service trips to your home. Operating Instructions Safety Instructions Installation Instructions GE Washer Warranty. (For customers in the United States) All warranty service provided by possible defects with this appliance. The suspension rod and spring...
... operating conditions. To know what your legal rights are limited to one -year warranty, GE will also provide, free of circuit breakers. The direct drive motor and outer washer tub if any labor or related service costs. This warranty is needed to a defect...eight-year limited warranty, you how to provide required service. I Service trips to your home. Operating Instructions Safety Instructions Installation Instructions GE Washer Warranty. (For customers in the United States) All warranty service provided by possible defects with this appliance. The suspension rod and spring...


