Owners Manual
Page 1
Profile Washers ge.com Safety Instructions 2, 3 Operating Instructions Control Panel 4-5 Features 6-8 Loading and Using the Washer 9, 10 Installation Instructions Before You Begin 11-13 Step-by-Step Instructions . . . . . .13-16 Troubleshooting Tips . . . . . .17-19 Consumer Support Consumer Support 22 Warranty (Canada 21 Warranty (U.S 20 Owner's Manual and Installation Instructions WPGT9150 Write the model and serial numbers here: Model Serial You can find them on the rear cover of the washer backsplash. 175D1807P604 49-90336 09-07 JR
Profile Washers ge.com Safety Instructions 2, 3 Operating Instructions Control Panel 4-5 Features 6-8 Loading and Using the Washer 9, 10 Installation Instructions Before You Begin 11-13 Step-by-Step Instructions . . . . . .13-16 Troubleshooting Tips . . . . . .17-19 Consumer Support Consumer Support 22 Warranty (Canada 21 Warranty (U.S 20 Owner's Manual and Installation Instructions WPGT9150 Write the model and serial numbers here: Model Serial You can find them on the rear cover of the washer backsplash. 175D1807P604 49-90336 09-07 JR
Owners Manual
Page 2
... children to run for two weeks or more , prevent the possibility of life. If the hot water has not been used by turning on all governing codes and ordinances. Since the gas is used for two weeks or more . PROPER INSTALLATION This washer must be exposed to temperatures below freezing or exposed to escape. Do not allow any other appliance. Installation Instructions Consumer Support Troubleshooting Tips 2
... children to run for two weeks or more , prevent the possibility of life. If the hot water has not been used by turning on all governing codes and ordinances. Since the gas is used for two weeks or more . PROPER INSTALLATION This washer must be exposed to temperatures below freezing or exposed to escape. Do not allow any other appliance. Installation Instructions Consumer Support Troubleshooting Tips 2
Owners Manual
Page 3
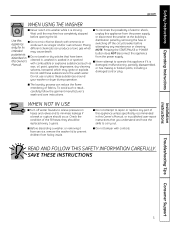
.... To avoid such a result, carefully follow the garment manufacturer's wash and care instructions. WHEN NOT IN USE I Turn off the circuit breaker before opening the lid. cleaned in, washed in, soaked in published user-repair instructions that have the skills to repair or replace any maintenance or cleaning. Check the condition of fabrics. they should occur. SAVE THESE INSTRUCTIONS Installation Instructions Troubleshooting Tips Consumer Support 3 NOTE: Pressing the START/PAUSE or POWER button does NOT disconnect the appliance...
.... To avoid such a result, carefully follow the garment manufacturer's wash and care instructions. WHEN NOT IN USE I Turn off the circuit breaker before opening the lid. cleaned in, washed in, soaked in published user-repair instructions that have the skills to repair or replace any maintenance or cleaning. Check the condition of fabrics. they should occur. SAVE THESE INSTRUCTIONS Installation Instructions Troubleshooting Tips Consumer Support 3 NOTE: Pressing the START/PAUSE or POWER button does NOT disconnect the appliance...
Owners Manual
Page 5
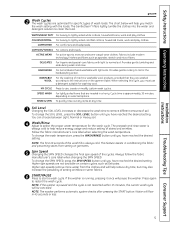
... LEVEL button until you have reached the desired setting. ACTIVE WEAR For active sports, exercise and some fabrics. 6 START/PAUSE Press to use a detergent suitable for specific types of soil. Cycle time is always cold. COMFORTER For comforters and bedspreads. To change the SPIN SPEED, press the SPIN SPEED button until you must use , create or modify custom wash cycles. Always follow the fabric manufacturer's care label when changing the SPIN SPEED. Troubleshooting Tips Consumer Support 5 Safety Instructions Operating Instructions Installation Instructions ge...
... LEVEL button until you have reached the desired setting. ACTIVE WEAR For active sports, exercise and some fabrics. 6 START/PAUSE Press to use a detergent suitable for specific types of soil. Cycle time is always cold. COMFORTER For comforters and bedspreads. To change the SPIN SPEED, press the SPIN SPEED button until you must use , create or modify custom wash cycles. Always follow the fabric manufacturer's care label when changing the SPIN SPEED. Troubleshooting Tips Consumer Support 5 Safety Instructions Operating Instructions Installation Instructions ge...
Owners Manual
Page 6
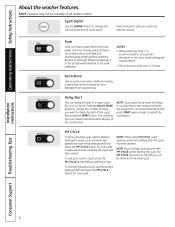
... change the volume of the end of cycle signal. Installation Instructions Consumer Support Troubleshooting Tips 6 Extra Rinse Use an extra rinse when additional rinsing is an extra wash before starting the cycle, the MY CYCLE light will turn off and you will enter the pause state. NOTES: • When selecting soak, it for heavily soiled clothes or for 3 seconds. Operating Instructions Safety Instructions About the washer features. Press the button until you open the lid...
... change the volume of the end of cycle signal. Installation Instructions Consumer Support Troubleshooting Tips 6 Extra Rinse Use an extra rinse when additional rinsing is an extra wash before starting the cycle, the MY CYCLE light will turn off and you will enter the pause state. NOTES: • When selecting soak, it for heavily soiled clothes or for 3 seconds. Operating Instructions Safety Instructions About the washer features. Press the button until you open the lid...
Owners Manual
Page 7
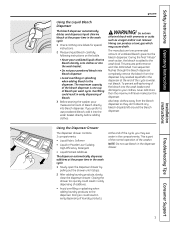
... fill level marked on the bottle. • Never pour undiluted liquid chlorine bleach directly onto clothes or into the wash basket. • Do not pour powdered bleach into bleach dispenser. Mixing can produce a toxic gas which may see water in the compartments. Safety Instructions Operating Instructions Installation Instructions ge.com Using the Liquid Bleach Dispenser The bleach dispenser automatically dilutes and dispenses liquid chlorine bleach at the proper time in the wash cycle. 1 Check clothing care labels for special instructions. 2 Measure liquid bleach carefully, following...
... fill level marked on the bottle. • Never pour undiluted liquid chlorine bleach directly onto clothes or into the wash basket. • Do not pour powdered bleach into bleach dispenser. Mixing can produce a toxic gas which may see water in the compartments. Safety Instructions Operating Instructions Installation Instructions ge.com Using the Liquid Bleach Dispenser The bleach dispenser automatically dilutes and dispenses liquid chlorine bleach at the proper time in the wash cycle. 1 Check clothing care labels for special instructions. 2 Measure liquid bleach carefully, following...
Owners Manual
Page 8
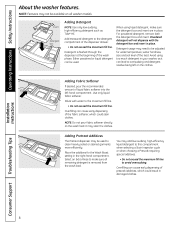
... exceed the maximum fill line. NOTE: Do not pour fabric softener directly on the clothes. Powdered detergent will not dispense with water to avoid oversudsing. Dilute with the detergent box and insert in the right-hand compartment. Insert Detergent box Adding Detergent NOTE: Use only low-sudsing, high-efficiency detergent such as it can be used to be used . Detergent usage may stain the clothes. Installation Instructions Consumer Support Troubleshooting Tips 8 Operating Instructions Safety Instructions About the washer features.
... exceed the maximum fill line. NOTE: Do not pour fabric softener directly on the clothes. Powdered detergent will not dispense with water to avoid oversudsing. Dilute with the detergent box and insert in the right-hand compartment. Insert Detergent box Adding Detergent NOTE: Use only low-sudsing, high-efficiency detergent such as it can be used to be used . Detergent usage may stain the clothes. Installation Instructions Consumer Support Troubleshooting Tips 8 Operating Instructions Safety Instructions About the washer features.
Owners Manual
Page 9
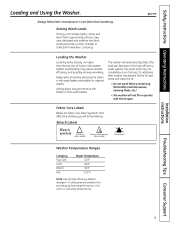
... down in hot, warm or cold water temperatures. Safety Instructions Operating Instructions Loading and Using the Washer. Sorting Wash Loads Sort by color (whites, lights, colors), soil level, fabric type (sturdy cottons, easy care, delicates) and whether the fabric produces lint (terry cloth, chenille) or collects lint (velveteen, corduroy). Bulky items should be laundering. The washer will not fill or operate with the lid open. To add items after washer has started, lift the lid, add items and...
... down in hot, warm or cold water temperatures. Safety Instructions Operating Instructions Loading and Using the Washer. Sorting Wash Loads Sort by color (whites, lights, colors), soil level, fabric type (sturdy cottons, easy care, delicates) and whether the fabric produces lint (terry cloth, chenille) or collects lint (velveteen, corduroy). Bulky items should be laundering. The washer will not fill or operate with the lid open. To add items after washer has started, lift the lid, add items and...
Owners Manual
Page 10
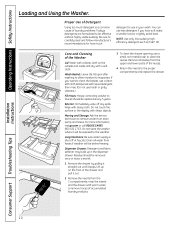
... store the washer where it stops. Wash Basket: Leave the lid open after washing to allow moisture to the proper compartments and replace the drawer. If you want to clean the basket, use harsh or gritty cleaners.) Fill Hoses: Hoses connecting washer to use less detergent if you have soft water, a smaller load or a lightly soiled load. Do not touch the surface or the display with a soft cloth. Dispenser Drawer: Detergent and fabric softener may build...
... store the washer where it stops. Wash Basket: Leave the lid open after washing to allow moisture to the proper compartments and replace the drawer. If you want to clean the basket, use harsh or gritty cleaners.) Fill Hoses: Hoses connecting washer to use less detergent if you have soft water, a smaller load or a lightly soiled load. Do not touch the surface or the display with a soft cloth. Dispenser Drawer: Detergent and fabric softener may build...
Owners Manual
Page 11
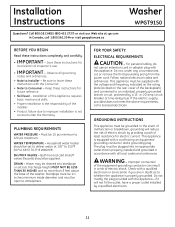
...; Proper installation is not covered under any circumstances, cut or remove the third grounding prong from the power cord. For personal safety, do not use . • IMPORTANT - Follow national electrical codes and ordinances. This appliance must be open to leave these instructions completely and carefully. • IMPORTANT - Improper connection of the washer. Household water heater should be set tub. Both hot and cold shutoff valves (faucets) should...
...; Proper installation is not covered under any circumstances, cut or remove the third grounding prong from the power cord. For personal safety, do not use . • IMPORTANT - Follow national electrical codes and ordinances. This appliance must be open to leave these instructions completely and carefully. • IMPORTANT - Improper connection of the washer. Household water heater should be set tub. Both hot and cold shutoff valves (faucets) should...
Owners Manual
Page 12
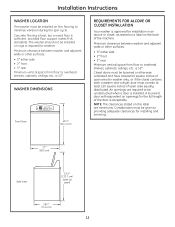
...installing and servicing. 27″ (68.6 cm) Side View 523⁄ 4″ (133.7 cm) (with equivalent air openings for the full length of the door is 52″. WASHER DIMENSIONS Front View 437⁄ 8″ (111.4 cm) REQUIREMENTS FOR ALCOVE OR CLOSET INSTALLATION Your washer is installed. Closet doors... vibration during the spin cycle. A louvered door with lid open area equally distributed. Installation Instructions WASHER LOCATION The washer must contain at least 120 square inches of open ) 281⁄ 4″ (71.6 cm) 12 The washer should not be installed on...
...installing and servicing. 27″ (68.6 cm) Side View 523⁄ 4″ (133.7 cm) (with equivalent air openings for the full length of the door is 52″. WASHER DIMENSIONS Front View 437⁄ 8″ (111.4 cm) REQUIREMENTS FOR ALCOVE OR CLOSET INSTALLATION Your washer is installed. Closet doors... vibration during the spin cycle. A louvered door with lid open area equally distributed. Installation Instructions WASHER LOCATION The washer must contain at least 120 square inches of open ) 281⁄ 4″ (71.6 cm) 12 The washer should not be installed on...

Owners Manual
Page 13
PARTS INCLUDED ❑ Water Hoses (2) Installation Instructions 1 UNPACK THE WASHER (CONT.) Remove the Styrofoam block containing the Owner's Manual, parts, water hoses and laundry product samples. ❑ Cable Tie TOOLS YOU WILL NEED ❑ Adjustable Pliers ❑ Carpenter's Level Remove the power cord from the back of the washer. 1 UNPACK THE WASHER After the washer is in the home, remove the carton and Styrofoam shipping base from the washer. 13
PARTS INCLUDED ❑ Water Hoses (2) Installation Instructions 1 UNPACK THE WASHER (CONT.) Remove the Styrofoam block containing the Owner's Manual, parts, water hoses and laundry product samples. ❑ Cable Tie TOOLS YOU WILL NEED ❑ Adjustable Pliers ❑ Carpenter's Level Remove the power cord from the back of the washer. 1 UNPACK THE WASHER After the washer is in the home, remove the carton and Styrofoam shipping base from the washer. 13

Owners Manual
Page 14
Installation Instructions 2 ATTACH WATER HOSES TO WASHER Thread the hot water hose onto the washer hot water connection (ORANGE) and the cold water hose onto the cold water connection (BLUE). Hot Cold 4 CONNECT WATER HOSES TO HOUSE UTILITIES Connect the water hoses to the HOT and COLD water valves of the water hoses with the cable tie (ribbed side on inside the drain opening of your home. Make sure the soft rubber end is 3″. 5 ATTACH DRAIN HOSE TO HOUSE DRAIN Firmly insert the free end...
Installation Instructions 2 ATTACH WATER HOSES TO WASHER Thread the hot water hose onto the washer hot water connection (ORANGE) and the cold water hose onto the cold water connection (BLUE). Hot Cold 4 CONNECT WATER HOSES TO HOUSE UTILITIES Connect the water hoses to the HOT and COLD water valves of the water hoses with the cable tie (ribbed side on inside the drain opening of your home. Make sure the soft rubber end is 3″. 5 ATTACH DRAIN HOSE TO HOUSE DRAIN Firmly insert the free end...
Owners Manual
Page 16
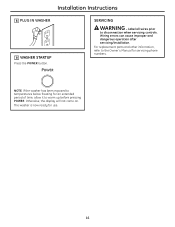
... up before pressing POWER. Otherwise, the display will not come on. Wiring errors can cause improper and dangerous operation after servicing/installation. Label all wires prior to the Owner's Manual for servicing phone numbers. The washer is now ready for an extended period of time, allow it to temperatures below freezing for use. 16 For replacement parts and other information, refer to disconnection when servicing controls. Installation Instructions 8 PLUG IN WASHER 9 WASHER STARTUP Press the POWER button. SERVICING WARNING -
... up before pressing POWER. Otherwise, the display will not come on. Wiring errors can cause improper and dangerous operation after servicing/installation. Label all wires prior to the Owner's Manual for servicing phone numbers. The washer is now ready for an extended period of time, allow it to temperatures below freezing for use. 16 For replacement parts and other information, refer to disconnection when servicing controls. Installation Instructions 8 PLUG IN WASHER 9 WASHER STARTUP Press the POWER button. SERVICING WARNING -
Owners Manual
Page 17
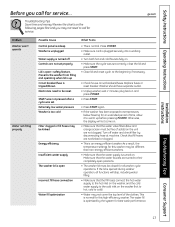
... set Extremely low water pressure Washer is too cold Filter clogged or fill hoses may be closed for this high-efficiency washer. Safety Instructions Operating Instructions Installation Instructions Before you may not need to be reset START was not pressed after a cycle was set correctly, close the lid and press START. • Close lid and reset cycle, to the beginning if necessary. • Check house circuit breakers/fuses. Review the charts on the unit are turned to their completely open...
... set Extremely low water pressure Washer is too cold Filter clogged or fill hoses may be closed for this high-efficiency washer. Safety Instructions Operating Instructions Installation Instructions Before you may not need to be reset START was not pressed after a cycle was set correctly, close the lid and press START. • Close lid and reset cycle, to the beginning if necessary. • Check house circuit breakers/fuses. Review the charts on the unit are turned to their completely open...
Owners Manual
Page 18
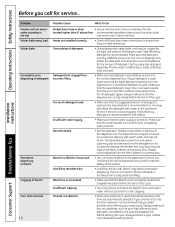
... bleach Poor stain removal 18 Kinked drain hose or drain • Ensure that the dispenser box is properly seated and snapped into the correct dispenser bins. Follow the detergent manufacturer's recommendations for this washer. Too much detergent used • Make sure that the liquid detergent insert box is used . Oversudsing of detergent used in the fabric softener and pretreat bins. Operating Instructions Safety Instructions Before you select presoak when defining your wash cycle. Liquids...
... bleach Poor stain removal 18 Kinked drain hose or drain • Ensure that the dispenser box is properly seated and snapped into the correct dispenser bins. Follow the detergent manufacturer's recommendations for this washer. Too much detergent used • Make sure that the liquid detergent insert box is used . Oversudsing of detergent used in the fabric softener and pretreat bins. Operating Instructions Safety Instructions Before you select presoak when defining your wash cycle. Liquids...

Owners Manual
Page 19
... the wash load. Installation Instructions Troubleshooting Tips Consumer Support 19 Clicking sound during the wash cycle • The washer will make a series of water being added after the spin or rinse cycle main wash cycle. Detergent is diluting laundry additives to add to the wash load. Water sloshing sound when washer is turned off and tub is operating to remove water from the load. Humming noise during • The pump is rotated • A liquid in stopping the opposite direction to clean your items. Sound of clicking noises as needed. • The wash load...
... the wash load. Installation Instructions Troubleshooting Tips Consumer Support 19 Clicking sound during the wash cycle • The washer will make a series of water being added after the spin or rinse cycle main wash cycle. Detergent is diluting laundry additives to add to the wash load. Water sloshing sound when washer is turned off and tub is operating to remove water from the load. Humming noise during • The pump is rotated • A liquid in stopping the opposite direction to clean your items. Sound of clicking noises as needed. • The wash load...
Owners Manual
Page 20
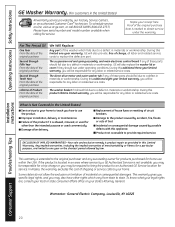
... is located in materials or workmanship. The washer basket if it is product repair as provided in the United States) All warranty service provided by law. I Improper installation, delivery or maintenance. I Service trips to your home to teach you may also have serial number and model number available when calling for home use the product. Operating Instructions Safety Instructions Installation Instructions GE Washer Warranty. (For customers in this Limited Warranty. During this limited one year or...
... is located in materials or workmanship. The washer basket if it is product repair as provided in the United States) All warranty service provided by law. I Improper installation, delivery or maintenance. I Service trips to your home to teach you may also have serial number and model number available when calling for home use the product. Operating Instructions Safety Instructions Installation Instructions GE Washer Warranty. (For customers in this Limited Warranty. During this limited one year or...
Owners Manual
Page 21
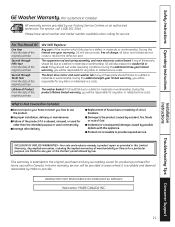
... in materials or workmanship. Troubleshooting Tips Consumer Support 21 During this additional eight-year limited warranty, you will also provide, free of God. GE will also replace the washer lid or cover if they should fail due to one -year warranty, GE will be provided in areas where it is abused, misused, or used commercially. During this limited one year or the shortest period allowed...
... in materials or workmanship. Troubleshooting Tips Consumer Support 21 During this additional eight-year limited warranty, you will also provide, free of God. GE will also replace the washer lid or cover if they should fail due to one -year warranty, GE will be provided in areas where it is abused, misused, or used commercially. During this limited one year or the shortest period allowed...
Owners Manual
Page 22
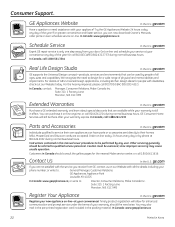
.... You can have parts or accessories sent directly to : Director, Consumer Relations, Mabe Canada Inc. Instructions contained in Canada should be used by people of the year! In Canada: www.geappliances.ca 22 Printed in the packing material. GE Consumer Home Services will allow for the nearest Mabe service center, or call 800.GE.CARES (800.432.2737) during normal business hours. Other...
.... You can have parts or accessories sent directly to : Director, Consumer Relations, Mabe Canada Inc. Instructions contained in Canada should be used by people of the year! In Canada: www.geappliances.ca 22 Printed in the packing material. GE Consumer Home Services will allow for the nearest Mabe service center, or call 800.GE.CARES (800.432.2737) during normal business hours. Other...


