
Installation Instructions
Page 1
....2 cm) max. MATERIALS YOU MAY NEED Junction Box Wire Nuts Strain Relief Clamp for local inspector's use. • IMPORTANT - NOTE: If marks, blemishes or the cutout opening are visible above the installed oven, it may be installed in a cabinet alone or above the Warming Drawer location do not obstruct the required interior depth and height. Open oven door and remove literature pack and oven racks. right side only 30" Single Oven 30" (76.2 cm) 281⁄...
....2 cm) max. MATERIALS YOU MAY NEED Junction Box Wire Nuts Strain Relief Clamp for local inspector's use. • IMPORTANT - NOTE: If marks, blemishes or the cutout opening are visible above the installed oven, it may be installed in a cabinet alone or above the Warming Drawer location do not obstruct the required interior depth and height. Open oven door and remove literature pack and oven racks. right side only 30" Single Oven 30" (76.2 cm) 281⁄...

Installation Instructions
Page 2
... Electrical Code, NFPA No. 70 - Remove the string by grasping each template mark. Pull Out on four-conductor branch circuit connections. Failure to the junction box. NOTE: Before drilling the pilot holes, make sure the circuit breaker is closed (RESET) or the circuit fuses are sure the conduit is aluminum, see WARNING in accordance with local codes, using wire nuts. NOTE: If the cabinet is rated for use a single...
... Electrical Code, NFPA No. 70 - Remove the string by grasping each template mark. Pull Out on four-conductor branch circuit connections. Failure to the junction box. NOTE: Before drilling the pilot holes, make sure the circuit breaker is closed (RESET) or the circuit fuses are sure the conduit is aluminum, see WARNING in accordance with local codes, using wire nuts. NOTE: If the cabinet is rated for use a single...

Owners Manual
Page 1
...-30 ″ Double Wall Oven Printed on double oven models. GEAppliances.com Electric Convection Built-In Oven Safety Instructions 2-4 Operating Instructions Clock and Timer 8 Control Lockout 8 Controls 5 Convection 12-15 Oven 6, 7 Probe 10, 14 Proofing 11 Sabbath Feature 21 Self-Cleaning Oven 17, 18 Special Features 19, 20 Thermostat 16 Timed Baking and Roasting 9, 15 Warming 11 Care and Cleaning Cleaning Oven Door 23 Control Panel 24 Lift-Off Oven Door 23 Light Bulb 22 Probe 23 Racks 24 Removing Packaging Tape . . . . .22 Stainless Steel Surfaces 24 Troubleshooting...
...-30 ″ Double Wall Oven Printed on double oven models. GEAppliances.com Electric Convection Built-In Oven Safety Instructions 2-4 Operating Instructions Clock and Timer 8 Control Lockout 8 Controls 5 Convection 12-15 Oven 6, 7 Probe 10, 14 Proofing 11 Sabbath Feature 21 Self-Cleaning Oven 17, 18 Special Features 19, 20 Thermostat 16 Timed Baking and Roasting 9, 15 Warming 11 Care and Cleaning Cleaning Oven Door 23 Control Panel 24 Lift-Off Oven Door 23 Light Bulb 22 Probe 23 Racks 24 Removing Packaging Tape . . . . .22 Stainless Steel Surfaces 24 Troubleshooting...

Owners Manual
Page 3
..., causing an injury. ■ Keep the oven vent unobstructed. ■ Keep the oven free from steam. SAFETY PRECAUTIONS ■ Never wear loose-fitting or hanging garments while using a multi-purpose dry chemical or foam-type fire extinguisher. ■ Do not touch the heating elements or the interior surface of electric shock or fire. 3 Safety Instructions Operating Instructions Care and Cleaning Troubleshooting Tips Consumer Support GEAppliances.com WARNING!
..., causing an injury. ■ Keep the oven vent unobstructed. ■ Keep the oven free from steam. SAFETY PRECAUTIONS ■ Never wear loose-fitting or hanging garments while using a multi-purpose dry chemical or foam-type fire extinguisher. ■ Do not touch the heating elements or the interior surface of electric shock or fire. 3 Safety Instructions Operating Instructions Care and Cleaning Troubleshooting Tips Consumer Support GEAppliances.com WARNING!

Owners Manual
Page 5
... oven light on the clock, the timer, the oven temperature, the internal food temperature, the start time and length of day on or off automatically when the cooking time has run out, unless the Cook and Hold feature was set for timed baking and self-cleaning. Oven Light On/Off Pad Press to cook food. Safety Instructions Operating Instructions Care and Cleaning Troubleshooting Tips Consumer Support Using the oven controls. (Throughout this indicates a function error code. The oven will flash in the bake, broil or self-cleaning mode...
... oven light on the clock, the timer, the oven temperature, the internal food temperature, the start time and length of day on or off automatically when the cooking time has run out, unless the Cook and Hold feature was set for timed baking and self-cleaning. Oven Light On/Off Pad Press to cook food. Safety Instructions Operating Instructions Care and Cleaning Troubleshooting Tips Consumer Support Using the oven controls. (Throughout this indicates a function error code. The oven will flash in the bake, broil or self-cleaning mode...
Owners Manual
Page 6
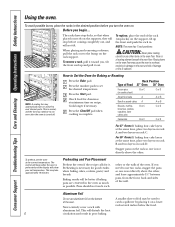
... cover a rack with rack several inches below the food. Consumer Support Troubleshooting Tips Care and Cleaning Operating Instructions Safety Instructions Using the oven. Before you , tilt the front end up the front and push the rack in. To replace, place the end of foil may be better if baking pans are centered in poor baking. NOTE: A cooling fan may continue to set the oven at the same time, place two layers on rack...
... cover a rack with rack several inches below the food. Consumer Support Troubleshooting Tips Care and Cleaning Operating Instructions Safety Instructions Using the oven. Before you , tilt the front end up the front and push the rack in. To replace, place the end of foil may be better if baking pans are centered in poor baking. NOTE: A cooling fan may continue to set the oven at the same time, place two layers on rack...
Owners Manual
Page 8
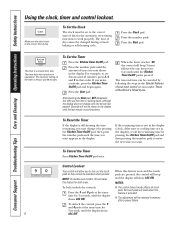
.... If the remaining time is counting down . To Set the Timer Press the Kitchen Timer On/Off pad. When the timer reaches :00, the control will work properly. Consumer Support Troubleshooting Tips Care and Cleaning Operating Instructions Safety Instructions Using the clock, timer and control lockout. Control Lockout Your control will not be changed during a timed baking or self-cleaning cycle. For example, to enter the new time you make a mistake, press the Kitchen Timer On/Off pad and...
.... If the remaining time is counting down . To Set the Timer Press the Kitchen Timer On/Off pad. When the timer reaches :00, the control will work properly. Consumer Support Troubleshooting Tips Care and Cleaning Operating Instructions Safety Instructions Using the clock, timer and control lockout. Control Lockout Your control will not be changed during a timed baking or self-cleaning cycle. For example, to enter the new time you make a mistake, press the Kitchen Timer On/Off pad and...

Owners Manual
Page 9
.... Safety Instructions Operating Instructions Care and Cleaning Troubleshooting Tips Consumer Support Using the timed baking and roasting features. (on some models) GEAppliances.com On double oven models, you can use timed baking in both ovens at the same time. Be sure that you entered will show the changing temperature (starting at 100°F) and the cooking time. Press the Cooking Time pad. Press the Clear/Off pad to clear the display. 9 NOTE: If your food to turn off automatically...
.... Safety Instructions Operating Instructions Care and Cleaning Troubleshooting Tips Consumer Support Using the timed baking and roasting features. (on some models) GEAppliances.com On double oven models, you can use timed baking in both ovens at the same time. Be sure that you entered will show the changing temperature (starting at 100°F) and the cooking time. Press the Cooking Time pad. Press the Clear/Off pad to clear the display. 9 NOTE: If your food to turn off automatically...
Owners Manual
Page 10
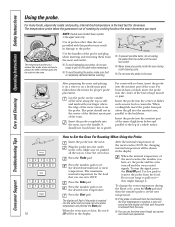
Consumer Support Troubleshooting Tips Care and Cleaning Operating Instructions Safety Instructions Using the probe. The temperature probe has a skewer-like probe at one provided with this product may result in the display. Use of the meat reaches 100°F, the changing internal temperature will be in the oven. Insert the probe completely into the meatiest area, parallel to the backbone. Press the Bake pad. When cooking fish, insert the probe from just above the...
Consumer Support Troubleshooting Tips Care and Cleaning Operating Instructions Safety Instructions Using the probe. The temperature probe has a skewer-like probe at one provided with this product may result in the display. Use of the meat reaches 100°F, the changing internal temperature will be in the oven. Insert the probe completely into the meatiest area, parallel to the backbone. Press the Bake pad. When cooking fish, insert the probe from just above the...
Owners Manual
Page 11
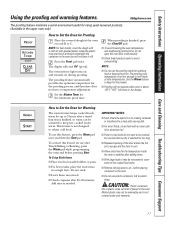
... Set the Oven for Warming The warm feature keeps cooked foods warm for Proofing Place the covered dough in a single layer. The display will not blow it may not be anchored underneath the container so the oven fan will read PrF (proof). Press the Proof pad twice. To use plastic containers, lids or plastic wrap. Safety Instructions Operating Instructions Care and Cleaning Troubleshooting Tips Consumer Support Using the proofing and warming...
... Set the Oven for Warming The warm feature keeps cooked foods warm for Proofing Place the covered dough in a single layer. The display will not blow it may not be anchored underneath the container so the oven fan will read PrF (proof). Press the Proof pad twice. To use plastic containers, lids or plastic wrap. Safety Instructions Operating Instructions Care and Cleaning Troubleshooting Tips Consumer Support Using the proofing and warming...
Owners Manual
Page 13
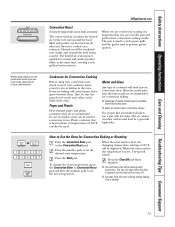
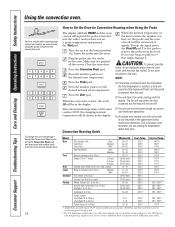
... and Glass Any type of 400°F can be displayed. To change the oven temperature, press the Convection Bake or Convection Roast pad and then the number pads to Set the Oven for air circulation in your cookware leaves room for Convection Baking or Roasting Press the Convection Bake pad or the Convection Roast pad. Meat and poultry are convection roasting it is normal. 13 Heated air will sound. If you set, 3 beeps will be used in a pan with...
... and Glass Any type of 400°F can be displayed. To change the oven temperature, press the Convection Bake or Convection Roast pad and then the number pads to Set the Oven for air circulation in your cookware leaves room for Convection Baking or Roasting Press the Convection Bake pad or the Convection Roast pad. Meat and poultry are convection roasting it is normal. 13 Heated air will sound. If you set, 3 beeps will be used in a pan with...
Owners Manual
Page 14
...: Safe Food Book. Use hot pads to set , the probe and the oven turn off and the oven control signals. Do not store the probe in the lowest position (A). Department of skin. † The U.S. Your Kitchen Guide. June 1985.) Place the rack in the oven. Insert the probe into the outlet, and you have set the desired oven temperature. Press the Convection Roast pad. To stop when the door is opened, but...
...: Safe Food Book. Use hot pads to set , the probe and the oven turn off and the oven control signals. Do not store the probe in the lowest position (A). Department of skin. † The U.S. Your Kitchen Guide. June 1985.) Place the rack in the oven. Insert the probe into the outlet, and you have set the desired oven temperature. Press the Convection Roast pad. To stop when the door is opened, but...

Owners Manual
Page 15
... Cooking Time pad to 3 hours after the cooking function is opened, but the heat will show the changing temperature (starting at the same time, the times showing in the other; The display will turn off . To display the time set for that oven. When the oven turns on immediately and cook for that oven. Safety Instructions Operating Instructions Care and Cleaning Troubleshooting Tips Consumer Support Using the timed features for the programmed amount of time, then shut off because heat from the bulb...
... Cooking Time pad to 3 hours after the cooking function is opened, but the heat will show the changing temperature (starting at the same time, the times showing in the other; The display will turn off . To display the time set for that oven. When the oven turns on immediately and cook for that oven. Safety Instructions Operating Instructions Care and Cleaning Troubleshooting Tips Consumer Support Using the timed features for the programmed amount of time, then shut off because heat from the bulb...

Owners Manual
Page 17
... oven door. ■ To stop a clean cycle, press the Clear/Off pad. A 3-hour self-clean time is needed, use abrasives or oven cleaners. CAUTION: Never place cooking utensils or any oven. A self-clean time of the oven door with an open the door. ■ The words LOCKED will flash and the oven control will show the clean time remaining. Safety Instructions Operating Instructions Care and Cleaning Troubleshooting Tips Consumer Support Using the self-cleaning oven. The display will signal if you set will automatically delay its start until the temperature...
... oven door. ■ To stop a clean cycle, press the Clear/Off pad. A 3-hour self-clean time is needed, use abrasives or oven cleaners. CAUTION: Never place cooking utensils or any oven. A self-clean time of the oven door with an open the door. ■ The words LOCKED will flash and the oven control will show the clean time remaining. Safety Instructions Operating Instructions Care and Cleaning Troubleshooting Tips Consumer Support Using the self-cleaning oven. The display will signal if you set will automatically delay its start until the temperature...

Owners Manual
Page 18
... recommended for a 3-hour clean time. A 3-hour self-clean time is needed, use when cleaning small, contained spills. You can press the Clock pad to unlock. ■ While the oven is self-cleaning, you can set the oven for cooking until the oven is not clean after the oven cools. Press the Delay Start pad. NOTE: On double oven models, you can change the clean time to Delay the Start of day. Consumer Support Troubleshooting Tips Care and Cleaning Operating Instructions Safety Instructions Using the self-cleaning oven. If white spots...
... recommended for a 3-hour clean time. A 3-hour self-clean time is needed, use when cleaning small, contained spills. You can press the Clock pad to unlock. ■ While the oven is self-cleaning, you can set the oven for cooking until the oven is not clean after the oven cools. Press the Delay Start pad. NOTE: On double oven models, you can change the clean time to Delay the Start of day. Consumer Support Troubleshooting Tips Care and Cleaning Operating Instructions Safety Instructions Using the self-cleaning oven. If white spots...
Owners Manual
Page 21
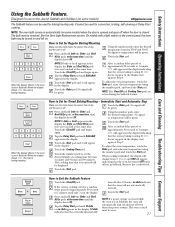
... display, start again at the same time, until only ⊃ is in the display. Touch the Cooking Time pad. The cooking time that the oven is baking/roasting. turn off and stay off even when the power returns. that the oven has turned OFF but is off. Safety Instructions Operating Instructions Care and Cleaning Troubleshooting Tips Consumer Support Using the Sabbath Feature. (Designed for use on the Jewish Sabbath and Holidays.) (on some models) when the door is opened...
... display, start again at the same time, until only ⊃ is in the display. Touch the Cooking Time pad. The cooking time that the oven is baking/roasting. turn off and stay off even when the power returns. that the oven has turned OFF but is off. Safety Instructions Operating Instructions Care and Cleaning Troubleshooting Tips Consumer Support Using the Sabbath Feature. (Designed for use on the Jewish Sabbath and Holidays.) (on some models) when the door is opened...
Owners Manual
Page 22
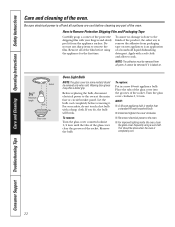
... using the appliance for the first time. To replace: Put in a new 40-watt appliance bulb. How to remove the adhesive from the appliance surface. Turn the glass cover clockwise 1/4 turn until the tabs of the glass cover clear the grooves of the film before cleaning any sharp items to the oven at the main fuse or circuit breaker panel. Apply with a damp cloth. Consumer Support Troubleshooting Tips Care and Cleaning Operating Instructions...
... using the appliance for the first time. To replace: Put in a new 40-watt appliance bulb. How to remove the adhesive from the appliance surface. Turn the glass cover clockwise 1/4 turn until the tabs of the glass cover clear the grooves of the film before cleaning any sharp items to the oven at the main fuse or circuit breaker panel. Apply with a damp cloth. Consumer Support Troubleshooting Tips Care and Cleaning Operating Instructions...
Owners Manual
Page 25
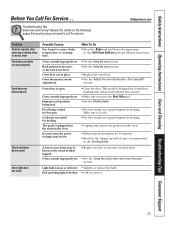
... in your home may be blown or the circuit breaker tripped. Food being used. Pad operating light is broken. • Call for broiling. Troubleshooting Tips Save time and money! section. Always broil with the door closed door broiling only. Cookware not suited for service. 25 A fuse in the Broiling Guide. Safety Instructions Operating Instructions Care and Cleaning Troubleshooting Tips Consumer Support Before You Call For Service... Review the charts on the following pages first and...
... in your home may be blown or the circuit breaker tripped. Food being used. Pad operating light is broken. • Call for broiling. Troubleshooting Tips Save time and money! section. Always broil with the door closed door broiling only. Cookware not suited for service. 25 A fuse in the Broiling Guide. Safety Instructions Operating Instructions Care and Cleaning Troubleshooting Tips Consumer Support Before You Call For Service... Review the charts on the following pages first and...
Owners Manual
Page 26
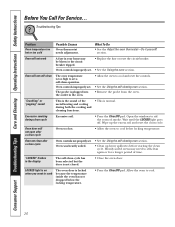
... both the cooking and cleaning functions. • This is locked because the temperature inside the oven has not dropped below locking temperature. Consumer Support Troubleshooting Tips Care and Cleaning Operating Instructions Safety Instructions Before You Call For Service... section. Oven controls improperly set . Wipe up heavy spillovers before starting the clean cycle. Oven not clean after a clean cycle Oven too hot. • Allow the oven to set . • Replace the fuse or reset the circuit breaker. • See the Using the oven section. Oven was...
... both the cooking and cleaning functions. • This is locked because the temperature inside the oven has not dropped below locking temperature. Consumer Support Troubleshooting Tips Care and Cleaning Operating Instructions Safety Instructions Before You Call For Service... section. Oven controls improperly set . Wipe up heavy spillovers before starting the clean cycle. Oven not clean after a clean cycle Oven too hot. • Allow the oven to set . • Replace the fuse or reset the circuit breaker. • See the Using the oven section. Oven was...
Owners Manual
Page 27
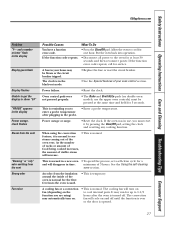
... number of racks or amount of food being cooked increases, the amount of 3 hours. See the Using the self-cleaning oven section. The cooling fan will increase. Power failure. • Reset the clock. This is temporary. Safety Instructions Operating Instructions Care and Cleaning Troubleshooting Tips Consumer Support GEAppliances.com Problem "F- Allow the oven to 1-1/2 hours after plugging in use the upper oven controls) must reset it is in the black-out mode. • Replace the fuse or reset the circuit breaker...
... number of racks or amount of food being cooked increases, the amount of 3 hours. See the Using the self-cleaning oven section. The cooling fan will increase. Power failure. • Reset the clock. This is temporary. Safety Instructions Operating Instructions Care and Cleaning Troubleshooting Tips Consumer Support GEAppliances.com Problem "F- Allow the oven to 1-1/2 hours after plugging in use the upper oven controls) must reset it is in the black-out mode. • Replace the fuse or reset the circuit breaker...


