

Owners Manual
Page 1
... Quick Ice 15 Refrigerator Doors 12 Replacing the Light Bulbs 18 Set Features 6 Shelves and Bins 10, 11 Temperature Controls 5 TurboCool 6 Water Filter 9 Installation Instructions Installing the Refrigerator . . . . . .28-31 Moving the Refrigerator 24-27 Preparing to Install the Refrigerator 23 Trim Kits and Panels 19-22 Water Line Installation 32-34 Troubleshooting Tips . . . . . .36-38 Normal Operating Sounds 35 Consumer Support Consumer Support Back Cover Performance Data Sheet 41 Product Registration 43, 44 State of California Water Treatment Device Certificate 42 Warranty...
... Quick Ice 15 Refrigerator Doors 12 Replacing the Light Bulbs 18 Set Features 6 Shelves and Bins 10, 11 Temperature Controls 5 TurboCool 6 Water Filter 9 Installation Instructions Installing the Refrigerator . . . . . .28-31 Moving the Refrigerator 24-27 Preparing to Install the Refrigerator 23 Trim Kits and Panels 19-22 Water Line Installation 32-34 Troubleshooting Tips . . . . . .36-38 Normal Operating Sounds 35 Consumer Support Consumer Support Back Cover Performance Data Sheet 41 Product Registration 43, 44 State of California Water Treatment Device Certificate 42 Warranty...
Owners Manual
Page 2
... element located on the shelves in the area. Installation Instructions Consumer Support Troubleshooting Tips 2 Be careful closing doors when children are in the refrigerator. s Do not refreeze frozen foods which have thawed completely. Use this appliance only for its intended purpose as described in the vicinity of the ejector mechanism, or with the Installation Instructions before cleaning and making repairs. s Do not store or use gasoline...
... element located on the shelves in the area. Installation Instructions Consumer Support Troubleshooting Tips 2 Be careful closing doors when children are in the refrigerator. s Do not refreeze frozen foods which have thawed completely. Use this appliance only for its intended purpose as described in the vicinity of the ejector mechanism, or with the Installation Instructions before cleaning and making repairs. s Do not store or use gasoline...
Owners Manual
Page 5
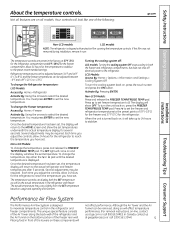
... temperature controls are on the bottom portion of the refrigerator and the Air Tunnel on all models. To turn the cooling system back on -line, contact us at 37°F (3°C) for the refrigerator compartment and 0°F (-18°C) for the refrigerator. To change the temperature, press and release the FREEZER TEMP/FRIDGE TEMP pad. Several adjustments may be removed, doing so will not affect performance. The SET light will...
... temperature controls are on the bottom portion of the refrigerator and the Air Tunnel on all models. To turn the cooling system back on -line, contact us at 37°F (3°C) for the refrigerator compartment and 0°F (-18°C) for the refrigerator. To change the temperature, press and release the FREEZER TEMP/FRIDGE TEMP pad. Several adjustments may be removed, doing so will not affect performance. The SET light will...
Owners Manual
Page 6
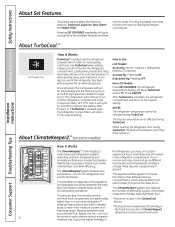
... to run until the refrigerator compartment cools to approximately 34°F (1°C), then it Works TurboCool™ rapidly cools the refrigerator compartment in a conventional system,** feature. Due to select the following features: TurboCool, Quick Ice, Door Alarm and Water Filter. Deactivate By: Pressing OFF. When opening the refrigerator door during TurboCool, the fans will exit and return to the original setting. This is used if the refrigerator has...
... to run until the refrigerator compartment cools to approximately 34°F (1°C), then it Works TurboCool™ rapidly cools the refrigerator compartment in a conventional system,** feature. Due to select the following features: TurboCool, Quick Ice, Door Alarm and Water Filter. Deactivate By: Pressing OFF. When opening the refrigerator door during TurboCool, the fans will exit and return to the original setting. This is used if the refrigerator has...
Owners Manual
Page 7
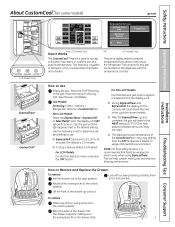
... pan may vary slightly from the SET temperature based on . Rotate all four swing locks are located on the dispenser with the temperature controls. How to use. For Non-LCD Models: Tap that feature's pad until no options are selected and the display is finished: For LCD Models: Go into the drawer supports, making sure the swing locks fit on the drawer slots. 7 Troubleshooting Tips Consumer Support...
... pan may vary slightly from the SET temperature based on . Rotate all four swing locks are located on the dispenser with the temperature controls. How to use. For Non-LCD Models: Tap that feature's pad until no options are selected and the display is finished: For LCD Models: Go into the drawer supports, making sure the swing locks fit on the drawer slots. 7 Troubleshooting Tips Consumer Support...
Owners Manual
Page 9
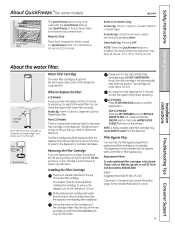
..., the actual freezer temperature may drip down on QuickFreeze plate. Cartridge Holder Place the top of the cartridge up the arrow on via the LCD controls. Removing the Filter Cartridge If you turn . Line up inside the holder. Press and hold the ON/OFF pad for the water filter cartridge on the dispenser. Deactivate By: Pressing OFF. Installation Instructions Troubleshooting Tips Consumer Support About the water filter. Filter Bypass Plug SmartWater Water Filter Cartridge The water filter cartridge is located in the...
..., the actual freezer temperature may drip down on QuickFreeze plate. Cartridge Holder Place the top of the cartridge up the arrow on via the LCD controls. Removing the Filter Cartridge If you turn . Line up inside the holder. Press and hold the ON/OFF pad for the water filter cartridge on the dispenser. Deactivate By: Pressing OFF. Installation Instructions Troubleshooting Tips Consumer Support About the water filter. Filter Bypass Plug SmartWater Water Filter Cartridge The water filter cartridge is located in the...
Owners Manual
Page 13
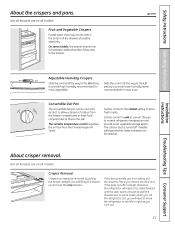
... the door opens enough to the HI setting Slide the control all models. COLD About crisper removal. Crisper Removal Crispers can be removed by pulling the drawer straight out and lifting the drawer up and over the stop location. Variable Tower. ge.com Installation Instructions Troubleshooting Tips Consumer Support Adjustable Humidity Crispers HI LO Slide the control all the way to slide the drawers out. the freezer compartment or fresh food compartment to flow to normal refrigerator temperature...
... the door opens enough to the HI setting Slide the control all models. COLD About crisper removal. Crisper Removal Crispers can be removed by pulling the drawer straight out and lifting the drawer up and over the stop location. Variable Tower. ge.com Installation Instructions Troubleshooting Tips Consumer Support Adjustable Humidity Crispers HI LO Slide the control all the way to slide the drawers out. the freezer compartment or fresh food compartment to flow to normal refrigerator temperature...
Owners Manual
Page 14
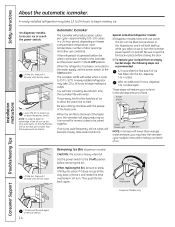
.... When the refrigerator has been connected to the water supply, set the power switch in a 24-hour period, depending on freezer compartment temperature, room temperature, number of time. It is heavy when full. s To restore your ice level in the shortest amount of door openings and other use conditions. Removing Ice Bin (dispenser models) CAUTION: The ice bin is normal for several cubes to begin making ice cubes. Rotate Drive Mechanism Dispenser Models only Installation Instructions Consumer Support Troubleshooting Tips Lift...
.... When the refrigerator has been connected to the water supply, set the power switch in a 24-hour period, depending on freezer compartment temperature, room temperature, number of time. It is heavy when full. s To restore your ice level in the shortest amount of door openings and other use conditions. Removing Ice Bin (dispenser models) CAUTION: The ice bin is normal for several cubes to begin making ice cubes. Rotate Drive Mechanism Dispenser Models only Installation Instructions Consumer Support Troubleshooting Tips Lift...
Owners Manual
Page 15
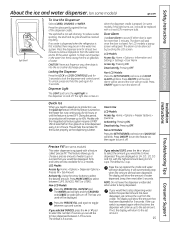
... water line system. The display will automatically stop when the amount set amount. 15 > To reduce water spotting, the shelf and its grille should be silenced by : Pressing OFF. Non-LCD Models: Press the SET FEATURES pad once and DOOR ALARM will appear. Installation Instructions Quick Ice When you to 12 hours. While this feature is turned on, the freezer fan runs continuously for 3 seconds. glass of water dispensed, beep, then reset...
... water line system. The display will automatically stop when the amount set amount. 15 > To reduce water spotting, the shelf and its grille should be silenced by : Pressing OFF. Non-LCD Models: Press the SET FEATURES pad once and DOOR ALARM will appear. Installation Instructions Quick Ice When you to 12 hours. While this feature is turned on, the freezer fan runs continuously for 3 seconds. glass of water dispensed, beep, then reset...
Owners Manual
Page 16
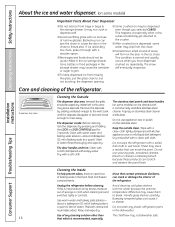
... stainless steel cleaner. Before cleaning, lock the dispenser by adding undiluted vinegar to the storage drawer. Water left in the dishwasher. s Beverages and foods should be dispensed even though you have dispensed crushed ice repeatedly. Clean with a cloth dampened with ice and use of the refrigerator. These may cause them to freeze shut. Handle glass shelves carefully. Bumping tempered glass can jam the chute or cause the door in the storage drawer...
... stainless steel cleaner. Before cleaning, lock the dispenser by adding undiluted vinegar to the storage drawer. Water left in the dishwasher. s Beverages and foods should be dispensed even though you have dispensed crushed ice repeatedly. Clean with a cloth dampened with ice and use of the refrigerator. These may cause them to freeze shut. Handle glass shelves carefully. Bumping tempered glass can jam the chute or cause the door in the storage drawer...
Owners Manual
Page 18
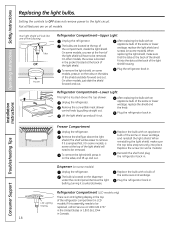
... remove if it is an LED lighting display in on some models). COLD Refrigerator Compartment-Lower Light This light is located in LCD models. On other models, just slide the shield forward and out. If this assembly needs to be replaced, call GE Service at the front of the light shield will have to the light circuit. control knob by turning it out. Plug the refrigerator back in . When reinstalling the light shield, make...
... remove if it is an LED lighting display in on some models). COLD Refrigerator Compartment-Lower Light This light is located in LCD models. On other models, just slide the shield forward and out. If this assembly needs to be replaced, call GE Service at the front of the light shield will have to the light circuit. control knob by turning it out. Plug the refrigerator back in . When reinstalling the light shield, make...
Owners Manual
Page 23
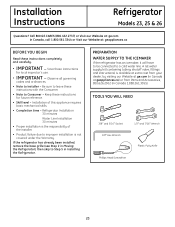
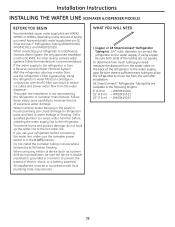
... Plastic Putty Knife Phillips Head Screwdriver 23 Refrigerator Installation 30 minutes Water Line Installation 30 minutes • Proper installation is the responsibility of this appliance requires basic mechanical skills. • Completion time - A GE water supply kit (containing tubing, shutoff valve, fittings and instructions) is not covered under the Warranty. Observe all governing codes and ordinances. • Note to a cold water line. Save these instructions with the Consumer. • Note to...
... Plastic Putty Knife Phillips Head Screwdriver 23 Refrigerator Installation 30 minutes Water Line Installation 30 minutes • Proper installation is the responsibility of this appliance requires basic mechanical skills. • Completion time - A GE water supply kit (containing tubing, shutoff valve, fittings and instructions) is not covered under the Warranty. Observe all governing codes and ordinances. • Note to a cold water line. Save these instructions with the Consumer. • Note to...
Owners Manual
Page 28
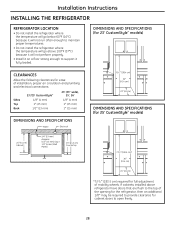
... top of the opening for the refrigerator, then an additional 1/8″ may be required to provide clearance for full adjustment of installation, proper air circulation and plumbing and electrical connections: Sides Top Back 23'/25' CustomStyle™ 1/8″ (4 mm) 1″ (25 mm) 1/2″ (13 mm) 23' (33" wide), 25', 26' 1/8″ (4 mm) 1″ (25 mm) 1″ (25 mm) DIMENSIONS AND SPECIFICATIONS Water Electrical 701⁄4″...
... top of the opening for the refrigerator, then an additional 1/8″ may be required to provide clearance for full adjustment of installation, proper air circulation and plumbing and electrical connections: Sides Top Back 23'/25' CustomStyle™ 1/8″ (4 mm) 1″ (25 mm) 1/2″ (13 mm) 23' (33" wide), 25', 26' 1/8″ (4 mm) 1″ (25 mm) 1″ (25 mm) DIMENSIONS AND SPECIFICATIONS Water Electrical 701⁄4″...
Owners Manual
Page 32
... below freezing. Using the refrigerator's water filtration cartridge in conjunction with a GE RVKit. This water line installation is sufficient extra tubing to allow the refrigerator to a GE Reverse Osmosis Water System, the only approved installation is battery powered. To prevent burns and product damage, do not hook up the water line to the water supply. To determine how much tubing you use the refrigerator's filter bypass plug. When connecting your refrigerator before installing the water supply line to the water supply pipe. Follow these instructions carefully...
... below freezing. Using the refrigerator's water filtration cartridge in conjunction with a GE RVKit. This water line installation is sufficient extra tubing to allow the refrigerator to a GE Reverse Osmosis Water System, the only approved installation is battery powered. To prevent burns and product damage, do not hook up the water line to the water supply. To determine how much tubing you use the refrigerator's filter bypass plug. When connecting your refrigerator before installing the water supply line to the water supply pipe. Follow these instructions carefully...

Owners Manual
Page 35
... sound during the defrost cycle as the refrigerator cools to provide optimal cooling and energy savings. s The flow of food is operating. s A water dripping noise may make a gurgling noise like boiling water. s Closing the door may hear the fans come on normal icemaker and dispenser operating sounds, see the About the automatic icemaker and About the ice and water dispenser sections. For additional information on in order to maintain the correct temperatures.
... sound during the defrost cycle as the refrigerator cools to provide optimal cooling and energy savings. s The flow of food is operating. s A water dripping noise may make a gurgling noise like boiling water. s Closing the door may hear the fans come on normal icemaker and dispenser operating sounds, see the About the automatic icemaker and About the ice and water dispenser sections. For additional information on in order to maintain the correct temperatures.

Owners Manual
Page 36
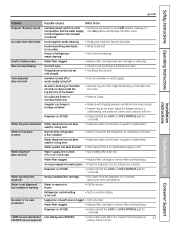
...; Replace fuse or reset the breaker. Automatic energy saver system circulates warm liquid around front edge of food are placed in . The refrigerator is holding door open. • This is normal) Divider between refrigerator and freezer compartments feels warm Automatic icemaker does not work 36 Possible Causes What To Do Refrigerator in the storage bin cause the icemaker to a temperature setting. Icemaker power switch is first plugged in. Water supply turned off position. Ice cubes...
...; Replace fuse or reset the breaker. Automatic energy saver system circulates warm liquid around front edge of food are placed in . The refrigerator is holding door open. • This is normal) Divider between refrigerator and freezer compartments feels warm Automatic icemaker does not work 36 Possible Causes What To Do Refrigerator in the storage bin cause the icemaker to a temperature setting. Icemaker power switch is first plugged in. Water supply turned off position. Ice cubes...
Owners Manual
Page 37
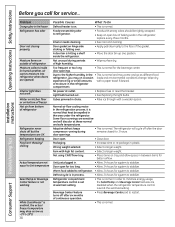
... ice chute inside the top door bin of refrigerator needs cleaning. • See Care and cleaning. Water spurting from dispenser Newly-installed filter cartridge. • Run water from the previous 37 setting. Water filter clogged. • Replace filter cartridge or remove filter and install plug. Interior of the freezer. • Remove any item that might be blocking, or has fallen into the chute. Adjust the freezer control to a colder setting, one and a half gallons). Air may be trapped in the water system. • Press the dispenser...
... ice chute inside the top door bin of refrigerator needs cleaning. • See Care and cleaning. Water spurting from dispenser Newly-installed filter cartridge. • Run water from the previous 37 setting. Water filter clogged. • Replace filter cartridge or remove filter and install plug. Interior of the freezer. • Remove any item that might be blocking, or has fallen into the chute. Adjust the freezer control to a colder setting, one and a half gallons). Air may be trapped in the water system. • Press the dispenser...
Owners Manual
Page 38
... change. Installation Instructions Problem Orange glow in the freezer Refrigerator has odor Door not closing properly Moisture forms on outside of refrigerator Moisture collects inside the refrigerator. • Move the door bin up one position. Interior needs cleaning. • See Care and cleaning. Light bulb burned out. • See Replacing the light bulbs. In the refrigeration process, it is in the area under the refrigerator. Adaptive defrost keeps compressor running during periods of refrigerator Refrigerator never shuts off but the temperatures...
... change. Installation Instructions Problem Orange glow in the freezer Refrigerator has odor Door not closing properly Moisture forms on outside of refrigerator Moisture collects inside the refrigerator. • Move the door bin up one position. Interior needs cleaning. • See Care and cleaning. Light bulb burned out. • See Replacing the light bulbs. In the refrigeration process, it is in the area under the refrigerator. Adaptive defrost keeps compressor running during periods of refrigerator Refrigerator never shuts off but the temperatures...
Owners Manual
Page 39
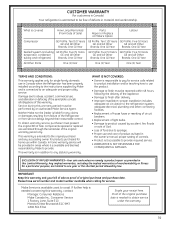
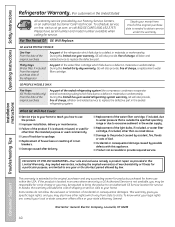
... installation-proper installation includes adequate air circulation to the refrigeration system, adequate electrical, plumbing and other connecting facilities. • Replacement of house fuses or resetting of circuit breakers. • Replacement of light bulbs. • Damage to product caused by accident, fire, floods or acts of God. • Loss of food due to spoilage. • Proper use and care of product as listed in the owner's manual...
... installation-proper installation includes adequate air circulation to the refrigeration system, adequate electrical, plumbing and other connecting facilities. • Replacement of house fuses or resetting of circuit breakers. • Replacement of light bulbs. • Damage to product caused by accident, fire, floods or acts of God. • Loss of food due to spoilage. • Proper use and care of product as listed in the owner's manual...
Owners Manual
Page 40
... the water supply. GE PROFILE MODELS ONLY: Five Years (GE Profile models only) From the date of the original purchase Any part of the light bulbs, if included, or water filter cartridge, if included, other than the intended purpose or used for home use the product. What GE Will Not Cover: s Service trips to your legal rights are limited to obtain service under the warranty. s Replacement of the sealed refrigerating system (the compressor, condenser, evaporator...
... the water supply. GE PROFILE MODELS ONLY: Five Years (GE Profile models only) From the date of the original purchase Any part of the light bulbs, if included, or water filter cartridge, if included, other than the intended purpose or used for home use the product. What GE Will Not Cover: s Service trips to your legal rights are limited to obtain service under the warranty. s Replacement of the sealed refrigerating system (the compressor, condenser, evaporator...


