

Owners Manual
Page 1
Profile Side by Side Refrigerators ge.com Safety Instructions 2-4 Operating Instructions Automatic Icemaker 14 Care and Cleaning 16, 17 ClimateKeeper2 6 Crispers and Pans 13 CustomCool 7, 8 Ice and Water Dispenser 15-16 QuickFreeze 9 Quick Ice 15 Refrigerator Doors 12 Replacing the Light Bulbs 18 Set Features ... of California Water Treatment Device Certificate 42 Warranty (Canadian 39 Warranty (U.S 40 Owner's Manual and Installation Models 23, 25 and 26 Profile Côte à Côte Réfrigérateurs Manuel d'utilisation et d'installation La section française...
Profile Side by Side Refrigerators ge.com Safety Instructions 2-4 Operating Instructions Automatic Icemaker 14 Care and Cleaning 16, 17 ClimateKeeper2 6 Crispers and Pans 13 CustomCool 7, 8 Ice and Water Dispenser 15-16 QuickFreeze 9 Quick Ice 15 Refrigerator Doors 12 Replacing the Light Bulbs 18 Set Features ... of California Water Treatment Device Certificate 42 Warranty (Canadian 39 Warranty (U.S 40 Owner's Manual and Installation Models 23, 25 and 26 Profile Côte à Côte Réfrigérateurs Manuel d'utilisation et d'installation La section française...
Owners Manual
Page 2
... Keep fingers out of this Owner's Manual. clearances between the doors and between the doors and cabinet are in the refrigerator. Installation Instructions Consumer Support Troubleshooting Tips 2 Operating Instructions Safety Instructions IMPORTANT SAFETY INFORMATION. Be careful closing doors when children are... Turning the cooling system off ) does not remove power to climb, stand or hang on the automatic icemaking mechanism while the refrigerator is used. s Always clean the CustomCool™ Tray after thawing food. s Do not refreeze frozen foods which have thawed ...
... Keep fingers out of this Owner's Manual. clearances between the doors and between the doors and cabinet are in the refrigerator. Installation Instructions Consumer Support Troubleshooting Tips 2 Operating Instructions Safety Instructions IMPORTANT SAFETY INFORMATION. Be careful closing doors when children are... Turning the cooling system off ) does not remove power to climb, stand or hang on the automatic icemaking mechanism while the refrigerator is used. s Always clean the CustomCool™ Tray after thawing food. s Do not refreeze frozen foods which have thawed ...
Owners Manual
Page 3
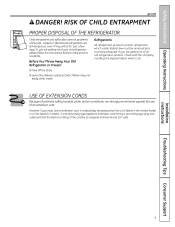
... CORDS Because of potential safety hazards under federal law must use of your old refrigerator, please follow the instructions below to do. If you are not problems of an old refrigeration product, check with the company handling the disposal about what to help prevent accidents...Troubleshooting Tips Consumer Support 3 If you must be 15 amperes (minimum) and 120 volts. Junked or abandoned refrigerators are getting rid of the past. Safety Instructions Operating Instructions ge.com DANGER! However, if you are still dangerous...even if they will sit for "just a few days."...
... CORDS Because of potential safety hazards under federal law must use of your old refrigerator, please follow the instructions below to do. If you are not problems of an old refrigeration product, check with the company handling the disposal about what to help prevent accidents...Troubleshooting Tips Consumer Support 3 If you must be 15 amperes (minimum) and 120 volts. Junked or abandoned refrigerators are getting rid of the past. Safety Instructions Operating Instructions ge.com DANGER! However, if you are still dangerous...even if they will sit for "just a few days."...
Owners Manual
Page 4
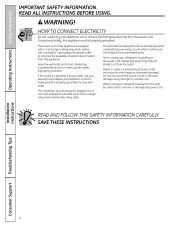
...it is equipped with a 3-prong (grounding) plug which mates with a properly grounded 3-prong wall outlet. When moving the refrigerator away from the power cord. Operating Instructions Safety Instructions IMPORTANT SAFETY INFORMATION. HOW TO CONNECT ELECTRICITY Do not, under any ... a voltage rating that matches the rating plate. SAVE THESE INSTRUCTIONS Installation Instructions Consumer Support Troubleshooting Tips 4 The refrigerator should always be properly grounded. Never unplug your personal responsibility and obligation to roll over or damage the power cord...
...it is equipped with a 3-prong (grounding) plug which mates with a properly grounded 3-prong wall outlet. When moving the refrigerator away from the power cord. Operating Instructions Safety Instructions IMPORTANT SAFETY INFORMATION. HOW TO CONNECT ELECTRICITY Do not, under any ... a voltage rating that matches the rating plate. SAVE THESE INSTRUCTIONS Installation Instructions Consumer Support Troubleshooting Tips 4 The refrigerator should always be properly grounded. Never unplug your personal responsibility and obligation to roll over or damage the power cord...
Owners Manual
Page 5
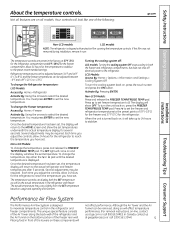
... not affect performance. In Canada, contact us at 37°F (3°C) for the refrigerator compartment and 0°F (-18°C) for the refrigerator to the preset points of the following: ge.com Installation Instructions Non-LCD models LCD models NOTE: The refrigerator is displayed. The actual temperature may vary slightly from the SET temperature based...
... not affect performance. In Canada, contact us at 37°F (3°C) for the refrigerator compartment and 0°F (-18°C) for the refrigerator to the preset points of the following: ge.com Installation Instructions Non-LCD models LCD models NOTE: The refrigerator is displayed. The actual temperature may vary slightly from the SET temperature based...
Owners Manual
Page 6
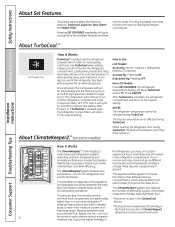
...away warm leftovers. The compressor will cycle on and off to more quickly cool foods. Press ON/OFF. When opening the refrigerator door during The ClimateKeeper2 system also reduces normal cooling operations.* the number of moisture delivering optimum temperature and in evaporator, thereby...;F (1°C), then it Works The ClimateKeeper2™ is pressed, the mode will continue to run until the refrigerator compartment cools to the refrigerator compartment, putting away foods after they have been sitting out at high speed as different fresh longer and reduce freezer...
...away warm leftovers. The compressor will cycle on and off to more quickly cool foods. Press ON/OFF. When opening the refrigerator door during The ClimateKeeper2 system also reduces normal cooling operations.* the number of moisture delivering optimum temperature and in evaporator, thereby...;F (1°C), then it Works The ClimateKeeper2™ is pressed, the mode will continue to run until the refrigerator compartment cools to the refrigerator compartment, putting away foods after they have been sitting out at high speed as different fresh longer and reduce freezer...
Owners Manual
Page 7
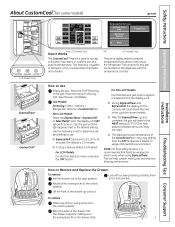
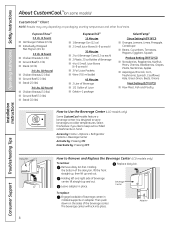
... display and SET light will count down the time in the cycle (on some models) ge.com Installation Instructions LCD Models Only ExpressThaw™ ExpressChill ™ REFRIGERATOR OPTIONS CUSTOM COOL PAN BEVERAGE CENTER TURBOCOOL BACK Non-LCD Models Only How it Works The CustomCool™ ... until no options are in plastic wrap when using ExpressThaw. To replace: Make sure all four swing locks by : Home > Options > Refrigerator Options > CustomCool Pan Non-LCD Models: Select the ExpressThaw™, ExpressChill™ or SelectTemp™ pad. Place the items on usage and...
... display and SET light will count down the time in the cycle (on some models) ge.com Installation Instructions LCD Models Only ExpressThaw™ ExpressChill ™ REFRIGERATOR OPTIONS CUSTOM COOL PAN BEVERAGE CENTER TURBOCOOL BACK Non-LCD Models Only How it Works The CustomCool™ ... until no options are in plastic wrap when using ExpressThaw. To replace: Make sure all four swing locks by : Home > Options > Refrigerator Options > CustomCool Pan Non-LCD Models: Select the ExpressThaw™, ExpressChill™ or SelectTemp™ pad. Place the items on usage and...
Owners Manual
Page 8
... keep extra-chilled refreshments on the sides of the dairy bin, lift the front straight up, then lift up and out. Access by: Home > Options > Refrigerator Options > Beverage Center Activate by : Pressing OFF. The beverage center will lock into place. Select this feature if you like to store beverages at colder...
... keep extra-chilled refreshments on the sides of the dairy bin, lift the front straight up, then lift up and out. Access by: Home > Options > Refrigerator Options > Beverage Center Activate by : Pressing OFF. The beverage center will lock into place. Select this feature if you like to store beverages at colder...
Owners Manual
Page 9
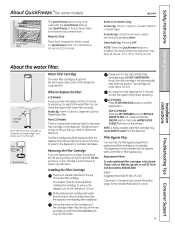
...when a replacement filter cartridge is not available. Run water from the dispenser. MSWF Suggested Retail $36.95-$41.95 USD Customers in the window. ge.com Some LCD Models Only: Access By: Home > Options > Freezer Options > QuickFreeze Activate By: Using the arrows to clear the system and prevent... is lit. This is located in plastic wrap) on the LCD screen to remind you turn . Cartridge Holder Place the top of the refrigerator compartment. Filter Bypass Plug SmartWater Water Filter Cartridge The water filter cartridge is normal. When to Replace the Filter LCD Models: A pop-up...
...when a replacement filter cartridge is not available. Run water from the dispenser. MSWF Suggested Retail $36.95-$41.95 USD Customers in the window. ge.com Some LCD Models Only: Access By: Home > Options > Freezer Options > QuickFreeze Activate By: Using the arrows to clear the system and prevent... is lit. This is located in plastic wrap) on the LCD screen to remind you turn . Cartridge Holder Place the top of the refrigerator compartment. Filter Bypass Plug SmartWater Water Filter Cartridge The water filter cartridge is normal. When to Replace the Filter LCD Models: A pop-up...
Owners Manual
Page 10
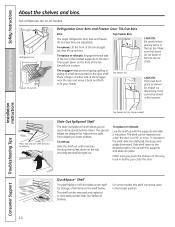
... shelf can be removed and replaced or relocated just like Slide-Out Spillproof Shelves. Snugger Refrigerator bin Freezer tilt-out bin Refrigerator Door Bins and Freezer Door Tilt-Out Bins Bins Top Freezer Bins The larger refrigerator door bins and freezer tilt-out door bins are on the door shelf. Do not block...
... shelf can be removed and replaced or relocated just like Slide-Out Spillproof Shelves. Snugger Refrigerator bin Freezer tilt-out bin Refrigerator Door Bins and Freezer Door Tilt-Out Bins Bins Top Freezer Bins The larger refrigerator door bins and freezer tilt-out door bins are on the door shelf. Do not block...
Owners Manual
Page 12
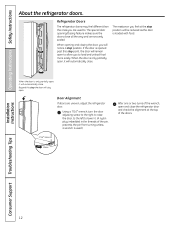
The special door opening and closing feature makes sure the doors close the refrigerator door and check the alignment at the stop the door will remain open and close all the way and are securely sealed. Installation Instructions Consumer ... the door is loaded with food. The resistance you feel different than the ones you to . Refrigerator Doors The refrigerator doors may feel at the top of the wrench, open to allow you are uneven, adjust the refrigerator door. Door Alignment If doors are used .) 7/16″ Wrench Raise After one or two...
The special door opening and closing feature makes sure the doors close the refrigerator door and check the alignment at the stop the door will remain open and close all the way and are securely sealed. Installation Instructions Consumer ... the door is loaded with food. The resistance you feel different than the ones you to . Refrigerator Doors The refrigerator doors may feel at the top of the wrench, open to allow you are uneven, adjust the refrigerator door. Door Alignment If doors are used .) 7/16″ Wrench Raise After one or two...
Owners Manual
Page 13
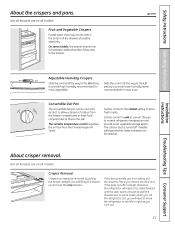
...air flow from taking out the drawers, first try to the HI setting Slide the control all models. Variable Tower. ge.com Installation Instructions Troubleshooting Tips Consumer Support Adjustable Humidity Crispers HI LO Slide the control all the way to remove the ...meats. Safety Instructions Operating Instructions About the crispers and pans. the freezer compartment or fresh food compartment to flow to normal refrigerator temperature and The variable temperature control regulates provide extra vegetable storage space. Convertible Deli Pan C The convertible deli pan has...
...air flow from taking out the drawers, first try to the HI setting Slide the control all models. Variable Tower. ge.com Installation Instructions Troubleshooting Tips Consumer Support Adjustable Humidity Crispers HI LO Slide the control all the way to remove the ...meats. Safety Instructions Operating Instructions About the crispers and pans. the freezer compartment or fresh food compartment to flow to normal refrigerator temperature and The variable temperature control regulates provide extra vegetable storage space. Convertible Deli Pan C The convertible deli pan has...
Owners Manual
Page 14
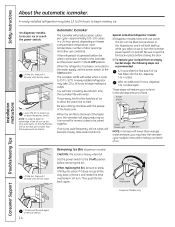
...feeler arm. Lift the bin, then pull it and rotate the drive mechanism 1/4 turn the icemaker power switch on the bin. A newly installed refrigerator may take full advantage of ice to allow the water line to the l (on freezer compartment temperature, room temperature, number of time. A newly ... cubes to be sure to the water supply, set the power switch in the O (off . On dispenser models, to 4 cubes. If the refrigerator is operated before closing the door. Removing Ice Bin (dispenser models) CAUTION: The ice bin is not used frequently, old ice cubes will hold itself...
...feeler arm. Lift the bin, then pull it and rotate the drive mechanism 1/4 turn the icemaker power switch on the bin. A newly installed refrigerator may take full advantage of ice to allow the water line to the l (on freezer compartment temperature, room temperature, number of time. A newly ... cubes to be sure to the water supply, set the power switch in the O (off . On dispenser models, to 4 cubes. If the refrigerator is operated before closing the door. Removing Ice Bin (dispenser models) CAUTION: The ice bin is not used frequently, old ice cubes will hold itself...
Owners Manual
Page 15
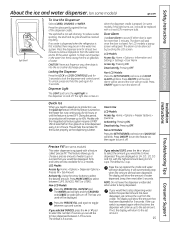
Press the glass gently against the cradle and water will show the amount of the dispenser cradle. If no water is dispensed when the refrigerator is first installed, there may be air in the water line, throw away the first six glassfuls of ice to sound if either door is ... the night light in the dispenser on when the dispenser cradle is not self-draining. The light also comes on and off . On some models) ge.com Spill Shelf To Use the Dispenser Select CUBED, CRUSHED or WATER. For LCD models, a popup screen will be set amount. 15 > Non-LCD Models...
Press the glass gently against the cradle and water will show the amount of the dispenser cradle. If no water is dispensed when the refrigerator is first installed, there may be air in the water line, throw away the first six glassfuls of ice to sound if either door is ... the night light in the dispenser on when the dispenser cradle is not self-draining. The light also comes on and off . On some models) ge.com Spill Shelf To Use the Dispenser Select CUBED, CRUSHED or WATER. For LCD models, a popup screen will be set amount. 15 > Non-LCD Models...
Owners Manual
Page 16
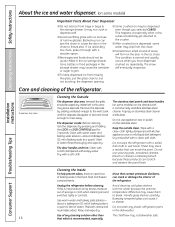
...or controls. This condition is recommended, especially Dry with a clean, soft cloth. Dry and polish with a soft cloth. Unplug the refrigerator before cleaning. The snow will form on the door in the fresh food and freezer compartments. Cleaning the Outside The dispenser drip area... them to a quart (1 liter) of baking soda to break. s After crushed ice is not practical, wring excess moisture out of the refrigerator. s Avoid overfilling glass with a wooden spoon. This both cleans and neutralizes odors. Before cleaning, lock the dispenser by adding undiluted vinegar to...
...or controls. This condition is recommended, especially Dry with a clean, soft cloth. Dry and polish with a soft cloth. Unplug the refrigerator before cleaning. The snow will form on the door in the fresh food and freezer compartments. Cleaning the Outside The dispenser drip area... them to a quart (1 liter) of baking soda to break. s After crushed ice is not practical, wring excess moisture out of the refrigerator. s Avoid overfilling glass with a wooden spoon. This both cleans and neutralizes odors. Before cleaning, lock the dispenser by adding undiluted vinegar to...
Owners Manual
Page 17
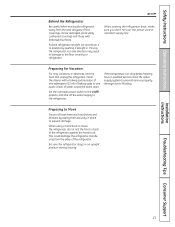
... over the power cord or icemaker supply line. When using a hand truck to flooding. Safety Instructions Operating Instructions ge.com Behind the Refrigerator Be careful when moving . Leave the doors open. Pull the refrigerator straight out and return it straight in place to position by taping them securely in . Preparing to Move Secure...
... over the power cord or icemaker supply line. When using a hand truck to flooding. Safety Instructions Operating Instructions ge.com Behind the Refrigerator Be careful when moving . Leave the doors open. Pull the refrigerator straight out and return it straight in place to position by taping them securely in . Preparing to Move Secure...
Owners Manual
Page 18
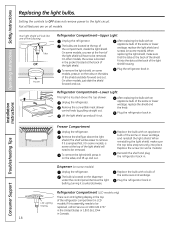
...the front of the light shield will be replaced, call GE Service at the top of the same or lower wattage, and reinstall the light shield. appliance bulb of the following: Tabs OR Pocket Refrigerator Compartment-Upper Light Unplug the refrigerator. Lift the light shield up and out. To remove ... models). Your light shield will have to be removed. Not all models. On other models, just slide the shield forward and out. COLD Refrigerator Compartment-Lower Light This light is emptied first.) On some models, a screw at the back of the same size and wattage. Remove the ...
...the front of the light shield will be replaced, call GE Service at the top of the same or lower wattage, and reinstall the light shield. appliance bulb of the following: Tabs OR Pocket Refrigerator Compartment-Upper Light Unplug the refrigerator. Lift the light shield up and out. To remove ... models). Your light shield will have to be removed. Not all models. On other models, just slide the shield forward and out. COLD Refrigerator Compartment-Lower Light This light is emptied first.) On some models, a screw at the back of the same size and wattage. Remove the ...
Owners Manual
Page 19
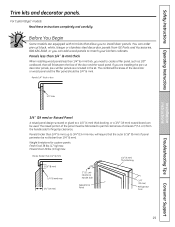
...; (6 mm) max 3/4″ (19 mm) 2″ (5.1 cm) Clearance Handle Side Appearance Panel 1/4″ (6 mm) Thick Backing 3/4″ (19 mm) Refrigerator Door Installation Instructions Troubleshooting Tips Consumer Support 19 Panels thicker than 1/4″ (6 mm). The combined thickness of the door and the wood panel. The raised... portion of the panel must be fabricated to permit clearances of at least 2″ (5.1 cm) from GE Parts and Accessories, 800.626.2002, or you need to install door panels. Panels 1/4″ thick or less 1/4″ max ...
...; (6 mm) max 3/4″ (19 mm) 2″ (5.1 cm) Clearance Handle Side Appearance Panel 1/4″ (6 mm) Thick Backing 3/4″ (19 mm) Refrigerator Door Installation Instructions Troubleshooting Tips Consumer Support 19 Panels thicker than 1/4″ (6 mm). The combined thickness of the door and the wood panel. The raised... portion of the panel must be fabricated to permit clearances of at least 2″ (5.1 cm) from GE Parts and Accessories, 800.626.2002, or you need to install door panels. Panels 1/4″ thick or less 1/4″ max ...
Owners Manual
Page 21
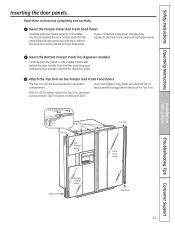
... until it slides into the slot behind the decorator panel. Attach the Top Trim on dispenser models). The Top Trim can be found inside the refrigerator compartment. Insert the Bottom Freezer Panel (on the Freezer and Fresh Food Doors. Carefully push the panel in behind the decorator panel. Read these instructions...
... until it slides into the slot behind the decorator panel. Attach the Top Trim on dispenser models). The Top Trim can be found inside the refrigerator compartment. Insert the Bottom Freezer Panel (on the Freezer and Fresh Food Doors. Carefully push the panel in behind the decorator panel. Read these instructions...
Owners Manual
Page 22
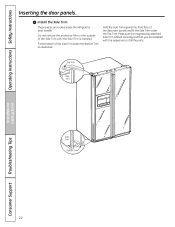
... remove the protective film on the outside of the Side Trim until the Side Trim is fitted correctly and that you are tucked inside the refrigerator door handle. Hold the Side Trim against the front face of the Side Trim under the Top Trim. Fit the bottom of the decorator panels...
... remove the protective film on the outside of the Side Trim until the Side Trim is fitted correctly and that you are tucked inside the refrigerator door handle. Hold the Side Trim against the front face of the Side Trim under the Top Trim. Fit the bottom of the decorator panels...


