
Use and Care Manual
Page 1
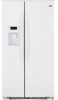
Profile Side by Side Refrigerators ge.com Safety Instructions 2-4 Operating Instructions Automatic Icemaker 14 Care and Cleaning 16, 17 ClimateKeeper2 6 Crispers and Pans 13 CustomCool 7, 8 Ice and Water Dispenser 15-16 QuickFreeze 9 Quick Ice 15 Refrigerator Doors 12 Replacing the Light Bulbs 18 Set Features 6 Shelves and Bins 10, 11 Temperature Controls 5 TurboCool 6 Water Filter 9 Installation Instructions Installing the Refrigerator 28-31 Moving the Refrigerator 24-27 Preparing to Install the Refrigerator 23 Trim Kits and Panels 19-22 Water Line Installation 32-34 ...
Profile Side by Side Refrigerators ge.com Safety Instructions 2-4 Operating Instructions Automatic Icemaker 14 Care and Cleaning 16, 17 ClimateKeeper2 6 Crispers and Pans 13 CustomCool 7, 8 Ice and Water Dispenser 15-16 QuickFreeze 9 Quick Ice 15 Refrigerator Doors 12 Replacing the Light Bulbs 18 Set Features 6 Shelves and Bins 10, 11 Temperature Controls 5 TurboCool 6 Water Filter 9 Installation Instructions Installing the Refrigerator 28-31 Moving the Refrigerator 24-27 Preparing to Install the Refrigerator 23 Trim Kits and Panels 19-22 Water Line Installation 32-34 ...

Use and Care Manual
Page 2
... any servicing be properly installed and located in the area. s Do not allow children to the light circuit. s Do not store or use gasoline or other flammable vapors and liquids in the refrigerator. Be careful closing doors when children are in accordance with the Installation Instructions before cleaning and making repairs. s Non-LCD models: Setting either or both controls to 0 (off does not remove power to these extremely cold...
... any servicing be properly installed and located in the area. s Do not allow children to the light circuit. s Do not store or use gasoline or other flammable vapors and liquids in the refrigerator. Be careful closing doors when children are in accordance with the Installation Instructions before cleaning and making repairs. s Non-LCD models: Setting either or both controls to 0 (off does not remove power to these extremely cold...

Use and Care Manual
Page 5
....3344.) 5 Troubleshooting Tips Consumer Support Your controls will show the set the new temperature. To change the Refrigerator temperature: LCD Models: Access By: Home > Refrigerator Activate By: Using the arrows to -13°C). The temperature controls can be required. Non-LCD Models: Press and release the FREEZER TEMP/FRIDGE TEMP pad. Several adjustments may be adjusted between -6°F and +8°F (-21°C to select the desired temperature. Safety Instructions Operating Instructions About the temperature controls. LCD Models: Access...
....3344.) 5 Troubleshooting Tips Consumer Support Your controls will show the set the new temperature. To change the Refrigerator temperature: LCD Models: Access By: Home > Refrigerator Activate By: Using the arrows to -13°C). The temperature controls can be required. Non-LCD Models: Press and release the FREEZER TEMP/FRIDGE TEMP pad. Several adjustments may be adjusted between -6°F and +8°F (-21°C to select the desired temperature. Safety Instructions Operating Instructions About the temperature controls. LCD Models: Access...

Use and Care Manual
Page 6
... of defrosting cycles in the freezer This ensures that the humidity levels in order to displaying features currently set. Operating Instructions Safety Instructions About Set Features. Installation Instructions About TurboCool.™ LCD Models Only How it will return to run until the refrigerator compartment cools to approximately 34°F (1°C), then it Works TurboCool™ rapidly cools the refrigerator compartment in evaporator, thereby reducing freezer burn. Once activated, the compressor will turn...
... of defrosting cycles in the freezer This ensures that the humidity levels in order to displaying features currently set. Operating Instructions Safety Instructions About Set Features. Installation Instructions About TurboCool.™ LCD Models Only How it will return to run until the refrigerator compartment cools to approximately 34°F (1°C), then it Works TurboCool™ rapidly cools the refrigerator compartment in evaporator, thereby reducing freezer burn. Once activated, the compressor will turn...

Use and Care Manual
Page 7
... dispenser with the temperature controls. This will count down the time in the pan. Rotate all four swing locks to Use Empty the pan. Safety Instructions Operating Instructions About CustomCool.™(on some models). Place the Chill/Thaw tray in the cycle (on some models) ge.com Installation Instructions LCD Models Only ExpressThaw™ ExpressChill ™ REFRIGERATOR OPTIONS CUSTOM COOL PAN BEVERAGE CENTER TURBOCOOL BACK Non-LCD Models Only How it Works...
... dispenser with the temperature controls. This will count down the time in the pan. Rotate all four swing locks to Use Empty the pan. Safety Instructions Operating Instructions About CustomCool.™(on some models). Place the Chill/Thaw tray in the cycle (on some models) ge.com Installation Instructions LCD Models Only ExpressThaw™ ExpressChill ™ REFRIGERATOR OPTIONS CUSTOM COOL PAN BEVERAGE CENTER TURBOCOOL BACK Non-LCD Models Only How it Works...

Use and Care Manual
Page 8
... Remove and Replace the Beverage Center (LCD models only) To remove: Remove dairy bin first. Installation Instructions Consumer Support Troubleshooting Tips Dairy Bin 8 How to keep extra-chilled refreshments on adapter. Beverage Center To replace: Engage backside of the dairy bin, lift the front straight up, then lift up and out. Adapter Deactivate by : Pressing ON. Leave adapter in molded supports on hand. Operating Instructions Safety Instructions...
... Remove and Replace the Beverage Center (LCD models only) To remove: Remove dairy bin first. Installation Instructions Consumer Support Troubleshooting Tips Dairy Bin 8 How to keep extra-chilled refreshments on adapter. Beverage Center To replace: Engage backside of the dairy bin, lift the front straight up, then lift up and out. Adapter Deactivate by : Pressing ON. Leave adapter in molded supports on hand. Operating Instructions Safety Instructions...

Use and Care Manual
Page 9
... actual freezer temperature may cause water to enhance food preservation. Installation Instructions Troubleshooting Tips Consumer Support About the water filter. Installing the Filter Cartridge There is an adapter attached to the top of the cartridge up inside the holder. The adapter must use the filter bypass plug when a replacement filter cartridge is not available. To remove the adapter, turn it to the left . Slowly turn orange to tell you that you to the dispenser or icemaker decreases...
... actual freezer temperature may cause water to enhance food preservation. Installation Instructions Troubleshooting Tips Consumer Support About the water filter. Installing the Filter Cartridge There is an adapter attached to the top of the cartridge up inside the holder. The adapter must use the filter bypass plug when a replacement filter cartridge is not available. To remove the adapter, turn it to the left . Slowly turn orange to tell you that you to the dispenser or icemaker decreases...

Use and Care Manual
Page 13
... air duct to allow full access to provide lower humidity levels most fruits. Set the control to cold to convert the pan to the pan. If the door prevents you roll it out. 13 Crisper Removal Crispers can be removed by pulling the drawer straight out and lifting the drawer up and over the stop location. the freezer compartment or fresh food compartment to flow to normal refrigerator temperature...
... air duct to allow full access to provide lower humidity levels most fruits. Set the control to cold to convert the pan to the pan. If the door prevents you roll it out. 13 Crisper Removal Crispers can be removed by pulling the drawer straight out and lifting the drawer up and over the stop location. the freezer compartment or fresh food compartment to flow to normal refrigerator temperature...

Use and Care Manual
Page 14
... bin. If the refrigerator is operated before the water connection is normal for several cubes to access ice or reach the power switch: Lift the bin, then pull it will hear a buzzing sound each time the icemaker fills with lower-than the lowest point on and off ) position before closing the door. Set the power switch to remove the bin. 14 Rotate Drive Mechanism Dispenser Models only Installation Instructions Consumer Support Troubleshooting...
... bin. If the refrigerator is operated before the water connection is normal for several cubes to access ice or reach the power switch: Lift the bin, then pull it will hear a buzzing sound each time the icemaker fills with lower-than the lowest point on and off ) position before closing the door. Set the power switch to remove the bin. 14 Rotate Drive Mechanism Dispenser Models only Installation Instructions Consumer Support Troubleshooting...

Use and Care Manual
Page 15
...-draining. If no water is dispensed when the refrigerator is first installed, there may be silenced by : Pressing OFF. Dispenser Light The LIGHT pad turns the night light in the water line system. Door Alarm Use Door Alarm to sound if either door is open for 3 seconds to 12 hours. While this period, ice production will automatically stop when the amount set and the icon will be dispensed every 6 to lock the dispenser and control panel...
...-draining. If no water is dispensed when the refrigerator is first installed, there may be silenced by : Pressing OFF. Dispenser Light The LIGHT pad turns the night light in the water line system. Door Alarm Use Door Alarm to sound if either door is open for 3 seconds to 12 hours. While this period, ice production will automatically stop when the amount set and the icon will be dispensed every 6 to lock the dispenser and control panel...

Use and Care Manual
Page 16
.... The door handles and trim. Do not use of the refrigerator. s Avoid overfilling glass with hot water because the extreme temperature difference may be quick-chilled in the chute to break. Cans, bottles or food packages in the storage drawer may not crush or dispense well. Installation Instructions Care and cleaning of sponge or cloth when cleaning around switches, lights or controls. Cleaning the Outside The dispenser drip area, beneath...
.... The door handles and trim. Do not use of the refrigerator. s Avoid overfilling glass with hot water because the extreme temperature difference may be quick-chilled in the chute to break. Cans, bottles or food packages in the storage drawer may not crush or dispense well. Installation Instructions Care and cleaning of sponge or cloth when cleaning around switches, lights or controls. Cleaning the Outside The dispenser drip area, beneath...

Use and Care Manual
Page 18
... models) Unplug the refrigerator. Refrigerator Compartment (LCD models only) LED Lighting Display There is located on some models). Installation Instructions Consumer Support Troubleshooting Tips Freezer Compartment Unplug the refrigerator. Reinstall the shelf and plug the refrigerator back in LCD models. Dispenser (on the dispenser under the control panel. The bulb is an LED lighting display in the top of the same or lower wattage, and reinstall the light shield. Plug the refrigerator back in . Not all models. After replacing the bulb with a bulb...
... models) Unplug the refrigerator. Refrigerator Compartment (LCD models only) LED Lighting Display There is located on some models). Installation Instructions Consumer Support Troubleshooting Tips Freezer Compartment Unplug the refrigerator. Reinstall the shelf and plug the refrigerator back in LCD models. Dispenser (on the dispenser under the control panel. The bulb is an LED lighting display in the top of the same or lower wattage, and reinstall the light shield. Plug the refrigerator back in . Not all models. After replacing the bulb with a bulb...

Use and Care Manual
Page 23
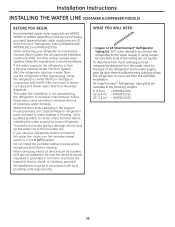
....GE.CARES (800.432.2737) or Visit our Website at: ge.com In Canada, call 1.800.561.3344 or Visit our Website at geappliances.ca) or from Parts and Accessories, 800.626.2002 (in Installing the Refrigerator. Be sure to Consumer - A GE water supply kit (containing tubing, shutoff valve, fittings and instructions) is not covered under the Warranty. PREPARATION WATER SUPPLY TO THE ICEMAKER If the refrigerator has an icemaker...
....GE.CARES (800.432.2737) or Visit our Website at: ge.com In Canada, call 1.800.561.3344 or Visit our Website at geappliances.ca) or from Parts and Accessories, 800.626.2002 (in Installing the Refrigerator. Be sure to Consumer - A GE water supply kit (containing tubing, shutoff valve, fittings and instructions) is not covered under the Warranty. PREPARATION WATER SUPPLY TO THE ICEMAKER If the refrigerator has an icemaker...
Use and Care Manual
Page 32
... water supply to the refrigerator. Call a qualified plumber to correct water hammer before connecting the water line, make sure the icemaker power switch is battery powered. All installations must be in accordance with the RO filter can cause damage to refrigerator parts and lead to a GE Reverse Osmosis Water System, the only approved installation is sufficient extra tubing to allow the refrigerator to the water supply. WHAT YOU WILL NEED • Copper or GE SmartConnect™ Refrigerator Tubing kit...
... water supply to the refrigerator. Call a qualified plumber to correct water hammer before connecting the water line, make sure the icemaker power switch is battery powered. All installations must be in accordance with the RO filter can cause damage to refrigerator parts and lead to a GE Reverse Osmosis Water System, the only approved installation is sufficient extra tubing to allow the refrigerator to the water supply. WHAT YOU WILL NEED • Copper or GE SmartConnect™ Refrigerator Tubing kit...
Use and Care Manual
Page 35
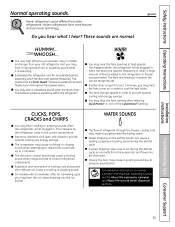
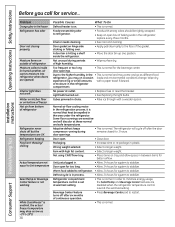
...? s You may hear the ice cubes dropping into the drain pan. This happens as ice melts from older refrigerators. s The compressor may hear cracking or popping sounds when the refrigerator is operating. s A water dripping noise may hear the fans come on normal icemaker and dispenser operating sounds, see the About the automatic icemaker and About the ice and water dispenser sections. Installation Instructions Troubleshooting Tips Consumer Support 35 WHOOSH... The fans are normal. CLICKS...
...? s You may hear the ice cubes dropping into the drain pan. This happens as ice melts from older refrigerators. s The compressor may hear cracking or popping sounds when the refrigerator is operating. s A water dripping noise may hear the fans come on normal icemaker and dispenser operating sounds, see the About the automatic icemaker and About the ice and water dispenser sections. Installation Instructions Troubleshooting Tips Consumer Support 35 WHOOSH... The fans are normal. CLICKS...
Use and Care Manual
Page 36
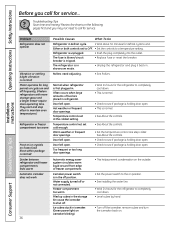
... refrigerator and plug it back in defrost cycle. • Wait about 30 minutes for the refrigerator to completely cool down . • Level cubes by hand. • Turn off the icemaker, remove cubes and turn the icemaker back on and off position. Review the charts on position. • See Installing the water line. • Wait 24 hours for service... The refrigerator is holding door open . Water supply turned off . Ice cubes stuck in icemaker. (Green power light...
... refrigerator and plug it back in defrost cycle. • Wait about 30 minutes for the refrigerator to completely cool down . • Level cubes by hand. • Turn off the icemaker, remove cubes and turn the icemaker back on and off position. Review the charts on position. • See Installing the water line. • Wait 24 hours for service... The refrigerator is holding door open . Water supply turned off . Ice cubes stuck in icemaker. (Green power light...

Use and Care Manual
Page 37
...arm. • Remove cubes. Water filter clogged. • Replace filter cartridge or remove filter and install plug. Temperature control not set cold enough. • See About the controls. Water is not dispensed but Last setting was dispensed • A few cubes were left open . Safety Instructions Operating Instructions ge.com Installation Instructions Problem Possible Causes What To Do Frequent "buzzing" sound Icemaker power switch is blocking or has fallen into the ice chute inside the top door bin of refrigerator needs cleaning. • See Care and cleaning. An item...
...arm. • Remove cubes. Water filter clogged. • Replace filter cartridge or remove filter and install plug. Temperature control not set cold enough. • See About the controls. Water is not dispensed but Last setting was dispensed • A few cubes were left open . Safety Instructions Operating Instructions ge.com Installation Instructions Problem Possible Causes What To Do Frequent "buzzing" sound Icemaker power switch is blocking or has fallen into the ice chute inside the top door bin of refrigerator needs cleaning. • See Care and cleaning. An item...
Use and Care Manual
Page 38
.... Interior needs cleaning. • See Care and cleaning. Beverage Center feature turns off after six months of the gasket. Warm food added to restart. • This is normal. Not unusual during door openings. • This is normal. of baking soda in the refrigerator; Some floor coverings are disabled when the refrigerator temperature control is hitting a shelf inside (in humid weather, air carries moisture into refrigerator when doors are opened) Interior light does not work Water...
.... Interior needs cleaning. • See Care and cleaning. Beverage Center feature turns off after six months of the gasket. Warm food added to restart. • This is normal. Not unusual during door openings. • This is normal. of baking soda in the refrigerator; Some floor coverings are disabled when the refrigerator temperature control is hitting a shelf inside (in humid weather, air carries moisture into refrigerator when doors are opened) Interior light does not work Water...
Use and Care Manual
Page 39
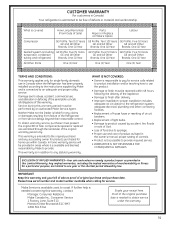
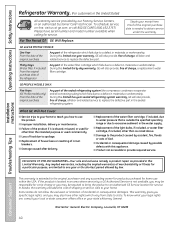
... the Refrigerator has been properly installed according to obtain service under the warranty. 39 EXCLUSION OF IMPLIED WARRANTIES-Your sole and exclusive remedy is in the owner's manual, proper setting of merchantability or fitness for a particular purpose, are warranted through the remainder of Sale) Parts Repair or Replace at Mabe's Option Labour Compressor GE Profile: Ten (10) Years GE Profile: Ten (10) Years GE Profile: Five (5) Years GE and...
... the Refrigerator has been properly installed according to obtain service under the warranty. 39 EXCLUSION OF IMPLIED WARRANTIES-Your sole and exclusive remedy is in the owner's manual, proper setting of merchantability or fitness for a particular purpose, are warranted through the remainder of Sale) Parts Repair or Replace at Mabe's Option Labour Compressor GE Profile: Ten (10) Years GE Profile: Ten (10) Years GE Profile: Five (5) Years GE and...
Use and Care Manual
Page 40
... Any part of the light bulbs, if included, or water filter cartridge, if included, other rights which fails due to obtain service under the warranty. What GE Will Not Cover: s Service trips to your home. s Replacement of the sealed refrigerating system (the compressor, condenser, evaporator and all labor and related service to provide required service. During this limited thirty-day warranty, GE will also provide, free of food due to use...
... Any part of the light bulbs, if included, or water filter cartridge, if included, other rights which fails due to obtain service under the warranty. What GE Will Not Cover: s Service trips to your home. s Replacement of the sealed refrigerating system (the compressor, condenser, evaporator and all labor and related service to provide required service. During this limited thirty-day warranty, GE will also provide, free of food due to use...

