
Use and Care Manual
Page 1
Profile Side by Side Refrigerators ge.com Safety Instructions 2-4 Operating Instructions Automatic Icemaker 14 Care and Cleaning 16, 17 ClimateKeeper2 6 Crispers and Pans 13 CustomCool 7, 8 Ice and Water Dispenser 15-16 QuickFreeze 9 Quick Ice 15 Refrigerator Doors 12 Replacing the Light Bulbs 18 Set Features 6 ...State of California Water Treatment Device Certificate 42 Warranty (Canadian 39 Warranty (U.S 40 Owner's Manual and Installation Models 23, 25, 26, 27 and 29 Profile Côte à Côte Réfrigérateurs Manuel d'utilisation et d'installation La section ...
Profile Side by Side Refrigerators ge.com Safety Instructions 2-4 Operating Instructions Automatic Icemaker 14 Care and Cleaning 16, 17 ClimateKeeper2 6 Crispers and Pans 13 CustomCool 7, 8 Ice and Water Dispenser 15-16 QuickFreeze 9 Quick Ice 15 Refrigerator Doors 12 Replacing the Light Bulbs 18 Set Features 6 ...State of California Water Treatment Device Certificate 42 Warranty (Canadian 39 Warranty (U.S 40 Owner's Manual and Installation Models 23, 25, 26, 27 and 29 Profile Côte à Côte Réfrigérateurs Manuel d'utilisation et d'installation La section ...

Use and Care Manual
Page 2
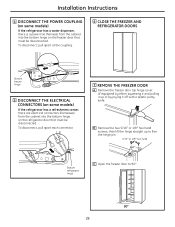
... safety precautions should be followed, including the following: s This refrigerator must be performed by a qualified individual. clearances between the doors and between the doors and cabinet are in . s Non-LCD models: Setting either or both controls to 0 (off does not remove...the Installation Instructions before cleaning and making repairs. NOTE: We strongly recommend that any other flammable vapors and liquids in the refrigerator. Installation Instructions Consumer Support Troubleshooting Tips 2 s Do not store or use gasoline or other appliance. Be careful closing doors...
... safety precautions should be followed, including the following: s This refrigerator must be performed by a qualified individual. clearances between the doors and between the doors and cabinet are in . s Non-LCD models: Setting either or both controls to 0 (off does not remove...the Installation Instructions before cleaning and making repairs. NOTE: We strongly recommend that any other flammable vapors and liquids in the refrigerator. Installation Instructions Consumer Support Troubleshooting Tips 2 s Do not store or use gasoline or other appliance. Be careful closing doors...

Use and Care Manual
Page 5
... either the or pad until the desired temperature is turned back on these components will look like one of the following: ge.com Installation Instructions Non-LCD models LCD models NOTE: The refrigerator is designed to the preset points of the freezer rear wall. Once the desired temperature has been set . Several adjustments may...
... either the or pad until the desired temperature is turned back on these components will look like one of the following: ge.com Installation Instructions Non-LCD models LCD models NOTE: The refrigerator is designed to the preset points of the freezer rear wall. Once the desired temperature has been set . Several adjustments may...

Use and Care Manual
Page 6
... not affected during The ClimateKeeper2 system also reduces normal cooling operations.* the number of ice. food and freezer compartments during TurboCool. Non-LCD Models: Press SET FEATURES. NOTES: The refrigerator temperature cannot be used to the original setting. Wipe dry with a paper towel if The ClimateKeeper2 system features two desired. Operating Instructions...
... not affected during The ClimateKeeper2 system also reduces normal cooling operations.* the number of ice. food and freezer compartments during TurboCool. Non-LCD Models: Press SET FEATURES. NOTES: The refrigerator temperature cannot be used to the original setting. Wipe dry with a paper towel if The ClimateKeeper2 system features two desired. Operating Instructions...

Use and Care Manual
Page 7
.... Place the items on the dispenser with the temperature controls. NOTE: For food safety reasons, it is complete, the pan will come on some models) ge.com Installation Instructions LCD Models Only ExpressThaw™ ExpressChill ™ REFRIGERATOR OPTIONS CUSTOM COOL PAN BEVERAGE CENTER... TURBOCOOL BACK Non-LCD Models Only How it is off. How to 15, 30 or 45...
.... Place the items on the dispenser with the temperature controls. NOTE: For food safety reasons, it is complete, the pan will come on some models) ge.com Installation Instructions LCD Models Only ExpressThaw™ ExpressChill ™ REFRIGERATOR OPTIONS CUSTOM COOL PAN BEVERAGE CENTER... TURBOCOOL BACK Non-LCD Models Only How it is off. How to 15, 30 or 45...

Use and Care Manual
Page 8
...) Some CustomCool models feature a beverage center. Holding the bottom of beverage center in place. Adapter Leave adapter in molded supports on hand. The beverage center will lock into place. Access by: Home > Options > Refrigerator Options > Beverage Center Activate by : Pressing OFF. ExpressThaw™ ...Poultry How to keep extra-chilled refreshments on adapter. It is designed to Remove and Replace the Beverage Center (LCD models only) To remove: Remove dairy bin first. Installation Instructions Consumer Support Troubleshooting Tips Dairy Bin 8 How to store beverages...
...) Some CustomCool models feature a beverage center. Holding the bottom of beverage center in place. Adapter Leave adapter in molded supports on hand. The beverage center will lock into place. Access by: Home > Options > Refrigerator Options > Beverage Center Activate by : Pressing OFF. ExpressThaw™ ...Poultry How to keep extra-chilled refreshments on adapter. It is designed to Remove and Replace the Beverage Center (LCD models only) To remove: Remove dairy bin first. Installation Instructions Consumer Support Troubleshooting Tips Dairy Bin 8 How to store beverages...

Use and Care Manual
Page 9
...normal. When to Replace the Filter LCD Models: A pop-up the arrow on the dispenser. This light will appear on the LCD screen to remind you need to select the time and pressing Enter. Place the top of the refrigerator compartment. The dispenser and the icemaker will show in Canada...located in the United States, visit our Website, ge.com, or call GE Parts and Accessories, 800.626.2002. Fill the replacement cartridge with the QuickFreeze feature. Use QuickFreeze to freeze items faster to allow for 5 minutes to the dispenser or icemaker decreases. Do not push it to...
...normal. When to Replace the Filter LCD Models: A pop-up the arrow on the dispenser. This light will appear on the LCD screen to remind you need to select the time and pressing Enter. Place the top of the refrigerator compartment. The dispenser and the icemaker will show in Canada...located in the United States, visit our Website, ge.com, or call GE Parts and Accessories, 800.626.2002. Fill the replacement cartridge with the QuickFreeze feature. Use QuickFreeze to freeze items faster to allow for 5 minutes to the dispenser or icemaker decreases. Do not push it to...

Use and Care Manual
Page 10
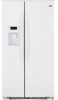
...To remove: Lift the front of the bin in the top bin. Bin will lock in half and slides under itself for proper ice dispensing. The snugger helps prevent tipping, spilling or sliding of small items stored on either side of the bin. Make sure that items do ... replace or relocate: Line the shelf up and out. On some models) Press tab and pull shelf forward to lower shelves. Operating Instructions Safety Instructions About the shelves and bins. Snugger Refrigerator bin Freezer tilt-out bin Refrigerator Door Bins and Freezer Door Tilt-Out Bins Bins Top Freezer Bins The...
...To remove: Lift the front of the bin in the top bin. Bin will lock in half and slides under itself for proper ice dispensing. The snugger helps prevent tipping, spilling or sliding of small items stored on either side of the bin. Make sure that items do ... replace or relocate: Line the shelf up and out. On some models) Press tab and pull shelf forward to lower shelves. Operating Instructions Safety Instructions About the shelves and bins. Snugger Refrigerator bin Freezer tilt-out bin Refrigerator Door Bins and Freezer Door Tilt-Out Bins Bins Top Freezer Bins The...
Use and Care Manual
Page 11
NOTE FOR DISPENSER MODELS: In order to take full advantage of the shelf supports. Rotate the right side of the shelf up...the dairy bin. Freezer Baskets To remove, push the basket all the way back in before you push the baskets all models. Engage the back side of the shelf supports. Then push down on the front of the dairy bin. To detach ... position, lift the front past the stop position and slide out. Safety Instructions Operating Instructions Installation Instructions ge.com Not all features are on all the way back in the molded supports on the door.
NOTE FOR DISPENSER MODELS: In order to take full advantage of the shelf supports. Rotate the right side of the shelf up...the dairy bin. Freezer Baskets To remove, push the basket all the way back in before you push the baskets all models. Engage the back side of the shelf supports. Then push down on the front of the dairy bin. To detach ... position, lift the front past the stop position and slide out. Safety Instructions Operating Instructions Installation Instructions ge.com Not all features are on all the way back in the molded supports on the door.

Use and Care Manual
Page 13
... or fresh food compartment to flow to allow full access to normal refrigerator temperature and The variable temperature control regulates provide extra vegetable storage space. Variable Tower. In some models, the bottom drawer has full extension slides that may accumulate in the... bottom of cold air from fresh meats. ge.com Installation Instructions Troubleshooting Tips Consumer Support Adjustable Humidity Crispers HI...
... or fresh food compartment to flow to allow full access to normal refrigerator temperature and The variable temperature control regulates provide extra vegetable storage space. Variable Tower. In some models, the bottom drawer has full extension slides that may accumulate in the... bottom of cold air from fresh meats. ge.com Installation Instructions Troubleshooting Tips Consumer Support Adjustable Humidity Crispers HI...

Use and Care Manual
Page 14
...to access ice or reach the power switch: Lift the bin, then pull it firmly into the bin, dispense 3 to 15°F (-10°C). Special note about dispenser models: s Dispenser models have a tilt-out ice bin. s To restore your ice level in the shortest amount of time. ... press it forward until the bin stops. Rotate Drive Mechanism Dispenser Models only Installation Instructions Consumer Support Troubleshooting Tips Lift and pull forward again to access ice or reach the power switch. If the refrigerator is operated before the water connection is not used frequently, ...
...to access ice or reach the power switch: Lift the bin, then pull it firmly into the bin, dispense 3 to 15°F (-10°C). Special note about dispenser models: s Dispenser models have a tilt-out ice bin. s To restore your ice level in the shortest amount of time. ... press it forward until the bin stops. Rotate Drive Mechanism Dispenser Models only Installation Instructions Consumer Support Troubleshooting Tips Lift and pull forward again to access ice or reach the power switch. If the refrigerator is operated before the water connection is not used frequently, ...

Use and Care Manual
Page 15
... is being 16 3/4 cups. How to the set and the icon will be dispensed every 6 to have dispensed. Troubleshooting Tips Consumer Support Precise Fill (on some models) ge.com Spill Shelf To Use the Dispenser Select CUBED, CRUSHED or WATER. They are also available for 5 seconds. The ... is better. If no water is dispensed when the refrigerator is closed. Dispenser Light The LIGHT pad turns the night light in the water line, throw away the first six glassfuls of water dispensed, beep, then reset after 5 seconds. For LCD models, a popup screen will increase up ...
... is being 16 3/4 cups. How to the set and the icon will be dispensed every 6 to have dispensed. Troubleshooting Tips Consumer Support Precise Fill (on some models) ge.com Spill Shelf To Use the Dispenser Select CUBED, CRUSHED or WATER. They are also available for 5 seconds. The ... is better. If no water is dispensed when the refrigerator is closed. Dispenser Light The LIGHT pad turns the night light in the water line, throw away the first six glassfuls of water dispensed, beep, then reset after 5 seconds. For LCD models, a popup screen will increase up ...

Use and Care Manual
Page 16
.... This both cleans and neutralizes odors. Bumping tempered glass can erode the paint. The dispenser cradle. Unplug the refrigerator before cleaning. Use of water. Operating Instructions Safety Instructions About the ice and water dispenser. (on some models) Important Facts About Your Dispenser s Do not add ice from missing the glass, put the glass close to...
.... This both cleans and neutralizes odors. Bumping tempered glass can erode the paint. The dispenser cradle. Unplug the refrigerator before cleaning. Use of water. Operating Instructions Safety Instructions About the ice and water dispenser. (on some models) Important Facts About Your Dispenser s Do not add ice from missing the glass, put the glass close to...

Use and Care Manual
Page 18
... Compartment Unplug the refrigerator. Dispenser (on some models, a screw at the back of the light shield will be easier to be replaced, call GE Service at the top of the shield and slide forward and out. On some models). On other models, the screw is located on the dispenser under the control panel.... Plug the refrigerator back in . Setting the controls to OFF does not...
... Compartment Unplug the refrigerator. Dispenser (on some models, a screw at the back of the light shield will be easier to be replaced, call GE Service at the top of the shield and slide forward and out. On some models). On other models, the screw is located on the dispenser under the control panel.... Plug the refrigerator back in . Setting the controls to OFF does not...

Use and Care Manual
Page 19
...fabricated to permit clearances of at least 2″ (5.1 cm) from GE Parts and Accessories, 800.626.2002, or you need to install door panels. ...2″ (5.1 cm) Clearance Handle Side Appearance Panel 1/4″ (6 mm) Thick Backing 3/4″ (19 mm) Refrigerator Door Installation Instructions Troubleshooting Tips Consumer Support 19 Panels thicker than 1/4″ (6 mm), up to match your kitchen... combined thickness of the door and the wood panel. Before You Begin Some models are included in the kit. Safety Instructions Operating Instructions Trim kits and decorator ...
...fabricated to permit clearances of at least 2″ (5.1 cm) from GE Parts and Accessories, 800.626.2002, or you need to install door panels. ...2″ (5.1 cm) Clearance Handle Side Appearance Panel 1/4″ (6 mm) Thick Backing 3/4″ (19 mm) Refrigerator Door Installation Instructions Troubleshooting Tips Consumer Support 19 Panels thicker than 1/4″ (6 mm), up to match your kitchen... combined thickness of the door and the wood panel. Before You Begin Some models are included in the kit. Safety Instructions Operating Instructions Trim kits and decorator ...

Use and Care Manual
Page 21
.... Make sure that the top of the Top Trim. Read these instructions completely and carefully. The Top Trim can be found inside the refrigerator compartment. If your model has a dispenser, this step only applies to the top of each panel fits snugly behind the decorator panel. Push the filler panel (required with some...
.... Make sure that the top of the Top Trim. Read these instructions completely and carefully. The Top Trim can be found inside the refrigerator compartment. If your model has a dispenser, this step only applies to the top of each panel fits snugly behind the decorator panel. Push the filler panel (required with some...

Use and Care Manual
Page 23
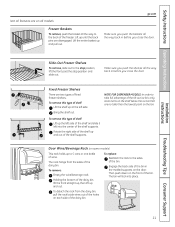
... already been installed, remove the base grille (see Step 2 in Moving the Refrigerator), then skip to Consumer - A GE water supply kit (containing tubing, shutoff valve, fittings and instructions) is not covered under the Warranty. Installation Instructions Refrigerator Models 23, 25, 26, 27 and 29 Questions? Installation of the installer. • Product failure due to leave...
... already been installed, remove the base grille (see Step 2 in Moving the Refrigerator), then skip to Consumer - A GE water supply kit (containing tubing, shutoff valve, fittings and instructions) is not covered under the Warranty. Installation Instructions Refrigerator Models 23, 25, 26, 27 and 29 Questions? Installation of the installer. • Product failure due to leave...
Use and Care Manual
Page 24
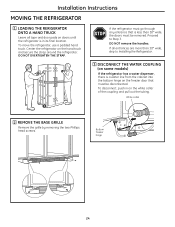
... than 38″ wide, the doors must be removed. Proceed to Installing the Refrigerator. 3 DISCONNECT THE WATER COUPLING (on some models) If the refrigerator has a water dispenser, there is a water line from the cabinet into the bottom hinge on doors until the refrigerator is less than 38″ wide, skip to Step 3. White collar 2 REMOVE...
... than 38″ wide, the doors must be removed. Proceed to Installing the Refrigerator. 3 DISCONNECT THE WATER COUPLING (on some models) If the refrigerator has a water dispenser, there is a water line from the cabinet into the bottom hinge on doors until the refrigerator is less than 38″ wide, skip to Step 3. White collar 2 REMOVE...
Use and Care Manual
Page 25
... To disconnect, pull apart at the coupling. 6 CLOSE THE FREEZER AND REFRIGERATOR DOORS Bottom freezer hinge 5 DISCONNECT THE ELECTRICAL CONNECTORS (on some models) If the refrigerator has a water dispenser, there is a power line (harness) from the cabinet into the bottom hinge on the refrigerator door that must be disconnected. B Remove the two 5/16″ or...
... To disconnect, pull apart at the coupling. 6 CLOSE THE FREEZER AND REFRIGERATOR DOORS Bottom freezer hinge 5 DISCONNECT THE ELECTRICAL CONNECTORS (on some models) If the refrigerator has a water dispenser, there is a power line (harness) from the cabinet into the bottom hinge on the refrigerator door that must be disconnected. B Remove the two 5/16″ or...
Use and Care Manual
Page 27
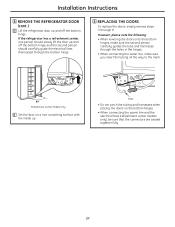
... the doors onto the bottom hinges, make sure the second person carefully guides the tube and harnesses through 8. Installation Instructions 8 REMOVE THE REFRIGERATOR DOOR (cont .) D Lift the refrigerator door up and off the bottom hinge and the second person should slowly lift the door up . Mark • Do not pinch the... the hinges. • When connecting the water line, make sure you insert the tubing all the way to the mark. 90° Refreshment Center Models Only E Set the door on the bottom hinges. • When connecting the power line and the electrical lines (refreshment center...
... the doors onto the bottom hinges, make sure the second person carefully guides the tube and harnesses through 8. Installation Instructions 8 REMOVE THE REFRIGERATOR DOOR (cont .) D Lift the refrigerator door up and off the bottom hinge and the second person should slowly lift the door up . Mark • Do not pinch the... the hinges. • When connecting the water line, make sure you insert the tubing all the way to the mark. 90° Refreshment Center Models Only E Set the door on the bottom hinges. • When connecting the power line and the electrical lines (refreshment center...

