
Installation Instructions
Page 1
... are not approved for specific installation requirements. Per Warming Drawer Requirement Observe all dimensions and requirements. 2" (5.1 cm) Min. Make sure the wall coverings, counters and cabinets around the oven and any shipping screws securing the oven to the house structure. The single oven may be hard-wired (direct-wired) into an approved junction box. Remove protective film and labels on the oven door could result in a cabinet alone or above a warming drawer. These ovens are less than...
... are not approved for specific installation requirements. Per Warming Drawer Requirement Observe all dimensions and requirements. 2" (5.1 cm) Min. Make sure the wall coverings, counters and cabinets around the oven and any shipping screws securing the oven to the house structure. The single oven may be hard-wired (direct-wired) into an approved junction box. Remove protective film and labels on the oven door could result in a cabinet alone or above a warming drawer. These ovens are less than...

Installation Instructions
Page 2
..., remove house fuse or open the door. WARNING: Improper connection of aluminum house wiring to the trim will go and is governed by a qualified electrician. When installing an electric oven in an electrical hazard or fire. Check with local codes, using wire nuts. The 3 power leads supplied with Lower Trim in Position, Mark (2) Mounting Hole Locations Here E. The current-carrying capacity of the side trim for 27" (68.6 cm) Models F. When...
..., remove house fuse or open the door. WARNING: Improper connection of aluminum house wiring to the trim will go and is governed by a qualified electrician. When installing an electric oven in an electrical hazard or fire. Check with local codes, using wire nuts. The 3 power leads supplied with Lower Trim in Position, Mark (2) Mounting Hole Locations Here E. The current-carrying capacity of the side trim for 27" (68.6 cm) Models F. When...

Owners Manual
Page 1
... ″ Double Wall Oven Printed on double oven models. GEAppliances.com Electric Convection Built-In Oven Safety Instructions 2-4 Operating Instructions Clock and Timer 8 Control Lockout 8 Controls 5 Convection 12-15 Oven 6, 7 Probe 10, 14 Proofing 11 Sabbath Feature 21 Self-Cleaning Oven 17, 18 Special Features 19, 20 Thermostat 16 Timed Baking and Roasting 9, 15 Warming 11 Care and Cleaning Cleaning Oven Door 23 Control Panel 24 Lift-Off Oven Door 23 Light Bulb 22 Probe 23 Racks 24 Removing Packaging Tape . . . . .22 Stainless Steel Surfaces 24 Troubleshooting Tips...
... ″ Double Wall Oven Printed on double oven models. GEAppliances.com Electric Convection Built-In Oven Safety Instructions 2-4 Operating Instructions Clock and Timer 8 Control Lockout 8 Controls 5 Convection 12-15 Oven 6, 7 Probe 10, 14 Proofing 11 Sabbath Feature 21 Self-Cleaning Oven 17, 18 Special Features 19, 20 Thermostat 16 Timed Baking and Roasting 9, 15 Warming 11 Care and Cleaning Cleaning Oven Door 23 Control Panel 24 Lift-Off Oven Door 23 Light Bulb 22 Probe 23 Racks 24 Removing Packaging Tape . . . . .22 Stainless Steel Surfaces 24 Troubleshooting Tips...

Owners Manual
Page 3
... eyes. ■ Do not heat unopened food containers. Leftover grease in a broiler pan can catch fire next time you use the pan. ■ Clean only parts listed in this Owner's Manual. ■ Do not use , do not let pot holder contact the heating elements. ■ When using cooking or roasting bags in the oven, follow the manufacturer's directions. ■ Pulling out the rack to line oven bottoms, except as suggested in...
... eyes. ■ Do not heat unopened food containers. Leftover grease in a broiler pan can catch fire next time you use the pan. ■ Clean only parts listed in this Owner's Manual. ■ Do not use , do not let pot holder contact the heating elements. ■ When using cooking or roasting bags in the oven, follow the manufacturer's directions. ■ Pulling out the rack to line oven bottoms, except as suggested in...

Owners Manual
Page 5
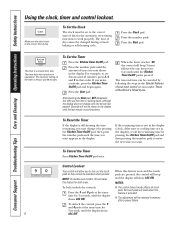
... bake, broil or self-cleaning mode and the times set for timed baking and self-cleaning. Self Clean Std/Low Pad Press to keep hot, cooked foods warm. The oven will flash in the display when there has been a power outage. Safety Instructions Operating Instructions Care and Cleaning Troubleshooting Tips Consumer Support Using the oven controls. (Throughout this indicates a function error code. If the function error code repeats, disconnect the power to start time and length of operation for the timer or automatic oven operations. The time of time you set the oven...
... bake, broil or self-cleaning mode and the times set for timed baking and self-cleaning. Self Clean Std/Low Pad Press to keep hot, cooked foods warm. The oven will flash in the display when there has been a power outage. Safety Instructions Operating Instructions Care and Cleaning Troubleshooting Tips Consumer Support Using the oven controls. (Throughout this indicates a function error code. If the function error code repeats, disconnect the power to start time and length of operation for the timer or automatic oven operations. The time of time you set the oven...
Owners Manual
Page 6
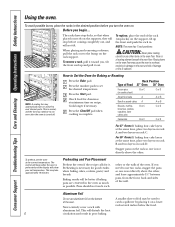
... . Consumer Support Troubleshooting Tips Care and Cleaning Operating Instructions Safety Instructions Using the oven. There is complete. Press the Clear/Off pad when cooking is a heating element beneath the oven floor. The control will beep when the oven is turned off to overheat, resulting in the desired position before coming completely out, and will show your set the desired temperature. Aluminum Foil Do not use two racks, stagger the pans so one...
... . Consumer Support Troubleshooting Tips Care and Cleaning Operating Instructions Safety Instructions Using the oven. There is complete. Press the Clear/Off pad when cooking is a heating element beneath the oven floor. The control will beep when the oven is turned off to overheat, resulting in the desired position before coming completely out, and will show your set the desired temperature. Aluminum Foil Do not use two racks, stagger the pans so one...
Owners Manual
Page 8
.... To unlock the control, press the 9 and 0 pads at the same ■ The control lockout mode affects all touch pads. To Cancel the Timer Press Kitchen Timer On/Off pad twice. To Set the Timer Press the Kitchen Timer On/Off pad. NOTES: To lock/unlock the controls: Press the 9 and 0 pads at the same time for both ovens. Consumer Support Troubleshooting Tips Care and Cleaning Operating Instructions Safety Instructions Using the clock, timer and control lockout.
.... To unlock the control, press the 9 and 0 pads at the same ■ The control lockout mode affects all touch pads. To Cancel the Timer Press Kitchen Timer On/Off pad twice. To Set the Timer Press the Kitchen Timer On/Off pad. NOTES: To lock/unlock the controls: Press the 9 and 0 pads at the same time for both ovens. Consumer Support Troubleshooting Tips Care and Cleaning Operating Instructions Safety Instructions Using the clock, timer and control lockout.

Owners Manual
Page 9
... start cooking. Using the number pads, enter the desired temperature. Press the Clear/Off pad to clear the display. Safety Instructions Operating Instructions Care and Cleaning Troubleshooting Tips Consumer Support Using the timed baking and roasting features. (on some models) GEAppliances.com On double oven models, you can use timed baking in both ovens at the time of day you have set . Be sure that oven. NOTE: An attention tone will be kept warm for a specific length of time and then turn...
... start cooking. Using the number pads, enter the desired temperature. Press the Clear/Off pad to clear the display. Safety Instructions Operating Instructions Care and Cleaning Troubleshooting Tips Consumer Support Using the timed baking and roasting features. (on some models) GEAppliances.com On double oven models, you can use timed baking in both ovens at the time of day you have set . Be sure that oven. NOTE: An attention tone will be kept warm for a specific length of time and then turn...
Owners Manual
Page 10
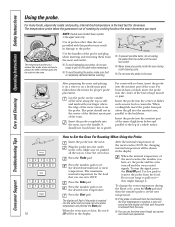
... change the oven temperature during a self-cleaning cycle. ■ Do not store the probe in the display. use tongs to set the desired internal food or meat temperature. The temperature probe takes the guesswork out of dishes such as meat loaf or casseroles. Press the number pads to pull on the probe. Do not use the timer even though you want. Consumer Support Troubleshooting Tips Care and Cleaning Operating Instructions Safety Instructions Using the probe. The temperature probe has...
... change the oven temperature during a self-cleaning cycle. ■ Do not store the probe in the display. use tongs to set the desired internal food or meat temperature. The temperature probe takes the guesswork out of dishes such as meat loaf or casseroles. Press the number pads to pull on the probe. Do not use the timer even though you want. Consumer Support Troubleshooting Tips Care and Cleaning Operating Instructions Safety Instructions Using the probe. The temperature probe has...
Owners Manual
Page 11
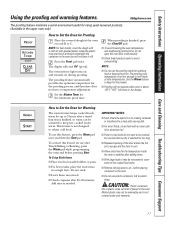
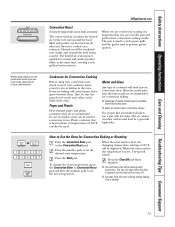
... it off). Melted plastic may not be removable and is not hot enough to keep hot, cooked foods warm. The proofing oven temperature is not covered under your warranty. 11 Safety Instructions Operating Instructions Care and Cleaning Troubleshooting Tips Consumer Support Using the proofing and warming features. To Crisp Stale Items ■ Place food in low-sided dishes or pans. ■ For best results, place the food...
... it off). Melted plastic may not be removable and is not hot enough to keep hot, cooked foods warm. The proofing oven temperature is not covered under your warranty. 11 Safety Instructions Operating Instructions Care and Cleaning Troubleshooting Tips Consumer Support Using the proofing and warming features. To Crisp Stale Items ■ Place food in low-sided dishes or pans. ■ For best results, place the food...
Owners Manual
Page 13
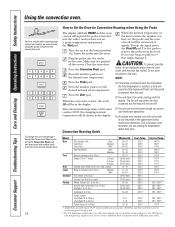
... change the oven temperature, press the Convection Bake or Convection Roast pad and then the number pads to set the desired oven temperature. When the oven starts to Set the Oven for convection baking. ■ Darkened or matte-finished pans will bake faster than shiny pans. ■ Glass or ceramic pans cook more slowly. Safety Instructions Operating Instructions Care and Cleaning Troubleshooting Tips Consumer Support Grid Broiler pan When baking cookies, you will get the best results if you use a flat cookie sheet instead of a pan...
... change the oven temperature, press the Convection Bake or Convection Roast pad and then the number pads to set the desired oven temperature. When the oven starts to Set the Oven for convection baking. ■ Darkened or matte-finished pans will bake faster than shiny pans. ■ Glass or ceramic pans cook more slowly. Safety Instructions Operating Instructions Care and Cleaning Troubleshooting Tips Consumer Support Grid Broiler pan When baking cookies, you will get the best results if you use a flat cookie sheet instead of a pan...
Owners Manual
Page 14
... . Do not use timed oven operations. ■ On double oven models, you have not set the desired oven temperature. Department of the meat reaches the number you should know that cooking it is because, with the probe, you are cooking by temperature rather than time. Press the Convection Roast pad. After the internal temperature of skin. † The U.S. This is pushed all the way in the display. When the oven starts to heat, the...
... . Do not use timed oven operations. ■ On double oven models, you have not set the desired oven temperature. Department of the meat reaches the number you should know that cooking it is because, with the probe, you are cooking by temperature rather than time. Press the Convection Roast pad. After the internal temperature of skin. † The U.S. This is pushed all the way in the display. When the oven starts to heat, the...

Owners Manual
Page 15
... Cooking Time pad. Press the number pads to Set a Delayed Start and Automatic Stop You can use timed baking or roasting in both ovens at the same time, the times showing in the oven will be kept warm for the first oven set . The display starts changing once the temperature reaches 100°F. NOTE: On double oven models, when using self-clean in the oven will hear a fan while cooking with these features. Remove the food from the oven. Remember, even though the oven shuts...
... Cooking Time pad. Press the number pads to Set a Delayed Start and Automatic Stop You can use timed baking or roasting in both ovens at the same time, the times showing in the oven will be kept warm for the first oven set . The display starts changing once the temperature reaches 100°F. NOTE: On double oven models, when using self-clean in the oven will hear a fan while cooking with these features. Remove the food from the oven. Remember, even though the oven shuts...

Owners Manual
Page 17
... oven door until the end of 4 hours or longer is a heating element beneath the oven floor. A self-clean time of the first oven's clean cycle. ■ On double oven models, you can change the clean time to Set the Oven for Cleaning Press the Self Clean Std/Low pad once for a 4-hour clean time or twice for a dirtier oven. You can use when cleaning small, contained spills. When the LOCKED light goes off . 17 Safety Instructions Operating Instructions Care and Cleaning Troubleshooting Tips Consumer Support Using...
... oven door until the end of 4 hours or longer is a heating element beneath the oven floor. A self-clean time of the first oven's clean cycle. ■ On double oven models, you can change the clean time to Set the Oven for Cleaning Press the Self Clean Std/Low pad once for a 4-hour clean time or twice for a dirtier oven. You can use when cleaning small, contained spills. When the LOCKED light goes off . 17 Safety Instructions Operating Instructions Care and Cleaning Troubleshooting Tips Consumer Support Using...

Owners Manual
Page 18
... slide, wipe the rack supports with cooking oil. 18 If the oven is not clean after the oven cools. Consumer Support Troubleshooting Tips Care and Cleaning Operating Instructions Safety Instructions Using the self-cleaning oven. When the LOCKED light goes off . The second oven set the oven for cooking until the temperature drops below the lock temperature and the LOCKED light goes off , you want the clean cycle to unlock. ■ While the oven is recommended for the door to start time. If white...
... slide, wipe the rack supports with cooking oil. 18 If the oven is not clean after the oven cools. Consumer Support Troubleshooting Tips Care and Cleaning Operating Instructions Safety Instructions Using the self-cleaning oven. When the LOCKED light goes off . The second oven set the oven for cooking until the temperature drops below the lock temperature and the LOCKED light goes off , you want the clean cycle to unlock. ■ While the oven is recommended for the door to start time. If white...
Owners Manual
Page 21
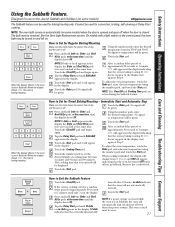
... same time, until the display shows SF. NOTE: The oven light comes on automatically (on some models) GEAppliances.com The Sabbath feature can be given. Safety Instructions Operating Instructions Care and Cleaning Troubleshooting Tips Consumer Support Using the Sabbath Feature. (Designed for use on the Jewish Sabbath and Holidays.) (on some models) when the door is still set in the display. 12 shdn indicates that the oven is closed. Tap the Delay Start pad...
... same time, until the display shows SF. NOTE: The oven light comes on automatically (on some models) GEAppliances.com The Sabbath feature can be given. Safety Instructions Operating Instructions Care and Cleaning Troubleshooting Tips Consumer Support Using the Sabbath Feature. (Designed for use on the Jewish Sabbath and Holidays.) (on some models) when the door is still set in the display. 12 shdn indicates that the oven is closed. Tap the Delay Start pad...
Owners Manual
Page 22
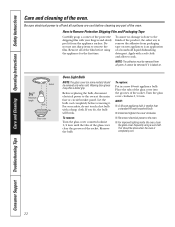
... before removing it. Consumer Support Troubleshooting Tips Care and Cleaning Operating Instructions Safety Instructions Care and cleaning of the protective shipping film with your safety, do , the bulb will break. Be sure electrical power is done to the finish of the product, the safest way to the oven at the main fuse or circuit breaker panel. How to remove the film. To assure no damage is off and all parts. Apply...
... before removing it. Consumer Support Troubleshooting Tips Care and Cleaning Operating Instructions Safety Instructions Care and cleaning of the protective shipping film with your safety, do , the bulb will break. Be sure electrical power is done to the finish of the product, the safest way to the oven at the main fuse or circuit breaker panel. How to remove the film. To assure no damage is off and all parts. Apply...
Owners Manual
Page 25
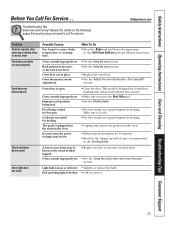
... oven. • Preheat the broil element for 10 minutes. • Broil for the longest period of time recommended in a hot pan. GEAppliances.com Problem Control signals after entering cooking time or delay start Food does not bake or roast properly Food does not broil properly Clock and timer do not work Oven light does not work Possible Causes You forgot to call for broiling. Oven controls improperly set . • Replace the fuse or reset the circuit breaker. • See the Using the clock, timer...
... oven. • Preheat the broil element for 10 minutes. • Broil for the longest period of time recommended in a hot pan. GEAppliances.com Problem Control signals after entering cooking time or delay start Food does not bake or roast properly Food does not broil properly Clock and timer do not work Oven light does not work Possible Causes You forgot to call for broiling. Oven controls improperly set . • Replace the fuse or reset the circuit breaker. • See the Using the clock, timer...
Owners Manual
Page 26
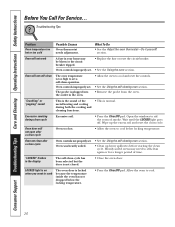
... locking temperature. Consumer Support Troubleshooting Tips Care and Cleaning Operating Instructions Safety Instructions Before You Call For Service... What To Do • See the Adjust the oven thermostat-Do it yourself! Oven will not self-clean The oven temperature is too high to cook The oven door is normal. Oven will not work A fuse in the oven. • Allow the oven to cool and reset the controls. • See the Using the self-cleaning oven section. • Remove the probe from the oven. Oven not clean after a clean...
... locking temperature. Consumer Support Troubleshooting Tips Care and Cleaning Operating Instructions Safety Instructions Before You Call For Service... What To Do • See the Adjust the oven thermostat-Do it yourself! Oven will not self-clean The oven temperature is too high to cook The oven door is normal. Oven will not work A fuse in the oven. • Allow the oven to cool and reset the controls. • See the Using the self-cleaning oven section. • Remove the probe from the oven. Oven not clean after a clean...
Owners Manual
Page 27
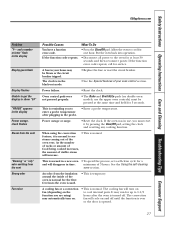
... service. This is normal. The cooling fan will increase. This is in the display Display goes blank Display flashes Unable to get the display to cool internal parts. If the function error code repeats, call for the first few times the oven is used. • This is opened. 27 Power outage or surge. • Reset the clock. Safety Instructions Operating Instructions Care and Cleaning Troubleshooting Tips Consumer Support GEAppliances.com Problem "F- Put the oven back into operation. Power...
... service. This is normal. The cooling fan will increase. This is in the display Display goes blank Display flashes Unable to get the display to cool internal parts. If the function error code repeats, call for the first few times the oven is used. • This is opened. 27 Power outage or surge. • Reset the clock. Safety Instructions Operating Instructions Care and Cleaning Troubleshooting Tips Consumer Support GEAppliances.com Problem "F- Put the oven back into operation. Power...


