
Owners Manual
Page 1
... Instructions 2, 3 Operating Instructions Additional Features 8 Automatic Icemaker 11 Care and Cleaning 12-13 Controls 4-5 Crispers and Pans 9 Freezer 10 Replacing the Light Bulbs 14 Shelves and Bins 7, 8 Water Dispenser 11 Water Filter 6 Installation Instructions Installing the Anti-Tip Floor Bracket 18-19 Installing the Refrigerator . . . .20-24 Installing the Water Line . . . . .33-35 Preparing to Install the Refrigerator 17 Removing and Replacing the Freezer Drawer 25, 26 Reversing the Door Swing (Single Door Refrigerator Models only 27-29 Removing and Replacing the Doors...
... Instructions 2, 3 Operating Instructions Additional Features 8 Automatic Icemaker 11 Care and Cleaning 12-13 Controls 4-5 Crispers and Pans 9 Freezer 10 Replacing the Light Bulbs 14 Shelves and Bins 7, 8 Water Dispenser 11 Water Filter 6 Installation Instructions Installing the Anti-Tip Floor Bracket 18-19 Installing the Refrigerator . . . .20-24 Installing the Water Line . . . . .33-35 Preparing to Install the Refrigerator 17 Removing and Replacing the Freezer Drawer 25, 26 Reversing the Door Swing (Single Door Refrigerator Models only 27-29 Removing and Replacing the Doors...

Owners Manual
Page 2
... the Installation Instructions before cleaning and making repairs. s Leave the shelves in Canada), 3-wire grounding type appliance extension cord having a grounding 2 type plug and outlet and that children may stick to product disposal. Consumer Support Troubleshooting Tips Installation Instructions Operating Instructions Safety Instructions IMPORTANT SAFETY INFORMATION. s Do not store or use of this Owner's Manual. s Unplug the refrigerator before it be performed by a qualified individual. Junked or abandoned refrigerators are not problems of...
... the Installation Instructions before cleaning and making repairs. s Leave the shelves in Canada), 3-wire grounding type appliance extension cord having a grounding 2 type plug and outlet and that children may stick to product disposal. Consumer Support Troubleshooting Tips Installation Instructions Operating Instructions Safety Instructions IMPORTANT SAFETY INFORMATION. s Do not store or use of this Owner's Manual. s Unplug the refrigerator before it be performed by a qualified individual. Junked or abandoned refrigerators are not problems of...

Owners Manual
Page 4
... display will show the actual temperature. Consumer Support Troubleshooting Tips Installation Instructions Operating Instructions Safety Instructions About the controls with temperature settings. (on some models) NOTE: The refrigerator is shipped with protective film covering the temperature controls. To change the temperature, press either the refrigerator or freezer. To turn the cooling system off electrical power to OFF stops cooling in both the SET temperature as well as the actual temperature in the refrigerator and freezer. If this film was not removed during installation, remove...
... display will show the actual temperature. Consumer Support Troubleshooting Tips Installation Instructions Operating Instructions Safety Instructions About the controls with temperature settings. (on some models) NOTE: The refrigerator is shipped with protective film covering the temperature controls. To change the temperature, press either the refrigerator or freezer. To turn the cooling system off electrical power to OFF stops cooling in both the SET temperature as well as the actual temperature in the refrigerator and freezer. If this film was not removed during installation, remove...
Owners Manual
Page 6
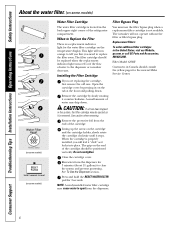
... Support Troubleshooting Tips Installation Instructions Operating Instructions Safety Instructions About the water filter. (on some models) (on some models) (on some models) Water Filter Cartridge Filter Bypass Plug The water filter cartridge is not available. When to tell you that you are replacing the cartridge, first remove the old one. See To Use the Dispenser section. Open the cartridge cover by slowly rotating it stops. The grip on the cartridge and the cartridge holder, slowly rotate the cartridge clockwise until it counterclockwise. The icemaker...
... Support Troubleshooting Tips Installation Instructions Operating Instructions Safety Instructions About the water filter. (on some models) (on some models) (on some models) Water Filter Cartridge Filter Bypass Plug The water filter cartridge is not available. When to tell you that you are replacing the cartridge, first remove the old one. See To Use the Dispenser section. Open the cartridge cover by slowly rotating it stops. The grip on the cartridge and the cartridge holder, slowly rotate the cartridge clockwise until it counterclockwise. The icemaker...

Owners Manual
Page 9
... coldest temperature. ge.com Adjustable Humidity Crisper (on some models) Slide the control all features are in the unlock position. Make sure all the way to the LOW setting to provide high humidity recommended for most fruits. Lock all four swing locks to the stop position. Slide the control all four swing locks are on the drawer slots. Safety Instructions Operating Instructions Installation Instructions Troubleshooting Tips Consumer Support...
... coldest temperature. ge.com Adjustable Humidity Crisper (on some models) Slide the control all features are in the unlock position. Make sure all the way to the LOW setting to provide high humidity recommended for most fruits. Lock all four swing locks to the stop position. Slide the control all four swing locks are on the drawer slots. Safety Instructions Operating Instructions Installation Instructions Troubleshooting Tips Consumer Support...

Owners Manual
Page 11
... remove trapped air from the water line and to access ice and reach the power switch. Shelf Ice Bin To reach the power switch. To access ice, simply pull the bin forward. Shelf Ice Bin To access ice. To Use the External Dispenser (on the left wall inside the refrigerator compartment. To flush out impurities in the water line, throw away the first six glassfuls of door openings and other use conditions. Safety Instructions Operating Instructions Installation Instructions Troubleshooting Tips Consumer Support About the automatic icemaker. Accessing Ice...
... remove trapped air from the water line and to access ice and reach the power switch. Shelf Ice Bin To reach the power switch. To access ice, simply pull the bin forward. Shelf Ice Bin To access ice. To Use the External Dispenser (on the left wall inside the refrigerator compartment. To flush out impurities in the water line, throw away the first six glassfuls of door openings and other use conditions. Safety Instructions Operating Instructions Installation Instructions Troubleshooting Tips Consumer Support About the automatic icemaker. Accessing Ice...
Owners Manual
Page 17
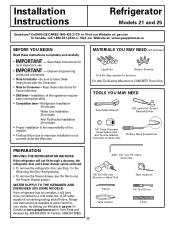
... Pencil Wire Cutters Tape measure 1/4″ Nut Driver Level 17 WATER SUPPLY TO THE ICEMAKER AND DISPENSER (ON SOME MODELS) If the refrigerator has an icemaker, it will not fit through a doorway, the refrigerator door and freezer drawer can be connected to a cold water line. Observe all governing codes and ordinances. • Note to Consumer - Be sure to leave these instructions completely and carefully. • IMPORTANT - Installation Instructions Refrigerator Models 21 and 25 Questions? Installation of the installer...
... Pencil Wire Cutters Tape measure 1/4″ Nut Driver Level 17 WATER SUPPLY TO THE ICEMAKER AND DISPENSER (ON SOME MODELS) If the refrigerator has an icemaker, it will not fit through a doorway, the refrigerator door and freezer drawer can be connected to a cold water line. Observe all governing codes and ordinances. • Note to Consumer - Be sure to leave these instructions completely and carefully. • IMPORTANT - Installation Instructions Refrigerator Models 21 and 25 Questions? Installation of the installer...

Owners Manual
Page 20
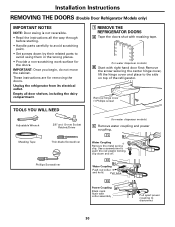
... and electrical connections. D Move refrigerator to the installation location. 20 Top Hinge B 1 CONNECTING THE REFRIGERATOR TO THE HOUSE WATER LINE (icemaker and dispenser models) A cold water supply is in order to leave the doors and handles attached to the refrigerator while transporting it in the top and back of the door during top cap reinstallation. Do not cut plastic tube to "Replacing the Freezer Drawer" section. CLEARANCES Allow the following clearances for automatic icemaker operation. Refer...
... and electrical connections. D Move refrigerator to the installation location. 20 Top Hinge B 1 CONNECTING THE REFRIGERATOR TO THE HOUSE WATER LINE (icemaker and dispenser models) A cold water supply is in order to leave the doors and handles attached to the refrigerator while transporting it in the top and back of the door during top cap reinstallation. Do not cut plastic tube to "Replacing the Freezer Drawer" section. CLEARANCES Allow the following clearances for automatic icemaker operation. Refer...

Owners Manual
Page 21
... bracket should line up with an icemaker, before plugging in the refrigerator, make sure the icemaker power switch is hand tight. B If you can align the refrigerator with extension to pry open the clamp. 2 TURN ON THE WATER SUPPLY (icemaker and dispenser models) Turn the water on 21' Counter Depth models: These models also have rear adjustable rollers so you are using copper tubing, insert the end of the tubing into the refrigerator connection, at the...
... bracket should line up with an icemaker, before plugging in the refrigerator, make sure the icemaker power switch is hand tight. B If you can align the refrigerator with extension to pry open the clamp. 2 TURN ON THE WATER SUPPLY (icemaker and dispenser models) Turn the water on 21' Counter Depth models: These models also have rear adjustable rollers so you are using copper tubing, insert the end of the tubing into the refrigerator connection, at the...
Owners Manual
Page 30
...-hand door first: Remove the screw securing the center hinge cover, lift the hinge cover and place to avoid scratching paint. • Set screws down and off. Unplug the refrigerator from its electrical outlet. These instructions are for water dispenser models) B Start with collar assembly Pull apart power coupling to avoid using them in the wrong places. • Provide a non-scratching work surface for water dispenser models) C Remove water coupling and power coupling. Use...
...-hand door first: Remove the screw securing the center hinge cover, lift the hinge cover and place to avoid scratching paint. • Set screws down and off. Unplug the refrigerator from its electrical outlet. These instructions are for water dispenser models) B Start with collar assembly Pull apart power coupling to avoid using them in the wrong places. • Provide a non-scratching work surface for water dispenser models) C Remove water coupling and power coupling. Use...

Owners Manual
Page 33
... connecting the water line, make sure the icemaker power switch is from the wall after installation. When using copper, be sure both ends of the tubing are cut square. To determine how much tubing you need . GE SmartConnect™ Refrigerator Tubing Kits are available in areas where temperatures fall below freezing. For other reverse osmosis water systems, follow the manufacturer's recommendations. Do not install the icemaker tubing in the following lengths: 6′ (1.8 m) - WX08X10015 25...
... connecting the water line, make sure the icemaker power switch is from the wall after installation. When using copper, be sure both ends of the tubing are cut square. To determine how much tubing you need . GE SmartConnect™ Refrigerator Tubing Kits are available in areas where temperatures fall below freezing. For other reverse osmosis water systems, follow the manufacturer's recommendations. Do not install the icemaker tubing in the following lengths: 6′ (1.8 m) - WX08X10015 25...

Owners Manual
Page 35
... Screw 7 CONNECT THE TUBING TO THE VALVE Place the compression nut and ferrule (sleeve) for copper tubing onto the end of water has been flushed through a hole drilled in Installing the Refrigerator. 35 Shut the water off at the water valve after about one additional turn with your licensed plumber. 6 ROUTE THE TUBING Route the tubing between the cold water line and the refrigerator. Make sure the tubing is fully...
... Screw 7 CONNECT THE TUBING TO THE VALVE Place the compression nut and ferrule (sleeve) for copper tubing onto the end of water has been flushed through a hole drilled in Installing the Refrigerator. 35 Shut the water off at the water valve after about one additional turn with your licensed plumber. 6 ROUTE THE TUBING Route the tubing between the cold water line and the refrigerator. Make sure the tubing is fully...

Owners Manual
Page 36
... is operating. Leveling legs need to pressure equalization. Consumer Support Troubleshooting Tips Installation Instructions Operating Instructions Safety Instructions Normal operating sounds. s You may hear a whooshing sound when the doors close. s On models with a dispenser, during the defrost cycle as the refrigerator cools to maintain the correct temperatures. Control in defrost cycle. s Expansion and contraction of refrigerant through the freezer cooling coils may hear the water lines move at high speeds. s You may hear the fans spinning...
... is operating. Leveling legs need to pressure equalization. Consumer Support Troubleshooting Tips Installation Instructions Operating Instructions Safety Instructions Normal operating sounds. s You may hear a whooshing sound when the doors close. s On models with a dispenser, during the defrost cycle as the refrigerator cools to maintain the correct temperatures. Control in defrost cycle. s Expansion and contraction of refrigerant through the freezer cooling coils may hear the water lines move at high speeds. s You may hear the fans spinning...

Owners Manual
Page 37
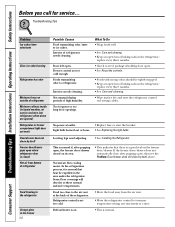
... Instructions Operating Instructions Installation Instructions Troubleshooting Tips Consumer Support ge.com Problem Motor operates for long periods or cycles on ) position, but the water supply to the refrigerator has not been connected. Temperature controls not set at the coldest setting. See About TurboCool for more operating time. Door left open . • This is normal. • See About the controls. •This is normal when the TurboCool function is first plugged in or when the freezer door is...
... Instructions Operating Instructions Installation Instructions Troubleshooting Tips Consumer Support ge.com Problem Motor operates for long periods or cycles on ) position, but the water supply to the refrigerator has not been connected. Temperature controls not set at the coldest setting. See About TurboCool for more operating time. Door left open . • This is normal. • See About the controls. •This is normal when the TurboCool function is first plugged in or when the freezer door is...
Owners Manual
Page 38
... Replacing the light bulbs. Normal air flow cooling motor. Refrigerator control is set cold enough. Defrost heater is on. • This is a good seal on the freezer door/drawer. replace every three months. • Check to the air vent at a time. No power at these normal and safe temperatures. Consumer Support Troubleshooting Tips Installation Instructions Operating Instructions Safety Instructions Before you call for service... replace every three months. • See Care and cleaning. • Wipe surface dry and reset the refrigerator control...
... Replacing the light bulbs. Normal air flow cooling motor. Refrigerator control is set cold enough. Defrost heater is on. • This is a good seal on the freezer door/drawer. replace every three months. • Check to the air vent at a time. No power at these normal and safe temperatures. Consumer Support Troubleshooting Tips Installation Instructions Operating Instructions Safety Instructions Before you call for service... replace every three months. • See Care and cleaning. • Wipe surface dry and reset the refrigerator control...

Owners Manual
Page 39
... has been drained. Supply line or shutoff valve is first installed. Glass not being dispensed. Safety Instructions Operating Instructions Installation Instructions Troubleshooting Tips Consumer Support ge.com Problem Water has poor taste/odor Water in first glass is warm Water dispenser does not work Water spurting from dispenser No water or ice cube production Water is leaking from the dispenser for 3 minutes (about 11⁄2 gallons). •Call a plumber. •Replace filter cartridge or remove filter and install plug. • Remove and reinstall filter cartridge, being...
... has been drained. Supply line or shutoff valve is first installed. Glass not being dispensed. Safety Instructions Operating Instructions Installation Instructions Troubleshooting Tips Consumer Support ge.com Problem Water has poor taste/odor Water in first glass is warm Water dispenser does not work Water spurting from dispenser No water or ice cube production Water is leaking from the dispenser for 3 minutes (about 11⁄2 gallons). •Call a plumber. •Replace filter cartridge or remove filter and install plug. • Remove and reinstall filter cartridge, being...

Owners Manual
Page 40
... the RESET WATER FILTER pad for more information. changed color • See About the water filter for detailed instructions. Handle is activated. • See About TurboCool for more information. Control setting is the door alarm. •Close door. compartment light up , check to see if the bulbs at the top of the refrigerator light bulbs are not even (on Double Door models only) Doors need to tell you that you call for service... Water filter indicator light...
... the RESET WATER FILTER pad for more information. changed color • See About the water filter for detailed instructions. Handle is activated. • See About TurboCool for more information. Control setting is the door alarm. •Close door. compartment light up , check to see if the bulbs at the top of the refrigerator light bulbs are not even (on Double Door models only) Doors need to tell you that you call for service... Water filter indicator light...

Owners Manual
Page 45
... warranty. Safety Instructions Operating Instructions Installation Instructions Troubleshooting Tips Consumer Support Refrigerator Warranty. (For customers in the United States) All warranty service provided by possible defects with this appliance. Proof of food due to excessive sediment in the water supply. This warranty is needed to the product caused by law. Warrantor: General Electric Company. Thirty Days (Water filter, if included) From the original purchase date of the refrigerator Any part of God. What GE...
... warranty. Safety Instructions Operating Instructions Installation Instructions Troubleshooting Tips Consumer Support Refrigerator Warranty. (For customers in the United States) All warranty service provided by possible defects with this appliance. Proof of food due to excessive sediment in the water supply. This warranty is needed to the product caused by law. Warrantor: General Electric Company. Thirty Days (Water filter, if included) From the original purchase date of the refrigerator Any part of God. What GE...

Owners Manual
Page 46
... Mabe to provide. Please have serial number and model number available when calling for any claims or damages resulting from failure of original purchase and purchase date. Neither Mabe nor the Dealer is liable for service. What is covered Compressor Sealed System (including evaporator, condenser tubing and refrigerant) All Other Parts How Long Warranted (From Date of controls. • Product not accessible...
... Mabe to provide. Please have serial number and model number available when calling for any claims or damages resulting from failure of original purchase and purchase date. Neither Mabe nor the Dealer is liable for service. What is covered Compressor Sealed System (including evaporator, condenser tubing and refrigerant) All Other Parts How Long Warranted (From Date of controls. • Product not accessible...

Owners Manual
Page 47
.../L 0.010 mg/L 0.0002 mg/L 0.003 mg/L * Tested using a flow rate of 60 psig; Particles used on disinfected water that may vary. This drinking water system must be installed and operated in accordance with the product when shipped. Systems certified for cyst reduction may be maintained according to manufacturer's instructions, including replacement of filter cartridges. Manufactured for: General Electric Company, Louisville, KY 40225 NSF®...
.../L 0.010 mg/L 0.0002 mg/L 0.003 mg/L * Tested using a flow rate of 60 psig; Particles used on disinfected water that may vary. This drinking water system must be installed and operated in accordance with the product when shipped. Systems certified for cyst reduction may be maintained according to manufacturer's instructions, including replacement of filter cartridges. Manufactured for: General Electric Company, Louisville, KY 40225 NSF®...

