
Owners Manual
Page 1
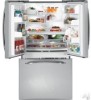
...: Model Serial Find these numbers on a label on the right side, near the top of California Water Treatment Device Certificate . . . . .48 Warranty for Canadian Customers 46 Warranty for U.S. ge.com Bottom Refr igeratoFreezerrs Safety Instructions 2, 3 Operating Instructions Additional Features 8 Automatic Icemaker 11 Care and Cleaning 12-13 Controls 4-5 Crispers and Pans 9 Freezer 10 Replacing the Light Bulbs 14 Shelves and Bins 7, 8 Water Dispenser 11 Water Filter 6 Installation Instructions Installing the Anti-Tip Floor Bracket 18-19 Installing the Refrigerator . . . .20...
...: Model Serial Find these numbers on a label on the right side, near the top of California Water Treatment Device Certificate . . . . .48 Warranty for Canadian Customers 46 Warranty for U.S. ge.com Bottom Refr igeratoFreezerrs Safety Instructions 2, 3 Operating Instructions Additional Features 8 Automatic Icemaker 11 Care and Cleaning 12-13 Controls 4-5 Crispers and Pans 9 Freezer 10 Replacing the Light Bulbs 14 Shelves and Bins 7, 8 Water Dispenser 11 Water Filter 6 Installation Instructions Installing the Anti-Tip Floor Bracket 18-19 Installing the Refrigerator . . . .20...

Owners Manual
Page 2
... with the Installation Instructions before cleaning and making repairs. s In refrigerators with automatic icemakers, avoid contact with the moving parts of the past. USE OF EXTENSION CORDS Because of the "pinch point" areas; Be careful closing doors when children are damp or wet. Do not place fingers or hands on the shelves in the refrigerator. s Leave the shelves in . Consumer Support Troubleshooting Tips Installation Instructions Operating Instructions Safety Instructions IMPORTANT SAFETY...
... with the Installation Instructions before cleaning and making repairs. s In refrigerators with automatic icemakers, avoid contact with the moving parts of the past. USE OF EXTENSION CORDS Because of the "pinch point" areas; Be careful closing doors when children are damp or wet. Do not place fingers or hands on the shelves in the refrigerator. s Leave the shelves in . Consumer Support Troubleshooting Tips Installation Instructions Operating Instructions Safety Instructions IMPORTANT SAFETY...

Owners Manual
Page 4
... the refrigerator. For Controls Inside the Refrigerator: Opening the door displays the actual temperature. Changing the Temperature For Controls-on-the-Door Models: To change the temperature, tap either the refrigerator or the freezer until the display shows OFF. Once the desired temperature has been set . The temperature controls can display both the freezer and refrigerator compartments, but does not shut off electrical power to the preset recommended settings. The temperature controls are preset in the refrigerator and freezer. The ACTUAL TEMP light will...
... the refrigerator. For Controls Inside the Refrigerator: Opening the door displays the actual temperature. Changing the Temperature For Controls-on-the-Door Models: To change the temperature, tap either the refrigerator or the freezer until the display shows OFF. Once the desired temperature has been set . The temperature controls can display both the freezer and refrigerator compartments, but does not shut off electrical power to the preset recommended settings. The temperature controls are preset in the refrigerator and freezer. The ACTUAL TEMP light will...
Owners Manual
Page 6
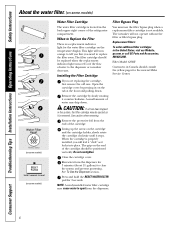
... Cartridge You must use the filter bypass plug when a replacement filter cartridge is a replacement indicator light for the water filter cartridge on the temperature display. The grip on the end of water to clear the system and prevent sputtering. Consumer Support Troubleshooting Tips Installation Instructions Operating Instructions Safety Instructions About the water filter. (on some models) (on some models) (on some models) Water Filter Cartridge Filter Bypass Plug The water filter cartridge is located in Canada should consult the yellow pages for the nearest Mabe Service...
... Cartridge You must use the filter bypass plug when a replacement filter cartridge is a replacement indicator light for the water filter cartridge on the temperature display. The grip on the end of water to clear the system and prevent sputtering. Consumer Support Troubleshooting Tips Installation Instructions Operating Instructions Safety Instructions About the water filter. (on some models) (on some models) (on some models) Water Filter Cartridge Filter Bypass Plug The water filter cartridge is located in Canada should consult the yellow pages for the nearest Mabe Service...

Owners Manual
Page 9
... left for most vegetables. Adjustable Temperature Deli Pan (on all models. Lower the lid and slide in the unlock position. Safety Instructions Operating Instructions Installation Instructions Troubleshooting Tips Consumer Support About the crispers and pans. Swing Locks Lift the lid to the stop position. Lift the front of the drawers or under the drawers should be wiped dry. How to provide lower humidity levels recommended for the coldest temperature. ge...
... left for most vegetables. Adjustable Temperature Deli Pan (on all models. Lower the lid and slide in the unlock position. Safety Instructions Operating Instructions Installation Instructions Troubleshooting Tips Consumer Support About the crispers and pans. Swing Locks Lift the lid to the stop position. Lift the front of the drawers or under the drawers should be wiped dry. How to provide lower humidity levels recommended for the coldest temperature. ge...

Owners Manual
Page 11
... power switch, pull the shelf above the ice bin straight out. NOTE: Set the power switch to replace the shelf. To Use the External Dispenser (on freezer compartment temperature, room temperature, number of the dispenser cradle. Door Alarm To set the power switch to clear. Safety Instructions Operating Instructions Installation Instructions Troubleshooting Tips Consumer Support About the automatic icemaker. The icemaker power light will illuminate. If no water is dispensed when the refrigerator is normal for at least two minutes to remove trapped air from the water line...
... power switch, pull the shelf above the ice bin straight out. NOTE: Set the power switch to replace the shelf. To Use the External Dispenser (on freezer compartment temperature, room temperature, number of the dispenser cradle. Door Alarm To set the power switch to clear. Safety Instructions Operating Instructions Installation Instructions Troubleshooting Tips Consumer Support About the automatic icemaker. The icemaker power light will illuminate. If no water is dispensed when the refrigerator is normal for at least two minutes to remove trapped air from the water line...
Owners Manual
Page 17
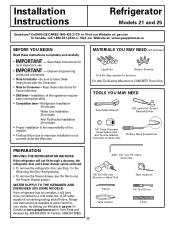
... BEGIN Read these instructions for local inspector's use. • IMPORTANT - Installation of the installer. • Product failure due to Installer - WATER SUPPLY TO THE ICEMAKER AND DISPENSER (ON SOME MODELS) If the refrigerator has an icemaker, it will not fit through a doorway, the refrigerator door and freezer drawer can be connected to Consumer - Installation Instructions Refrigerator Models 21 and 25 Questions? Save these instructions completely and carefully. • IMPORTANT - Call 800.GE.CARES (800.432...
... BEGIN Read these instructions for local inspector's use. • IMPORTANT - Installation of the installer. • Product failure due to Installer - WATER SUPPLY TO THE ICEMAKER AND DISPENSER (ON SOME MODELS) If the refrigerator has an icemaker, it will not fit through a doorway, the refrigerator door and freezer drawer can be connected to Consumer - Installation Instructions Refrigerator Models 21 and 25 Questions? Save these instructions completely and carefully. • IMPORTANT - Call 800.GE.CARES (800.432...

Owners Manual
Page 20
... "Replacing the Freezer Drawer" section. C Remove the bottom freezer drawer. If using GE SmartConnect™ Refrigerator Tubing Kit, you will need to the installation location must be removed to allow the refrigerator to remove doors, skip Step A. F Place cap over the top of the cap. If passageways are less than 36″, the refrigerator doors and handles can be at the rear of the refrigerator. See Installing the Water Line section. Standard Depth Counter Depth Models Models...
... "Replacing the Freezer Drawer" section. C Remove the bottom freezer drawer. If using GE SmartConnect™ Refrigerator Tubing Kit, you will need to the installation location must be removed to allow the refrigerator to remove doors, skip Step A. F Place cap over the top of the cap. If passageways are less than 36″, the refrigerator doors and handles can be at the rear of the refrigerator. See Installing the Water Line section. Standard Depth Counter Depth Models Models...

Owners Manual
Page 21
... cold water supply. Use a 3/8″ hex wrench with extension to turn with your refrigerator. While holding the tubing, tighten the fitting. Overtightening may need to pry open the clamp. 2 TURN ON THE WATER SUPPLY (icemaker and dispenser models) Turn the water on your kitchen cabinets. One of the refrigerator engages the anti-tip bracket properly. The anti-tip floor bracket should line up with extension, or an Roller adjusting screws adjustable wrench. Use...
... cold water supply. Use a 3/8″ hex wrench with extension to turn with your refrigerator. While holding the tubing, tighten the fitting. Overtightening may need to pry open the clamp. 2 TURN ON THE WATER SUPPLY (icemaker and dispenser models) Turn the water on your kitchen cabinets. One of the refrigerator engages the anti-tip bracket properly. The anti-tip floor bracket should line up with extension, or an Roller adjusting screws adjustable wrench. Use...
Owners Manual
Page 24
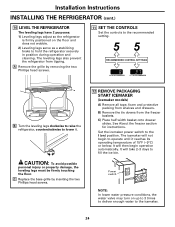
... screws. 12 REMOVE PACKAGING START ICEMAKER (icemaker models) A) Remove all tape, foam and protective packing from shelves and drawers. See About the freezer section for instructions. Installation Instructions INSTALLING THE REFRIGERATOR (cont.) 10 LEVEL THE REFRIGERATOR The leveling legs have 2 purposes: 1) Leveling legs adjust so the refrigerator is firmly positioned on up to 3 times to deliver enough water to the recommended setting. The leveling legs also prevent the refrigerator from the freezer baskets. It...
... screws. 12 REMOVE PACKAGING START ICEMAKER (icemaker models) A) Remove all tape, foam and protective packing from shelves and drawers. See About the freezer section for instructions. Installation Instructions INSTALLING THE REFRIGERATOR (cont.) 10 LEVEL THE REFRIGERATOR The leveling legs have 2 purposes: 1) Leveling legs adjust so the refrigerator is firmly positioned on up to 3 times to deliver enough water to the recommended setting. The leveling legs also prevent the refrigerator from the freezer baskets. It...

Owners Manual
Page 27
... all door shelves, including the dairy compartment. 1 REMOVE THE REFRIGERATOR DOOR A Tape the door shut with the inside door hinge pin hole located in the hinge kit. These instructions are included in the door hinge kit. • Handle parts carefully to the left side-if you begin, do not move the cabinet until door-swing reversal is completed. Installation Instructions REVERSING THE DOOR SWING (Single Door Refrigerator Models only) IMPORTANT NOTES When reversing the door swing: NOTE: Door swing is not reversible on stainless steel models...
... all door shelves, including the dairy compartment. 1 REMOVE THE REFRIGERATOR DOOR A Tape the door shut with the inside door hinge pin hole located in the hinge kit. These instructions are included in the door hinge kit. • Handle parts carefully to the left side-if you begin, do not move the cabinet until door-swing reversal is completed. Installation Instructions REVERSING THE DOOR SWING (Single Door Refrigerator Models only) IMPORTANT NOTES When reversing the door swing: NOTE: Door swing is not reversible on stainless steel models...
Owners Manual
Page 30
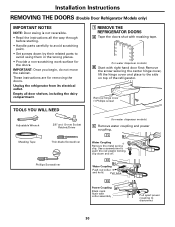
... paint. • Set screws down and off. Unplug the refrigerator from its electrical outlet. C2 Water Coupling Push red collar and hold. Installation Instructions REMOVING THE DOORS (Double Door Refrigerator Models only) IMPORTANT NOTES NOTE: Door swing is not reversible. • Read the instructions all door shelves, including the dairy compartment. 1 REMOVE THE REFRIGERATOR DOORS A Tape the doors shut with masking tape. (for the doors. Remove hinge cover (1 Phillips screw) TOOLS YOU WILL NEED Adjustable Wrench 3/8″...
... paint. • Set screws down and off. Unplug the refrigerator from its electrical outlet. C2 Water Coupling Push red collar and hold. Installation Instructions REMOVING THE DOORS (Double Door Refrigerator Models only) IMPORTANT NOTES NOTE: Door swing is not reversible. • Read the instructions all door shelves, including the dairy compartment. 1 REMOVE THE REFRIGERATOR DOORS A Tape the doors shut with masking tape. (for the doors. Remove hinge cover (1 Phillips screw) TOOLS YOU WILL NEED Adjustable Wrench 3/8″...

Owners Manual
Page 36
... tripped. Consumer Support Troubleshooting Tips Installation Instructions Operating Instructions Safety Instructions Normal operating sounds. Modern refrigerators have more features and use newer technology. Newer refrigerators sound different from the evaporator and flows into the outlet. • Replace fuse or reset the breaker. • See Level the Refrigerator. Do you may not need adjusting. • Move the control to provide optimal cooling and energy savings. HUMMM... s You may hear the fans spinning at...
... tripped. Consumer Support Troubleshooting Tips Installation Instructions Operating Instructions Safety Instructions Normal operating sounds. Modern refrigerators have more features and use newer technology. Newer refrigerators sound different from the evaporator and flows into the outlet. • Replace fuse or reset the breaker. • See Level the Refrigerator. Do you may not need adjusting. • Move the control to provide optimal cooling and energy savings. HUMMM... s You may hear the fans spinning at...

Owners Manual
Page 37
...the water valve. • Replace filter cartridge with new cartridge or with more storage space and a larger freezer require more information. • See About the controls. • Set the temperature control one step colder. Freezer compartment too warm. Piled up cubes in refrigerator. The icemaker power light will turn the icemaker back on and off ) position. Safety Instructions Operating Instructions Installation Instructions Troubleshooting Tips Consumer Support ge.com Problem Motor operates for more operating time. TurboCool function has been activated. Door left open...
...the water valve. • Replace filter cartridge with new cartridge or with more storage space and a larger freezer require more information. • See About the controls. • Set the temperature control one step colder. Freezer compartment too warm. Piled up cubes in refrigerator. The icemaker power light will turn the icemaker back on and off ) position. Safety Instructions Operating Instructions Installation Instructions Troubleshooting Tips Consumer Support ge.com Problem Motor operates for more operating time. TurboCool function has been activated. Door left open...
Owners Manual
Page 38
... bottom of refrigerator needs cleaning. Too frequent or too long door openings. replace every three months. • See Care and cleaning. • Wipe surface dry and reset the refrigerator control one increment at the back of the refrigerator. Leveling legs need adjusting. •See Installing the Refrigerator. Defrost heater is on outside of baking soda in humid weather, air carries moisture into refrigerator when doors are opened) Refrigerator or freezer compartment light does not work Door/drawer does...
... bottom of refrigerator needs cleaning. Too frequent or too long door openings. replace every three months. • See Care and cleaning. • Wipe surface dry and reset the refrigerator control one increment at the back of the refrigerator. Leveling legs need adjusting. •See Installing the Refrigerator. Defrost heater is on outside of baking soda in humid weather, air carries moisture into refrigerator when doors are opened) Refrigerator or freezer compartment light does not work Door/drawer does...

Owners Manual
Page 39
... connected. Supply line or shutoff valve is first installed. The blade on the end of the cartridge should be present in the water line system, causing water to drip after being certain that it locks into place. Water may continue to dispense after releasing the dispenser button. Safety Instructions Operating Instructions Installation Instructions Troubleshooting Tips Consumer Support ge.com Problem Water has poor taste/odor Water in first glass is warm Water dispenser does not work Water spurting from dispenser No water or ice...
... connected. Supply line or shutoff valve is first installed. The blade on the end of the cartridge should be present in the water line system, causing water to drip after being certain that it locks into place. Water may continue to dispense after releasing the dispenser button. Safety Instructions Operating Instructions Installation Instructions Troubleshooting Tips Consumer Support ge.com Problem Water has poor taste/odor Water in first glass is warm Water dispenser does not work Water spurting from dispenser No water or ice...

Owners Manual
Page 40
... About the water filter for service... Refrigerator beeping This is activated. • See About TurboCool for more information. Control setting is normal. Consumer Support Troubleshooting Tips Installation Instructions Operating Instructions Safety Instructions Before you need to see if the bulbs at the top of the refrigerator light bulbs are not even (on Double Door models only) Doors need realigning. •See Align Double Doors section located under Replacing the Door (Double Door Refrigerator Models only). 40 Refrigerator doors are burned out...
... About the water filter for service... Refrigerator beeping This is activated. • See About TurboCool for more information. Control setting is normal. Consumer Support Troubleshooting Tips Installation Instructions Operating Instructions Safety Instructions Before you need to see if the bulbs at the top of the refrigerator light bulbs are not even (on Double Door models only) Doors need realigning. •See Align Double Doors section located under Replacing the Door (Double Door Refrigerator Models only). 40 Refrigerator doors are burned out...

Owners Manual
Page 45
Safety Instructions Operating Instructions Installation Instructions Troubleshooting Tips Consumer Support Refrigerator Warranty. (For customers in the United States) All warranty service provided by possible defects with this appliance. GE PROFILE MODELS ONLY: Five Years (GE Profile models only) From the date of the original purchase Any part of circuit breakers. s Replacement of house fuses or resetting of the sealed refrigerating system (the compressor, condenser, evaporator and all connecting tubing) which fails due to your home. s Replacement of charge...
Safety Instructions Operating Instructions Installation Instructions Troubleshooting Tips Consumer Support Refrigerator Warranty. (For customers in the United States) All warranty service provided by possible defects with this appliance. GE PROFILE MODELS ONLY: Five Years (GE Profile models only) From the date of the original purchase Any part of circuit breakers. s Replacement of house fuses or resetting of the sealed refrigerating system (the compressor, condenser, evaporator and all connecting tubing) which fails due to your home. s Replacement of charge...

Owners Manual
Page 46
... covered Compressor Sealed System (including evaporator, condenser tubing and refrigerant) All Other Parts How Long Warranted (From Date of defects in material and workmanship. Please have serial number and model number available when calling for service. Neither Mabe nor the Dealer is liable for any succeeding owner for products purchased for home use in Canada when the Refrigerator has been properly installed according to the instructions supplied...
... covered Compressor Sealed System (including evaporator, condenser tubing and refrigerant) All Other Parts How Long Warranted (From Date of defects in material and workmanship. Please have serial number and model number available when calling for service. Neither Mabe nor the Dealer is liable for any succeeding owner for products purchased for home use in Canada when the Refrigerator has been properly installed according to the instructions supplied...

Owners Manual
Page 47
.../L 0.010 mg/L 0.0002 mg/L 0.003 mg/L * Tested using a flow rate of the indicated substances in water entering the system was performed under standard laboratory conditions, actual performance may contain filterable cysts. of the substances listed below. Replace cartridge when flow becomes too slow. Check for compliance with the product when shipped. Manufactured for: General Electric Company, Louisville, KY 40225 NSF® 47...
.../L 0.010 mg/L 0.0002 mg/L 0.003 mg/L * Tested using a flow rate of the indicated substances in water entering the system was performed under standard laboratory conditions, actual performance may contain filterable cysts. of the substances listed below. Replace cartridge when flow becomes too slow. Check for compliance with the product when shipped. Manufactured for: General Electric Company, Louisville, KY 40225 NSF® 47...


