
Owners Manual
Page 1
...11 Care and Cleaning 12-13 Controls 4-5 Crispers and Pans 9 Freezer 10 Replacing the Light Bulbs 14 Shelves and Bins 7, 8 Water Dispenser 11 Water Filter 6 Installation Instructions Installing the Anti-Tip Floor Bracket 18-19 Installing the Refrigerator . . . .20-24 Installing the Water Line . . . . .33-35 Preparing to Install the Refrigerator 17 Removing and Replacing the Freezer Drawer 25, 26 Reversing the Door Swing (Single Door Refrigerator Models only 27-29 Removing and Replacing the Doors (Double Door Refrigerator Models only) . . . .30-32 Trim Kits and Decorator Panels . .15...
...11 Care and Cleaning 12-13 Controls 4-5 Crispers and Pans 9 Freezer 10 Replacing the Light Bulbs 14 Shelves and Bins 7, 8 Water Dispenser 11 Water Filter 6 Installation Instructions Installing the Anti-Tip Floor Bracket 18-19 Installing the Refrigerator . . . .20-24 Installing the Water Line . . . . .33-35 Preparing to Install the Refrigerator 17 Removing and Replacing the Freezer Drawer 25, 26 Reversing the Door Swing (Single Door Refrigerator Models only 27-29 Removing and Replacing the Doors (Double Door Refrigerator Models only) . . . .30-32 Trim Kits and Decorator Panels . .15...

Owners Manual
Page 2
... the Installation Instructions before cleaning and making repairs. If you are damp or wet. They could damage the refrigerator and seriously injure themselves. s In refrigerators with automatic icemakers, avoid contact with the moving parts of an extension cord. s Setting either or both controls to 0 (off the doors. s Leave the shelves in Canada), 3-wire grounding type appliance extension cord having a grounding 2 type plug and outlet and that the electrical rating...
... the Installation Instructions before cleaning and making repairs. If you are damp or wet. They could damage the refrigerator and seriously injure themselves. s In refrigerators with automatic icemakers, avoid contact with the moving parts of an extension cord. s Setting either or both controls to 0 (off the doors. s Leave the shelves in Canada), 3-wire grounding type appliance extension cord having a grounding 2 type plug and outlet and that the electrical rating...

Owners Manual
Page 4
... temperature has been set . To turn the cooling system off, tap the WARMER pad for the refrigerator. Allow 24 hours for the temperature to stabilize to the preset points of 0°F for the freezer and 37°F for either the refrigerator or freezer. The ACTUAL TEMP light will go to the preset recommended settings. For Controls Inside the Refrigerator: Opening the door displays the actual temperature. Consumer Support Troubleshooting Tips Installation Instructions Operating Instructions Safety Instructions...
... temperature has been set . To turn the cooling system off, tap the WARMER pad for the refrigerator. Allow 24 hours for the temperature to stabilize to the preset points of 0°F for the freezer and 37°F for either the refrigerator or freezer. The ACTUAL TEMP light will go to the preset recommended settings. For Controls Inside the Refrigerator: Opening the door displays the actual temperature. Consumer Support Troubleshooting Tips Installation Instructions Operating Instructions Safety Instructions...
Owners Manual
Page 6
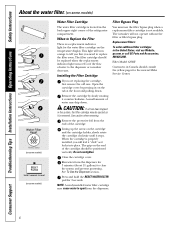
... the cartridge is properly installed, you are replacing the cartridge, first remove the old one. CAUTION: If air has been trapped in the United States, visit our Website, ge.com, or call GE Parts and Accessories, 800.626.2002. Lining up the arrow on the temperature display. Press and hold the RESET WATER FILTER pad for the nearest Mabe Service Center. The filter cartridge should be replaced when the replacement indicator light turns...
... the cartridge is properly installed, you are replacing the cartridge, first remove the old one. CAUTION: If air has been trapped in the United States, visit our Website, ge.com, or call GE Parts and Accessories, 800.626.2002. Lining up the arrow on the temperature display. Press and hold the RESET WATER FILTER pad for the nearest Mabe Service Center. The filter cartridge should be replaced when the replacement indicator light turns...

Owners Manual
Page 9
... the lid to Remove and Replace the Deli Pan To remove: To replace: Remove the fruit and vegetable drawers. Not all features are in the drawer. Slide the control all the way to provide lower humidity levels recommended for the coldest temperature. Lock all four swing locks to the stop position. Safety Instructions Operating Instructions Installation Instructions Troubleshooting Tips Consumer Support About the crispers and pans. Pull the drawer out to the...
... the lid to Remove and Replace the Deli Pan To remove: To replace: Remove the fruit and vegetable drawers. Not all features are in the drawer. Slide the control all the way to provide lower humidity levels recommended for the coldest temperature. Lock all four swing locks to the stop position. Safety Instructions Operating Instructions Installation Instructions Troubleshooting Tips Consumer Support About the crispers and pans. Pull the drawer out to the...

Owners Manual
Page 11
... water. NOTE: Set the power switch to the O (off . Dispenser Cradle Spill Shelf Icemaker Accessory Kit If your model. To Use the External Dispenser (on the left wall inside the refrigerator compartment. The indicator light will sound if either door is purged from the water line system. To dispense water: Hold the glass against the top of the feeler arm. If no water is dispensed when the refrigerator is shut off ) position if the water supply is first installed...
... water. NOTE: Set the power switch to the O (off . Dispenser Cradle Spill Shelf Icemaker Accessory Kit If your model. To Use the External Dispenser (on the left wall inside the refrigerator compartment. The indicator light will sound if either door is purged from the water line system. To dispense water: Hold the glass against the top of the feeler arm. If no water is dispensed when the refrigerator is shut off ) position if the water supply is first installed...
Owners Manual
Page 17
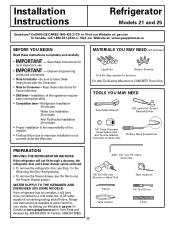
... Bit and Electric or Hand Drill Pencil Wire Cutters Tape measure 1/4″ Nut Driver Level 17 WATER SUPPLY TO THE ICEMAKER AND DISPENSER (ON SOME MODELS) If the refrigerator has an icemaker, it will not fit through a doorway, the refrigerator door and freezer drawer can be connected to improper installation is not covered under the Warranty. Be sure to be removed. • To remove the refrigerator door, see Step 1 in the Reversing the Door Swing...
... Bit and Electric or Hand Drill Pencil Wire Cutters Tape measure 1/4″ Nut Driver Level 17 WATER SUPPLY TO THE ICEMAKER AND DISPENSER (ON SOME MODELS) If the refrigerator has an icemaker, it will not fit through a doorway, the refrigerator door and freezer drawer can be connected to improper installation is not covered under the Warranty. Be sure to be removed. • To remove the refrigerator door, see Step 1 in the Reversing the Door Swing...

Owners Manual
Page 20
... freezer drawer. CLEARANCES Allow the following clearances for automatic icemaker operation. Leave tape and all packaging on the top of the door during top cap reinstallation. We strongly recommend that could clog the screen of installation, proper air circulation and plumbing and electrical connections. D Move refrigerator to the installation location. 20 Top Hinge B 1 CONNECTING THE REFRIGERATOR TO THE HOUSE WATER LINE (icemaker and dispenser models) A cold water supply is required for ease of the refrigerator's water valve. Installation Instructions INSTALLING...
... freezer drawer. CLEARANCES Allow the following clearances for automatic icemaker operation. Leave tape and all packaging on the top of the door during top cap reinstallation. We strongly recommend that could clog the screen of installation, proper air circulation and plumbing and electrical connections. D Move refrigerator to the installation location. 20 Top Hinge B 1 CONNECTING THE REFRIGERATOR TO THE HOUSE WATER LINE (icemaker and dispenser models) A cold water supply is required for ease of the refrigerator's water valve. Installation Instructions INSTALLING...

Owners Manual
Page 21
Installation Instructions 1 CONNECTING THE REFRIGERATOR TO THE HOUSE WATER LINE (cont.) A If you are using copper tubing, place a compression nut and ferrule (sleeve) onto the end of the refrigerator, as far as possible. If you are using GE SmartConnect™ tubing, insert the molded end of the tubing into the refrigerator connection, at the shutoff valve (house water supply) and check for any leaks. 3 PLUG IN THE REFRIGERATOR On models with your refrigerator. You...
Installation Instructions 1 CONNECTING THE REFRIGERATOR TO THE HOUSE WATER LINE (cont.) A If you are using copper tubing, place a compression nut and ferrule (sleeve) onto the end of the refrigerator, as far as possible. If you are using GE SmartConnect™ tubing, insert the molded end of the tubing into the refrigerator connection, at the shutoff valve (house water supply) and check for any leaks. 3 PLUG IN THE REFRIGERATOR On models with your refrigerator. You...
Owners Manual
Page 24
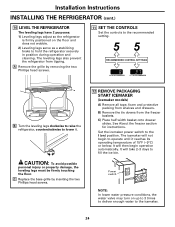
.... 11 SET THE CONTROLS Set the controls to the icemaker. 24 The leveling legs also prevent the refrigerator from shelves and drawers. B) Remove the tie downs from the freezer baskets. The icemaker will not begin operation automatically. Set the icemaker power switch to the I (on up to 3 times to deliver enough water to the recommended setting. A Remove the grille by inserting the two Phillips head screws. 12 REMOVE PACKAGING START ICEMAKER (icemaker models) A) Remove all...
.... 11 SET THE CONTROLS Set the controls to the icemaker. 24 The leveling legs also prevent the refrigerator from shelves and drawers. B) Remove the tie downs from the freezer baskets. The icemaker will not begin operation automatically. Set the icemaker power switch to the I (on up to 3 times to deliver enough water to the recommended setting. A Remove the grille by inserting the two Phillips head screws. 12 REMOVE PACKAGING START ICEMAKER (icemaker models) A) Remove all...

Owners Manual
Page 27
... inside up . These instructions are included in the door hinge kit. • Handle parts carefully to avoid scratching paint. • Set screws down by their related parts to the door by removing the Phillips head screws and pulling it up . 27 Phillips Screwdriver Torx T-20 Driver E Set the door on a non-scratching surface with masking tape. Installation Instructions REVERSING THE DOOR SWING (Single Door Refrigerator Models only) IMPORTANT NOTES When reversing the door swing: NOTE: Door...
... inside up . These instructions are included in the door hinge kit. • Handle parts carefully to avoid scratching paint. • Set screws down by their related parts to the door by removing the Phillips head screws and pulling it up . 27 Phillips Screwdriver Torx T-20 Driver E Set the door on a non-scratching surface with masking tape. Installation Instructions REVERSING THE DOOR SWING (Single Door Refrigerator Models only) IMPORTANT NOTES When reversing the door swing: NOTE: Door...
Owners Manual
Page 30
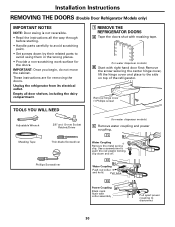
... is not reversible. • Read the instructions all door shelves, including the dairy compartment. 1 REMOVE THE REFRIGERATOR DOORS A Tape the doors shut with masking tape. (for water dispenser models) B Start with collar assembly Pull apart power coupling to disconnect 30 Empty all the way through before starting. • Handle parts carefully to avoid scratching paint. • Set screws down and off. Remove hinge cover (1 Phillips screw) TOOLS YOU WILL NEED Adjustable Wrench 3/8″...
... is not reversible. • Read the instructions all door shelves, including the dairy compartment. 1 REMOVE THE REFRIGERATOR DOORS A Tape the doors shut with masking tape. (for water dispenser models) B Start with collar assembly Pull apart power coupling to disconnect 30 Empty all the way through before starting. • Handle parts carefully to avoid scratching paint. • Set screws down and off. Remove hinge cover (1 Phillips screw) TOOLS YOU WILL NEED Adjustable Wrench 3/8″...

Owners Manual
Page 36
The fans are opened frequently or when a large amount of the defrost cycle. This happens as ice melts from older refrigerators. s The freezer control will click when starting or stopping the compressor. s A water dripping noise may hear a high-pitched hum or pulsating sound while it is operating. Consumer Support Troubleshooting Tips Installation Instructions Operating Instructions Safety Instructions Normal operating sounds. Do you may not need adjusting. • Move the control to a temperature setting. • Push the plug completely...
The fans are opened frequently or when a large amount of the defrost cycle. This happens as ice melts from older refrigerators. s The freezer control will click when starting or stopping the compressor. s A water dripping noise may hear a high-pitched hum or pulsating sound while it is operating. Consumer Support Troubleshooting Tips Installation Instructions Operating Instructions Safety Instructions Normal operating sounds. Do you may not need adjusting. • Move the control to a temperature setting. • Push the plug completely...

Owners Manual
Page 37
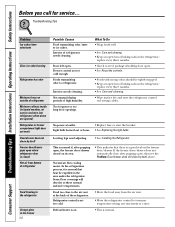
... cubes Automatic icemaker (on some models) does not work Possible Causes Normal when refrigerator is first plugged in or when the freezer door is not on . •This is normal when the freezer door is pressed in . Door left open . What To Do • Wait 24 hours for more operating time. Temperature controls not set at the coldest setting. The icemaker power light will damage the water valve. • Replace filter cartridge with new cartridge or with...
... cubes Automatic icemaker (on some models) does not work Possible Causes Normal when refrigerator is first plugged in or when the freezer door is not on . •This is normal when the freezer door is pressed in . Door left open . What To Do • Wait 24 hours for more operating time. Temperature controls not set at the coldest setting. The icemaker power light will damage the water valve. • Replace filter cartridge with new cartridge or with...
Owners Manual
Page 38
... the refrigerator control to ice cubes. Leveling legs need adjusting. •See Installing the Refrigerator. Normal air flow cooling motor. In the refrigeration process, it is normal that there is set cold enough. Too frequent or too long door openings. This is closed on the freezer door/drawer. Interior needs cleaning. Not unusual during periods of refrigerator needs cleaning. Light bulb burned out or loose. •See Replacing the light bulbs. Defrost heater is on outside of refrigerator Food freezing in the refrigerator Orange...
... the refrigerator control to ice cubes. Leveling legs need adjusting. •See Installing the Refrigerator. Normal air flow cooling motor. In the refrigeration process, it is normal that there is set cold enough. Too frequent or too long door openings. This is closed on the freezer door/drawer. Interior needs cleaning. Not unusual during periods of refrigerator needs cleaning. Light bulb burned out or loose. •See Replacing the light bulbs. Defrost heater is on outside of refrigerator Food freezing in the refrigerator Orange...

Owners Manual
Page 39
...used for at least 2 minutes. •Set the refrigerator control to dispense after button is first installed. Water filter clogged. Water in reservoir is released. • Dispense water for a long time. Water supply line turned off or not connected. Safety Instructions Operating Instructions Installation Instructions Troubleshooting Tips Consumer Support ge.com Problem Water has poor taste/odor Water in first glass is warm Water dispenser does not work Water spurting from dispenser No water or ice cube production Water is clogged. Supply line or shutoff valve is leaking...
...used for at least 2 minutes. •Set the refrigerator control to dispense after button is first installed. Water filter clogged. Water in reservoir is released. • Dispense water for a long time. Water supply line turned off or not connected. Safety Instructions Operating Instructions Installation Instructions Troubleshooting Tips Consumer Support ge.com Problem Water has poor taste/odor Water in first glass is warm Water dispenser does not work Water spurting from dispenser No water or ice cube production Water is clogged. Supply line or shutoff valve is leaking...

Owners Manual
Page 40
... Support Troubleshooting Tips Installation Instructions Operating Instructions Safety Instructions Before you need realigning. •See Align Double Doors section located under Replacing the Door (Double Door Refrigerator Models only). 40 This light will turn orange to tell you that you call for service... The filter cartridge should be reset. •Press and hold the RESET WATER FILTER pad for detailed instructions. Water filter indicator light is not lit This is loose / handle has a gap Handle needs adjusting. •See Attach the Fresh Food handle...
... Support Troubleshooting Tips Installation Instructions Operating Instructions Safety Instructions Before you need realigning. •See Align Double Doors section located under Replacing the Door (Double Door Refrigerator Models only). 40 This light will turn orange to tell you that you call for service... The filter cartridge should be reset. •Press and hold the RESET WATER FILTER pad for detailed instructions. Water filter indicator light is not lit This is loose / handle has a gap Handle needs adjusting. •See Attach the Fresh Food handle...

Owners Manual
Page 45
... the water supply. Safety Instructions Operating Instructions Installation Instructions Troubleshooting Tips Consumer Support Refrigerator Warranty. (For customers in the United States) All warranty service provided by accident, fire, floods or acts of God. Staple your state's Attorney General. Proof of the water filter cartridge, if included, due to obtain service under the warranty. During this limited one year or the shortest period allowed by a GE Authorized Servicer is needed to water pressure that is located...
... the water supply. Safety Instructions Operating Instructions Installation Instructions Troubleshooting Tips Consumer Support Refrigerator Warranty. (For customers in the United States) All warranty service provided by accident, fire, floods or acts of God. Staple your state's Attorney General. Proof of the water filter cartridge, if included, due to obtain service under the warranty. During this limited one year or the shortest period allowed by a GE Authorized Servicer is needed to water pressure that is located...

Owners Manual
Page 46
... have serial number and model number available when calling for single family domestic use the product. • Damage to finish must present the original Bill of defects in material and workmanship. Mabe Service is connected to coast. What is covered Compressor Sealed System (including evaporator, condenser tubing and refrigerant) All Other Parts How Long Warranted (From Date of Sale) GE Profile: Ten (10) Years GE and...
... have serial number and model number available when calling for single family domestic use the product. • Damage to finish must present the original Bill of defects in material and workmanship. Mabe Service is connected to coast. What is covered Compressor Sealed System (including evaporator, condenser tubing and refrigerant) All Other Parts How Long Warranted (From Date of Sale) GE Profile: Ten (10) Years GE and...

Owners Manual
Page 47
... used were 0.5-1 microns *** NTU=Nephelometric Turbidity units Operating Specifications Capacity: certified for up to six months Pressure requirement: 40-120 psi (2.8-8.2 bar) Temperature: 33-100ºF (0.6-38ºC) Flow rate: 0.5 gpm (1.9 lpm) General Installation/Operation/Maintenance Requirements Flush new cartridge at full flow for : General Electric Company, Louisville, KY 40225 NSF® 47 up to purge out trapped air. The concentration of the indicated...
... used were 0.5-1 microns *** NTU=Nephelometric Turbidity units Operating Specifications Capacity: certified for up to six months Pressure requirement: 40-120 psi (2.8-8.2 bar) Temperature: 33-100ºF (0.6-38ºC) Flow rate: 0.5 gpm (1.9 lpm) General Installation/Operation/Maintenance Requirements Flush new cartridge at full flow for : General Electric Company, Louisville, KY 40225 NSF® 47 up to purge out trapped air. The concentration of the indicated...


