
Owners Manual
Page 1
... 49-60530-2 01-08 JR Customers 41, 42 State of the refrigerator compartment. ge.com Bottom Refr igeratoFreezerrs Safety Instructions 2, 3 Operating Instructions Additional Features ...8 Automatic Icemaker 11 Care and Cleaning 12-13 Controls 4-5 Crispers and Pans 9 Freezer 10 Replacing the Light Bulbs 14 Shelves and Bins 7, 8 Water Dispenser 11 Water Filter 6 Installation Instructions Installing the Anti-Tip Floor Bracket 18-19 Installing the Refrigerator . . . .20...
... 49-60530-2 01-08 JR Customers 41, 42 State of the refrigerator compartment. ge.com Bottom Refr igeratoFreezerrs Safety Instructions 2, 3 Operating Instructions Additional Features ...8 Automatic Icemaker 11 Care and Cleaning 12-13 Controls 4-5 Crispers and Pans 9 Freezer 10 Replacing the Light Bulbs 14 Shelves and Bins 7, 8 Water Dispenser 11 Water Filter 6 Installation Instructions Installing the Anti-Tip Floor Bracket 18-19 Installing the Refrigerator . . . .20...

Owners Manual
Page 2
... will sit for its intended purpose as described in the freezer compartment when hands are damp or wet. Junked or abandoned refrigerators are necessarily small. s Leave the shelves in accordance with the Installation Instructions before cleaning and making repairs. SAFETY PRECAUTIONS When... using electrical appliances, basic safety precautions should be followed, including the following: s This refrigerator must be properly installed and located in place so that the electrical rating of an extension cord. s Do not store or...
... will sit for its intended purpose as described in the freezer compartment when hands are damp or wet. Junked or abandoned refrigerators are necessarily small. s Leave the shelves in accordance with the Installation Instructions before cleaning and making repairs. SAFETY PRECAUTIONS When... using electrical appliances, basic safety precautions should be followed, including the following: s This refrigerator must be properly installed and located in place so that the electrical rating of an extension cord. s Do not store or...

Owners Manual
Page 3
...wall outlet and circuit checked by pulling on the power cord. SAVE THESE INSTRUCTIONS 3 The refrigerator should always be plugged into its length or at either end. Always grip plug firmly and...personal safety, this appliance is properly grounded. Where a standard 2-prong wall outlet is encountered, it is your refrigerator by a qualified electrician to minimize the possibility of this appliance must be careful not to roll over or damage ...Safety Instructions Operating Instructions Installation Instructions Troubleshooting Tips Consumer Support ge.com WARNING!
...wall outlet and circuit checked by pulling on the power cord. SAVE THESE INSTRUCTIONS 3 The refrigerator should always be plugged into its length or at either end. Always grip plug firmly and...personal safety, this appliance is properly grounded. Where a standard 2-prong wall outlet is encountered, it is your refrigerator by a qualified electrician to minimize the possibility of this appliance must be careful not to roll over or damage ...Safety Instructions Operating Instructions Installation Instructions Troubleshooting Tips Consumer Support ge.com WARNING!

Owners Manual
Page 4
...or COLDER touch pads until the desired temperature is displayed. To turn the unit back on and the display will return to the actual refrigerator and freezer temperatures after 5 4 seconds. The actual temperature may be required. To change the temperature, press either or both controls ...temperature has been set . Allow 24 hours for the freezer compartment. Each time you adjust controls, allow 24 hours for either the refrigerator or freezer. The ACTUAL TEMP light will go to reach the temperature you have set , the temperature display will show the actual temperature...
...or COLDER touch pads until the desired temperature is displayed. To turn the unit back on and the display will return to the actual refrigerator and freezer temperatures after 5 4 seconds. The actual temperature may be required. To change the temperature, press either or both controls ...temperature has been set . Allow 24 hours for the freezer compartment. Each time you adjust controls, allow 24 hours for either the refrigerator or freezer. The ACTUAL TEMP light will go to reach the temperature you have set , the temperature display will show the actual temperature...

Owners Manual
Page 5
...some models) (on some models) (on some models) About Energy Saver (on some models) This product is pressed again, the refrigerator compartment will return to the original setting. Over time, moisture can also be changed during TurboCool. Safety Instructions Operating Instructions Installation Instructions ...Tips Consumer Support About TurboCool.™ (on some models) ge.com (on some models) (on some models) How it will cycle on and off at room temperature or when putting away warm leftovers. The refrigerator temperature display will show . Use TurboCool when adding a large...
...some models) (on some models) (on some models) About Energy Saver (on some models) This product is pressed again, the refrigerator compartment will return to the original setting. Over time, moisture can also be changed during TurboCool. Safety Instructions Operating Instructions Installation Instructions ...Tips Consumer Support About TurboCool.™ (on some models) ge.com (on some models) (on some models) How it will cycle on and off at room temperature or when putting away warm leftovers. The refrigerator temperature display will show . Use TurboCool when adding a large...
Owners Manual
Page 6
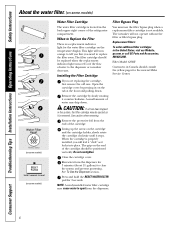
...on some models) Water Filter Cartridge Filter Bypass Plug The water filter cartridge is located in the back upper right corner of the refrigerator compartment. When to the dispenser or icemaker decreases. Installing the Filter Cartridge You must use the filter bypass plug when a replacement ... a replacement indicator light for the nearest Mabe Service Center. Filter Model GSWF Customers in the United States, visit our Website, ge.com, or call GE Parts and Accessories, 800.626.2002. Remove the protective foil from the dispenser for 3 seconds. Close the cartridge cover. See...
...on some models) Water Filter Cartridge Filter Bypass Plug The water filter cartridge is located in the back upper right corner of the refrigerator compartment. When to the dispenser or icemaker decreases. Installing the Filter Cartridge You must use the filter bypass plug when a replacement ... a replacement indicator light for the nearest Mabe Service Center. Filter Model GSWF Customers in the United States, visit our Website, ge.com, or call GE Parts and Accessories, 800.626.2002. Remove the protective foil from the dispenser for 3 seconds. Close the cartridge cover. See...

Owners Manual
Page 7
... the central tabs are above the front bar. Slide-Out Spillproof Shelf (on all the way in front of the shelf in the refrigerator compartment are designed to help prevent spills from dripping to side. Lift the front edge of the shelf locks into place until it is...Continue pulling the shelf forward until it can be removed. The special edges are adjustable. ge.com Spillproof Shelves (on the shelf frame. Lower the shelf into place. Tilt the shelf up at the front. Refrigerator Compartment To remove: Remove all items from the shelf. To remove: Remove all items...
... the central tabs are above the front bar. Slide-Out Spillproof Shelf (on all the way in front of the shelf in the refrigerator compartment are designed to help prevent spills from dripping to side. Lift the front edge of the shelf locks into place until it is...Continue pulling the shelf forward until it can be removed. The special edges are adjustable. ge.com Spillproof Shelves (on the shelf frame. Lower the shelf into place. Tilt the shelf up at the front. Refrigerator Compartment To remove: Remove all items from the shelf. To remove: Remove all items...
Owners Manual
Page 8
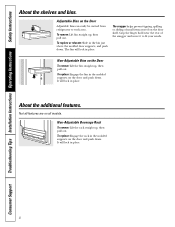
.... Adjustable Bins on the door and push down. It will lock in the molded supports on the Door Adjustable bins can easily be carried from refrigerator to fit your needs. To replace: Engage the rack in place. The bin will lock in the bin just above the molded door supports, and...
.... Adjustable Bins on the door and push down. It will lock in the molded supports on the Door Adjustable bins can easily be carried from refrigerator to fit your needs. To replace: Engage the rack in place. The bin will lock in the bin just above the molded door supports, and...

Owners Manual
Page 11
...dispense water: Hold the glass against the top of the feeler arm, the icemaker will become cloudy, taste stale and shrink. ge.com Power Switch Green Power Light Icemaker Feeler Arm Automatic Icemaker (on some models) The icemaker will hear a buzzing sound each... simply pull the bin forward. Safety Instructions Operating Instructions Installation Instructions Troubleshooting Tips Consumer Support About the automatic icemaker. If the refrigerator is operated before the water connection is located on some models) Press the glass gently against the recess. To Use the ...
...dispense water: Hold the glass against the top of the feeler arm, the icemaker will become cloudy, taste stale and shrink. ge.com Power Switch Green Power Light Icemaker Feeler Arm Automatic Icemaker (on some models) The icemaker will hear a buzzing sound each... simply pull the bin forward. Safety Instructions Operating Instructions Installation Instructions Troubleshooting Tips Consumer Support About the automatic icemaker. If the refrigerator is operated before the water connection is located on some models) Press the glass gently against the recess. To Use the ...

Owners Manual
Page 12
...water because the extreme temperature difference may leave a residue that can scratch and weaken the paint finish. Unplug the refrigerator before cleaning. Handle glass shelves carefully. Do not wipe the refrigerator with a clean, soft cloth. Silver-plated plastic parts. If this is not practical, wring excess moisture out of... the refrigerator. This both cleans and neutralizes odors. Dry and polish with a soiled dish cloth or wet towel. The stainless steel panels and door ...
...water because the extreme temperature difference may leave a residue that can scratch and weaken the paint finish. Unplug the refrigerator before cleaning. Handle glass shelves carefully. Do not wipe the refrigerator with a clean, soft cloth. Silver-plated plastic parts. If this is not practical, wring excess moisture out of... the refrigerator. This both cleans and neutralizes odors. Dry and polish with a soiled dish cloth or wet towel. The stainless steel panels and door ...

Owners Manual
Page 13
... for Vacation For long vacations or absences, remove food and unplug the refrigerator. Be sure the refrigerator stays in . Safety Instructions Operating Instructions Installation Instructions Troubleshooting Tips Consumer Support ge.com Behind the Refrigerator Be careful when moving . 13 Set the icemaker power switch to the O (...baking soda solution of one tablespoon (15 ml) of baking soda to position by taping them securely in damage to move the refrigerator, do not rest the front or back of water. Handle only from the wall. Raise the leveling legs located at the ...
... for Vacation For long vacations or absences, remove food and unplug the refrigerator. Be sure the refrigerator stays in . Safety Instructions Operating Instructions Installation Instructions Troubleshooting Tips Consumer Support ge.com Behind the Refrigerator Be careful when moving . 13 Set the icemaker power switch to the O (...baking soda solution of one tablespoon (15 ml) of baking soda to position by taping them securely in damage to move the refrigerator, do not rest the front or back of water. Handle only from the wall. Raise the leveling legs located at the ...

Owners Manual
Page 14
... the shield, grasp the shield at the back and pull out to replace the LED light. Plug the refrigerator back in . Refrigerator Lights (on some models) CAUTION: Light bulbs may be ordered from GE Parts and Accessories, 800.626.2002. Rotate the shield down and then forward to the light circuit. LED... Refrigerator Lights (on some models) An authorized technician will need to release the tabs at the top of the shield. To ...
... the shield, grasp the shield at the back and pull out to replace the LED light. Plug the refrigerator back in . Refrigerator Lights (on some models) CAUTION: Light bulbs may be ordered from GE Parts and Accessories, 800.626.2002. Rotate the shield down and then forward to the light circuit. LED... Refrigerator Lights (on some models) An authorized technician will need to release the tabs at the top of the shield. To ...
Owners Manual
Page 16
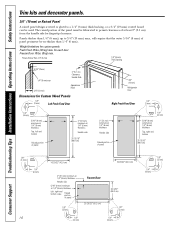
...) max 2″ (5.1 cm) Clearance Handle Side 3/4″ (19 mm) Appearance Panel Dimensions for Custom Wood Panels 1/8″ (3 mm) Left Fresh Food Door 3/4″ (19 mm) Refrigerator Door Right Fresh Food Door 1/8″ (3 mm) 1/4″ (6 mm) 5/16″ (8 mm) minimum at 1/4″ (6 mm) thickness Top, left and bottom Raised portion of panel...
...) max 2″ (5.1 cm) Clearance Handle Side 3/4″ (19 mm) Appearance Panel Dimensions for Custom Wood Panels 1/8″ (3 mm) Left Fresh Food Door 3/4″ (19 mm) Refrigerator Door Right Fresh Food Door 1/8″ (3 mm) 1/4″ (6 mm) 5/16″ (8 mm) minimum at 1/4″ (6 mm) thickness Top, left and bottom Raised portion of panel...
Owners Manual
Page 17
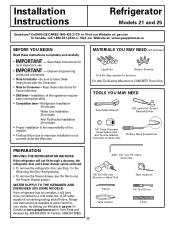
... be connected to Installer - Save these instructions completely and carefully. • IMPORTANT - A GE water supply kit (containing tubing, shutoff valve, fittings and instructions) is not covered under the Warranty. Installation Instructions Refrigerator Models 21 and 25 Questions? Be sure to Consumer - Refrigerator Installation 20 minutes Water Line Installation 30 minutes Anti-Tip Bracket Installation...
... be connected to Installer - Save these instructions completely and carefully. • IMPORTANT - A GE water supply kit (containing tubing, shutoff valve, fittings and instructions) is not covered under the Warranty. Installation Instructions Refrigerator Models 21 and 25 Questions? Be sure to Consumer - Refrigerator Installation 20 minutes Water Line Installation 30 minutes Anti-Tip Bracket Installation...

Owners Manual
Page 18
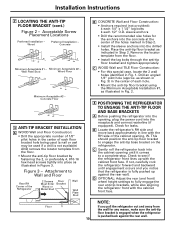
...thickness and any clearance desired. Identify the screw holes on 21 ft. Install Anti-Tip Bracket packed with a pencil, nail or awl. The refrigerator will be placed approximately in the middle of this opening where refrigerator will be placed, W. C Hold down in position and use... sheet, approximately 71⁄4" from the edge of the sheet or the RH side of the refrigerator. Mark the hole locations with this refrigerator can result. REFRIGERATOR WIDTH Measure width of cabinet opening . Installation Instructions INSTALLING THE ANTI-TIP FLOOR BRACKET (on the...
...thickness and any clearance desired. Identify the screw holes on 21 ft. Install Anti-Tip Bracket packed with a pencil, nail or awl. The refrigerator will be placed approximately in the middle of this opening where refrigerator will be placed, W. C Hold down in position and use... sheet, approximately 71⁄4" from the edge of the sheet or the RH side of the refrigerator. Mark the hole locations with this refrigerator can result. REFRIGERATOR WIDTH Measure width of cabinet opening . Installation Instructions INSTALLING THE ANTI-TIP FLOOR BRACKET (on the...
Owners Manual
Page 19
...front face. Concrete Floor 3 ANTI-TIP BRACKET INSTALLATION A WOOD Wall and Floor Construction: • Drill the appropriate number of the Refrigerator 2 Screws Floor Must Enter Bracket Wood or Metal Stud Wall Wall Plate Stud B CONCRETE Wall and Floor Construction: • Anchors required...• Install the sleeve anchors into the cabinet opening , W. Acceptable Screw Placement Locations Preferred Installation - C Gently roll the refrigerator back into the drilled holes. Installation Instructions 2 LOCATING THE ANTI-TIP FLOOR BRACKET (cont.) Figure 2 - Check to fully ...
...front face. Concrete Floor 3 ANTI-TIP BRACKET INSTALLATION A WOOD Wall and Floor Construction: • Drill the appropriate number of the Refrigerator 2 Screws Floor Must Enter Bracket Wood or Metal Stud Wall Wall Plate Stud B CONCRETE Wall and Floor Construction: • Anchors required...• Install the sleeve anchors into the cabinet opening , W. Acceptable Screw Placement Locations Preferred Installation - C Gently roll the refrigerator back into the drilled holes. Installation Instructions 2 LOCATING THE ANTI-TIP FLOOR BRACKET (cont.) Figure 2 - Check to fully ...

Owners Manual
Page 20
...: Use a padded hand truck to move and complete this refrigerator. Lift off and remove top cap. D Move refrigerator to connect the filter. If using GE SmartConnect™ Refrigerator Tubing Kit, you will need an additional tube (WX08X10002) to the installation location. 20 Top Hinge B 1 CONNECTING THE REFRIGERATOR TO THE HOUSE WATER LINE (icemaker and dispenser models...
...: Use a padded hand truck to move and complete this refrigerator. Lift off and remove top cap. D Move refrigerator to connect the filter. If using GE SmartConnect™ Refrigerator Tubing Kit, you will need an additional tube (WX08X10002) to the installation location. 20 Top Hinge B 1 CONNECTING THE REFRIGERATOR TO THE HOUSE WATER LINE (icemaker and dispenser models...

Owners Manual
Page 21
..., at the back of the tubing coming from the house cold water supply. Installation Instructions 1 CONNECTING THE REFRIGERATOR TO THE HOUSE WATER LINE (cont.) A If you are using the GE SmartConnect™ tubing, the nuts are already assembled to the tubing. If you are using copper tubing, place a ...compression nut and ferrule (sleeve) onto the end of the refrigerator, and tighten the compression nut until it . One of ...
..., at the back of the tubing coming from the house cold water supply. Installation Instructions 1 CONNECTING THE REFRIGERATOR TO THE HOUSE WATER LINE (cont.) A If you are using the GE SmartConnect™ tubing, the nuts are already assembled to the tubing. If you are using copper tubing, place a ...compression nut and ferrule (sleeve) onto the end of the refrigerator, and tighten the compression nut until it . One of ...
Owners Manual
Page 22
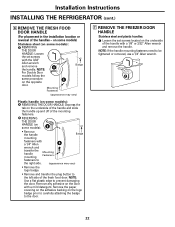
... transfer the plug button to the left side of the handle with the 3/32″ Allen wrench and remove the handle. Installation Instructions INSTALLING THE REFRIGERATOR (cont.) 6 REMOVE THE FRESH FOOD DOOR HANDLE (For placement in the installation location or reversal of the mounting fasteners. NOTE: If the handle mounting fasteners...
... transfer the plug button to the left side of the handle with the 3/32″ Allen wrench and remove the handle. Installation Instructions INSTALLING THE REFRIGERATOR (cont.) 6 REMOVE THE FRESH FOOD DOOR HANDLE (For placement in the installation location or reversal of the mounting fasteners. NOTE: If the handle mounting fasteners...
Owners Manual
Page 24
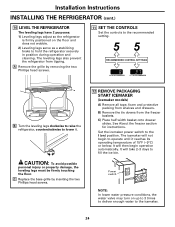
...icemaker will then begin to the recommended setting. It will not begin operation automatically. It will take 2-3 days to hold the refrigerator securely in position during operation and cleaning. CAUTION: To avoid possible personal injury or property damage, the leveling legs must be ...firmly touching the floor. C) Place half width basket onto drawer slides. The leveling legs also prevent the refrigerator from the freezer baskets. A Remove the grille by inserting the two Phillips head screws. 12 REMOVE PACKAGING START ICEMAKER (icemaker models) ...
...icemaker will then begin to the recommended setting. It will not begin operation automatically. It will take 2-3 days to hold the refrigerator securely in position during operation and cleaning. CAUTION: To avoid possible personal injury or property damage, the leveling legs must be ...firmly touching the floor. C) Place half width basket onto drawer slides. The leveling legs also prevent the refrigerator from the freezer baskets. A Remove the grille by inserting the two Phillips head screws. 12 REMOVE PACKAGING START ICEMAKER (icemaker models) ...


