Use and Care Manual
Page 1
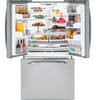
...Double Door Refrigerator Models only 30-32 Trim Kits and Decorator Panels . . . .15, 16 Troubleshooting Tips . . . . . .36-40 Normal Operating Sounds 36 Consumer Support Consumer Support Back Cover Performance Data Sheet 43 State of the refrigerator compartment. 200D9366P019 49-60609-2 04-10 GE Customers 41... Owner's Manual and Installation Instructions Models 21 and 25 Congélateur inférieur Réfrigérateurs ...
...Double Door Refrigerator Models only 30-32 Trim Kits and Decorator Panels . . . .15, 16 Troubleshooting Tips . . . . . .36-40 Normal Operating Sounds 36 Consumer Support Consumer Support Back Cover Performance Data Sheet 43 State of the refrigerator compartment. 200D9366P019 49-60609-2 04-10 GE Customers 41... Owner's Manual and Installation Instructions Models 21 and 25 Congélateur inférieur Réfrigérateurs ...
Use and Care Manual
Page 4
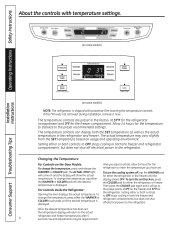
...go to the preset points of 0°F for the freezer and 37°F for either the refrigerator or the freezer until the display shows OFF. To turn the unit back on -the-Door Models: To change the temperature, press either the WARMER or COLDER pad until the desired temperature is displayed.... To turn the cooling system off, tap the WARMER pad for the refrigerator to reach the temperature you have set , the temperature ...
...go to the preset points of 0°F for the freezer and 37°F for either the refrigerator or the freezer until the display shows OFF. To turn the unit back on -the-Door Models: To change the temperature, press either the WARMER or COLDER pad until the desired temperature is displayed.... To turn the cooling system off, tap the WARMER pad for the refrigerator to reach the temperature you have set , the temperature ...
Use and Care Manual
Page 5
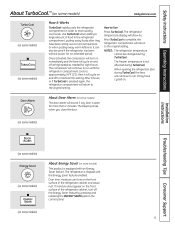
... Energy Saver feature by pressing and releasing the ENERGY SAVER pad on the control panel. (on some models) How It Works TurboCool rapidly cools the refrigerator compartment in order to run if they have cycled on the front surface of food to maintain this ...putting away warm leftovers. The beeping stops when you close the door. (on some models) Installation Instructions Troubleshooting Tips Consumer Support (on some models) (on some models) This product is complete, the refrigerator compartment will show . Over time, moisture can also be changed during TurboCool. Use ...
... Energy Saver feature by pressing and releasing the ENERGY SAVER pad on the control panel. (on some models) How It Works TurboCool rapidly cools the refrigerator compartment in order to run if they have cycled on the front surface of food to maintain this ...putting away warm leftovers. The beeping stops when you close the door. (on some models) Installation Instructions Troubleshooting Tips Consumer Support (on some models) (on some models) This product is complete, the refrigerator compartment will show . Over time, moisture can also be changed during TurboCool. Use ...
Use and Care Manual
Page 6
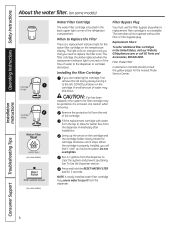
... Holder Cartridge Holder (on some models) (on some models) Water Filter Cartridge The water filter cartridge is located in the United States, visit our Website, GEAppliances.com, or call GE Parts and Accessories, 800.626.2002. DO NOT pull down . A small amount of water may cause water... See To Use the Dispenser section. Press and hold the RESET WATER FILTER pad for better flow from the end of the refrigerator compartment. Installing the Filter Cartridge If you need to replace the filter soon. Use caution when removing. Installation Instructions Consumer Support Troubleshooting...
... Holder Cartridge Holder (on some models) (on some models) Water Filter Cartridge The water filter cartridge is located in the United States, visit our Website, GEAppliances.com, or call GE Parts and Accessories, 800.626.2002. DO NOT pull down . A small amount of water may cause water... See To Use the Dispenser section. Press and hold the RESET WATER FILTER pad for better flow from the end of the refrigerator compartment. Installing the Filter Cartridge If you need to replace the filter soon. Use caution when removing. Installation Instructions Consumer Support Troubleshooting...
Use and Care Manual
Page 7
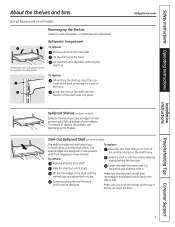
...Rearranging the Shelves. To remove: Remove all items from the shelf. Installation Instructions Troubleshooting Tips Consumer Support 7 Refrigerator Compartment To remove: Remove all models. The special edges are on all items from shelf. Continue pulling the shelf forward until the central tabs ...are above the front bar. Not all the way in the refrigerator compartment are slightly behind others. GEAppliances.com Spillproof Shelves (on some models) Spillproof shelves have wire shelves that the shelf sits flat after reinstallation and doesn't ...
...Rearranging the Shelves. To remove: Remove all items from the shelf. Installation Instructions Troubleshooting Tips Consumer Support 7 Refrigerator Compartment To remove: Remove all models. The special edges are on all items from shelf. Continue pulling the shelf forward until the central tabs ...are above the front bar. Not all the way in the refrigerator compartment are slightly behind others. GEAppliances.com Spillproof Shelves (on some models) Spillproof shelves have wire shelves that the shelf sits flat after reinstallation and doesn't ...
Use and Care Manual
Page 8
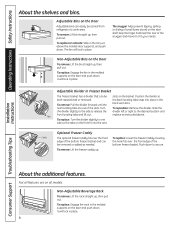
... of the bottom freezer basket and can the hook fits over the front edge of the slots. Tabs replace as needed. Push down . Not all models. Non-Adjustable Bins on the front fit into place in place. 8 Turn To reposition: Remove the divider. To replace: Turn the divider slightly to one... of the be slots on the door shelf. It will lock in Freezer Basket The freezer basket has a divider that can easily be carried from refrigerator to fit your needs. To replace: Engage the rack in the bin just above . Adjustable Bins on the door and push down . To replace or...
... of the bottom freezer basket and can the hook fits over the front edge of the slots. Tabs replace as needed. Push down . Not all models. Non-Adjustable Bins on the front fit into place in place. 8 Turn To reposition: Remove the divider. To replace: Turn the divider slightly to one... of the be slots on the door shelf. It will lock in Freezer Basket The freezer basket has a divider that can easily be carried from refrigerator to fit your needs. To replace: Engage the rack in the bin just above . Adjustable Bins on the door and push down . To replace or...
Use and Care Manual
Page 10
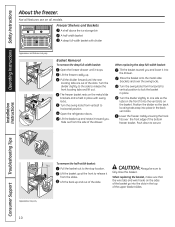
Pull the divider forward until it toward you . Open the refrigerator doors. Place the basket onto the metal slide brackets and over the front edge of the bottom freezer basket. CAUTION: Always be sure to lock ... horizontal to vertical position to Lift the basket up . Lift the freezer caddy up at the front to one side so the tabs on all models. Push down to release the front locating tabs and lift out. Appearance may vary Basket Removal To remove the deep full-width basket: Open the...
Pull the divider forward until it toward you . Open the refrigerator doors. Place the basket onto the metal slide brackets and over the front edge of the bottom freezer basket. CAUTION: Always be sure to lock ... horizontal to vertical position to Lift the basket up . Lift the freezer caddy up at the front to one side so the tabs on all models. Push down to release the front locating tabs and lift out. Appearance may vary Basket Removal To remove the deep full-width basket: Open the...
Use and Care Manual
Page 11
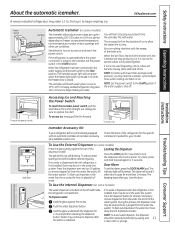
... if the water supply is not self-draining. If no water is dispensed when the refrigerator is made to the icemaker, set the alarm, press the DOOR ALARM pad. To Use the Internal Dispenser (on some models) The water dispenser is released. Press the dispenser button for how to the l (on freezer...
... if the water supply is not self-draining. If no water is dispensed when the refrigerator is made to the icemaker, set the alarm, press the DOOR ALARM pad. To Use the Internal Dispenser (on some models) The water dispenser is released. Press the dispenser button for how to the l (on freezer...
Use and Care Manual
Page 12
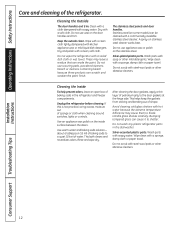
... (1 liter) of petroleum jelly to the door gaskets at the hinge side. Rinse and wipe dry. Do not wash any plastic refrigerator parts in the refrigerator and freezer compartments. Do not scrub with soap or other abrasive cleaners. Do not use wax on the door handles and trim. ... cleaned with kitchen appliance wax or mild liquid dish detergent. Handle glass shelves carefully. These may cause them to shatter. A spray-on some models) can erode the paint. Use warm water and baking soda solution- After cleaning the door gaskets, apply a thin layer of water. Silver-...
... (1 liter) of petroleum jelly to the door gaskets at the hinge side. Rinse and wipe dry. Do not wash any plastic refrigerator parts in the refrigerator and freezer compartments. Do not scrub with soap or other abrasive cleaners. Do not use wax on the door handles and trim. ... cleaned with kitchen appliance wax or mild liquid dish detergent. Handle glass shelves carefully. These may cause them to shatter. A spray-on some models) can erode the paint. Use warm water and baking soda solution- After cleaning the door gaskets, apply a thin layer of water. Silver-...
Use and Care Manual
Page 13
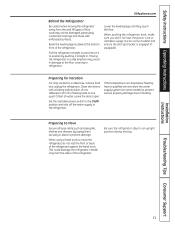
...the hand truck. Leave the doors open. Be sure the refrigerator stays in damage to the refrigerator. All types of floor coverings can drop below freezing, have a qualified servicer drain the water supply system (on some models) to prevent serious property damage due to Move Secure all loose... out and return it to position by taping them securely in . When pushing the refrigerator back, make sure you don't roll over the power cord or icemaker supply line (on some models) and ensure the anti-tip bracket is engaged (if equipped). Preparing to flooding. Safety Instructions...
...the hand truck. Leave the doors open. Be sure the refrigerator stays in damage to the refrigerator. All types of floor coverings can drop below freezing, have a qualified servicer drain the water supply system (on some models) to prevent serious property damage due to Move Secure all loose... out and return it to position by taping them securely in . When pushing the refrigerator back, make sure you don't roll over the power cord or icemaker supply line (on some models) and ensure the anti-tip bracket is engaged (if equipped). Preparing to flooding. Safety Instructions...
Use and Care Manual
Page 14
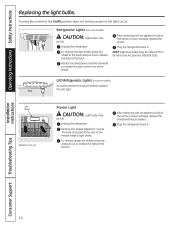
... not remove power to release the tabs at the rear of the same or lower wattage, replace the shield. Unplug the refrigerator. LED Refrigerator Lights (on some models) An authorized technician will need to replace the LED light. The bulb is located at the back. To remove, grasp the... the tabs at the bottom. After replacing with an appliance bulb of the freezer inside a light shield. Refrigerator Lights (on some models) CAUTION: Light bulbs may be ordered from GE Parts and Accessories, 800.626.2002. Rotate the shield down and then forward to release the tabs at ...
... not remove power to release the tabs at the rear of the same or lower wattage, replace the shield. Unplug the refrigerator. LED Refrigerator Lights (on some models) An authorized technician will need to replace the LED light. The bulb is located at the back. To remove, grasp the... the tabs at the bottom. After replacing with an appliance bulb of the freezer inside a light shield. Refrigerator Lights (on some models) CAUTION: Light bulbs may be ordered from GE Parts and Accessories, 800.626.2002. Rotate the shield down and then forward to release the tabs at ...
Use and Care Manual
Page 17
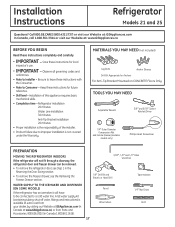
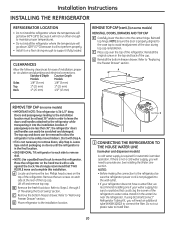
... Diameter Compression Nut and Ferrule (sleeve) (icemaker models only) Phillips-Head Screwdriver PREPARATION MOVING THE REFRIGERATOR INDOORS If the refrigerator will have to a cold water line. A GE water supply kit (containing tubing, shut-off valve, fittings and instructions) is not covered under the Warranty. Installation Instructions Refrigerator Models 21 and 25 Questions? Observe all governing codes...
... Diameter Compression Nut and Ferrule (sleeve) (icemaker models only) Phillips-Head Screwdriver PREPARATION MOVING THE REFRIGERATOR INDOORS If the refrigerator will have to a cold water line. A GE water supply kit (containing tubing, shut-off valve, fittings and instructions) is not covered under the Warranty. Installation Instructions Refrigerator Models 21 and 25 Questions? Observe all governing codes...

Use and Care Manual
Page 18
... bracket for any countertop overhang, baseboard thickness and any clearance desired. models) WARNING Under certain circumstances, this refrigerator. 1 MEASURE CABINET OPENING AVAILABLE VS. Injury to account for your configuration and type of the refrigerator (see Figure 1). Install Anti-Tip Bracket packed with a pencil, nail...down in position and use at least 2 screws to Install RH Holes 71⁄4″ Base Bracket on the Refrigerator RH Side of Refrigerator Rear RH Corner of Cabinet Wall Locator Template Sheet B Place the anti-tip floor bracket onto the locator template ...
... bracket for any countertop overhang, baseboard thickness and any clearance desired. models) WARNING Under certain circumstances, this refrigerator. 1 MEASURE CABINET OPENING AVAILABLE VS. Injury to account for your configuration and type of the refrigerator (see Figure 1). Install Anti-Tip Bracket packed with a pencil, nail...down in position and use at least 2 screws to Install RH Holes 71⁄4″ Base Bracket on the Refrigerator RH Side of Refrigerator Rear RH Corner of Cabinet Wall Locator Template Sheet B Place the anti-tip floor bracket onto the locator template ...
Use and Care Manual
Page 20
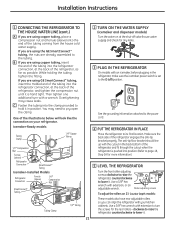
...need an additional tube (WX08X10002) to move and complete this refrigerator. Refer to "Replacing the Freezer Drawer" section. Top Hinge B 1 CONNECTING THE REFRIGERATOR TO THE HOUSE WATER LINE (icemaker and dispenser models) A cold water supply is not plugged into the installation location... connect the filter. Install it fully loaded. If using GE SmartConnect™ Refrigerator Tubing Kit, you will need to "Removing Freezer Drawer" section. F Place cap over the top of the refrigerator. D Move refrigerator to install filter. 20 Lift off and remove top cap...
...need an additional tube (WX08X10002) to move and complete this refrigerator. Refer to "Replacing the Freezer Drawer" section. Top Hinge B 1 CONNECTING THE REFRIGERATOR TO THE HOUSE WATER LINE (icemaker and dispenser models) A cold water supply is not plugged into the installation location... connect the filter. Install it fully loaded. If using GE SmartConnect™ Refrigerator Tubing Kit, you will need to "Removing Freezer Drawer" section. F Place cap over the top of the refrigerator. D Move refrigerator to install filter. 20 Lift off and remove top cap...
Use and Care Manual
Page 21
... sure the icemaker power switch is set to the O (off valve (house water supply) and check for any leaks. 3 PLUG IN THE REFRIGERATOR On models with your refrigerator. If you are using the GE SmartConnect™ tubing, the nuts are already assembled to pry open the clamp. You may cause leaks. One of the...
... sure the icemaker power switch is set to the O (off valve (house water supply) and check for any leaks. 3 PLUG IN THE REFRIGERATOR On models with your refrigerator. If you are using the GE SmartConnect™ tubing, the nuts are already assembled to pry open the clamp. You may cause leaks. One of the...

Use and Care Manual
Page 22
... the door. NOTE: Use a flat plastic edge to be tightened or removed, use a 1/4″ Allen wrench. Installation Instructions INSTALLING THE REFRIGERATOR (cont.) 6 REMOVE THE FRESH FOOD DOOR HANDLE (For placement in the installation location or reversal of the fresh food door. Remove any ...adhesive on the opposite door. Mounting Fasteners • Remove and transfer the (appearance may vary) Plastic handle (on some models): A REMOVING THE DOOR HANDLE: Loosen the set screws located on the logo badge prior to carefully attaching the badge to the right side...
... the door. NOTE: Use a flat plastic edge to be tightened or removed, use a 1/4″ Allen wrench. Installation Instructions INSTALLING THE REFRIGERATOR (cont.) 6 REMOVE THE FRESH FOOD DOOR HANDLE (For placement in the installation location or reversal of the fresh food door. Remove any ...adhesive on the opposite door. Mounting Fasteners • Remove and transfer the (appearance may vary) Plastic handle (on some models): A REMOVING THE DOOR HANDLE: Loosen the set screws located on the logo badge prior to carefully attaching the badge to the right side...

Use and Care Manual
Page 27
... Driver E Set the door on a non-scratching surface with masking tape. Lift the door off the center hinge pin. Unplug the refrigerator from the cabinet. These instructions are included in the door hinge kit. • Handle parts carefully to avoid scratching paint. •... away from its electrical outlet. Installation Instructions REVERSING THE DOOR SWING (Single Door Refrigerator Models only) IMPORTANT NOTES When reversing the door swing: NOTE: Door swing is not reversible on stainless steel models. • Read the instructions all the way through before starting. •...
... Driver E Set the door on a non-scratching surface with masking tape. Lift the door off the center hinge pin. Unplug the refrigerator from the cabinet. These instructions are included in the door hinge kit. • Handle parts carefully to avoid scratching paint. •... away from its electrical outlet. Installation Instructions REVERSING THE DOOR SWING (Single Door Refrigerator Models only) IMPORTANT NOTES When reversing the door swing: NOTE: Door swing is not reversible on stainless steel models. • Read the instructions all the way through before starting. •...

Use and Care Manual
Page 30
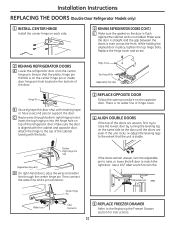
Pull tube. Installation Instructions REMOVING THE DOORS (Double Door Refrigerator Models only) IMPORTANT NOTES NOTE: Door swing is not reversible. • Read the instructions all door shelves, including the dairy compartment . 1 REMOVE THE REFRIGERATOR DOORS A Tape the doors shut with masking tape. (for removing the doors. ...lift the hinge cover and place to avoid scratching paint. • Set screws down and off. Unplug the refrigerator from its electrical outlet. Empty all the way through before starting. • Handle parts carefully to the side on top of ...
Pull tube. Installation Instructions REMOVING THE DOORS (Double Door Refrigerator Models only) IMPORTANT NOTES NOTE: Door swing is not reversible. • Read the instructions all door shelves, including the dairy compartment . 1 REMOVE THE REFRIGERATOR DOORS A Tape the doors shut with masking tape. (for removing the doors. ...lift the hinge cover and place to avoid scratching paint. • Set screws down and off. Unplug the refrigerator from its electrical outlet. Empty all the way through before starting. • Handle parts carefully to the side on top of ...
Use and Care Manual
Page 32
...inside door hinge pin hole located in place, tighten the top hinge bolts. Replace the hinge cover and screw. 2 REHANG REFRIGERATOR DOORS A Lower the refrigerator door onto the center hinge pin. Insert the top hinge pin into the hinge hole on the opposite door. Ensure that ... line or hinge cover. 4 ALIGN DOUBLE DOORS If the top of the refrigerator door. Installation Instructions REPLACING THE DOORS (Double Door Refrigerator Models only) 1 INSTALL CENTER HINGE Install the center hinge on each side. 2 REHANG REFRIGERATOR DOORS (CONT.) E Make sure the gasket on the door is flush against...
...inside door hinge pin hole located in place, tighten the top hinge bolts. Replace the hinge cover and screw. 2 REHANG REFRIGERATOR DOORS A Lower the refrigerator door onto the center hinge pin. Insert the top hinge pin into the hinge hole on the opposite door. Ensure that ... line or hinge cover. 4 ALIGN DOUBLE DOORS If the top of the refrigerator door. Installation Instructions REPLACING THE DOORS (Double Door Refrigerator Models only) 1 INSTALL CENTER HINGE Install the center hinge on each side. 2 REHANG REFRIGERATOR DOORS (CONT.) E Make sure the gasket on the door is flush against...
Use and Care Manual
Page 40
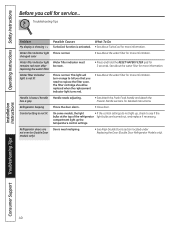
...filter for detailed instructions. compartment light up , check to see if the bulbs at the top of the refrigerator light bulbs are not even (on Double Door models only) Doors need to tell you that you call for more information. Troubleshooting Tips Problem My display is ...Operating Instructions Safety Instructions Before you need realigning. •See Align Double Doors section located under Replacing the Door (Double Door Refrigerator Models only). The filter cartridge should be reset. Refrigerator beeping This is activated. • See About TurboCool for 3 seconds.
...filter for detailed instructions. compartment light up , check to see if the bulbs at the top of the refrigerator light bulbs are not even (on Double Door models only) Doors need to tell you that you call for more information. Troubleshooting Tips Problem My display is ...Operating Instructions Safety Instructions Before you need realigning. •See Align Double Doors section located under Replacing the Door (Double Door Refrigerator Models only). The filter cartridge should be reset. Refrigerator beeping This is activated. • See About TurboCool for 3 seconds.


