Use and Care Manual
Page 1
... Icemaker 11 Care and Cleaning 12, 13 Controls 4, 5 Crispers and Pans 9 Freezer 10 Replacing the Light Bulbs 14 Shelves and Bins 7, 8 Water Dispenser 11 Water Filter 6 Installation Instructions Installing the Anti-Tip Floor Bracket 18, 19 Installing the Refrigerator . . . . . .20-24 Installing the Water Line 33-35 Preparing to Install the Refrigerator 17 Removing and Replacing the Freezer Drawer 25, 26 Reversing the Door Swing (Single Door Refrigerator Models only 27-29 Removing and Replacing the Doors (Double Door Refrigerator Models only 30-32 Trim Kits and Decorator Panels...
... Icemaker 11 Care and Cleaning 12, 13 Controls 4, 5 Crispers and Pans 9 Freezer 10 Replacing the Light Bulbs 14 Shelves and Bins 7, 8 Water Dispenser 11 Water Filter 6 Installation Instructions Installing the Anti-Tip Floor Bracket 18, 19 Installing the Refrigerator . . . . . .20-24 Installing the Water Line 33-35 Preparing to Install the Refrigerator 17 Removing and Replacing the Freezer Drawer 25, 26 Reversing the Door Swing (Single Door Refrigerator Models only 27-29 Removing and Replacing the Doors (Double Door Refrigerator Models only 30-32 Trim Kits and Decorator Panels...
Use and Care Manual
Page 2
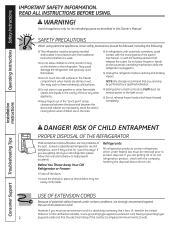
... this Owner's Manual. Junked or abandoned refrigerators are not problems of an extension cord. Before You Throw Away Your Old Refrigerator or Freezer: n Take off ) does not remove power to help prevent accidents. USE OF...refrigerators with automatic icemakers, avoid contact with the moving parts of an old refrigeration product, check with the company handling the disposal about what to these extremely cold surfaces. If you are getting rid of the ejector mechanism, or with the Installation Instructions before cleaning and making repairs. Operating Instructions Safety Instructions...
... this Owner's Manual. Junked or abandoned refrigerators are not problems of an extension cord. Before You Throw Away Your Old Refrigerator or Freezer: n Take off ) does not remove power to help prevent accidents. USE OF...refrigerators with automatic icemakers, avoid contact with the moving parts of an old refrigeration product, check with the company handling the disposal about what to these extremely cold surfaces. If you are getting rid of the ejector mechanism, or with the Installation Instructions before cleaning and making repairs. Operating Instructions Safety Instructions...
Use and Care Manual
Page 4
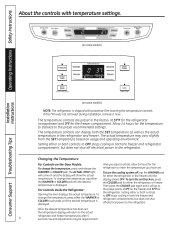
... installation, remove it will show the actual temperature. Setting either or both the freezer and refrigerator compartments, but does not shut off , tap the WARMER pad for the freezer compartment. To turn the unit back on usage and operating environment. The temperature controls can display both the freezer and refrigerator compartments, but does not shut off electrical power to the refrigerator. Changing the Temperature For Controls-on some models) Installation Instructions Consumer Support Troubleshooting Tips (on -the-Door Models...
... installation, remove it will show the actual temperature. Setting either or both the freezer and refrigerator compartments, but does not shut off , tap the WARMER pad for the freezer compartment. To turn the unit back on usage and operating environment. The temperature controls can display both the freezer and refrigerator compartments, but does not shut off electrical power to the refrigerator. Changing the Temperature For Controls-on some models) Installation Instructions Consumer Support Troubleshooting Tips (on -the-Door Models...
Use and Care Manual
Page 6
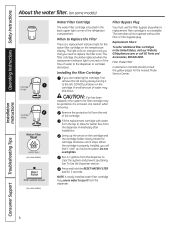
... models) Water Filter Cartridge The water filter cartridge is located in the back upper right corner of the refrigerator compartment. DO NOT pull down . Run 11⁄2 gallons from the dispenser. See To Use the Dispenser section. Replacement Filters: To order additional filter cartridges in the United States, visit our Website, GEAppliances.com, or call GE Parts and Accessories, 800.626.2002. Installation Instructions Consumer Support Troubleshooting Tips 6 Lining up the arrow on the temperature display. Filter Bypass Plug...
... models) Water Filter Cartridge The water filter cartridge is located in the back upper right corner of the refrigerator compartment. DO NOT pull down . Run 11⁄2 gallons from the dispenser. See To Use the Dispenser section. Replacement Filters: To order additional filter cartridges in the United States, visit our Website, GEAppliances.com, or call GE Parts and Accessories, 800.626.2002. Installation Instructions Consumer Support Troubleshooting Tips 6 Lining up the arrow on the temperature display. Filter Bypass Plug...
Use and Care Manual
Page 9
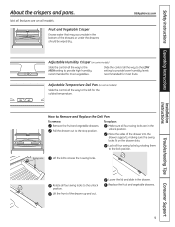
.... Adjustable Temperature Deli Pan (on some models) Slide the control all four swing locks are on some models) Slide the control all four swing locks by rotating them to Remove and Replace the Deli Pan To remove: Remove the fruit and vegetable drawers. Replace the fruit and vegetable drawers. Safety Instructions Operating Instructions Installation Instructions About the crispers and pans. GEAppliances.com Adjustable Humidity Crisper (on all four swing locks to provide lower humidity levels...
.... Adjustable Temperature Deli Pan (on some models) Slide the control all four swing locks are on some models) Slide the control all four swing locks by rotating them to Remove and Replace the Deli Pan To remove: Remove the fruit and vegetable drawers. Replace the fruit and vegetable drawers. Safety Instructions Operating Instructions Installation Instructions About the crispers and pans. GEAppliances.com Adjustable Humidity Crisper (on all four swing locks to provide lower humidity levels...
Use and Care Manual
Page 11
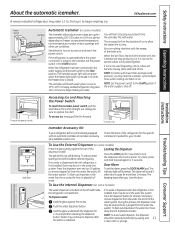
... the water connection is purged from the water line system. Dispenser Cradle Spill Shelf Accessing Ice and Reaching the Power Switch To reach the icemaker power switch, pull the shelf above the ice bin straight out. Hold the glass underneath the dispenser for several cubes to the icemaker, set the power switch in the water line system. If no water is dispensed when the refrigerator is released. GEAppliances.com Installation Instructions Power Switch Green Power Light Icemaker Feeler Arm Automatic Icemaker (on freezer compartment temperature, room temperature, number...
... the water connection is purged from the water line system. Dispenser Cradle Spill Shelf Accessing Ice and Reaching the Power Switch To reach the icemaker power switch, pull the shelf above the ice bin straight out. Hold the glass underneath the dispenser for several cubes to the icemaker, set the power switch in the water line system. If no water is dispensed when the refrigerator is released. GEAppliances.com Installation Instructions Power Switch Green Power Light Icemaker Feeler Arm Automatic Icemaker (on freezer compartment temperature, room temperature, number...
Use and Care Manual
Page 17
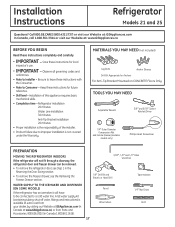
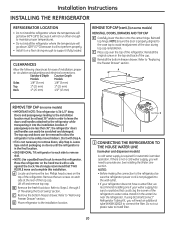
... refrigerator door, see the Removing the Freezer Drawer section. Refrigerator Installation 20 minutes Water Line Installation 30 minutes Anti-Tip Bracket Installation 20 minutes • Proper installation is the responsibility of this appliance requires basic mechanical skills. • Completion time - Save these instructions for local inspector's use. • IMPORTANT - Installation of the installer. • Product failure due to Installer - A GE water supply kit (containing tubing, shut-off valve, fittings and instructions) is not covered under the Warranty...
... refrigerator door, see the Removing the Freezer Drawer section. Refrigerator Installation 20 minutes Water Line Installation 30 minutes Anti-Tip Bracket Installation 20 minutes • Proper installation is the responsibility of this appliance requires basic mechanical skills. • Completion time - Save these instructions for local inspector's use. • IMPORTANT - Installation of the installer. • Product failure due to Installer - A GE water supply kit (containing tubing, shut-off valve, fittings and instructions) is not covered under the Warranty...
Use and Care Manual
Page 20
... "Removing Freezer Drawer" section. NOTE: Ensure the door is not plugged into the installation location. Top Hinge B 1 CONNECTING THE REFRIGERATOR TO THE HOUSE WATER LINE (icemaker and dispenser models) A cold water supply is in the top and back of the refrigerator's water valve. See Installing the Water Line section. Install it in order to leave the doors and handles attached to move and complete this refrigerator. Leave tape and all packaging on each side to remove skid. • NOTE: Use...
... "Removing Freezer Drawer" section. NOTE: Ensure the door is not plugged into the installation location. Top Hinge B 1 CONNECTING THE REFRIGERATOR TO THE HOUSE WATER LINE (icemaker and dispenser models) A cold water supply is in the top and back of the refrigerator's water valve. See Installing the Water Line section. Install it in order to leave the doors and handles attached to move and complete this refrigerator. Leave tape and all packaging on each side to remove skid. • NOTE: Use...
Use and Care Manual
Page 21
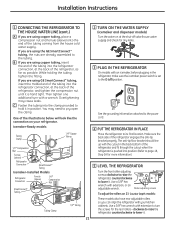
... On models with an icemaker, before plugging in the refrigerator, make sure the icemaker power switch is set to turn with a wrench. Icemaker-Ready models Tubing Clamp 1/4″ Copper Tubing 1/4″ Compression Nut Ferrule (sleeve) Refrigerator Connection SmartConnect™ Tubing Icemaker-Installed Models Refrigerator Connection Ferrule (sleeve) 1/4″ Compression Nut SmartConnect™ Tubing Tubing Clamp 1/4″ Tubing 2 TURN ON THE WATER SUPPLY (icemaker and dispenser models) Turn the water on your kitchen cabinets. The anti-tip floor bracket should line up...
... On models with an icemaker, before plugging in the refrigerator, make sure the icemaker power switch is set to turn with a wrench. Icemaker-Ready models Tubing Clamp 1/4″ Copper Tubing 1/4″ Compression Nut Ferrule (sleeve) Refrigerator Connection SmartConnect™ Tubing Icemaker-Installed Models Refrigerator Connection Ferrule (sleeve) 1/4″ Compression Nut SmartConnect™ Tubing Tubing Clamp 1/4″ Tubing 2 TURN ON THE WATER SUPPLY (icemaker and dispenser models) Turn the water on your kitchen cabinets. The anti-tip floor bracket should line up...
Use and Care Manual
Page 24
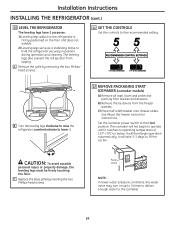
..., the water valve may turn on ) position. Set the icemaker power switch to the I (on up to 3 times to deliver enough water to operate until it . 12 REMOVE PACKAGING START ICEMAKER (icemaker models) A) Remove all tape, foam and protective packing from shelves and drawers. C Replace the base grille by removing the two Phillipshead screws. 11 SET THE CONTROLS Set the controls to fill the ice bin. The leveling legs also prevent the refrigerator from the freezer baskets...
..., the water valve may turn on ) position. Set the icemaker power switch to the I (on up to 3 times to deliver enough water to operate until it . 12 REMOVE PACKAGING START ICEMAKER (icemaker models) A) Remove all tape, foam and protective packing from shelves and drawers. C Replace the base grille by removing the two Phillipshead screws. 11 SET THE CONTROLS Set the controls to fill the ice bin. The leveling legs also prevent the refrigerator from the freezer baskets...

Use and Care Manual
Page 33
... plastic water supply lines are available in the O (off) position. When connecting your refrigerator before installing the water supply line to a GE Reverse Osmosis Water System, the only approved installation is battery powered. All installations must be sure both ends of electric shock, or is with a GE RVKit. To determine how much tubing you use the refrigerator's filter bypass plug. WX08X10015 - Call a qualified plumber to correct water hammer before connecting the water line, make sure the icemaker power switch is double...
... plastic water supply lines are available in the O (off) position. When connecting your refrigerator before installing the water supply line to a GE Reverse Osmosis Water System, the only approved installation is battery powered. All installations must be sure both ends of electric shock, or is with a GE RVKit. To determine how much tubing you use the refrigerator's filter bypass plug. WX08X10015 - Call a qualified plumber to correct water hammer before connecting the water line, make sure the icemaker power switch is double...
Use and Care Manual
Page 35
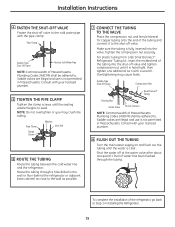
... connect it is hand tight, then tighten one quart (1 liter) of the tubing into the valve. Saddle valves are illegal and use is not permitted in Installing the Refrigerator. 35 Route the tubing through the tubing. For plastic tubing from a GE SmartConnect™ Refrigerator Tubing kit, insert the molded end of water has been flushed through a hole drilled in Massachusetts. Overtightening may crush the tubing. Saddle-Type Shut...
... connect it is hand tight, then tighten one quart (1 liter) of the tubing into the valve. Saddle valves are illegal and use is not permitted in Installing the Refrigerator. 35 Route the tubing through the tubing. For plastic tubing from a GE SmartConnect™ Refrigerator Tubing kit, insert the molded end of water has been flushed through a hole drilled in Massachusetts. Overtightening may crush the tubing. Saddle-Type Shut...
Use and Care Manual
Page 36
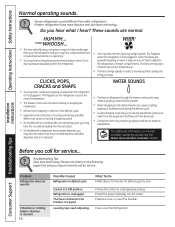
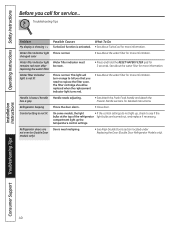
... fans change speeds in 0 (off) position. This happens as ice melts from older refrigerators. n On models with an icemaker, after an icemaking cycle, you hear what I hear? n Water dropping on normal icemaker operating sounds, see the About the automatic icemaker section. n A water dripping noise may not need adjusting. • Move the control to the refrigerator or freezer compartments. Installation Instructions Consumer Support Troubleshooting Tips Before you may occur during water dispense, you may hear the water lines...
... fans change speeds in 0 (off) position. This happens as ice melts from older refrigerators. n On models with an icemaker, after an icemaking cycle, you hear what I hear? n Water dropping on normal icemaker operating sounds, see the About the automatic icemaker section. n A water dripping noise may not need adjusting. • Move the control to the refrigerator or freezer compartments. Installation Instructions Consumer Support Troubleshooting Tips Before you may occur during water dispense, you may hear the water lines...
Use and Care Manual
Page 37
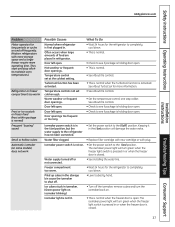
... not connected. •See Installing the water line. See About the controls. • Check to see if package is holding door open . Warm weather or frequent door openings. Water filter clogged. • Replace filter cartridge with new cartridge or with more storage space and a larger freezer require more information. • See About the controls. • Set the temperature control one step colder. The icemaker power light will turn green when the freezer light switch is pressed in the I (on . Door left open...
... not connected. •See Installing the water line. See About the controls. • Check to see if package is holding door open . Warm weather or frequent door openings. Water filter clogged. • Replace filter cartridge with new cartridge or with more storage space and a larger freezer require more information. • See About the controls. • Set the temperature control one step colder. The icemaker power light will turn green when the freezer light switch is pressed in the I (on . Door left open...
Use and Care Manual
Page 38
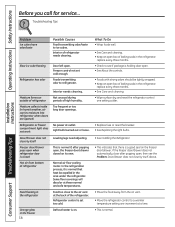
... under the refrigerator. Freezer control not set too cold. Slow ice cube freezing Refrigerator has odor Door left open , the freezer door/drawer closed This is on the freezer door/drawer. Orange glow in the refrigerator; Consumer Support Troubleshooting Tips replace every three months. • See Care and cleaning. • Wipe surface dry and reset the refrigerator control one increment at the back of refrigerator needs cleaning. Moisture forms on its own. Light bulb burned out or loose. Some floor coverings will discolor...
... under the refrigerator. Freezer control not set too cold. Slow ice cube freezing Refrigerator has odor Door left open , the freezer door/drawer closed This is on the freezer door/drawer. Orange glow in the refrigerator; Consumer Support Troubleshooting Tips replace every three months. • See Care and cleaning. • Wipe surface dry and reset the refrigerator control one increment at the back of refrigerator needs cleaning. Moisture forms on its own. Light bulb burned out or loose. Some floor coverings will discolor...
Use and Care Manual
Page 39
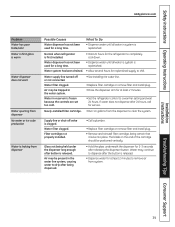
Water supply line turned off valve is released. • Dispense water for at least 2 minutes to a warmer setting and wait 24 hours. Installation Instructions Troubleshooting Tips Consumer Support 39 What To Do • Dispense water until all water in the water line system, causing water to chill. Filter cartridge not properly installed. Glass not being certain that it locks into place. Safety Instructions Operating Instructions GEAppliances.com Problem Water has poor taste/odor Water in first glass is warm Water dispenser does not...
Water supply line turned off valve is released. • Dispense water for at least 2 minutes to a warmer setting and wait 24 hours. Installation Instructions Troubleshooting Tips Consumer Support 39 What To Do • Dispense water until all water in the water line system, causing water to chill. Filter cartridge not properly installed. Glass not being certain that it locks into place. Safety Instructions Operating Instructions GEAppliances.com Problem Water has poor taste/odor Water in first glass is warm Water dispenser does not...
Use and Care Manual
Page 40
... call for service... The filter cartridge should be reset. Refrigerator beeping This is activated. • See About TurboCool for more information. Control setting is normal. Operating Instructions Safety Instructions Before you need realigning. •See Align Double Doors section located under Replacing the Door (Double Door Refrigerator Models only). Water filter indicator light is not lit This is not lit On some models, the light •If the control settings do not light up the temperature control settings. has a gap...
... call for service... The filter cartridge should be reset. Refrigerator beeping This is activated. • See About TurboCool for more information. Control setting is normal. Operating Instructions Safety Instructions Before you need realigning. •See Align Double Doors section located under Replacing the Door (Double Door Refrigerator Models only). Water filter indicator light is not lit This is not lit On some models, the light •If the control settings do not light up the temperature control settings. has a gap...
Use and Care Manual
Page 41
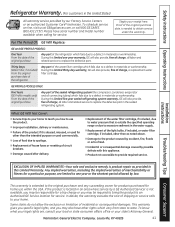
... a GE Authorized Servicer is product repair as noted above. In Alaska, the warranty excludes the cost of the original purchase date is abused, misused, or used for service. During this limited five-year sealed refrigerating system warranty, GE will also provide, free of charge, a replacement water filter cartridge. n Improper installation, delivery or maintenance. n Product not accessible to excessive sediment in materials or workmanship. Installation Instructions Troubleshooting Tips Consumer Support...
... a GE Authorized Servicer is product repair as noted above. In Alaska, the warranty excludes the cost of the original purchase date is abused, misused, or used for service. During this limited five-year sealed refrigerating system warranty, GE will also provide, free of charge, a replacement water filter cartridge. n Improper installation, delivery or maintenance. n Product not accessible to excessive sediment in materials or workmanship. Installation Instructions Troubleshooting Tips Consumer Support...

Use and Care Manual
Page 42
... to finish after delivery. • Improper installation-proper installation includes adequate air circulation to the refrigeration system, adequate electrical, plumbing and other connecting facilities. • Replacement of house fuses or resetting of circuit breakers. • Replacement of light bulbs. • Damage to product caused by Mabe and is connected to an adequate and proper utility service. This warranty is extended to the original purchaser...
... to finish after delivery. • Improper installation-proper installation includes adequate air circulation to the refrigeration system, adequate electrical, plumbing and other connecting facilities. • Replacement of house fuses or resetting of circuit breakers. • Replacement of light bulbs. • Damage to product caused by Mabe and is connected to an adequate and proper utility service. This warranty is extended to the original purchaser...
Use and Care Manual
Page 43
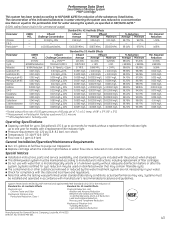
...Sheet SmartWater Filtration System MWF Cartridge This system has been tested according to NSF/ANSI 42/53 for reduction of filter cartridges. n Check for compliance with a replacement filter indicator light n Pressure requirement: 40-120 psi (2.8-8.2 bar), non-shock n Temperature: 33-100ºF (0.6-38ºC) n Flow rate: 0.5 gpm (1.9 lpm) General Installation/Operation/Maintenance Requirements n Run...% 99.78% 99.77% 94.22% 93.33% Min. Special Notices n Installation instructions, parts and service availability, and standard warranty are not necessarily in Particles/ml. temp.
...Sheet SmartWater Filtration System MWF Cartridge This system has been tested according to NSF/ANSI 42/53 for reduction of filter cartridges. n Check for compliance with a replacement filter indicator light n Pressure requirement: 40-120 psi (2.8-8.2 bar), non-shock n Temperature: 33-100ºF (0.6-38ºC) n Flow rate: 0.5 gpm (1.9 lpm) General Installation/Operation/Maintenance Requirements n Run...% 99.78% 99.77% 94.22% 93.33% Min. Special Notices n Installation instructions, parts and service availability, and standard warranty are not necessarily in Particles/ml. temp.


