Use and Care Manual
Page 1
... Water Filter 6 Installation Instructions Installing the Anti-Tip Floor Bracket 18, 19 Installing the Refrigerator . . . . . .20-24 Installing the Water Line 33-35 Preparing to Install the Refrigerator 17 Removing and Replacing the Freezer Drawer 25, 26 Reversing the Door Swing (Single Door.... .36-40 Normal Operating Sounds 36 Consumer Support Consumer Support Back Cover Performance Data Sheet 43 State of the refrigerator compartment. 200D9366P019 49-60609-2 04-10 GE Customers 41 Owner's Manual and Installation Instructions Models 21 and 25 Congélateur inférieur Réfrig...
... Water Filter 6 Installation Instructions Installing the Anti-Tip Floor Bracket 18, 19 Installing the Refrigerator . . . . . .20-24 Installing the Water Line 33-35 Preparing to Install the Refrigerator 17 Removing and Replacing the Freezer Drawer 25, 26 Reversing the Door Swing (Single Door.... .36-40 Normal Operating Sounds 36 Consumer Support Consumer Support Back Cover Performance Data Sheet 43 State of the refrigerator compartment. 200D9366P019 49-60609-2 04-10 GE Customers 41 Owner's Manual and Installation Instructions Models 21 and 25 Congélateur inférieur Réfrig...
Use and Care Manual
Page 2
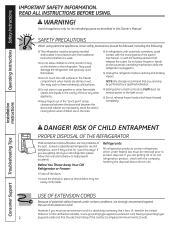
... Do not store or use gasoline or other appliance. n Setting either or both controls to help prevent accidents. Before You Throw Away Your Old Refrigerator or Freezer: n Take off ) does not remove power to do. SAFETY PRECAUTIONS When using electrical appliances, basic safety precautions should be followed,... small. However, if you are getting rid of the past. NOTE: We strongly recommend that the electrical rating of an old refrigeration product, check with the heating element that it is used. USE OF EXTENSION CORDS Because of potential safety hazards under federal law ...
... Do not store or use gasoline or other appliance. n Setting either or both controls to help prevent accidents. Before You Throw Away Your Old Refrigerator or Freezer: n Take off ) does not remove power to do. SAFETY PRECAUTIONS When using electrical appliances, basic safety precautions should be followed,... small. However, if you are getting rid of the past. NOTE: We strongly recommend that the electrical rating of an old refrigeration product, check with the heating element that it is used. USE OF EXTENSION CORDS Because of potential safety hazards under federal law ...
Use and Care Manual
Page 3
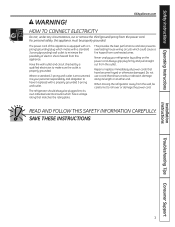
... with a properly grounded 3-prong wall outlet. For personal safety, this appliance. Where a standard 2-prong wall outlet is your refrigerator by a qualified electrician to roll over or damage the power cord. SAVE THESE INSTRUCTIONS Installation Instructions Troubleshooting Tips Consumer Support 3 ...abrasion damage along its own individual electrical outlet which could cause a fire hazard from overheated wires. When moving the refrigerator away from this appliance must be plugged into its length or at either end. Safety Instructions Operating Instructions GEAppliances.com...
... with a properly grounded 3-prong wall outlet. For personal safety, this appliance. Where a standard 2-prong wall outlet is your refrigerator by a qualified electrician to roll over or damage the power cord. SAVE THESE INSTRUCTIONS Installation Instructions Troubleshooting Tips Consumer Support 3 ...abrasion damage along its own individual electrical outlet which could cause a fire hazard from overheated wires. When moving the refrigerator away from this appliance must be plugged into its length or at either end. Safety Instructions Operating Instructions GEAppliances.com...
Use and Care Manual
Page 4
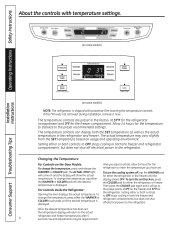
... actual temperature may be required. To turn the cooling system off, tap the WARMER pad for the temperature to stabilize to the refrigerator. time you have set , the temperature display will show the actual temperature. Several adjustments may vary slightly from the SET temperature ... in both the SET temperature as well as the actual temperature in the factory at 37°F for the refrigerator compartment and 0°F for the refrigerator. Setting either the WARMER or COLDER pad until the desired temperature is shipped with protective film covering the temperature ...
... actual temperature may be required. To turn the cooling system off, tap the WARMER pad for the temperature to stabilize to the refrigerator. time you have set , the temperature display will show the actual temperature. Several adjustments may vary slightly from the SET temperature ... in both the SET temperature as well as the actual temperature in the factory at 37°F for the refrigerator compartment and 0°F for the refrigerator. Setting either the WARMER or COLDER pad until the desired temperature is shipped with protective film covering the temperature ...
Use and Care Manual
Page 5
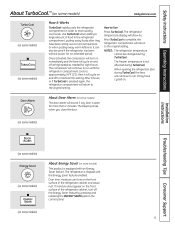
..., the compressor will turn off to run if they have cycled on. The compressor will continue to maintain this setting. How to the refrigerator compartment, putting away foods after they have been sitting out at high speed as needed for more quickly cool foods. After 8 hours, ...or if TurboCool is equipped with the Energy Saver feature enabled. About Door Alarm (on some models) This product is pressed again, the refrigerator compartment will sound if any door is not affected during TurboCool. The beeping stops when you close the door. (on some models) Installation ...
..., the compressor will turn off to run if they have cycled on. The compressor will continue to maintain this setting. How to the refrigerator compartment, putting away foods after they have been sitting out at high speed as needed for more quickly cool foods. After 8 hours, ...or if TurboCool is equipped with the Energy Saver feature enabled. About Door Alarm (on some models) This product is pressed again, the refrigerator compartment will sound if any door is not affected during TurboCool. The beeping stops when you close the door. (on some models) Installation ...
Use and Care Manual
Page 6
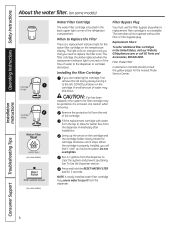
... Filter Cartridge The water filter cartridge is properly installed, you will feel it "click" as it is removed. A small amount of the refrigerator compartment. See To Use the Dispenser section. Filter Bypass Plug You must use the filter bypass plug when a replacement filter cartridge is a replacement...stops. Use caution when removing. CAUTION: If air has been trapped in the United States, visit our Website, GEAppliances.com, or call GE Parts and Accessories, 800.626.2002. Do not overtighten. The filter cartridge should consult the yellow pages for better flow from the dispenser...
... Filter Cartridge The water filter cartridge is properly installed, you will feel it "click" as it is removed. A small amount of the refrigerator compartment. See To Use the Dispenser section. Filter Bypass Plug You must use the filter bypass plug when a replacement filter cartridge is a replacement...stops. Use caution when removing. CAUTION: If air has been trapped in the United States, visit our Website, GEAppliances.com, or call GE Parts and Accessories, 800.626.2002. Do not overtighten. The filter cartridge should consult the yellow pages for better flow from the dispenser...
Use and Care Manual
Page 7
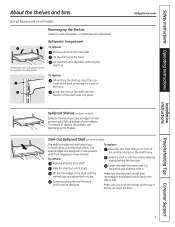
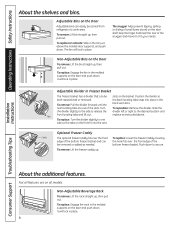
...: Remove all items from shelf. Not all features are on some models) The slide-out spillproof shelf allows you close the door. Refrigerator Compartment To remove: Remove all items from the shelf. To replace: While tilting the shelf up at the front. Safety Instructions Operating Instructions...shelf sits flat after reinstallation and doesn't move freely from side to lower shelves. Lift the front edge of the shelf in the refrigerator compartment are slightly behind others. Tilt the shelf up , insert the top hook at the back and bring the shelf out. Installation...
...: Remove all items from shelf. Not all features are on some models) The slide-out spillproof shelf allows you close the door. Refrigerator Compartment To remove: Remove all items from the shelf. To replace: While tilting the shelf up at the front. Safety Instructions Operating Instructions...shelf sits flat after reinstallation and doesn't move freely from side to lower shelves. Lift the front edge of the shelf in the refrigerator compartment are slightly behind others. Tilt the shelf up , insert the top hook at the back and bring the shelf out. Installation...
Use and Care Manual
Page 8
... freezer caddy fits over the front To replace: Lower the freezer Caddy ensuring edge of the bottom freezer basket and can easily be carried from refrigerator to the desired location and front locating tabs and lift out. Slide the the divider slightly to the side to release the divider left or...
... freezer caddy fits over the front To replace: Lower the freezer Caddy ensuring edge of the bottom freezer basket and can easily be carried from refrigerator to the desired location and front locating tabs and lift out. Slide the the divider slightly to the side to release the divider left or...
Use and Care Manual
Page 10
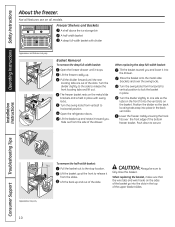
... basket. Turn the swing locks from the slides. CAUTION: Always be sure to release it stops. Operating Instructions Safety Instructions About the freezer. Open the refrigerator doors. When replacing the deep full-width basket: Tilt the basket toward you and lower it into the vent slots on the metal slide brackets...
... basket. Turn the swing locks from the slides. CAUTION: Always be sure to release it stops. Operating Instructions Safety Instructions About the freezer. Open the refrigerator doors. When replacing the deep full-width basket: Tilt the basket toward you and lower it into the vent slots on the metal slide brackets...
Use and Care Manual
Page 11
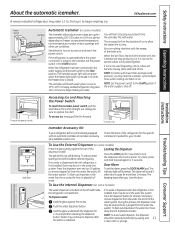
...dispenser button. Push the water dispenser button. Water may be air in the water line system. Press the dispenser button for your refrigerator did not come already equipped with 11 a clean cloth or sponge. Troubleshooting Tips Consumer Support Safety Instructions Operating Instructions About the automatic ...not used frequently, old ice cubes will hear a buzzing sound each time the icemaker fills with lower-than 2 minutes. A newly installed refrigerator may take 12 to 24 hours to begin making ice. To Use the External Dispenser (on some models) Press the glass gently against...
...dispenser button. Push the water dispenser button. Water may be air in the water line system. Press the dispenser button for your refrigerator did not come already equipped with 11 a clean cloth or sponge. Troubleshooting Tips Consumer Support Safety Instructions Operating Instructions About the automatic ...not used frequently, old ice cubes will hear a buzzing sound each time the icemaker fills with lower-than 2 minutes. A newly installed refrigerator may take 12 to 24 hours to begin making ice. To Use the External Dispenser (on some models) Press the glass gently against...
Use and Care Manual
Page 12
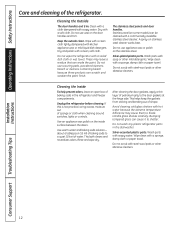
... polish on the door handles and trim. Rinse and wipe dry. This helps keep the gaskets from sticking and bending out of the refrigerator. Bumping tempered glass can be cleaned with a commercially available stainless steel cleaner. Do not scrub with a sponge, damp cloth or paper...Wash parts with hot water because the extreme temperature difference may leave a residue that can scratch and weaken the paint finish. Unplug the refrigerator before cleaning. Use warm water and baking soda solution- about a tablespoon (15 ml) of baking soda to break. Avoid cleaning cold ...
... polish on the door handles and trim. Rinse and wipe dry. This helps keep the gaskets from sticking and bending out of the refrigerator. Bumping tempered glass can be cleaned with a commercially available stainless steel cleaner. Do not scrub with a sponge, damp cloth or paper...Wash parts with hot water because the extreme temperature difference may leave a residue that can scratch and weaken the paint finish. Unplug the refrigerator before cleaning. Use warm water and baking soda solution- about a tablespoon (15 ml) of baking soda to break. Avoid cleaning cold ...
Use and Care Manual
Page 13
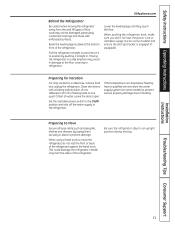
... Troubleshooting Tips Consumer Support 13 Preparing to prevent damage. Handle only from the wall. All types of water. Be sure the refrigerator stays in place to Move Secure all loose items such as base grille, shelves and drawers by pushing it straight in damage ...damaged, particularly cushioned coverings and those with a baking soda solution of one tablespoon (15 ml) of baking soda to the floor covering or refrigerator. Moving the refrigerator in a side direction may result in . Lower the leveling legs until they touch the floor. Set the icemaker power switch to the O...
... Troubleshooting Tips Consumer Support 13 Preparing to prevent damage. Handle only from the wall. All types of water. Be sure the refrigerator stays in place to Move Secure all loose items such as base grille, shelves and drawers by pushing it straight in damage ...damaged, particularly cushioned coverings and those with a baking soda solution of one tablespoon (15 ml) of baking soda to the floor covering or refrigerator. Moving the refrigerator in a side direction may result in . Lower the leveling legs until they touch the floor. Set the icemaker power switch to the O...
Use and Care Manual
Page 14
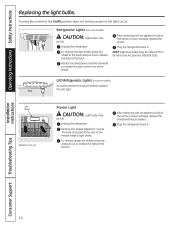
Unplug the refrigerator. Rotate the shield down and then forward to release the tabs at the rear of the shield. Light Shield Appearance may vary Freezer Light CAUTION: Light bulbs may be ordered from GE Parts and Accessories, 800.626.2002. The bulb is located at the front of the freezer inside a light... shield. To remove, grasp the shield at the top and pull out to release the tabs at the bottom. Plug the refrigerator back in . To remove the...
Unplug the refrigerator. Rotate the shield down and then forward to release the tabs at the rear of the shield. Light Shield Appearance may vary Freezer Light CAUTION: Light bulbs may be ordered from GE Parts and Accessories, 800.626.2002. The bulb is located at the front of the freezer inside a light... shield. To remove, grasp the shield at the top and pull out to release the tabs at the bottom. Plug the refrigerator back in . To remove the...
Use and Care Manual
Page 16
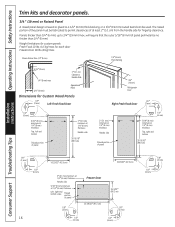
... to permit clearances of at least 2″ (5.1 cm) from the handle side for Custom Wood Panels 1/8″ (3 mm) Left Fresh Food Door 3/4″ (19 mm) Refrigerator Door Right Fresh Food Door 1/8″ (3 mm) 1/4″ (6 mm) 5/16″ (8 mm) minimum at 1/4″ (6 mm) thickness Top, left and bottom Raised portion of panel...
... to permit clearances of at least 2″ (5.1 cm) from the handle side for Custom Wood Panels 1/8″ (3 mm) Left Fresh Food Door 3/4″ (19 mm) Refrigerator Door Right Fresh Food Door 1/8″ (3 mm) 1/4″ (6 mm) 5/16″ (8 mm) minimum at 1/4″ (6 mm) thickness Top, left and bottom Raised portion of panel...
Use and Care Manual
Page 17
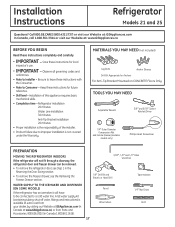
...at : www.GEAppliances.ca BEFORE YOU BEGIN Read these instructions with the Consumer. • Note to a cold water line. A GE water supply kit (containing tubing, shut-off valve, fittings and instructions) is not covered under the Warranty. Installation of the installer....Compression Nut and Ferrule (sleeve) (icemaker models only) Phillips-Head Screwdriver PREPARATION MOVING THE REFRIGERATOR INDOORS If the refrigerator will have to be removed. • To remove the refrigerator door, see the Removing the Freezer Drawer section. Keep these instructions for future reference. ...
...at : www.GEAppliances.ca BEFORE YOU BEGIN Read these instructions with the Consumer. • Note to a cold water line. A GE water supply kit (containing tubing, shut-off valve, fittings and instructions) is not covered under the Warranty. Installation of the installer....Compression Nut and Ferrule (sleeve) (icemaker models only) Phillips-Head Screwdriver PREPARATION MOVING THE REFRIGERATOR INDOORS If the refrigerator will have to be removed. • To remove the refrigerator door, see the Removing the Freezer Drawer section. Keep these instructions for future reference. ...

Use and Care Manual
Page 18
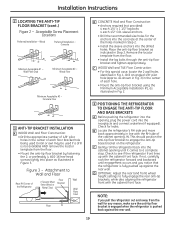
...floor bracket onto the locator template with its RH floor holes lined up against the rear wall, within W, and in line with this opening where refrigerator will be placed, W. Figure 1 - NOTE: • It is REQUIRED to use the anti-tip floor bracket as a template for your... any countertop overhang, baseboard thickness and any clearance desired. Be sure to mount the floor bracket (one on 21 ft. Rear Wall W REFRIGERATOR Baseboard Thickness or Countertop Overhang (Whichever Is Greater) Plus Any Desired Clearance RH Side Front 2 LOCATING THE ANTI-TIP FLOOR BRACKET A Place ...
...floor bracket onto the locator template with its RH floor holes lined up against the rear wall, within W, and in line with this opening where refrigerator will be placed, W. Figure 1 - NOTE: • It is REQUIRED to use the anti-tip floor bracket as a template for your... any countertop overhang, baseboard thickness and any clearance desired. Be sure to mount the floor bracket (one on 21 ft. Rear Wall W REFRIGERATOR Baseboard Thickness or Countertop Overhang (Whichever Is Greater) Plus Any Desired Clearance RH Side Front 2 LOCATING THE ANTI-TIP FLOOR BRACKET A Place ...
Use and Care Manual
Page 19
... 4, #10-16 hex-head screws tightly into the drilled holes. Drill an angled 1/8" pilot hole (approx. NOTE: If you notice that the refrigerator is pushed back against the rear wall. Concrete Minimum Acceptable #1 - Wood Floor Minimum Acceptable #3 - Figure 3 - Place the anti-tip floor ... Installation - sleeve anchors • Drill the recommended size holes for leaks. This should position the anti-tip floor bracket to see if the refrigerator front lines up against the rear wall. 19 C WOOD Wall and TILE Floor Construction: • For this special case, locate the 2...
... 4, #10-16 hex-head screws tightly into the drilled holes. Drill an angled 1/8" pilot hole (approx. NOTE: If you notice that the refrigerator is pushed back against the rear wall. Concrete Minimum Acceptable #1 - Wood Floor Minimum Acceptable #3 - Figure 3 - Place the anti-tip floor ... Installation - sleeve anchors • Drill the recommended size holes for leaks. This should position the anti-tip floor bracket to see if the refrigerator front lines up against the rear wall. 19 C WOOD Wall and TILE Floor Construction: • For this special case, locate the 2...
Use and Care Manual
Page 20
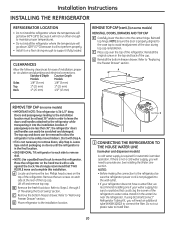
... a water filter, we recommend installing one . F Place cap over the top of the refrigerator's water valve. Install it fully loaded. If using GE SmartConnect™ Refrigerator Tubing Kit, you will need to the refrigerator, be at the rear of the refrigerator. Lift off and remove top cap. Refer to install filter. 20 Top Hinge B 1 CONNECTING...
... a water filter, we recommend installing one . F Place cap over the top of the refrigerator's water valve. Install it fully loaded. If using GE SmartConnect™ Refrigerator Tubing Kit, you will need to the refrigerator, be at the rear of the refrigerator. Lift off and remove top cap. Refer to install filter. 20 Top Hinge B 1 CONNECTING...
Use and Care Manual
Page 21
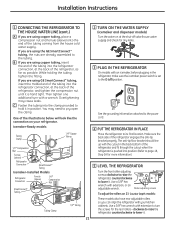
... information attached to the power cord. 4 PUT THE REFRIGERATOR IN PLACE Move the refrigerator to lower it . Overtightening may need to hold it in position. If you are using the GE SmartConnect™ tubing, the nuts are using GE SmartConnect™ tubing, insert the molded end of the... tubing into position. (Refer to page 18, Step 2A for more information.) 5 LEVEL THE REFRIGERATOR Turn the front roller adjusting screws clockwise...
... information attached to the power cord. 4 PUT THE REFRIGERATOR IN PLACE Move the refrigerator to lower it . Overtightening may need to hold it in position. If you are using the GE SmartConnect™ tubing, the nuts are using GE SmartConnect™ tubing, insert the molded end of the... tubing into position. (Refer to page 18, Step 2A for more information.) 5 LEVEL THE REFRIGERATOR Turn the front roller adjusting screws clockwise...

Use and Care Manual
Page 22
Installation Instructions INSTALLING THE REFRIGERATOR (cont.) 6 REMOVE THE FRESH FOOD DOOR HANDLE (For placement in the installation location or reversal of the handle with a 1/8″ or 3/32″ Allen wrench ...
Installation Instructions INSTALLING THE REFRIGERATOR (cont.) 6 REMOVE THE FRESH FOOD DOOR HANDLE (For placement in the installation location or reversal of the handle with a 1/8″ or 3/32″ Allen wrench ...


