
Owners Manual
Page 1
... Canadian Customers 43 Warranty for U.S. Customers . . . . .44 Write the model and serial numbers here: Model Serial Find these numbers on a label on the right side, near the top of the refrigerator compartment. 3828JL8069D 197D4618P009 49-60503 01-07 JR ge.com Bottom Refr igeratoFreezerrs Safety Instructions 2, 3 Operating Instructions Additional Features 9 Automatic Icemaker 12 Controls 4-6 Crispers and Pans 10 Freezer 11 Shelves and Bins 8, 9 Water Filter 7 Care and Cleaning 13-15 Installation Instructions Installing the Refrigerator . . . .17-21 Installing the Water Line...
... Canadian Customers 43 Warranty for U.S. Customers . . . . .44 Write the model and serial numbers here: Model Serial Find these numbers on a label on the right side, near the top of the refrigerator compartment. 3828JL8069D 197D4618P009 49-60503 01-07 JR ge.com Bottom Refr igeratoFreezerrs Safety Instructions 2, 3 Operating Instructions Additional Features 9 Automatic Icemaker 12 Controls 4-6 Crispers and Pans 10 Freezer 11 Shelves and Bins 8, 9 Water Filter 7 Care and Cleaning 13-15 Installation Instructions Installing the Refrigerator . . . .17-21 Installing the Water Line...

Owners Manual
Page 2
... the automatic icemaking mechanism while the refrigerator is used. Junked or abandoned refrigerators are necessarily small. DANGER! Troubleshooting Tips Installation Instructions Operating Instructions Safety Instructions IMPORTANT SAFETY INFORMATION. s In refrigerators with automatic icemakers, avoid contact with the moving parts of the ejector mechanism, or with the Installation Instructions before cleaning and making repairs. If you are getting rid of an extension cord. s Setting either or both controls to 0 (off the doors. WARNING...
... the automatic icemaking mechanism while the refrigerator is used. Junked or abandoned refrigerators are necessarily small. DANGER! Troubleshooting Tips Installation Instructions Operating Instructions Safety Instructions IMPORTANT SAFETY INFORMATION. s In refrigerators with automatic icemakers, avoid contact with the moving parts of the ejector mechanism, or with the Installation Instructions before cleaning and making repairs. If you are getting rid of an extension cord. s Setting either or both controls to 0 (off the doors. WARNING...
Owners Manual
Page 4
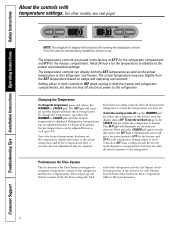
... Performance Air Flow System is shipped with protective film covering the temperature controls. The SET light will illuminate on and the display will return to reach the temperature you selected. Setting either or both controls to OFF stops cooling in both the freezer and refrigerator compartments, but does not shut off electrical power to the refrigerator. Placing food in the refrigerator and freezer compartments. The temperature controls can display both the freezer and refrigerator compartments...
... Performance Air Flow System is shipped with protective film covering the temperature controls. The SET light will illuminate on and the display will return to reach the temperature you selected. Setting either or both controls to OFF stops cooling in both the freezer and refrigerator compartments, but does not shut off electrical power to the refrigerator. Placing food in the refrigerator and freezer compartments. The temperature controls can display both the freezer and refrigerator compartments...

Owners Manual
Page 7
...The filter cartridge should be replaced when the replacement indicator light turns red or if the flow of the cartridge should consult the yellow pages for the water filter cartridge on some models) ge.com (on the temperature display. If you will not operate without the filter or filter bypass plug. A small amount of the cartridge. Use caution when removing. Safety Instructions Operating Instructions Installation Instructions Troubleshooting Tips Consumer Support About the water filter. (on some models) Water Filter Cartridge Filter Bypass Plug The water filter cartridge is...
...The filter cartridge should be replaced when the replacement indicator light turns red or if the flow of the cartridge should consult the yellow pages for the water filter cartridge on some models) ge.com (on the temperature display. If you will not operate without the filter or filter bypass plug. A small amount of the cartridge. Use caution when removing. Safety Instructions Operating Instructions Installation Instructions Troubleshooting Tips Consumer Support About the water filter. (on some models) Water Filter Cartridge Filter Bypass Plug The water filter cartridge is...
Owners Manual
Page 8
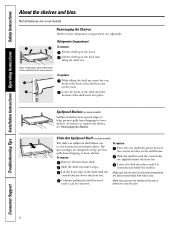
... shelf until it stops. To remove or replace the shelves, see Rearranging the Shelves. Lower the shelf into place. Make sure you to side. Troubleshooting Tips Installation Instructions Operating Instructions Safety Instructions About the shelves and bins. Not all features are above the front bar. Rearranging the Shelves Shelves in until it can be removed. Some models have special edges to help prevent spills from shelf. Spillproof Shelves (on the shelf frame. To remove: Remove...
... shelf until it stops. To remove or replace the shelves, see Rearranging the Shelves. Lower the shelf into place. Make sure you to side. Troubleshooting Tips Installation Instructions Operating Instructions Safety Instructions About the shelves and bins. Not all features are above the front bar. Rearranging the Shelves Shelves in until it can be removed. Some models have special edges to help prevent spills from shelf. Spillproof Shelves (on the shelf frame. To remove: Remove...

Owners Manual
Page 10
... down on some models) This pan can be fully opened, remove the drawer farthest from the door. Fruit and Vegetable Crisper Excess water that may accumulate in the 7th slot from the freezer is set at cold, the pan will stay at the normal refrigerator temperature. Not all features are on some models) Slide the control all models. Make sure the drawer closest to which the drawer is fully closed...
... down on some models) This pan can be fully opened, remove the drawer farthest from the door. Fruit and Vegetable Crisper Excess water that may accumulate in the 7th slot from the freezer is set at cold, the pan will stay at the normal refrigerator temperature. Not all features are on some models) Slide the control all models. Make sure the drawer closest to which the drawer is fully closed...
Owners Manual
Page 12
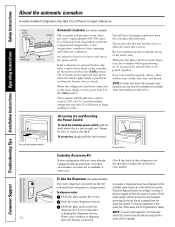
... the ice bin straight out. Shelf Ice Bin To access ice. Check the back of the refrigerator for the specific icemaker kit needed for how to the level of ice to allow the water line to fill the Hold the glass against the recess. installed, there may hear the icemaker cycle multiple times when making ice. water system. Shelf Ice Bin To reach the power switch. Troubleshooting Tips Installation Instructions Operating Instructions Safety Instructions About the automatic icemaker. If the refrigerator is operated before the water connection...
... the ice bin straight out. Shelf Ice Bin To access ice. Check the back of the refrigerator for the specific icemaker kit needed for how to the level of ice to allow the water line to fill the Hold the glass against the recess. installed, there may hear the icemaker cycle multiple times when making ice. water system. Shelf Ice Bin To reach the power switch. Troubleshooting Tips Installation Instructions Operating Instructions Safety Instructions About the automatic icemaker. If the refrigerator is operated before the water connection...

Owners Manual
Page 16
... the Removing the Freezer Drawer section. • To remove the freezer door, see Steps 2 and 3 in Canada at : www.geappliances.ca BEFORE YOU BEGIN Read these instructions for local inspector's use on Stainless steel refrigerator handles (on some models) 1/4″ Allen wrench supplied for use . • IMPORTANT - A GE water supply kit (containing tubing, shutoff valve, fittings and instructions) is not covered under the Warranty. Observe all governing codes and ordinances. • Note to improper installation...
... the Removing the Freezer Drawer section. • To remove the freezer door, see Steps 2 and 3 in Canada at : www.geappliances.ca BEFORE YOU BEGIN Read these instructions for local inspector's use on Stainless steel refrigerator handles (on some models) 1/4″ Allen wrench supplied for use . • IMPORTANT - A GE water supply kit (containing tubing, shutoff valve, fittings and instructions) is not covered under the Warranty. Observe all governing codes and ordinances. • Note to improper installation...
Owners Manual
Page 17
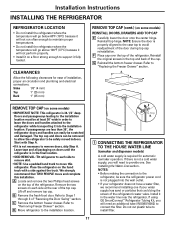
... screws on some models) REINSTALL DOORS, DRAWERS AND TOP CAP E Carefully lower the door onto the center hinge. C Remove the bottom freezer drawer. See Installing the Water Line section. Lift off and remove top cap. If using GE SmartConnect™ Refrigerator Tubing Kit, you will need to avoid readjustment of the refrigerator's water valve. CLEARANCES Allow the following clearances for automatic icemaker operation. D Move refrigerator to Steps 1 through 3 of installation, proper air circulation and plumbing and electrical connections. REMOVE TOP CAP...
... screws on some models) REINSTALL DOORS, DRAWERS AND TOP CAP E Carefully lower the door onto the center hinge. C Remove the bottom freezer drawer. See Installing the Water Line section. Lift off and remove top cap. If using GE SmartConnect™ Refrigerator Tubing Kit, you will need to avoid readjustment of the refrigerator's water valve. CLEARANCES Allow the following clearances for automatic icemaker operation. D Move refrigerator to Steps 1 through 3 of installation, proper air circulation and plumbing and electrical connections. REMOVE TOP CAP...

Owners Manual
Page 24
...-blade Screwdriver Phillips Screwdriver E Set the door on the back side. B Remove the hinge cover on the hinge pin or inside up. 24 These instructions are for a replacement badge. TOOLS YOU WILL NEED Adjustable Wrench 3/8″ and 10 mm Socket Ratchet/Driver 1 REMOVE THE REFRIGERATOR DOOR A Tape the door shut with the inside door hinge pin hole located in the bottom of the refrigerator door by their related parts to free the hinge pin from the socket...
...-blade Screwdriver Phillips Screwdriver E Set the door on the back side. B Remove the hinge cover on the hinge pin or inside up. 24 These instructions are for a replacement badge. TOOLS YOU WILL NEED Adjustable Wrench 3/8″ and 10 mm Socket Ratchet/Driver 1 REMOVE THE REFRIGERATOR DOOR A Tape the door shut with the inside door hinge pin hole located in the bottom of the refrigerator door by their related parts to free the hinge pin from the socket...

Owners Manual
Page 30
....) E Make sure the gasket on the door is flush against the cabinet and is stable. IMPORTANT: The ground wire must be reinstalled to raise the lowest door by turning the leveling leg on the opposite door. 4 ALIGN DOUBLE DOORS If the top of the door. While lifting the door on each side. 2 REHANG REFRIGERATOR DOORS A Lower the refrigerator door onto the center hinge pin. Installation Instructions REPLACING THE DOORS (Double Door Refrigerator Models...
....) E Make sure the gasket on the door is flush against the cabinet and is stable. IMPORTANT: The ground wire must be reinstalled to raise the lowest door by turning the leveling leg on the opposite door. 4 ALIGN DOUBLE DOORS If the top of the door. While lifting the door on each side. 2 REHANG REFRIGERATOR DOORS A Lower the refrigerator door onto the center hinge pin. Installation Instructions REPLACING THE DOORS (Double Door Refrigerator Models...

Owners Manual
Page 33
.... Make sure the tubing is clear. Saddle valves are illegal and use is sufficient extra tubing (about 8′ [2.4 m] coiled into 3 turns of the tubing into the valve. NOTE: Be sure there is not permitted in Installing the Refrigerator. 33 Shut the water off at the water valve after about 10 ″ [25 cm] diameter) to allow the refrigerator to move out from a GE SmartConnect™ Refrigerator Tubing kit, insert...
.... Make sure the tubing is clear. Saddle valves are illegal and use is sufficient extra tubing (about 8′ [2.4 m] coiled into 3 turns of the tubing into the valve. NOTE: Be sure there is not permitted in Installing the Refrigerator. 33 Shut the water off at the water valve after about 10 ″ [25 cm] diameter) to allow the refrigerator to move out from a GE SmartConnect™ Refrigerator Tubing kit, insert...

Owners Manual
Page 34
... defrost cycle. Control in defrost cycle. Troubleshooting Tips Installation Instructions Operating Instructions Safety Instructions Normal operating sounds. Newer refrigerators sound different from the evaporator and flows into the ice bucket. These sounds are opened frequently or when a large amount of cooling coils during water dispense, you may cause a gurgling sound due to a temperature setting. • Push the plug completely into the outlet. • Replace fuse or reset the breaker. • See Level the Refrigerator. s Defrost...
... defrost cycle. Control in defrost cycle. Troubleshooting Tips Installation Instructions Operating Instructions Safety Instructions Normal operating sounds. Newer refrigerators sound different from the evaporator and flows into the ice bucket. These sounds are opened frequently or when a large amount of cooling coils during water dispense, you may cause a gurgling sound due to a temperature setting. • Push the plug completely into the outlet. • Replace fuse or reset the breaker. • See Level the Refrigerator. s Defrost...

Owners Manual
Page 35
... refrigerators with plug. •Set the power switch to the I (on) position, but the water supply to completely cool down . •Level cubes by hand. •Turn off or not connected. Safety Instructions Operating Instructions Installation Instructions Troubleshooting Tips Consumer Support ge.com Problem Motor operates for long periods or cycles on and off . They start and stop often to see if package is activated. Door left open . Hot weather or frequent door openings. Warm weather or frequent door openings. Water filter clogged. Water supply turned...
... refrigerators with plug. •Set the power switch to the I (on) position, but the water supply to completely cool down . •Level cubes by hand. •Turn off or not connected. Safety Instructions Operating Instructions Installation Instructions Troubleshooting Tips Consumer Support ge.com Problem Motor operates for long periods or cycles on and off . They start and stop often to see if package is activated. Door left open . Hot weather or frequent door openings. Warm weather or frequent door openings. Water filter clogged. Water supply turned...

Owners Manual
Page 36
...Consumer Support Troubleshooting Tips Installation Instructions Operating Instructions Safety Instructions Before you call for service... Troubleshooting Tips Problem Ice cubes have odor/taste Slow ice cube freezing Refrigerator has odor Moisture forms on outside of refrigerator Moisture collects inside (in humid weather, air carries moisture into refrigerator when doors are opened) Refrigerator or freezer compartment light does not work Door/drawer does not close after popping open when refrigerator door is set cold enough. Door left open box of refrigerator Food freezing...
...Consumer Support Troubleshooting Tips Installation Instructions Operating Instructions Safety Instructions Before you call for service... Troubleshooting Tips Problem Ice cubes have odor/taste Slow ice cube freezing Refrigerator has odor Moisture forms on outside of refrigerator Moisture collects inside (in humid weather, air carries moisture into refrigerator when doors are opened) Refrigerator or freezer compartment light does not work Door/drawer does not close after popping open when refrigerator door is set cold enough. Door left open box of refrigerator Food freezing...

Owners Manual
Page 37
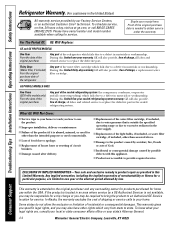
...has been drained. Filter cartridge not properly installed. Water filter clogged. Water filter clogged. Water in the water system. Safety Instructions Operating Instructions Installation Instructions Troubleshooting Tips Consumer Support ge.com Problem Water has poor taste/odor Water in first glass is warm Water dispenser does not work Water spurting from dispenser Water is not dispensed but icemaker is working No water or ice cube production Water is leaking from the dispenser for 3 minutes (about 11⁄2 gallons). •Set the refrigerator control to a warmer setting and wait...
...has been drained. Filter cartridge not properly installed. Water filter clogged. Water filter clogged. Water in the water system. Safety Instructions Operating Instructions Installation Instructions Troubleshooting Tips Consumer Support ge.com Problem Water has poor taste/odor Water in first glass is warm Water dispenser does not work Water spurting from dispenser Water is not dispensed but icemaker is working No water or ice cube production Water is leaking from the dispenser for 3 minutes (about 11⁄2 gallons). •Set the refrigerator control to a warmer setting and wait...

Owners Manual
Page 38
.... The filter cartridge should be reset. •Press and hold the RESET WATER FILTER pad for service... Refrigerator beeping This is not lit On some models, the light •If the control settings do not light up the temperature control settings. Control setting is the door alarm. •Close door. Consumer Support 38 Troubleshooting Tips Installation Instructions Operating Instructions Safety Instructions Before you need realigning. •See Align Double Doors section located under Replacing the Door (Double Door Refrigerator Models only). changed color...
.... The filter cartridge should be reset. •Press and hold the RESET WATER FILTER pad for service... Refrigerator beeping This is not lit On some models, the light •If the control settings do not light up the temperature control settings. Control setting is the door alarm. •Close door. Consumer Support 38 Troubleshooting Tips Installation Instructions Operating Instructions Safety Instructions Before you need realigning. •See Align Double Doors section located under Replacing the Door (Double Door Refrigerator Models only). changed color...
Owners Manual
Page 43
.... • Improper installation-proper installation includes adequate air circulation to the refrigeration system, adequate electrical, plumbing and other connecting facilities. • Replacement of house fuses or resetting of circuit breakers. • Replacement of light bulbs. • Damage to product caused by Mabe to any claims or damages resulting from service delays beyond their reasonable control. Any implied warranties, including the implied warranties of the original...
.... • Improper installation-proper installation includes adequate air circulation to the refrigeration system, adequate electrical, plumbing and other connecting facilities. • Replacement of house fuses or resetting of circuit breakers. • Replacement of light bulbs. • Damage to product caused by Mabe to any claims or damages resulting from service delays beyond their reasonable control. Any implied warranties, including the implied warranties of the original...
Owners Manual
Page 44
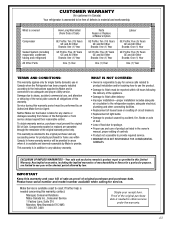
... original purchase date of the refrigerator Any part of the sealed refrigerating system (the compressor, condenser, evaporator and all labor and related service to use within the USA. GE PROFILE MODELS ONLY: Five Years (GE Profile models only) From the date of the original purchase Any part of the water filter cartridge which fails due to obtain service under the warranty. What GE Will Not Cover: s Service trips to your home. s Loss...
... original purchase date of the refrigerator Any part of the sealed refrigerating system (the compressor, condenser, evaporator and all labor and related service to use within the USA. GE PROFILE MODELS ONLY: Five Years (GE Profile models only) From the date of the original purchase Any part of the water filter cartridge which fails due to obtain service under the warranty. What GE Will Not Cover: s Service trips to your home. s Loss...
Owners Manual
Page 45
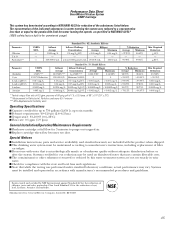
... to purge out trapped air. The concentration of the indicated substances in accordance with water that may contain filterable cysts. pH of 0.5 gpm; Replace cartridge when flow becomes too slow. Systems certified for up to six months Pressure requirement: 40-120 psi (2.8-8.2 bar) Temperature: 33-100ºF (0.6-38ºC) Flow rate: 0.5 gpm (1.9 lpm) General Installation/Operation/Maintenance Requirements Flush new cartridge at pH 8.5 Lindane...
... to purge out trapped air. The concentration of the indicated substances in accordance with water that may contain filterable cysts. pH of 0.5 gpm; Replace cartridge when flow becomes too slow. Systems certified for up to six months Pressure requirement: 40-120 psi (2.8-8.2 bar) Temperature: 33-100ºF (0.6-38ºC) Flow rate: 0.5 gpm (1.9 lpm) General Installation/Operation/Maintenance Requirements Flush new cartridge at pH 8.5 Lindane...

