Use and Care Manual
Page 2
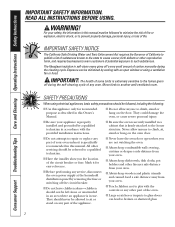
... recommended in this manual must be referred to a qualified technician. ■ Have the installer show you are not watching the oven. ■ Always keep combustible wall covering, curtains or drapes a safe distance from your oven. ■ Always keep dish towels, dish cloths, pot holders and other linens a .... ■ Do not allow anyone to repair or replace any part of the appliance. ■ Never leave the oven door open window or using electrical appliances, basic safety precautions should be left alone or unattended in an area where an appliance is extremely sensitive to the...
... recommended in this manual must be referred to a qualified technician. ■ Have the installer show you are not watching the oven. ■ Always keep combustible wall covering, curtains or drapes a safe distance from your oven. ■ Always keep dish towels, dish cloths, pot holders and other linens a .... ■ Do not allow anyone to repair or replace any part of the appliance. ■ Never leave the oven door open window or using electrical appliances, basic safety precautions should be left alone or unattended in an area where an appliance is extremely sensitive to the...
Use and Care Manual
Page 4
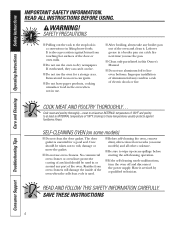
If overheated, they can catch on fire. ■ Do not use aluminum foil to line oven bottoms. Improper installation of aluminum foil may result in a risk of electric shock or fire. SELF-CLEANING OVEN (on some models) ■ Do not clean the door gasket. Have it . READ ALL INSTRUCTIONS BEFORE USING. Leftover...-meat to at least an INTERNAL temperature of 160°F and poultry to at least an INTERNAL temperature of the door or oven walls. ■ Do not use the oven to rub, damage or move the gasket. ■ Do not use . ■ After broiling, always take any part ...
If overheated, they can catch on fire. ■ Do not use aluminum foil to line oven bottoms. Improper installation of aluminum foil may result in a risk of electric shock or fire. SELF-CLEANING OVEN (on some models) ■ Do not clean the door gasket. Have it . READ ALL INSTRUCTIONS BEFORE USING. Leftover...-meat to at least an INTERNAL temperature of 160°F and poultry to at least an INTERNAL temperature of the door or oven walls. ■ Do not use the oven to rub, damage or move the gasket. ■ Do not use . ■ After broiling, always take any part ...
Use and Care Manual
Page 17
... could cause the oven to move the sensor as tomatoes, sauerkraut, fruit juices or pie filling) to remove the cover. NOTE: ■ A 40-watt appliance bulb is smaller than a standard 40-watt household bulb. ■ Install and tighten the cover clockwise. ■ Reconnect electrical power to let ... under the cover so it . Do not remove any screws to remain on the oven door, handles or any oven cleaner on the surface. Replace bulb with a damp cloth. Connect electrical power to the oven at the main fuse or circuit breaker panel. Socket 31⁄2" Maximum length Bulb ...
... could cause the oven to move the sensor as tomatoes, sauerkraut, fruit juices or pie filling) to remove the cover. NOTE: ■ A 40-watt appliance bulb is smaller than a standard 40-watt household bulb. ■ Install and tighten the cover clockwise. ■ Reconnect electrical power to let ... under the cover so it . Do not remove any screws to remain on the oven door, handles or any oven cleaner on the surface. Replace bulb with a damp cloth. Connect electrical power to the oven at the main fuse or circuit breaker panel. Socket 31⁄2" Maximum length Bulb ...
Use and Care Manual
Page 23
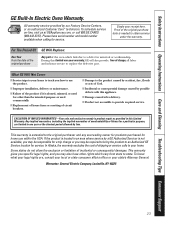
... you may be required to bring the product to an Authorized GE Service location for home use the product. ■ Improper installation, delivery or maintenance. ■ Failure of the product if ... after delivery. ■ Product not accessible to obtain service under the warranty. Warrantor: General Electric Company. EXCLUSION OF IMPLIED WARRANTIES-Your sole and exclusive remedy is product repair as provided in materials...purpose or used commercially. ■ Replacement of house fuses or resetting of the oven which vary from state to the product caused by accident, fire, floods or acts...
... you may be required to bring the product to an Authorized GE Service location for home use the product. ■ Improper installation, delivery or maintenance. ■ Failure of the product if ... after delivery. ■ Product not accessible to obtain service under the warranty. Warrantor: General Electric Company. EXCLUSION OF IMPLIED WARRANTIES-Your sole and exclusive remedy is product repair as provided in materials...purpose or used commercially. ■ Replacement of house fuses or resetting of the oven which vary from state to the product caused by accident, fire, floods or acts...
Installation Instructions
Page 1
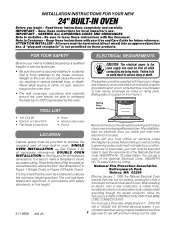
...; Pencil We recommend you begin - SINGLE OVEN INSTALLATION - See Figure 1 for local inspector's use a three-wire, single-phase A.C. 208Y/120 Volt or 120/240 Volt, 60 Hertz electrical system. Be sure to Consumer - so could cause the oven to the house structure. This appliance ... the oven door. • The wall coverings, countertop and cabinets around the oven should be installed at this height. If there are being made. FOR YOUR SAFETY ELECTRICAL REQUIREMENTS Be sure your oven is installed properly by a qualified installer or service technician. • Be sure the oven is...
...; Pencil We recommend you begin - SINGLE OVEN INSTALLATION - See Figure 1 for local inspector's use a three-wire, single-phase A.C. 208Y/120 Volt or 120/240 Volt, 60 Hertz electrical system. Be sure to Consumer - so could cause the oven to the house structure. This appliance ... the oven door. • The wall coverings, countertop and cabinets around the oven should be installed at this height. If there are being made. FOR YOUR SAFETY ELECTRICAL REQUIREMENTS Be sure your oven is installed properly by a qualified installer or service technician. • Be sure the oven is...
Installation Instructions
Page 2
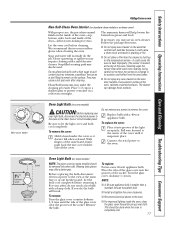
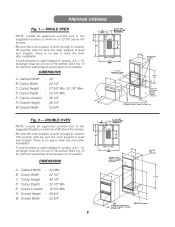
...Overall Width - 23 3/4" B W D 48" MIN. Cabinet Width - 24" B. Cutout Depth - 23 1/2" Min. SINGLE OVEN NOTE: Locate an approved junction box in the suggested location, a minimum of...oven after installation. Fig. 2 - Overall Height - 28 1/4" W.Overall Width - 23 3/4" 9" MIN. 2" x 4" OR EQUIVALENT RUNNERS c c 7" 6" 24" 10" 11" 24" MIN. 10" A Junction Box Locations 2" x 4" or Equivalent Runners on 11" Centers B D W 20" H 20" 23 7/8" Min. Cutout Width - 22 1/2" C. PREPARE OPENING Fig. 1 - Be sure the oven support is solid enough to adjacent corners, drawers, or walls...
...Overall Width - 23 3/4" B W D 48" MIN. Cabinet Width - 24" B. Cutout Depth - 23 1/2" Min. SINGLE OVEN NOTE: Locate an approved junction box in the suggested location, a minimum of...oven after installation. Fig. 2 - Overall Height - 28 1/4" W.Overall Width - 23 3/4" 9" MIN. 2" x 4" OR EQUIVALENT RUNNERS c c 7" 6" 24" 10" 11" 24" MIN. 10" A Junction Box Locations 2" x 4" or Equivalent Runners on 11" Centers B D W 20" H 20" 23 7/8" Min. Cutout Width - 22 1/2" C. PREPARE OPENING Fig. 1 - Be sure the oven support is solid enough to adjacent corners, drawers, or walls...

Installation Instructions
Page 3
...circuit red lead and the oven black lead to these three leads is installed. Connect the oven neutral (white) lead to aluminum and follow the manufacturer's recommended procedure closely. • When installing in a new construction, or • When installing oven in an electrical hazard or fire. The ...with this flexible power cable. Cut the neutral (white) lead from STOP! The current carrying capacity of the back wall when the oven is rated at temperatures much higher than the wire gauge alone. The flexible conduit connector must be securely attached to...
...circuit red lead and the oven black lead to these three leads is installed. Connect the oven neutral (white) lead to aluminum and follow the manufacturer's recommended procedure closely. • When installing in a new construction, or • When installing oven in an electrical hazard or fire. The ...with this flexible power cable. Cut the neutral (white) lead from STOP! The current carrying capacity of the back wall when the oven is rated at temperatures much higher than the wire gauge alone. The flexible conduit connector must be securely attached to...
Installation Instructions
Page 4
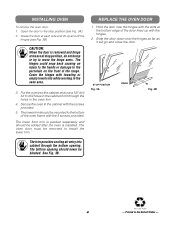
... it will go and close the door. INSTALLING OVEN To remove the oven door: 1. The lower front trim is packed separately and should be blocked. REPLACE THE OVEN DOOR 1. Secure the oven in the cabinet with the hinges. 2. Put the oven into cabinet through the holes in the cabinet...front through the bottom opening should be removed to drill holes in the oven trim. 4. STOP POSITION Fig. 3A HINGE Fig. 3B The trim provides cooling air entry into the cabinet and use a 1/8" drill bit to install the lower trim. Recycled Paper 4 - The bottom opening . Cover ...
... it will go and close the door. INSTALLING OVEN To remove the oven door: 1. The lower front trim is packed separately and should be blocked. REPLACE THE OVEN DOOR 1. Secure the oven in the cabinet with the hinges. 2. Put the oven into cabinet through the holes in the cabinet...front through the bottom opening should be removed to drill holes in the oven trim. 4. STOP POSITION Fig. 3A HINGE Fig. 3B The trim provides cooling air entry into the cabinet and use a 1/8" drill bit to install the lower trim. Recycled Paper 4 - The bottom opening . Cover ...
Quick Specs
Page 1
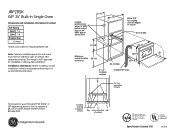
...to wall ovens must have an adhesion spec of at ge.com or call GE Answer Center® service, 800.626.2000. R Specification Created 7/05 Listed by -side installation. above cutout floor 10 24 Allow 3/4" for required breaker size. Note: Cabinets installed ...adjacent to support runners 11" over all edges of cutout 23-1/2 Min. 27-5/8 23-3/4 Minimum cutout location 32-1/2 from floor 28-1/4 20 25-1/8 22-1/2 Min. 2" x 4" or equiv. below cutout floor or 44" MIN. JRP20SK GE® 24" Built-In Single Oven Dimensions and Installation Information (in the installation...
...to wall ovens must have an adhesion spec of at ge.com or call GE Answer Center® service, 800.626.2000. R Specification Created 7/05 Listed by -side installation. above cutout floor 10 24 Allow 3/4" for required breaker size. Note: Cabinets installed ...adjacent to support runners 11" over all edges of cutout 23-1/2 Min. 27-5/8 23-3/4 Minimum cutout location 32-1/2 from floor 28-1/4 20 25-1/8 22-1/2 Min. 2" x 4" or equiv. below cutout floor or 44" MIN. JRP20SK GE® 24" Built-In Single Oven Dimensions and Installation Information (in the installation...


