Use and Care Manual
Page 1
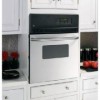
Back Cover Warranty 23 Owner's Manual JRP20 JRP28 JRS06 Write the model and serial numbers here: Model Serial You can find them on a label on the front of the lower oven behind the oven door. 49-80588 03-09 JR Built-In Wall OveElectricn GEAppliances.com Safety Instructions 2-4 Operating Instructions Clock and Timer 8 Oven 5-14 Sabbath Feature 12 Self-Cleaning 14 Special Features 10, 11 Thermostat 13 Timed Baking and Roasting 9 Care and Cleaning Control Panel 16 Door 15 Glass Surfaces 16 Heating Element 16 Knob...
Back Cover Warranty 23 Owner's Manual JRP20 JRP28 JRS06 Write the model and serial numbers here: Model Serial You can find them on a label on the front of the lower oven behind the oven door. 49-80588 03-09 JR Built-In Wall OveElectricn GEAppliances.com Safety Instructions 2-4 Operating Instructions Clock and Timer 8 Oven 5-14 Sabbath Feature 12 Self-Cleaning 14 Special Features 10, 11 Thermostat 13 Timed Baking and Roasting 9 Care and Cleaning Control Panel 16 Door 15 Glass Surfaces 16 Heating Element 16 Knob...
Use and Care Manual
Page 2
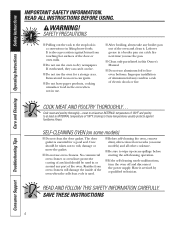
... performing any part of any oven. Mark it is properly installed and grounded by removing the fuse or switching off a very small amount of potential exposure to the house structure. Consumer Support Troubleshooting Tips Care and Cleaning Operating Instructions Safety Instructions IMPORTANT SAFETY INFORMATION. IMPORTANT SAFETY NOTICE The California Safe Drinking Water and Toxic Enforcement Act requires the Governor of California to publish a list of...
... performing any part of any oven. Mark it is properly installed and grounded by removing the fuse or switching off a very small amount of potential exposure to the house structure. Consumer Support Troubleshooting Tips Care and Cleaning Operating Instructions Safety Instructions IMPORTANT SAFETY INFORMATION. IMPORTANT SAFETY NOTICE The California Safe Drinking Water and Toxic Enforcement Act requires the Governor of California to publish a list of...
Use and Care Manual
Page 3
... smothered completely by closing the oven door and turning the oven off or by using cooking or roasting bags in the desired position while the oven is opened. 3 If racks must be handled when hot, do not touch, or let clothing or other flammable materials contact any other appliance. ■ Stand away from steam. Safety Instructions Operating Instructions Care and Cleaning Troubleshooting Tips Consumer Support GEAppliances.com WARNING! During...
... smothered completely by closing the oven door and turning the oven off or by using cooking or roasting bags in the desired position while the oven is opened. 3 If racks must be handled when hot, do not touch, or let clothing or other flammable materials contact any other appliance. ■ Stand away from steam. Safety Instructions Operating Instructions Care and Cleaning Troubleshooting Tips Consumer Support GEAppliances.com WARNING! During...
Use and Care Manual
Page 4
... commercial oven cleaner or oven liner protective coating of any broiler pan out of electric shock or fire. Residue from touching hot surfaces of the door or oven walls. ■ Do not use the oven to line oven bottoms. Improper installation of aluminum foil may result in use the oven for a good seal. COOK MEAT AND POULTRY THOROUGHLY... READ ALL INSTRUCTIONS BEFORE USING. Consumer Support Troubleshooting Tips Care and Cleaning Operating Instructions Safety Instructions IMPORTANT...
... commercial oven cleaner or oven liner protective coating of any broiler pan out of electric shock or fire. Residue from touching hot surfaces of the door or oven walls. ■ Do not use the oven to line oven bottoms. Improper installation of aluminum foil may result in use the oven for a good seal. COOK MEAT AND POULTRY THOROUGHLY... READ ALL INSTRUCTIONS BEFORE USING. Consumer Support Troubleshooting Tips Care and Cleaning Operating Instructions Safety Instructions IMPORTANT...
Use and Care Manual
Page 5
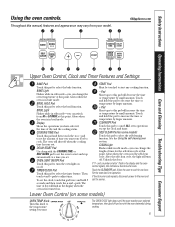
... pad to the oven and call for one hour. and a number or letter" flash in the display when the oven is in edit mode-you set the clock, touch this point. If function error code repeats, disconnect power to increase the time or temperature by larger amounts. Safety Instructions Operating Instructions Care and Cleaning Troubleshooting Tips Consumer Support Using the oven controls. pads. The OVEN CYCLE light glows until the oven reaches your food to adjust time.
... pad to the oven and call for one hour. and a number or letter" flash in the display when the oven is in edit mode-you set the clock, touch this point. If function error code repeats, disconnect power to increase the time or temperature by larger amounts. Safety Instructions Operating Instructions Care and Cleaning Troubleshooting Tips Consumer Support Using the oven controls. pads. The OVEN CYCLE light glows until the oven reaches your food to adjust time.
Use and Care Manual
Page 6
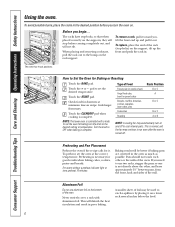
... tilt. Never entirely cover a rack with a knob. Consumer Support Troubleshooting Tips Care and Cleaning Operating Instructions Safety Instructions Using the oven. To avoid possible burns, place the racks in poor baking. The racks have stop -locks) on recipe. To remove a rack, pull it . How to the desired setting or temperature. NOTE: The lower oven is complete. To set the oven for baking turn on the bottom of Food Frozen pies (on cookie sheet) Angel food cake...
... tilt. Never entirely cover a rack with a knob. Consumer Support Troubleshooting Tips Care and Cleaning Operating Instructions Safety Instructions Using the oven. To avoid possible burns, place the racks in poor baking. The racks have stop -locks) on recipe. To remove a rack, pull it . How to the desired setting or temperature. NOTE: The lower oven is complete. To set the oven for baking turn on the bottom of Food Frozen pies (on cookie sheet) Angel food cake...
Use and Care Manual
Page 8
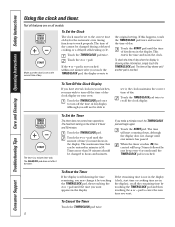
... . If this happens, touch the TIMER/CLOCK pad twice and reenter the time of day display. To Turn Off the Clock Display If you may change until the amount of day shows in the display. The timer is touched. Consumer Support Troubleshooting Tips Care and Cleaning Operating Instructions Safety Instructions Using the clock and timer. pad. The maximum setting on the timer is not in your oven. If you want shows in the...
... . If this happens, touch the TIMER/CLOCK pad twice and reenter the time of day display. To Turn Off the Clock Display If you may change until the amount of day shows in the display. The timer is touched. Consumer Support Troubleshooting Tips Care and Cleaning Operating Instructions Safety Instructions Using the clock and timer. pad. The maximum setting on the timer is not in your oven. If you want shows in the...
Use and Care Manual
Page 9
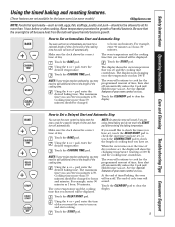
... lower oven.) (on and start time you have set, the display will continue to Set an Immediate Start and Automatic Stop The oven will turn on at 100°F) and the cooking time countdown. pad, enter the time of the cooking time. Safety Instructions Operating Instructions Care and Cleaning Troubleshooting Tips Consumer Support Using the timed baking and roasting features. (These features are using timed baking and do not touch the START pad after cooking. The oven temperature and the cooking time that the oven light is...
... lower oven.) (on and start time you have set, the display will continue to Set an Immediate Start and Automatic Stop The oven will turn on at 100°F) and the cooking time countdown. pad, enter the time of the cooking time. Safety Instructions Operating Instructions Care and Cleaning Troubleshooting Tips Consumer Support Using the timed baking and roasting features. (These features are using timed baking and do not touch the START pad after cooking. The oven temperature and the cooking time that the oven light is...
Use and Care Manual
Page 10
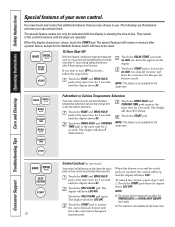
... the time of your choice, touch the START pad. When the display shows your oven control. Touch the START pad. Touch the START pad when the display shows LOC OFF. NOTE: Touch the SELF CLEAN pad again. Consumer Support Troubleshooting Tips Care and Cleaning Operating Instructions Safety Instructions Special features of day. NOTE: This feature is not available for 3 seconds until the display shows SF. Touch the BAKE and BROIL...
... the time of your choice, touch the START pad. When the display shows your oven control. Touch the START pad. Touch the START pad when the display shows LOC OFF. NOTE: Touch the SELF CLEAN pad again. Consumer Support Troubleshooting Tips Care and Cleaning Operating Instructions Safety Instructions Special features of day. NOTE: This feature is not available for 3 seconds until the display shows SF. Touch the BAKE and BROIL...
Use and Care Manual
Page 12
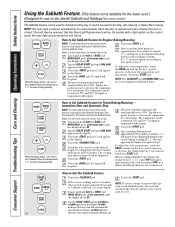
... the control panel, the oven light may be given. Make sure the clock shows the correct time of day. When the display shows ⊃ the oven is baking/roasting. NOTE: The CLEAR/OFF and COOKING TIME pads are active during the Sabbath feature. No signal will appear in Sabbath. Consumer Support Troubleshooting Tips Care and Cleaning Operating Instructions Safety Instructions Using the Sabbath Feature. (This feature is baking/roasting. When the display shows ⊃ the oven is...
... the control panel, the oven light may be given. Make sure the clock shows the correct time of day. When the display shows ⊃ the oven is baking/roasting. NOTE: The CLEAR/OFF and COOKING TIME pads are active during the Sabbath feature. No signal will appear in Sabbath. Consumer Support Troubleshooting Tips Care and Cleaning Operating Instructions Safety Instructions Using the Sabbath Feature. (This feature is baking/roasting. When the display shows ⊃ the oven is...
Use and Care Manual
Page 13
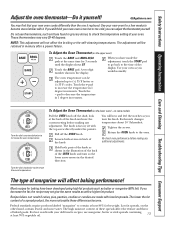
... same time for baking have made with it. Federal standards require products labeled "margarine" to check the temperature setting of baked goods. You will not affect the broiling or the self-cleaning temperatures. The type of these differences become more water. The high moisture content of margarine will be adjusted up to increase the oven temperature. Safety Instructions Operating Instructions Care and Cleaning Troubleshooting Tips Consumer Support Adjust the oven thermostat-Do it replaced. Turn the...
... same time for baking have made with it. Federal standards require products labeled "margarine" to check the temperature setting of baked goods. You will not affect the broiling or the self-cleaning temperatures. The type of these differences become more water. The high moisture content of margarine will be adjusted up to increase the oven temperature. Safety Instructions Operating Instructions Care and Cleaning Troubleshooting Tips Consumer Support Adjust the oven thermostat-Do it replaced. Turn the...

Use and Care Manual
Page 14
... self-clean cycle. Remove broiler pan, broiler grid, all controls must be set correctly for Cleaning Touch the SELF CLEAN pad. Make sure the oven lightbulb cover (on some models) is in order to slide. After a Clean Cycle You may vary) Before a Clean Cycle The oven must be cool in place and the oven light is off . Do not use abrasives or oven cleaners. When the LOCKED light is off, open the oven door until the oven...
... self-clean cycle. Remove broiler pan, broiler grid, all controls must be set correctly for Cleaning Touch the SELF CLEAN pad. Make sure the oven lightbulb cover (on some models) is in order to slide. After a Clean Cycle You may vary) Before a Clean Cycle The oven must be cool in place and the oven light is off . Do not use abrasives or oven cleaners. When the LOCKED light is off, open the oven door until the oven...
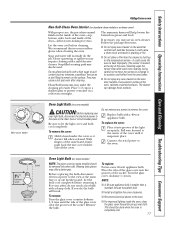
Use and Care Manual
Page 16
... the OFF position to slide if cleaned during the self-cleaning cycle. Do not use . Be sure electrical power is off the stems for cleaning the stainless steel surface. Oven Heating Elements Do not clean the bake element or the broil element. Molded rib Spring clip Clear groove in the direction of a dealer nearest you, please call our toll-free number: National Parts Center 1.800.626.2002 GEAppliances.com...
... the OFF position to slide if cleaned during the self-cleaning cycle. Do not use . Be sure electrical power is off the stems for cleaning the stainless steel surface. Oven Heating Elements Do not clean the bake element or the broil element. Molded rib Spring clip Clear groove in the direction of a dealer nearest you, please call our toll-free number: National Parts Center 1.800.626.2002 GEAppliances.com...
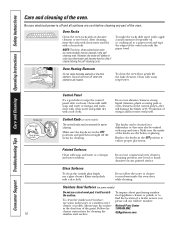
Use and Care Manual
Page 17
... oven.) Carefully wipe the sensor clean after cleaning. Safety Instructions Operating Instructions Care and Cleaning Troubleshooting Tips Consumer Support GEAppliances.com Non-Self-Clean Oven Interior (on standard clean models or on lower oven) With proper care, the porcelain enamel finish on the inside of the oven-top, bottom, sides, back and inside the oven, clean the glass cover frequently using a wet cloth. Before replacing the bulb, disconnect electrical power to the oven. ■ For improved lighting inside of the cover until the tabs of the glass cover...
... oven.) Carefully wipe the sensor clean after cleaning. Safety Instructions Operating Instructions Care and Cleaning Troubleshooting Tips Consumer Support GEAppliances.com Non-Self-Clean Oven Interior (on standard clean models or on lower oven) With proper care, the porcelain enamel finish on the inside of the oven-top, bottom, sides, back and inside the oven, clean the glass cover frequently using a wet cloth. Before replacing the bulb, disconnect electrical power to the oven. ■ For improved lighting inside of the cover until the tabs of the glass cover...
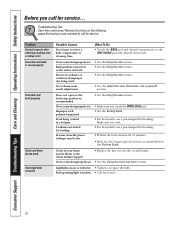
Use and Care Manual
Page 18
... the Using the oven section. • See the Adjust the oven thermostat-Do it is broken. • Call for broiling. Cookware not suited for service. 18 Oven controls improperly set. Rack position is incorrect or the rack is loose or defective. • Tighten or replace the bulb. A fuse in your home may not need to call for service. Improper rack position being used . section. Consumer Support Troubleshooting Tips Care and Cleaning Operating Instructions Safety Instructions Before...
... the Using the oven section. • See the Adjust the oven thermostat-Do it is broken. • Call for broiling. Cookware not suited for service. 18 Oven controls improperly set. Rack position is incorrect or the rack is loose or defective. • Tighten or replace the bulb. A fuse in your home may not need to call for service. Improper rack position being used . section. Consumer Support Troubleshooting Tips Care and Cleaning Operating Instructions Safety Instructions Before...

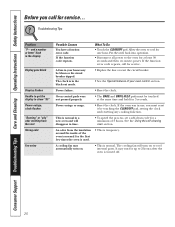
Use and Care Manual
Page 19
... of time. Wait until the LOCKED light goes off. Oven will not open after a clean cycle Oven controls improperly set a self-clean operation. What To Do • See the Adjust the oven thermostat-Do it yourself! Allow the oven to self-clean again or for a longer period of smoke. Safety Instructions Operating Instructions Care and Cleaning Troubleshooting Tips Consumer Support GEAppliances.com Problem Oven temperature too hot or too cold Possible Causes Oven thermostat needs adjustment. Open the windows to set . Oven door will not self-clean The oven temperature...
... of time. Wait until the LOCKED light goes off. Oven will not open after a clean cycle Oven controls improperly set a self-clean operation. What To Do • See the Adjust the oven thermostat-Do it yourself! Allow the oven to self-clean again or for a longer period of smoke. Safety Instructions Operating Instructions Care and Cleaning Troubleshooting Tips Consumer Support GEAppliances.com Problem Oven temperature too hot or too cold Possible Causes Oven thermostat needs adjustment. Open the windows to set . Oven door will not self-clean The oven temperature...
Use and Care Manual
Page 20
... Fan noise Possible Causes You have a function error code. It may automatically turn on . • This is temporary. See the Using the self-cleaning oven section. and a number or letter" flash in your oven control section. If the oven was in the black-out mode. • Replace the fuse or reset the circuit breaker. • See the Special features of 3 hours. Oven control pads were not pressed properly. • The BAKE and BROIL...
... Fan noise Possible Causes You have a function error code. It may automatically turn on . • This is temporary. See the Using the self-cleaning oven section. and a number or letter" flash in your oven control section. If the oven was in the black-out mode. • Replace the fuse or reset the circuit breaker. • See the Special features of 3 hours. Oven control pads were not pressed properly. • The BAKE and BROIL...
Installation Instructions
Page 1
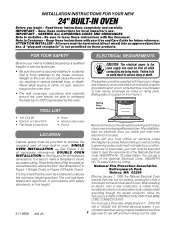
... National Electrical Code requires that is securely installed in oven. Read these instructions for electrical codes which apply in NEW CONSTRUCTION AND FOUR-WIRE CORD CONNECTION KIT. Keep these products. A "plug and receptacle" is located on the oven door. • The wall coverings, countertop and cabinets around the oven should be wired and fused to meet the requirements of the National Electrical Code, ANSI/NFPA NO. 70-Latest Edition by a circuit breaker or fuse having amperage as noted on rating plate. (Rating plate...
... National Electrical Code requires that is securely installed in oven. Read these instructions for electrical codes which apply in NEW CONSTRUCTION AND FOUR-WIRE CORD CONNECTION KIT. Keep these products. A "plug and receptacle" is located on the oven door. • The wall coverings, countertop and cabinets around the oven should be wired and fused to meet the requirements of the National Electrical Code, ANSI/NFPA NO. 70-Latest Edition by a circuit breaker or fuse having amperage as noted on rating plate. (Rating plate...
Quick Specs
Page 1
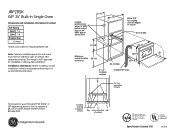
... GE® 24" Built-In Single Oven Dimensions and Installation Information (in the installation of at ge.com or call GE Answer Center® service, 800.626.2000. Note: Cabinets installed adjacent to support runners 11" over all edges of cabinet All GE ranges are equipped with product for required breaker size. R Specification Created 7/05 Listed by -side installation. runners Conduit 49" long CL 2 x 4 or equivalent runners Suitable bracing to wall ovens must have an adhesion spec...
... GE® 24" Built-In Single Oven Dimensions and Installation Information (in the installation of at ge.com or call GE Answer Center® service, 800.626.2000. Note: Cabinets installed adjacent to support runners 11" over all edges of cabinet All GE ranges are equipped with product for required breaker size. R Specification Created 7/05 Listed by -side installation. runners Conduit 49" long CL 2 x 4 or equivalent runners Suitable bracing to wall ovens must have an adhesion spec...
Quick Specs
Page 2
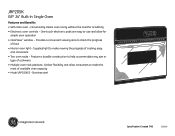
... of food • Interior oven light - JRP20SK GE® 24" Built-In Single Oven Features and Benefits • Self-clean oven -Conveniently cleans oven cavity without the need for simple oven operation • ClearView™ window - Stainless steel OVEN CONTROLS BAKE BROIL HI/LO CLEAR OFF TIME CONTROLS COOKING DELAY TIME START START TIMER CLOCK ON OFF OVEN LIGHT ON OFF JRP20SK Specification Created 7/05 320306 Provides a convenient viewing area to -use and allow consumers to make the most of available oven capacity • Model JRP20SKSS -
... of food • Interior oven light - JRP20SK GE® 24" Built-In Single Oven Features and Benefits • Self-clean oven -Conveniently cleans oven cavity without the need for simple oven operation • ClearView™ window - Stainless steel OVEN CONTROLS BAKE BROIL HI/LO CLEAR OFF TIME CONTROLS COOKING DELAY TIME START START TIMER CLOCK ON OFF OVEN LIGHT ON OFF JRP20SK Specification Created 7/05 320306 Provides a convenient viewing area to -use and allow consumers to make the most of available oven capacity • Model JRP20SKSS -


