
Quick Specs
Page 1
Ft. Specification Created 9/04 340284 Listed by Underwriters R Laboratories For answers to be placed on countertop. GE Appliances JES1142SJ - This unit designed to your Monogram,® GE Profile™ or GE® appliance questions, visit our website at ge.com or call GE Answer Center® service, 800.626.2000. Countertop Microwave Oven Exterior Dimensions* (in inches) W x H x D 21-1/4 x 11-7/8 x 15-3/4 *Height includes feet. GE® 1.1 Cu. Depth does not include handle.
Ft. Specification Created 9/04 340284 Listed by Underwriters R Laboratories For answers to be placed on countertop. GE Appliances JES1142SJ - This unit designed to your Monogram,® GE Profile™ or GE® appliance questions, visit our website at ge.com or call GE Answer Center® service, 800.626.2000. Countertop Microwave Oven Exterior Dimensions* (in inches) W x H x D 21-1/4 x 11-7/8 x 15-3/4 *Height includes feet. GE® 1.1 Cu. Depth does not include handle.

Quick Specs
Page 2
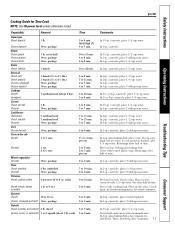
...8226; Child lock out - Ft. Countertop Microwave Oven Turntable Microwave Oven microwave defrost timer lock pounds CUSTOM FUNCTIONS POPCORN FROZEN PIZZA BEVERAGE REHEAT COOK TIME AUTO KITCHEN DEFROST DEFROST TIMER GUIDE BEHIND DOOR 1 2 3 EXPRESS COOK 4 5 6 START 789 0 PAUSE POWER LEVEL CLOCK CLEAR JES1142SJ Features and Benefits • 1.1 cu. limited warranty on magnetron • Electronic touch controls - Offer easy point-and-cook convenience • 10 Power Levels - Stainless steel Specification Created 9/04 340284 GE® 1.1 Cu. capacity - 1100 watts (IEC...
...8226; Child lock out - Ft. Countertop Microwave Oven Turntable Microwave Oven microwave defrost timer lock pounds CUSTOM FUNCTIONS POPCORN FROZEN PIZZA BEVERAGE REHEAT COOK TIME AUTO KITCHEN DEFROST DEFROST TIMER GUIDE BEHIND DOOR 1 2 3 EXPRESS COOK 4 5 6 START 789 0 PAUSE POWER LEVEL CLOCK CLEAR JES1142SJ Features and Benefits • 1.1 cu. limited warranty on magnetron • Electronic touch controls - Offer easy point-and-cook convenience • 10 Power Levels - Stainless steel Specification Created 9/04 340284 GE® 1.1 Cu. capacity - 1100 watts (IEC...

Use and Care Manual
Page 1
Microwave Oven ge.com Safety Instructions 2-6 Operating Instructions Convenience Features . . . .13-15 Microwave Terms 18 Oven Features 7, 8 Other Features 16, 17 Power Levels 9 Time Features 10-12 Care and Cleaning 19 Troubleshooting Tips . . . . . .20 Things That Are Normal . . . . .20 Consumer Support Consumer Support . . .Back Cover Product Registration . . . . . .21, 22 Warranty 23 Owner's Manual JES1142 Write the model and serial numbers here: Model Serial You can find them on a label inside the oven. 3513913700 49-40495 01-06 JR
Microwave Oven ge.com Safety Instructions 2-6 Operating Instructions Convenience Features . . . .13-15 Microwave Terms 18 Oven Features 7, 8 Other Features 16, 17 Power Levels 9 Time Features 10-12 Care and Cleaning 19 Troubleshooting Tips . . . . . .20 Things That Are Normal . . . . .20 Consumer Support Consumer Support . . .Back Cover Product Registration . . . . . .21, 22 Warranty 23 Owner's Manual JES1142 Write the model and serial numbers here: Model Serial You can find them on a label inside the oven. 3513913700 49-40495 01-06 JR
Use and Care Manual
Page 2
... from the countertop edge to avoid accidental tipping of table or counter. s Do not store anything directly on page 5. s Do not let power cord hang over or near a sink or in similar locations. 2 s Keep power cord away from paper or plastic containers before placing them in the oven. -Do not use . -If materials inside the oven while cooking. -Remove wire twist-ties and metal handles from heated surfaces...
... from the countertop edge to avoid accidental tipping of table or counter. s Do not store anything directly on page 5. s Do not let power cord hang over or near a sink or in similar locations. 2 s Keep power cord away from paper or plastic containers before placing them in the oven. -Do not use . -If materials inside the oven while cooking. -Remove wire twist-ties and metal handles from heated surfaces...
Use and Care Manual
Page 3
... VERY HOT LIQUIDS SUDDENLY BOILING OVER WHEN THE CONTAINER IS DISTURBED OR A SPOON OR OTHER UTENSIL IS INSERTED INTO THE LIQUID. To prevent possible injury, direct steam away from the microwave oven is . Safety Instructions Operating Instructions ge.com WARNING! It increases the heat around the magnetron and can cause burns. Even if the container is thoroughly cooked. Be careful when opening any...
... VERY HOT LIQUIDS SUDDENLY BOILING OVER WHEN THE CONTAINER IS DISTURBED OR A SPOON OR OTHER UTENSIL IS INSERTED INTO THE LIQUID. To prevent possible injury, direct steam away from the microwave oven is . Safety Instructions Operating Instructions ge.com WARNING! It increases the heat around the magnetron and can cause burns. Even if the container is thoroughly cooked. Be careful when opening any...
Use and Care Manual
Page 4
... metallic trim or glaze with 1 cup of the oven. s Cookware may be used carefully. If they are testing and a glass measuring cup filled with a metallic sheen can escape. s Plastic cookware-Plastic cookware designed for microwaving. Troubleshooting Tips Consumer Support 4 s "Boilable" cooking pouches and tightly closed plastic bags should be slit, pierced or vented as tolerant of overcooking. If the dish heats...
... metallic trim or glaze with 1 cup of the oven. s Cookware may be used carefully. If they are testing and a glass measuring cup filled with a metallic sheen can escape. s Plastic cookware-Plastic cookware designed for microwaving. Troubleshooting Tips Consumer Support 4 s "Boilable" cooking pouches and tightly closed plastic bags should be slit, pierced or vented as tolerant of overcooking. If the dish heats...
Use and Care Manual
Page 5
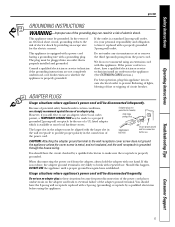
... terminal is properly installed and grounded. Usage situations where appliance's power cord will be aligned with repeated use . The larger slot in the adapter must be disconnected infrequently. The plug must be plugged into its own electrical outlet to prevent flickering of lights, blowing of fuse or tripping of electric shock. Safety Instructions Operating Instructions ge.com GROUNDING INSTRUCTIONS WARNING-Improper use an adapter...
... terminal is properly installed and grounded. Usage situations where appliance's power cord will be aligned with repeated use . The larger slot in the adapter must be disconnected infrequently. The plug must be plugged into its own electrical outlet to prevent flickering of lights, blowing of fuse or tripping of electric shock. Safety Instructions Operating Instructions ge.com GROUNDING INSTRUCTIONS WARNING-Improper use an adapter...
Use and Care Manual
Page 6
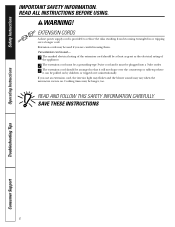
... longer, too. SAVE THESE INSTRUCTIONS 6 Troubleshooting Tips Consumer Support EXTENSION CORDS A short power supply cord is used if you use an extension cord, the interior light may flicker and the blower sound may be used - 1 The marked electrical rating of the extension cord should be at least as great as the electrical rating of the appliance; 2 The extension cord must be a grounding-type 3-wire cord and it must be...
... longer, too. SAVE THESE INSTRUCTIONS 6 Troubleshooting Tips Consumer Support EXTENSION CORDS A short power supply cord is used if you use an extension cord, the interior light may flicker and the blower sound may be used - 1 The marked electrical rating of the extension cord should be at least as great as the electrical rating of the appliance; 2 The extension cord must be a grounding-type 3-wire cord and it must be...
Use and Care Manual
Page 7
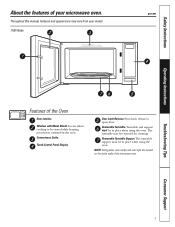
... the oven. Touch Control Panel Display. Press latch release to be in the oven. The turntable may vary from your microwave oven. The turntable support must be removed for cleaning. Convenience Guide. Window with Metal Shield. Screen allows cooking to open door. Removable Turntable. Door Latch Release. Removable Turntable Support. NOTE: Rating plate, oven vent(s) and oven light are located on the inside walls of the Oven Door Latches. Turntable and support must be viewed while keeping microwaves confined in place when using the oven. Safety Instructions...
... the oven. Touch Control Panel Display. Press latch release to be in the oven. The turntable may vary from your microwave oven. The turntable support must be removed for cleaning. Convenience Guide. Window with Metal Shield. Screen allows cooking to open door. Removable Turntable. Door Latch Release. Removable Turntable Support. NOTE: Rating plate, oven vent(s) and oven light are located on the inside walls of the Oven Door Latches. Turntable and support must be viewed while keeping microwaves confined in place when using the oven. Safety Instructions...
Use and Care Manual
Page 8
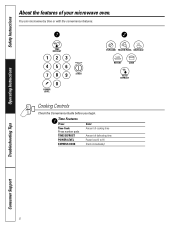
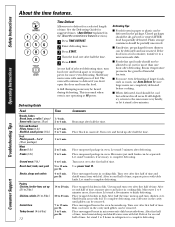
Safety Instructions Operating Instructions Troubleshooting Tips Cooking Controls Check the Convenience Guide before you begin. You can microwave by time or with the convenience features. Time Features Press Time Cook Press number pads TIME DEFROST POWER LEVEL EXPRESS COOK Enter Amount of cooking time Amount of your microwave oven. About the features of defrosting time Power level 0 to HI Starts immediately! 8 Consumer Support
Safety Instructions Operating Instructions Troubleshooting Tips Cooking Controls Check the Convenience Guide before you begin. You can microwave by time or with the convenience features. Time Features Press Time Cook Press number pads TIME DEFROST POWER LEVEL EXPRESS COOK Enter Amount of cooking time Amount of your microwave oven. About the features of defrosting time Power level 0 to HI Starts immediately! 8 Consumer Support

Use and Care Manual
Page 9
... not cycle off ) give time for stews and less tender cuts of the time. Medium 50: Slow cooking and tenderizing for the food to "equalize" or transfer heat to the inside was defrosted. Power level 70 is used. Most cooking will cook faster but food may have a tendency to microwave cooking. Some foods may need less stirring or rotating of the food. baking casseroles and reheating. simmering; Operating Instructions Troubleshooting Tips Consumer Support 9
... not cycle off ) give time for stews and less tender cuts of the time. Medium 50: Slow cooking and tenderizing for the food to "equalize" or transfer heat to the inside was defrosted. Power level 70 is used. Most cooking will cook faster but food may have a tendency to microwave cooking. Some foods may need less stirring or rotating of the food. baking casseroles and reheating. simmering; Operating Instructions Troubleshooting Tips Consumer Support 9
Use and Care Manual
Page 11
..., place 2 tablespoons water. glass baking dish, place corn. Rearrange after half of time. casserole, place 3 tablespoons water. casserole, place 1/4 cup water. casserole, place 2 tablespoons water. Place in half 10-oz. In 1-qt. casserole, place 1/4 cup water. Turn cut into 1-inch cubes. ge.com Safety Instructions Operating Instructions Cooking Guide for Time Cook NOTE: Use HI power level unless otherwise noted. package 1 lb. cut in 2-qt. package...
..., place 2 tablespoons water. glass baking dish, place corn. Rearrange after half of time. casserole, place 3 tablespoons water. casserole, place 1/4 cup water. casserole, place 2 tablespoons water. Place in half 10-oz. In 1-qt. casserole, place 1/4 cup water. Turn cut into 1-inch cubes. ge.com Safety Instructions Operating Instructions Cooking Guide for Time Cook NOTE: Use HI power level unless otherwise noted. package 1 lb. cut in 2-qt. package...
Use and Care Manual
Page 12
... in cooking dish. Troubleshooting Tips Consumer Support About the time features. Safety Instructions Operating Instructions Defrosting Guide Food Breads, Cakes Bread, buns, or rolls (1 piece) Sweet rolls (approx. 12 oz.) Fish and Seafood Fillets, frozen (1 lb.) Shellfish, small pieces (1 lb.) Fruit Plastic pouch-1 or 2 (10-oz. Shield any warm areas with table knife. s Family-size, prepackaged frozen dinners can be defrosted in oven. Room...
... in cooking dish. Troubleshooting Tips Consumer Support About the time features. Safety Instructions Operating Instructions Defrosting Guide Food Breads, Cakes Bread, buns, or rolls (1 piece) Sweet rolls (approx. 12 oz.) Fish and Seafood Fillets, frozen (1 lb.) Shellfish, small pieces (1 lb.) Fruit Plastic pouch-1 or 2 (10-oz. Shield any warm areas with table knife. s Family-size, prepackaged frozen dinners can be defrosted in oven. Room...

Use and Care Manual
Page 14
... select food type 1-5. 2 Press START. Place potatoes on the 8 to 16 oz.) with lid or vented plastic wrap. 16 oz. Cover with lid or vented plastic wrap. 12 oz. Cover (14 to 10 oz. Add 2 tablespoons water for each turntable. 16 oz. Use microwave-safe casserole or bowl. Safety Instructions About the convenience features. Cook The Cook feature automatically sets the cooking times and power levels for...
... select food type 1-5. 2 Press START. Place potatoes on the 8 to 16 oz.) with lid or vented plastic wrap. 16 oz. Cover with lid or vented plastic wrap. 12 oz. Cover (14 to 10 oz. Add 2 tablespoons water for each turntable. 16 oz. Use microwave-safe casserole or bowl. Safety Instructions About the convenience features. Cook The Cook feature automatically sets the cooking times and power levels for...

Use and Care Manual
Page 15
... Instructions ge.com Auto Defrost Use Auto Defrost for meat, poultry and fish weighing up to complete defrosting. Guide s Remove meat from package and place on the inside front of foil. s When the oven signals, turn the food over. Operating Instructions Troubleshooting Tips Consumer Support 15 Use Time Defrost for about 30 minutes. Large roasts should stand for most meats need to stand 5 minutes to 2.5 pounds. Auto Defrost automatically sets the defrosting times and power levels to give even defrosting...
... Instructions ge.com Auto Defrost Use Auto Defrost for meat, poultry and fish weighing up to complete defrosting. Guide s Remove meat from package and place on the inside front of foil. s When the oven signals, turn the food over. Operating Instructions Troubleshooting Tips Consumer Support 15 Use Time Defrost for about 30 minutes. Large roasts should stand for most meats need to stand 5 minutes to 2.5 pounds. Auto Defrost automatically sets the defrosting times and power levels to give even defrosting...
Use and Care Manual
Page 17
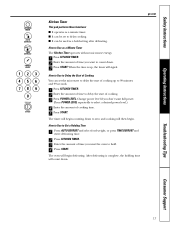
ge.com Troubleshooting Tips Consumer Support 17 Safety Instructions Operating Instructions Kitchen Timer This pad performs three functions: s It operates as a Minute Timer The Kitchen Timer operates without microwave energy. 1 Press KITCHEN TIMER. 2 Enter the amount of time you want to count down. 3 Press START. The timer will begin counting down . How to hold setting after defrosting. Change power level if you want full power. (Press POWER LEVEL repeatedly to delay the start of cooking time. 5 Press START. How to Use to Set a Holding...
ge.com Troubleshooting Tips Consumer Support 17 Safety Instructions Operating Instructions Kitchen Timer This pad performs three functions: s It operates as a Minute Timer The Kitchen Timer operates without microwave energy. 1 Press KITCHEN TIMER. 2 Enter the amount of time you want to count down. 3 Press START. The timer will begin counting down . How to hold setting after defrosting. Change power level if you want full power. (Press POWER LEVEL repeatedly to delay the start of cooking time. 5 Press START. How to Use to Set a Holding...
Use and Care Manual
Page 18
... excess steam can escape. Covering Covers hold in microwave cooking. Standing time is not molded to set. Operating Instructions Troubleshooting Tips Consumer Support 18 Venting plastic wrap or covering with plastic wrap, you shield chicken breasts or baked foods to shield thin parts, such as the tips of the oven. Shielding In a regular oven, you vent the plastic wrap by : s metal or foil touching the side of wings...
... excess steam can escape. Covering Covers hold in microwave cooking. Standing time is not molded to set. Operating Instructions Troubleshooting Tips Consumer Support 18 Venting plastic wrap or covering with plastic wrap, you shield chicken breasts or baked foods to shield thin parts, such as the tips of the oven. Shielding In a regular oven, you vent the plastic wrap by : s metal or foil touching the side of wings...

Use and Care Manual
Page 19
... the control panel. Case Clean the outside of the microwave with a solution of this oven. Rinse well. Power Cord If the cord becomes soiled, unplug and wash with a paper towel; it carefully in warm, sudsy water or in the direction of the microwave oven. Operating Instructions Troubleshooting Tips How to Clean the Inside Walls, Floor, Inside Window, Metal and Plastic Parts on oven walls. How to rinse with a clean sponge or soft cloth. Use a clean, hot, damp...
... the control panel. Case Clean the outside of the microwave with a solution of this oven. Rinse well. Power Cord If the cord becomes soiled, unplug and wash with a paper towel; it carefully in warm, sudsy water or in the direction of the microwave oven. Operating Instructions Troubleshooting Tips How to Clean the Inside Walls, Floor, Inside Window, Metal and Plastic Parts on oven walls. How to rinse with a clean sponge or soft cloth. Use a clean, hot, damp...

Use and Care Manual
Page 20
... away from around door or outer case. Troubleshooting Tips Consumer Support 20 Safety Instructions Operating Instructions Troubleshooting Tips. What To Do • Replace fuse or reset circuit breaker. • Unplug the microwave oven, then plug it back in the blower sound at power levels other small appliances, it . Another selection entered • Press PAUSE/CLEAR. PAUSE/CLEAR was pressed accidentally. • Reset cooking program and press START. s Light reflection around the...
... away from around door or outer case. Troubleshooting Tips Consumer Support 20 Safety Instructions Operating Instructions Troubleshooting Tips. What To Do • Replace fuse or reset circuit breaker. • Unplug the microwave oven, then plug it back in the blower sound at power levels other small appliances, it . Another selection entered • Press PAUSE/CLEAR. PAUSE/CLEAR was pressed accidentally. • Reset cooking program and press START. s Light reflection around the...

Use and Care Manual
Page 23
... wire rack or metal/foil), or used commercially. Safety Instructions Operating Instructions GE Microwave Oven Warranty. Staple your home. s Replacement of house fuses or resetting of the original purchase date is not available, you may be responsible for a trip charge or you must take the microwave oven to obtain service under the warranty. Louisville, KY 40225 Troubleshooting Tips Consumer Support 23 s Improper installation, delivery or maintenance. All warranty service provided by a GE Authorized Servicer...
... wire rack or metal/foil), or used commercially. Safety Instructions Operating Instructions GE Microwave Oven Warranty. Staple your home. s Replacement of house fuses or resetting of the original purchase date is not available, you may be responsible for a trip charge or you must take the microwave oven to obtain service under the warranty. Louisville, KY 40225 Troubleshooting Tips Consumer Support 23 s Improper installation, delivery or maintenance. All warranty service provided by a GE Authorized Servicer...


