Use and Care Manual
Page 2
... touch the cold surfaces in the refrigerator. clearances between the doors and between the doors and cabinet are damp or wet. If you are not problems of the icemaker. Skin may not easily climb inside. 2 READ ALL INSTRUCTIONS BEFORE USING. Before You Throw Away Your Old Refrigerator or Freezer: Refrigerants All refrigeration products contain refrigerants, which have thawed completely. Consumer Support Troubleshooting Tips Installation Instructions Operating Instructions Safety Instructions IMPORTANT SAFETY...
... touch the cold surfaces in the refrigerator. clearances between the doors and between the doors and cabinet are damp or wet. If you are not problems of the icemaker. Skin may not easily climb inside. 2 READ ALL INSTRUCTIONS BEFORE USING. Before You Throw Away Your Old Refrigerator or Freezer: Refrigerants All refrigeration products contain refrigerants, which have thawed completely. Consumer Support Troubleshooting Tips Installation Instructions Operating Instructions Safety Instructions IMPORTANT SAFETY...
Use and Care Manual
Page 3
... circuit checked by pulling on the power cord. SAVE THESE INSTRUCTIONS 3 READ ALL INSTRUCTIONS BEFORE USING. Always grip plug firmly and pull straight out from the power cord. ge.com WARNING! Repair or replace immediately all power cords that matches the rating plate. For personal safety, this appliance. When moving the refrigerator away from overheated wires. HOW TO CONNECT ELECTRICITY Do not, under certain conditions...
... circuit checked by pulling on the power cord. SAVE THESE INSTRUCTIONS 3 READ ALL INSTRUCTIONS BEFORE USING. Always grip plug firmly and pull straight out from the power cord. ge.com WARNING! Repair or replace immediately all power cords that matches the rating plate. For personal safety, this appliance. When moving the refrigerator away from overheated wires. HOW TO CONNECT ELECTRICITY Do not, under certain conditions...
Use and Care Manual
Page 4
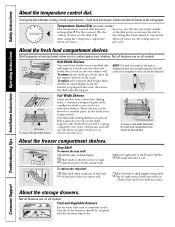
... Support Troubleshooting Tips Installation Instructions Operating Instructions Safety Instructions About the temperature control dial. About the fresh food compartment shelves. a bracket on the other end hooks into the right-hand slot; To replace, select desired shelf height. NOTE: The shelf to the right of shelf slightly. 2 Move shelf to the left to free its right ends from it. Lift rear Pull forward To remove the full-width shelves Full-Width Shelves Some models...
... Support Troubleshooting Tips Installation Instructions Operating Instructions Safety Instructions About the temperature control dial. About the fresh food compartment shelves. a bracket on the other end hooks into the right-hand slot; To replace, select desired shelf height. NOTE: The shelf to the right of shelf slightly. 2 Move shelf to the left to free its right ends from it. Lift rear Pull forward To remove the full-width shelves Full-Width Shelves Some models...
Use and Care Manual
Page 5
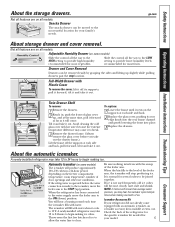
...: In homes with the sweep of the refrigerator for the specific icemaker kit needed for your model. 5 When the refrigerator has been connected to the water supply, move the feeler arm to the ON (down ) position Automatic Icemaker (on all models. Check the back of the feeler arm. Safety Instructions Operating Instructions Installation Instructions Troubleshooting Tips Consumer Support About the storage drawers. Drawer and Cover Removal Drawers can be joined together. Not all features...
...: In homes with the sweep of the refrigerator for the specific icemaker kit needed for your model. 5 When the refrigerator has been connected to the water supply, move the feeler arm to the ON (down ) position Automatic Icemaker (on all models. Check the back of the feeler arm. Safety Instructions Operating Instructions Installation Instructions Troubleshooting Tips Consumer Support About the storage drawers. Drawer and Cover Removal Drawers can be joined together. Not all features...
Use and Care Manual
Page 6
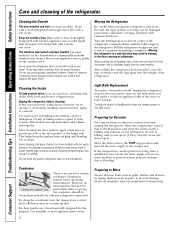
... electrical outlet, unscrew the bulb when cool and replace it to the STOP (up dust. Preparing for routine condenser cleaning in environments that can erode the paint. To clean the condenser, turn the legs clockwise until the rollers support the refrigerator. Do not use appliance wax or polish on some models) with embossed surfaces. Cleaning the Inside To help prevent odors, leave an open . Avoid cleaning cold glass shelves...
... electrical outlet, unscrew the bulb when cool and replace it to the STOP (up dust. Preparing for routine condenser cleaning in environments that can erode the paint. To clean the condenser, turn the legs clockwise until the rollers support the refrigerator. Do not use appliance wax or polish on some models) with embossed surfaces. Cleaning the Inside To help prevent odors, leave an open . Avoid cleaning cold glass shelves...
Use and Care Manual
Page 7
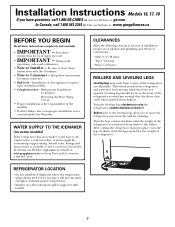
... firmly position the refrigerator and prevent it . Turn the leveling legs clockwise to raise the refrigerator, counterclockwise to a cold water line. Leveling legs should be connected to lower it from moving when the doors are adjustable. After rolling the refrigerator back into place, turn the legs clockwise until the weight of the refrigerator. 7 Installation Instructions Models 16, 17, 18 If you to Installer - Observe all governing codes and ordinances. •...
... firmly position the refrigerator and prevent it . Turn the leveling legs clockwise to raise the refrigerator, counterclockwise to a cold water line. Leveling legs should be connected to lower it from moving when the doors are adjustable. After rolling the refrigerator back into place, turn the legs clockwise until the weight of the refrigerator. 7 Installation Instructions Models 16, 17, 18 If you to Installer - Observe all governing codes and ordinances. •...
Use and Care Manual
Page 8
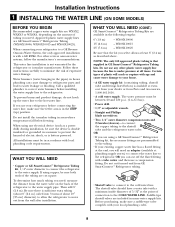
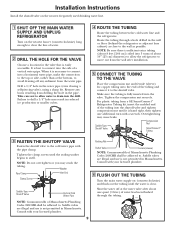
... the cold water line. The shutoff valve should have a water inlet with a tube cutter and then use a compression fitting. For other plastic water supply line because the line is not warranted by the refrigerator or icemaker manufacturer. WX08X10015 - Follow these instructions carefully to your existing copper water line has a flared fitting at the end, you need. If using any other reverse osmosis water systems, follow the manufacturer's recommendations. Installation Instructions 1 INSTALLING THE WATER LINE (ON SOME MODELS...
... the cold water line. The shutoff valve should have a water inlet with a tube cutter and then use a compression fitting. For other plastic water supply line because the line is not warranted by the refrigerator or icemaker manufacturer. WX08X10015 - Follow these instructions carefully to your existing copper water line has a flared fitting at the end, you need. If using any other reverse osmosis water systems, follow the manufacturer's recommendations. Installation Instructions 1 INSTALLING THE WATER LINE (ON SOME MODELS...
Use and Care Manual
Page 9
... THE TUBING Route the tubing between the cold water line and the refrigerator. Saddle valves are illegal and use is fully inserted into 3 turns of about 8 feet [244 cm] coiled into the valve. NOTE: Commonwealth of Massachusetts Plumbing Codes 248CMR shall be adhered to avoid drawing off at the bottom, to . Saddle valves are illegal and use is necessary to connect into a horizontal water pipe, make the connection...
... THE TUBING Route the tubing between the cold water line and the refrigerator. Saddle valves are illegal and use is fully inserted into 3 turns of about 8 feet [244 cm] coiled into the valve. NOTE: Commonwealth of Massachusetts Plumbing Codes 248CMR shall be adhered to avoid drawing off at the bottom, to . Saddle valves are illegal and use is necessary to connect into a horizontal water pipe, make the connection...
Use and Care Manual
Page 10
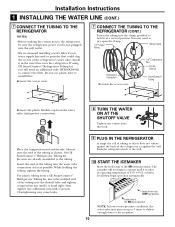
.... Installation Instructions 1 INSTALLING THE WATER LINE (CONT.) 7 CONNECT THE TUBING TO THE REFRIGERATOR NOTES: • Before making the connection to the refrigerator, be sure the refrigerator power cord is hand tight, then tighten one additional turn on up to 3 times to deliver enough water to the icemaker. 10 Do not cut plastic tube to the tubing. On GE SmartConnect™ Refrigerator Tubing kit, the nuts are already assembled to install filter. Overtightening may need an additional tube...
.... Installation Instructions 1 INSTALLING THE WATER LINE (CONT.) 7 CONNECT THE TUBING TO THE REFRIGERATOR NOTES: • Before making the connection to the refrigerator, be sure the refrigerator power cord is hand tight, then tighten one additional turn on up to 3 times to deliver enough water to the icemaker. 10 Do not cut plastic tube to the tubing. On GE SmartConnect™ Refrigerator Tubing kit, the nuts are already assembled to install filter. Overtightening may need an additional tube...
Use and Care Manual
Page 11
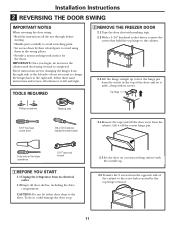
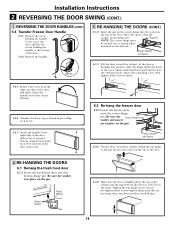
... with its electrical outlet. 1.2 Empty all door shelves, including the dairy compartment. IMPORTANT: Once you ever want to change the hinges back to the right side, follow these same instructions and reverse all the way through before starting. • Handle parts carefully to avoid scratching paint. • Set screws down by the top hinge removal. 11 TOOLS REQUIRED 2 REMOVE THE FREEZER DOOR 2.1 Tape the door shut with masking tape...
... with its electrical outlet. 1.2 Empty all door shelves, including the dairy compartment. IMPORTANT: Once you ever want to change the hinges back to the right side, follow these same instructions and reverse all the way through before starting. • Handle parts carefully to avoid scratching paint. • Set screws down by the top hinge removal. 11 TOOLS REQUIRED 2 REMOVE THE FREEZER DOOR 2.1 Tape the door shut with masking tape...
Use and Care Manual
Page 12
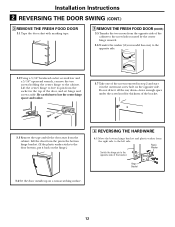
... Switch the hinge pin to the opposite side of the cabinet to the screw holes vacated by the center hinge removal. 3.6 Transfer the washer (if your model has one) to the opposite side. 3.2 Using a 5/16″ hex-head socket screwdriver and a 5/16″ open-end wrench, remove the...the screws removed in the top of the door, and set hinge and screws aside. Hinge Bracket 3.4 Set the door outside-up on the hinge.) 4 REVERSING THE HARDWARE 4.1 Move the bottom hinge bracket and plastic washer from the right side to free its pin from the cabinet. Lift the center hinge to the left side....
... Switch the hinge pin to the opposite side of the cabinet to the screw holes vacated by the center hinge removal. 3.6 Transfer the washer (if your model has one) to the opposite side. 3.2 Using a 5/16″ hex-head socket screwdriver and a 5/16″ open-end wrench, remove the...the screws removed in the top of the door, and set hinge and screws aside. Hinge Bracket 3.4 Set the door outside-up on the hinge.) 4 REVERSING THE HARDWARE 4.1 Move the bottom hinge bracket and plastic washer from the right side to free its pin from the cabinet. Lift the center hinge to the left side....

Use and Care Manual
Page 13
... fresh food door handle 5.3.1 Attach the handle to the right side of the door with screws at top left side of the door and insert it to the left . Installing the hinge on the opposite side. 5 REVERSING THE DOOR HANDLES 5.1 Transfer fresh food door handle 5.1.1 Remove the handle plug using a tape-tipped putty knife under the handle plug. 5.3.2 Reinstall the handle plug. 13 Plug Button To reattach the handle on the right. Plug Button Installing the hinge on the opposite...
... fresh food door handle 5.3.1 Attach the handle to the right side of the door with screws at top left side of the door and insert it to the left . Installing the hinge on the opposite side. 5 REVERSING THE DOOR HANDLES 5.1 Transfer fresh food door handle 5.1.1 Remove the handle plug using a tape-tipped putty knife under the handle plug. 5.3.2 Reinstall the handle plug. 13 Plug Button To reattach the handle on the right. Plug Button Installing the hinge on the opposite...
Use and Care Manual
Page 14
... and Spacer 6.2.2 Tilt the door toward the cabinet. Installation Instructions 2 REVERSING THE DOOR SWING (CONT.) 5 REVERSING THE DOOR HANDLES (CONT.) 5.4 Transfer Freezer Door Handle 5.4.1 Remove the screw TToOpP holding the handle to the top of the door and the two screws holding the handle to the right edge of the door with screws at top and bottom, using bottom holes vacated by removal of the door stop as shown when mounted on...
... and Spacer 6.2.2 Tilt the door toward the cabinet. Installation Instructions 2 REVERSING THE DOOR SWING (CONT.) 5 REVERSING THE DOOR HANDLES (CONT.) 5.4 Transfer Freezer Door Handle 5.4.1 Remove the screw TToOpP holding the handle to the top of the door and the two screws holding the handle to the right edge of the door with screws at top and bottom, using bottom holes vacated by removal of the door stop as shown when mounted on...
Use and Care Manual
Page 15
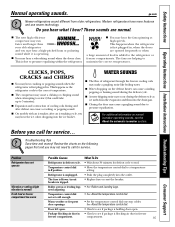
... refrigerant through the freezer cooling coils may make a gurgling noise like boiling water. ■ Water dropping on normal icemaker operating sounds, see if package is first plugged in freezer freezer compartment. Review the charts on the following pages first and you may run faster and longer than HUMMM... need to call for service... Warm weather or frequent door openings. • Set the temperature control dial one step colder. compartment. 15 ge.com Newer refrigerators...
... refrigerant through the freezer cooling coils may make a gurgling noise like boiling water. ■ Water dropping on normal icemaker operating sounds, see if package is first plugged in freezer freezer compartment. Review the charts on the following pages first and you may run faster and longer than HUMMM... need to call for service... Warm weather or frequent door openings. • Set the temperature control dial one step colder. compartment. 15 ge.com Newer refrigerators...
Use and Care Manual
Page 16
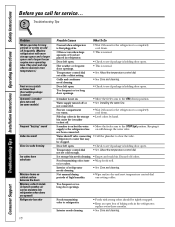
... not connected. • See Installing the water line. Troubleshooting Tips Problem Motor operates for the refrigerator to completely cool down. • This is normal. • Check to see if package is holding door open. • This is normal. • See About the temperature control dial. • See Care and cleaning. • Check to see if package is holding door open . bin cause the icemaker to refrigerator. to the ON (down) position. Door left open...
... not connected. • See Installing the water line. Troubleshooting Tips Problem Motor operates for the refrigerator to completely cool down. • This is normal. • Check to see if package is holding door open. • This is normal. • See About the temperature control dial. • See Care and cleaning. • Check to see if package is holding door open . bin cause the icemaker to refrigerator. to the ON (down) position. Door left open...

Use and Care Manual
Page 17
... only for customers in material and workmanship. Mabe Service is available coast to obtain service under the warranty. 17 CUSTOMER WARRANTY (for single family domestic use in Canada when the Refrigerator has been properly installed according to the instructions supplied by Mabe and is connected to an adequate and proper utility service. What is covered Compressor Sealed System (including evaporator, condenser tubing and refrigerant) All Other Parts How Long...
... only for customers in material and workmanship. Mabe Service is available coast to obtain service under the warranty. 17 CUSTOMER WARRANTY (for single family domestic use in Canada when the Refrigerator has been properly installed according to the instructions supplied by Mabe and is connected to an adequate and proper utility service. What is covered Compressor Sealed System (including evaporator, condenser tubing and refrigerant) All Other Parts How Long...
Use and Care Manual
Page 18
... toward a replacement product • Service coverage for covered operating parts and labor on the next page to provide you can contact you operate your Owner's Manual carefully. It contains information you will help you in a safe place. Model Number Serial Number Important: If you require service. We strive to ensure that fail during normal single family household use • Your satisfaction is 800 GE CARES (800.432...
... toward a replacement product • Service coverage for covered operating parts and labor on the next page to provide you can contact you operate your Owner's Manual carefully. It contains information you will help you in a safe place. Model Number Serial Number Important: If you require service. We strive to ensure that fail during normal single family household use • Your satisfaction is 800 GE CARES (800.432...
Use and Care Manual
Page 20
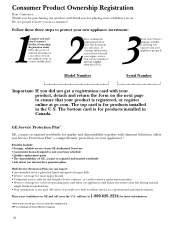
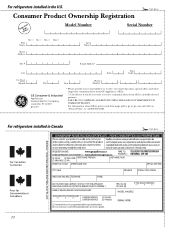
....626.2224. For refrigerators installed in the U.S. ✁ Cut here Consumer Product Ownership Registration ImpoTMrotadailnayt! Model Number Serial Number First Name Mr. ■ Ms. ■ Mrs. ■ Miss ■ Street Address Last Name Apt. # E-mail Address* Zip City State Code Date Placed In Use Month Day Year Phone _ _ Number GE Consumer & Industrial Appliances General Electric Company Louisville, KY 40225 ge.com * Please provide...
....626.2224. For refrigerators installed in the U.S. ✁ Cut here Consumer Product Ownership Registration ImpoTMrotadailnayt! Model Number Serial Number First Name Mr. ■ Ms. ■ Mrs. ■ Miss ■ Street Address Last Name Apt. # E-mail Address* Zip City State Code Date Placed In Use Month Day Year Phone _ _ Number GE Consumer & Industrial Appliances General Electric Company Louisville, KY 40225 ge.com * Please provide...
Use and Care Manual
Page 21
... exclusive remedy is needed to obtain service under the warranty. Please have other than as provided in this Limited Warranty. GE PROFILE MODELS ONLY: Five Years (GE Profile models only) From the date of the original purchase Any part of the water filter cartridge which fails due to a defect in materials or workmanship. Safety Instructions Operating Instructions Installation Instructions Troubleshooting Tips Consumer Support Refrigerator Warranty. (For customers in the United States) All warranty service provided by...
... exclusive remedy is needed to obtain service under the warranty. Please have other than as provided in this Limited Warranty. GE PROFILE MODELS ONLY: Five Years (GE Profile models only) From the date of the original purchase Any part of the water filter cartridge which fails due to a defect in materials or workmanship. Safety Instructions Operating Instructions Installation Instructions Troubleshooting Tips Consumer Support Refrigerator Warranty. (For customers in the United States) All warranty service provided by...

Use and Care Manual
Page 64
... Canada: www.geappliances.ca Schedule Service ge.com In the U.S.: www.Hotpoint.com Expert GE repair service is still in the United States Printed on -line anytime, or call 800.GE.CARES (800.432.2737) during normal business hours. You can now download Owner's Manuals, order parts, or even schedule service on -line and schedule your service at your warranty, should consult the yellow pages for...
... Canada: www.geappliances.ca Schedule Service ge.com In the U.S.: www.Hotpoint.com Expert GE repair service is still in the United States Printed on -line anytime, or call 800.GE.CARES (800.432.2737) during normal business hours. You can now download Owner's Manuals, order parts, or even schedule service on -line and schedule your service at your warranty, should consult the yellow pages for...

