Use and Care Manual
Page 2
...Be careful closing doors when children are in the area. ■ Unplug the refrigerator before it is plugged in place so that any other flammable vapors and liquids in the freezer compartment when hands are still dangerous...even if they will sit for its intended...light circuit. ■ Do not refreeze frozen foods which have thawed completely. DANGER! Before You Throw Away Your Old Refrigerator or Freezer: Refrigerants All refrigeration products contain refrigerants, which under federal law must be removed prior to these extremely cold surfaces. ■ Do not store or use...
...Be careful closing doors when children are in the area. ■ Unplug the refrigerator before it is plugged in place so that any other flammable vapors and liquids in the freezer compartment when hands are still dangerous...even if they will sit for its intended...light circuit. ■ Do not refreeze frozen foods which have thawed completely. DANGER! Before You Throw Away Your Old Refrigerator or Freezer: Refrigerants All refrigeration products contain refrigerants, which under federal law must be removed prior to these extremely cold surfaces. ■ Do not store or use...
Use and Care Manual
Page 3
...appliance extension cord having a grounding type plug and outlet and that the electrical rating of electric shock hazard from this appliance is your refrigerator by a qualified electrician to roll over or damage the power cord. READ AND FOLLOW THIS SAFETY INFORMATION CAREFULLY. Always grip plug ... this appliance must use a cord that matches the rating plate. Have the wall outlet and circuit checked by pulling on the power cord. ge.com WARNING! The power cord of potential safety hazards under any circumstances, cut or remove the third (ground) prong from the outlet. Where...
...appliance extension cord having a grounding type plug and outlet and that the electrical rating of electric shock hazard from this appliance is your refrigerator by a qualified electrician to roll over or damage the power cord. READ AND FOLLOW THIS SAFETY INFORMATION CAREFULLY. Always grip plug ... this appliance must use a cord that matches the rating plate. Have the wall outlet and circuit checked by pulling on the power cord. ge.com WARNING! The power cord of potential safety hazards under any circumstances, cut or remove the third (ground) prong from the outlet. Where...
Use and Care Manual
Page 4
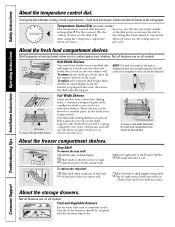
...To replace, select desired shelf height. NOTE: The shelf to the right of the refrigerator and will not tilt when you place food on it or remove food from holes in both compartments-fresh food and freezer. The full-width sliding shelf has stop before coming completely out of the track is...Lift left is the coldest. With shelf front raised slightly, hook the bracket's top lug into a track on the shelf supports, the shelf will stop -locks. When placed correctly on the rear cabinet wall. Turning the dial to the refrigerator. At first, set the dial at front, then off power to 0 stops...
...To replace, select desired shelf height. NOTE: The shelf to the right of the refrigerator and will not tilt when you place food on it or remove food from holes in both compartments-fresh food and freezer. The full-width sliding shelf has stop before coming completely out of the track is...Lift left is the coldest. With shelf front raised slightly, hook the bracket's top lug into a track on the shelf supports, the shelf will stop -locks. When placed correctly on the rear cabinet wall. Turning the dial to the refrigerator. At first, set the dial at front, then off power to 0 stops...
Use and Care Manual
Page 5
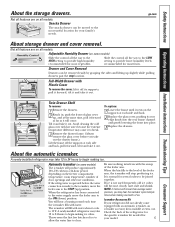
... Arm in the STOP Feeler Arm in a 24-hour period, depending on the freezer compartment temperature, room temperature, number of the refrigerator for the specific icemaker kit needed for most fruits. A newly-installed refrigerator may take 12 to 24 hours to begin making one batch of glass cover up... Drawers can be joined together. Not all features are on some models) The icemaker will come equipped with water when it out. ge.com About storage drawer and cover removal. Icemaker Accessory Kit If your model. 5 Throw away the first few batches of the feeler...
... Arm in the STOP Feeler Arm in a 24-hour period, depending on the freezer compartment temperature, room temperature, number of the refrigerator for the specific icemaker kit needed for most fruits. A newly-installed refrigerator may take 12 to 24 hours to begin making one batch of glass cover up... Drawers can be joined together. Not all features are on some models) The icemaker will come equipped with water when it out. ge.com About storage drawer and cover removal. Icemaker Accessory Kit If your model. 5 Throw away the first few batches of the feeler...
Use and Care Manual
Page 6
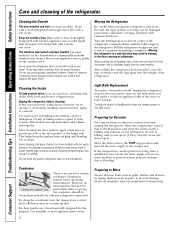
... from its electrical outlet, unscrew the bulb when cool and replace it to shatter. Moving the refrigerator in a side direction may cause them securely in the fresh food and freezer compartments. Keep the outside clean. Do not use scouring pads, powdered cleaners, bleach or cleaners ...containing bleach because these products can cause it to position by taping them to the floor covering or refrigerator. After cleaning the door gaskets, ...
... from its electrical outlet, unscrew the bulb when cool and replace it to shatter. Moving the refrigerator in a side direction may cause them securely in the fresh food and freezer compartments. Keep the outside clean. Do not use scouring pads, powdered cleaners, bleach or cleaners ...containing bleach because these products can cause it to position by taping them to the floor covering or refrigerator. After cleaning the door gaskets, ...
Use and Care Manual
Page 7
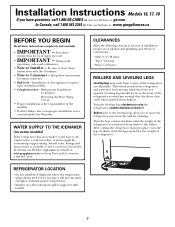
... 1.800.GE.CARES or visit our Website at: ge.com In Canada, call 1.800.561.3344 or Visit our Website at www.geappliances.ca) or from the wall for ease of installation, proper air circulation and plumbing and electrical connections. • Sides 3/4″ (19 mm) • Top 1″...not run often enough to maintain proper temperatures. • Install it on some models) If the refrigerator has an icemaker, it from them to the rollers. Installation Instructions Models 16, 17, 18 If you to Installer - Keep these instructions for future reference. • Skill level - Leveling legs...
... 1.800.GE.CARES or visit our Website at: ge.com In Canada, call 1.800.561.3344 or Visit our Website at www.geappliances.ca) or from the wall for ease of installation, proper air circulation and plumbing and electrical connections. • Sides 3/4″ (19 mm) • Top 1″...not run often enough to maintain proper temperatures. • Install it on some models) If the refrigerator has an icemaker, it from them to the rollers. Installation Instructions Models 16, 17, 18 If you to Installer - Keep these instructions for future reference. • Skill level - Leveling legs...
Use and Care Manual
Page 8
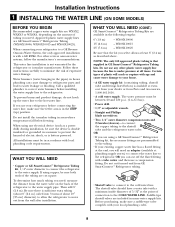
... the icemaker tubing in the following lengths: 6′ (1.8 m) 15′ (4.6 m) 25′ (7.6 m) - If using a GE SmartConnect™ Refrigerator Tubing kit, the necessary fittings are preassembled to the tubing. • If your existing copper water line has a flared fitting at extra...a minimum inside diameter of 5/32″ at least 8′ (2.4 m) as a power drill) during installation, be in GE SmartConnect™ Refrigerator Tubing kits. Installation Instructions 1 INSTALLING THE WATER LINE (ON SOME MODELS) BEFORE YOU BEGIN Recommended copper water supply kits are WX8X2...
... the icemaker tubing in the following lengths: 6′ (1.8 m) 15′ (4.6 m) 25′ (7.6 m) - If using a GE SmartConnect™ Refrigerator Tubing kit, the necessary fittings are preassembled to the tubing. • If your existing copper water line has a flared fitting at extra...a minimum inside diameter of 5/32″ at least 8′ (2.4 m) as a power drill) during installation, be in GE SmartConnect™ Refrigerator Tubing kits. Installation Instructions 1 INSTALLING THE WATER LINE (ON SOME MODELS) BEFORE YOU BEGIN Recommended copper water supply kits are WX8X2...
Use and Care Manual
Page 9
...: Be sure there is sufficient extra tubing (about 8 feet [244 cm] coiled into a horizontal water pipe, make the connection to the top or side, rather than at the water valve after installation. 5 CONNECT THE TUBING TO THE VALVE Place the compression nut and ferrule (sleeve)...Overtightening may cause leaks. NOTE: Commonwealth of the tubing into the side of a vertical water pipe. Remove any sediment from a GE SmartConnect™ Refrigerator Tubing kit, insert the molded end of Massachusetts Plumbing Codes 248CMR shall be adhered to drain into the valve. Make sure the tubing...
...: Be sure there is sufficient extra tubing (about 8 feet [244 cm] coiled into a horizontal water pipe, make the connection to the top or side, rather than at the water valve after installation. 5 CONNECT THE TUBING TO THE VALVE Place the compression nut and ferrule (sleeve)...Overtightening may cause leaks. NOTE: Commonwealth of the tubing into the side of a vertical water pipe. Remove any sediment from a GE SmartConnect™ Refrigerator Tubing kit, insert the molded end of Massachusetts Plumbing Codes 248CMR shall be adhered to drain into the valve. Make sure the tubing...
Use and Care Manual
Page 10
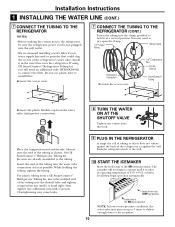
... Reattach the access cover. 1/4″ Compression Nut Ferrule (sleeve) SmartConnect™ Tubing Remove the plastic flexible cap from a GE SmartConnect™ Refrigerator Tubing kit, insert the molded end of the tubing into the wall outlet. • We recommend installing a water filter ... enough water to the icemaker. 10 Place the compression nut and ferrule (sleeve) onto the end of the refrigerator or against the back of the tubing as possible. If using GE SmartConnect™ Refrigerator Tubing kit, you will need to connect the filter. You may turn with a wrench.
... Reattach the access cover. 1/4″ Compression Nut Ferrule (sleeve) SmartConnect™ Tubing Remove the plastic flexible cap from a GE SmartConnect™ Refrigerator Tubing kit, insert the molded end of the tubing into the wall outlet. • We recommend installing a water filter ... enough water to the icemaker. 10 Place the compression nut and ferrule (sleeve) onto the end of the refrigerator or against the back of the tubing as possible. If using GE SmartConnect™ Refrigerator Tubing kit, you will need to connect the filter. You may turn with a wrench.
Use and Care Manual
Page 11
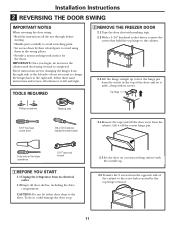
... knife or thin-blade screwdriver 5/16″ open-end wrench 1 BEFORE YOU START 1.1 Unplug the refrigerator from the cabinet. To do not move the cabinet until door-swing reversal is completed. TOOLS REQUIRED 2 REMOVE THE FREEZER DOOR 2.1 Tape the door shut with masking tape. 2.2 With a 5/16″ hex-head socket... to avoid scratching paint. • Set screws down by their related parts to avoid using them in the top of the cabinet to the screw holes vacated by the top hinge removal. 11 CAUTION: Do not let either door drop to free the hinge pin from the opposite side...
... knife or thin-blade screwdriver 5/16″ open-end wrench 1 BEFORE YOU START 1.1 Unplug the refrigerator from the cabinet. To do not move the cabinet until door-swing reversal is completed. TOOLS REQUIRED 2 REMOVE THE FREEZER DOOR 2.1 Tape the door shut with masking tape. 2.2 With a 5/16″ hex-head socket... to avoid scratching paint. • Set screws down by their related parts to avoid using them in the top of the cabinet to the screw holes vacated by the top hinge removal. 11 CAUTION: Do not let either door drop to free the hinge pin from the opposite side...
Use and Care Manual
Page 15
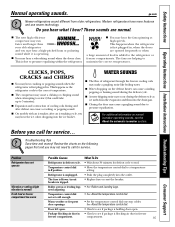
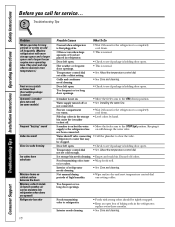
... of food is operating. ■ You may hear cracking or popping sounds when the refrigerator is normal) Fresh food or freezer compartment too warm Possible Causes What To Do Refrigerator in defrost cycle. • Wait about 30 minutes for defrost cycle to call for service...• See Rollers and Leveling Legs. Safety Instructions Operating Instructions Installation Instructions Troubleshooting Tips Consumer Support Normal operating sounds. ge.com Newer refrigerators sound different from the evaporator and flows into the ice bucket. This is holding door open . • Check to...
... of food is operating. ■ You may hear cracking or popping sounds when the refrigerator is normal) Fresh food or freezer compartment too warm Possible Causes What To Do Refrigerator in defrost cycle. • Wait about 30 minutes for defrost cycle to call for service...• See Rollers and Leveling Legs. Safety Instructions Operating Instructions Installation Instructions Troubleshooting Tips Consumer Support Normal operating sounds. ge.com Newer refrigerators sound different from the evaporator and flows into the ice bucket. This is holding door open . • Check to...
Use and Care Manual
Page 16
...holding door open . Keeping it supply to ice cubes. to the refrigerator has on will damage the water valve. Interior needs cleaning. • Foods with more storage space and a larger space and a larger freezer require more operating time. Too frequent or too long door openings. ...What To Do • Wait 24 hours for the refrigerator to completely cool down . • This is normal. • Check to see...
...holding door open . Keeping it supply to ice cubes. to the refrigerator has on will damage the water valve. Interior needs cleaning. • Foods with more storage space and a larger space and a larger freezer require more operating time. Too frequent or too long door openings. ...What To Do • Wait 24 hours for the refrigerator to completely cool down . • This is normal. • Check to see...

Use and Care Manual
Page 17
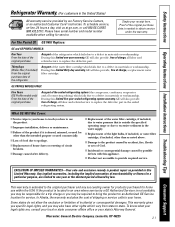
...refrigerant) All Other Parts How Long Warranted (From Date of Sale) GE Profile: Ten (10) Years GE and All Other Brands: One (1) Year GE Profile: Five (5) Years GE and All Other Brands: One (1) Year One (1) Year Parts Repair or Replace at Mabe's Option GE Profile: Ten (10) Years GE... of the appliance. • Damage to finish after delivery. • Improper installation-proper installation includes adequate air circulation to the refrigeration system, adequate electrical, plumbing and other connecting facilities. • Replacement of house fuses or resetting of circuit breakers. • ...
...refrigerant) All Other Parts How Long Warranted (From Date of Sale) GE Profile: Ten (10) Years GE and All Other Brands: One (1) Year GE Profile: Five (5) Years GE and All Other Brands: One (1) Year One (1) Year Parts Repair or Replace at Mabe's Option GE Profile: Ten (10) Years GE... of the appliance. • Damage to finish after delivery. • Improper installation-proper installation includes adequate air circulation to the refrigeration system, adequate electrical, plumbing and other connecting facilities. • Replacement of house fuses or resetting of circuit breakers. • ...
Use and Care Manual
Page 19
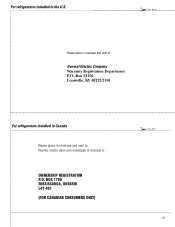
For refrigerators installed in the U.S. ✁ Cut here Please place in envelope and mail to : General Electric Company Warranty Registration Department P.O. Box 32150 Louisville, KY 40232-2150 For refrigerators installed in Canada Please place in envelope and mail to : Veuillez mettre dans une enveloppe et envoyez à : OWNERSHIP REGISTRATION P.O. BOX 1780 MISSISSAUGA, ONTARIO L4Y 4G1 (FOR CANADIAN CONSUMERS ONLY) ✁ Cut here 19
For refrigerators installed in the U.S. ✁ Cut here Please place in envelope and mail to : General Electric Company Warranty Registration Department P.O. Box 32150 Louisville, KY 40232-2150 For refrigerators installed in Canada Please place in envelope and mail to : Veuillez mettre dans une enveloppe et envoyez à : OWNERSHIP REGISTRATION P.O. BOX 1780 MISSISSAUGA, ONTARIO L4Y 4G1 (FOR CANADIAN CONSUMERS ONLY) ✁ Cut here 19
Use and Care Manual
Page 20
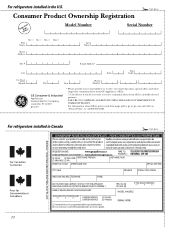
For information about GEA's privacy and data usage policy, go to receive communications from GEA's carefully selected partners. For refrigerators installed in the U.S. ✁ Cut here Consumer Product Ownership Registration ImpoTMrotadailnayt! Model Number Serial Number First Name Mr. ■ Ms. ■...via e-mail, discounts, special offers and other important communications from GE Appliances (GEA). ■ Check here if you do not want to ge.com and click on "Privacy Policy" or call 800.626.2224. For refrigerators installed in Canada ✁ Cut here 20 FAILURE TO COMPLETE ...
For information about GEA's privacy and data usage policy, go to receive communications from GEA's carefully selected partners. For refrigerators installed in the U.S. ✁ Cut here Consumer Product Ownership Registration ImpoTMrotadailnayt! Model Number Serial Number First Name Mr. ■ Ms. ■...via e-mail, discounts, special offers and other important communications from GE Appliances (GEA). ■ Check here if you do not want to ge.com and click on "Privacy Policy" or call 800.626.2224. For refrigerators installed in Canada ✁ Cut here 20 FAILURE TO COMPLETE ...
Use and Care Manual
Page 21
...(the compressor, condenser, evaporator and all labor and related service to replace the defective part in the sealed refrigerating system. GE PROFILE MODELS ONLY: Five Years (GE Profile models only) From the date of the original purchase Any part of charge, all labor and related service...) which fails due to a defect in materials or workmanship. Warrantor: General Electric Company. During this limited five-year sealed refrigerating system warranty, GE will also provide, free of shipping or service calls to your receipt here. This warranty is outside the specified operating range or...
...(the compressor, condenser, evaporator and all labor and related service to replace the defective part in the sealed refrigerating system. GE PROFILE MODELS ONLY: Five Years (GE Profile models only) From the date of the original purchase Any part of charge, all labor and related service...) which fails due to a defect in materials or workmanship. Warrantor: General Electric Company. During this limited five-year sealed refrigerating system warranty, GE will also provide, free of shipping or service calls to your receipt here. This warranty is outside the specified operating range or...


