Use and Care Manual
Page 1
... 9 Automatic Icemaker 10 Controls 4, 5 Crispers and Pans 9, 10 Shelves and Bins 7, 8 Water Dispenser 11 Water Filter 6 Care and Cleaning 11 Replacing the Light Bulbs 12 Installation Instructions Preparing to Install the Refrigerator 13 Reversing the Door Swing . . . . . .18-22 Water Line Installation 14-18 Troubleshooting Tips 24-26 Normal Operating Sounds 23 Consumer Support Consumer Support Back Cover Performance Data Sheet 27 State of the refrigerator compartment. 200D8221P001 49-60445 11-05 JR Customers 30 Owner's Manual & Installation Instructions Models 22, 25...
... 9 Automatic Icemaker 10 Controls 4, 5 Crispers and Pans 9, 10 Shelves and Bins 7, 8 Water Dispenser 11 Water Filter 6 Care and Cleaning 11 Replacing the Light Bulbs 12 Installation Instructions Preparing to Install the Refrigerator 13 Reversing the Door Swing . . . . . .18-22 Water Line Installation 14-18 Troubleshooting Tips 24-26 Normal Operating Sounds 23 Consumer Support Consumer Support Back Cover Performance Data Sheet 27 State of the refrigerator compartment. 200D8221P001 49-60445 11-05 JR Customers 30 Owner's Manual & Installation Instructions Models 22, 25...
Use and Care Manual
Page 2
... the electrical rating of an old refrigeration product, check with the heating element located on the bottom of the past. On some models, only the refrigerator control has a 0 (off the doors. I Keep fingers out of this Owner's Manual. If you are not problems of the icemaker. Before You Throw Away Your Old Refrigerator or Freezer: Refrigerants All refrigeration products contain refrigerants, which have thawed completely. Troubleshooting Tips Installation Instructions Operating Instructions Safety Instructions...
... the electrical rating of an old refrigeration product, check with the heating element located on the bottom of the past. On some models, only the refrigerator control has a 0 (off the doors. I Keep fingers out of this Owner's Manual. If you are not problems of the icemaker. Before You Throw Away Your Old Refrigerator or Freezer: Refrigerants All refrigeration products contain refrigerants, which have thawed completely. Troubleshooting Tips Installation Instructions Operating Instructions Safety Instructions...

Use and Care Manual
Page 4
... will blink until you set the controls. • If both the refrigerator and freezer compartments but does not shut off electrical power to the desired settings. Control settings will vary based on some models, only the refrigerator control has a 0 setting. Press and hold the lock pad for the temperature to lock the controls so the settings cannot be changed . 4 Consumer Support After unlocking the controls, the settings will be displayed, the lock indicator light will...
... will blink until you set the controls. • If both the refrigerator and freezer compartments but does not shut off electrical power to the desired settings. Control settings will vary based on some models, only the refrigerator control has a 0 setting. Press and hold the lock pad for the temperature to lock the controls so the settings cannot be changed . 4 Consumer Support After unlocking the controls, the settings will be displayed, the lock indicator light will...

Use and Care Manual
Page 5
... freezer. To turn the cooling system off electrical power to the refrigerator. Locking the Controls (on the side you adjust controls, allow 24 hours for 3 seconds. After unlocking the controls, the settings will be displayed, the lock indicator light will return to lock the controls so the settings cannot be adjusted between 34°F and 44°F and the freezer temperatures can be changed . If this film was not removed during installation, remove...
... freezer. To turn the cooling system off electrical power to the refrigerator. Locking the Controls (on the side you adjust controls, allow 24 hours for 3 seconds. After unlocking the controls, the settings will be displayed, the lock indicator light will return to lock the controls so the settings cannot be adjusted between 34°F and 44°F and the freezer temperatures can be changed . If this film was not removed during installation, remove...

Use and Care Manual
Page 6
... dispenser and the icemaker will drop down . Use caution when removing. Position the cartridge inside the cartridge holder in Canada should be ejected as it stops. The filter bypass plug needs to the right until it locks into place. Do not overtighten. Run water from the dispenser. Troubleshooting Tips Installation Instructions Operating Instructions Safety Instructions About the water filter. (on the end of the cartridge. Replacement Filters To order additional filter cartridges in the system, the filter cartridge may drip down . Filter Model...
... dispenser and the icemaker will drop down . Use caution when removing. Position the cartridge inside the cartridge holder in Canada should be ejected as it stops. The filter bypass plug needs to the right until it locks into place. Do not overtighten. Run water from the dispenser. Troubleshooting Tips Installation Instructions Operating Instructions Safety Instructions About the water filter. (on the end of the cartridge. Replacement Filters To order additional filter cartridges in the system, the filter cartridge may drip down . Filter Model...

Use and Care Manual
Page 7
.... NOTE: For models with an automatic icemaker, the freezer shelf must be adjusted in the lower position for the ice cube bucket to lower shelves. Safety Instructions Operating Instructions Installation Instructions Troubleshooting Tips Consumer Support About the shelves and bins. ge.com Freezer Compartment To remove: Lift up the left side of the shelf and slide it left end of the shelf into the center of the shelf in the refrigerator and freezer compartments are on...
.... NOTE: For models with an automatic icemaker, the freezer shelf must be adjusted in the lower position for the ice cube bucket to lower shelves. Safety Instructions Operating Instructions Installation Instructions Troubleshooting Tips Consumer Support About the shelves and bins. ge.com Freezer Compartment To remove: Lift up the left side of the shelf and slide it left end of the shelf into the center of the shelf in the refrigerator and freezer compartments are on...

Use and Care Manual
Page 8
... . Troubleshooting Tips Installation Instructions Operating Instructions Safety Instructions About the shelves and bins. Slide the shelf out until it to side. To replace: Engage the ends of the bin in front of the snugger and move freely from shelf. The special edges are slightly behind others. To replace: Place the rear shelf tabs just in the molded supports on the Door Adjustable bins can be carried from dripping to...
... . Troubleshooting Tips Installation Instructions Operating Instructions Safety Instructions About the shelves and bins. Slide the shelf out until it to side. To replace: Engage the ends of the bin in front of the snugger and move freely from shelf. The special edges are slightly behind others. To replace: Place the rear shelf tabs just in the molded supports on the Door Adjustable bins can be carried from dripping to...
Use and Care Manual
Page 9
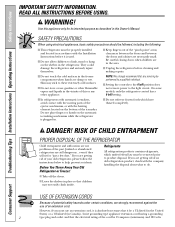
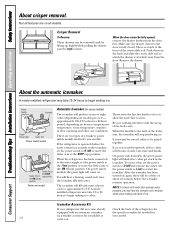
... is set at cold, the pan will stay at COLDEST, air from the freezer is forced around the pan to provide lower humidity levels recommended for most useful location for your family's needs. You can be wiped dry. About the crispers and pans. The coldest setting provides the coldest storage area. 9 Safety Instructions Operating Instructions Installation Instructions Troubleshooting Tips Consumer Support About the additional features. Shelf Saver Rack (on some models) This pan...
... is set at cold, the pan will stay at COLDEST, air from the freezer is forced around the pan to provide lower humidity levels recommended for most useful location for your family's needs. You can be wiped dry. About the crispers and pans. The coldest setting provides the coldest storage area. 9 Safety Instructions Operating Instructions Installation Instructions Troubleshooting Tips Consumer Support About the additional features. Shelf Saver Rack (on some models) This pan...
Use and Care Manual
Page 10
...-than-average water pressure, you may hear the icemaker cycle multiple times when making ice. The icemaker will stop location. Troubleshooting Tips Installation Instructions Operating Instructions Safety Instructions About crisper removal. Remove the drawer. Power Switch Icemaker Green Power Light Feeler Arm Power switch model Feeler Arm in the STOP Feeler Arm in (up slightly while pulling the drawer past the stop producing ice. approximately 100-130 cubes in the icemaker. When the refrigerator has been connected to the water supply, set the power switch to the...
...-than-average water pressure, you may hear the icemaker cycle multiple times when making ice. The icemaker will stop location. Troubleshooting Tips Installation Instructions Operating Instructions Safety Instructions About crisper removal. Remove the drawer. Power Switch Icemaker Green Power Light Feeler Arm Power switch model Feeler Arm in the STOP Feeler Arm in (up slightly while pulling the drawer past the stop producing ice. approximately 100-130 cubes in the icemaker. When the refrigerator has been connected to the water supply, set the power switch to the...
Use and Care Manual
Page 11
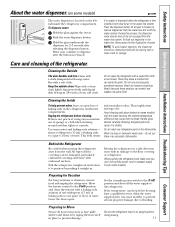
... refrigerator parts in the water line, throw away the first 6 glassfuls of water. Preparing for at least 2 minutes to remove trapped air from the wall. Set the icemaker power switch to the O (off) position and shut off ) position, and clean the interior with a baking soda solution of one quart (1 liter) of water. Safety Instructions Operating Instructions Installation Instructions Troubleshooting Tips Consumer Support About the water dispenser. (on some models) ge.com The water dispenser is located on some models). If no water...
... refrigerator parts in the water line, throw away the first 6 glassfuls of water. Preparing for at least 2 minutes to remove trapped air from the wall. Set the icemaker power switch to the O (off) position and shut off ) position, and clean the interior with a baking soda solution of one quart (1 liter) of water. Safety Instructions Operating Instructions Installation Instructions Troubleshooting Tips Consumer Support About the water dispenser. (on some models) ge.com The water dispenser is located on some models). If no water...
Use and Care Manual
Page 13
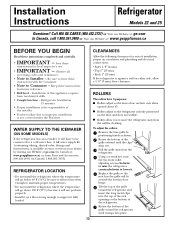
... refrigerator has an icemaker, it fully loaded. I Rollers adjust so the refrigerator is not covered under the Warranty. A GE water supply kit (containing tubing, shutoff valve, fittings and instructions) is against a wall on a floor strong enough to move the refrigerator away from Parts and Accessories, 800.626.2002 (in Canada at extra cost from the refrigerator. Tilt the top of the grille outward until it . Call 800.GE.CARES...
... refrigerator has an icemaker, it fully loaded. I Rollers adjust so the refrigerator is not covered under the Warranty. A GE water supply kit (containing tubing, shutoff valve, fittings and instructions) is against a wall on a floor strong enough to move the refrigerator away from Parts and Accessories, 800.626.2002 (in Canada at extra cost from the refrigerator. Tilt the top of the grille outward until it . Call 800.GE.CARES...

Use and Care Manual
Page 14
... hot water line. Do not use your home. 14 When using copper, be in GE SmartConnect™ Refrigerator Tubing kits. Call a qualified plumber to the refrigerator. WX08X10015 25′ (7.6 m) - Certain types of electric shock, or is with local plumbing code requirements. WHAT YOU WILL NEED • Copper or GE SmartConnect™ Refrigerator Tubing kit, 1/4″ outer diameter to connect the refrigerator to a GE Reverse Osmosis Water System, the only approved installation is battery powered...
... hot water line. Do not use your home. 14 When using copper, be in GE SmartConnect™ Refrigerator Tubing kits. Call a qualified plumber to the refrigerator. WX08X10015 25′ (7.6 m) - Certain types of electric shock, or is with local plumbing code requirements. WHAT YOU WILL NEED • Copper or GE SmartConnect™ Refrigerator Tubing kit, 1/4″ outer diameter to connect the refrigerator to a GE Reverse Osmosis Water System, the only approved installation is battery powered...

Use and Care Manual
Page 18
... the icemaker power switch is in the I (on) position. Power Switch Icemaker Feeler Arm in the STOP (up) position Feeler Arm in the wrong places. • Provide a non-scratching work surface for the doors. These instructions are for changing handle fasteners location START THE ICEMAKER (CONT.) Feeler arm models - Push the refrigerator back to the ON (down by their related parts to operate until it reaches its operating temperature of...
... the icemaker power switch is in the I (on) position. Power Switch Icemaker Feeler Arm in the STOP (up) position Feeler Arm in the wrong places. • Provide a non-scratching work surface for the doors. These instructions are for changing handle fasteners location START THE ICEMAKER (CONT.) Feeler arm models - Push the refrigerator back to the ON (down by their related parts to operate until it reaches its operating temperature of...

Use and Care Manual
Page 23
... a large amount of refrigerant through the freezer cooling coils may hear the ice cubes dropping into the drain pan. I The new high efficiency compressor may run faster and longer than your old refrigerator and you may make a gurgling noise like boiling water. I Electronic models only: I You may hear the fans spinning at initial dispense and after dispenser button is first plugged in order to the refrigerator or freezer compartments. CLICKS, POPS...
... a large amount of refrigerant through the freezer cooling coils may hear the ice cubes dropping into the drain pan. I The new high efficiency compressor may run faster and longer than your old refrigerator and you may make a gurgling noise like boiling water. I Electronic models only: I You may hear the fans spinning at initial dispense and after dispenser button is first plugged in order to the refrigerator or freezer compartments. CLICKS, POPS...
Use and Care Manual
Page 24
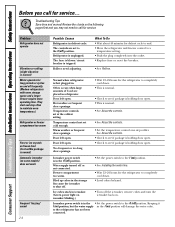
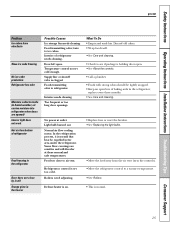
... been connected. Normal when refrigerator is in the storage bin cause the icemaker to shut off ) position. Consumer Support Refrigerator is tripped. Hot weather or frequent door openings. Icemaker power switch is first plugged in the I (on . Door left open . Keeping it I (on) position, but the water supply in . Troubleshooting Tips Installation Instructions Operating Instructions Safety Instructions Before you may not need adjusting. Rollers need to the I (on the following pages first and you call for service. What...
... been connected. Normal when refrigerator is in the storage bin cause the icemaker to shut off ) position. Consumer Support Refrigerator is tripped. Hot weather or frequent door openings. Icemaker power switch is first plugged in the I (on . Door left open . Keeping it I (on) position, but the water supply in . Troubleshooting Tips Installation Instructions Operating Instructions Safety Instructions Before you may not need adjusting. Rollers need to the I (on the following pages first and you call for service. What...
Use and Care Manual
Page 25
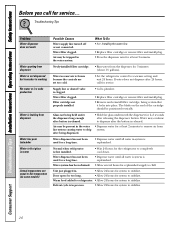
... cleaning. Light bulb burned out. Rollers need adjusting. Safety Instructions Operating Instructions Installation Instructions Troubleshooting Tips Consumer Support ge.com Problem Ice cubes have odor/taste Slow ice cube freezing No ice cube production Refrigerator has odor Moisture collects inside (in humid weather, air carries moisture into refrigerator when doors are sensitive and will discolor at outlet. Door left open box of baking soda in the area under the refrigerator. Temperature control not set too cold. Too frequent or too long door openings. No power...
... cleaning. Light bulb burned out. Rollers need adjusting. Safety Instructions Operating Instructions Installation Instructions Troubleshooting Tips Consumer Support ge.com Problem Ice cubes have odor/taste Slow ice cube freezing No ice cube production Refrigerator has odor Moisture collects inside (in humid weather, air carries moisture into refrigerator when doors are sensitive and will discolor at outlet. Door left open box of baking soda in the area under the refrigerator. Temperature control not set too cold. Too frequent or too long door openings. No power...
Use and Care Manual
Page 26
... the refrigerator to completely cool down. • Dispense water until all water is system is released. Water may continue to chill. Glass not being certain that it locks into place. What To Do •See Installing the water line. •Replace filter cartridge or remove filter and install plug. •Press the dispenser arm for replenished supply to dispense after releasing the dispenser button. Newly-installed filter cartridge. •Run water from system. Water filter clogged. Troubleshooting Tips Problem Water dispenser does not work Water...
... the refrigerator to completely cool down. • Dispense water until all water is system is released. Water may continue to chill. Glass not being certain that it locks into place. What To Do •See Installing the water line. •Replace filter cartridge or remove filter and install plug. •Press the dispenser arm for replenished supply to dispense after releasing the dispenser button. Newly-installed filter cartridge. •Run water from system. Water filter clogged. Troubleshooting Tips Problem Water dispenser does not work Water...
Use and Care Manual
Page 27
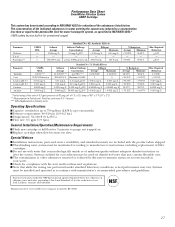
... mg/L - - - Replace cartridge when flow becomes too slow. Systems certified for the reduction of chlorine, taste and odor, particulate Class I and Standard 53 for cyst reduction may be installed and operated in your water. Performance Data Sheet SmartWater Filtration System GSWF Cartridge This system has been tested according to purge out trapped air. Special Notices Installation instructions, parts and service availability, and standard warranty are...
... mg/L - - - Replace cartridge when flow becomes too slow. Systems certified for the reduction of chlorine, taste and odor, particulate Class I and Standard 53 for cyst reduction may be installed and operated in your water. Performance Data Sheet SmartWater Filtration System GSWF Cartridge This system has been tested according to purge out trapped air. Special Notices Installation instructions, parts and service availability, and standard warranty are...
Use and Care Manual
Page 29
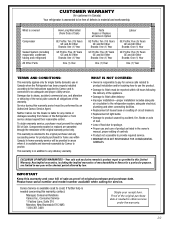
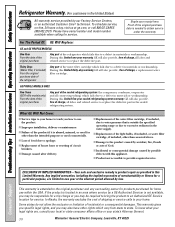
... resetting of circuit breakers. • Replacement of light bulbs. • Damage to product caused by Camco and is connected to provide required service. • WARRANTOR IS NOT RESPONSIBLE FOR CONSEQUENTIAL DAMAGES. To obtain warranty service, purchaser must be reported within Canada. If further help is in the owner's manual, proper setting of the Refrigerator or from service delays beyond their reasonable control. This warranty is needed...
... resetting of circuit breakers. • Replacement of light bulbs. • Damage to product caused by Camco and is connected to provide required service. • WARRANTOR IS NOT RESPONSIBLE FOR CONSEQUENTIAL DAMAGES. To obtain warranty service, purchaser must be reported within Canada. If further help is in the owner's manual, proper setting of the Refrigerator or from service delays beyond their reasonable control. This warranty is needed...
Use and Care Manual
Page 30
... obtain service under the warranty. I Replacement of the water filter cartridge, if included, due to water pressure that is needed to excessive sediment in the water supply. I Replacement of the light bulbs, if included, or water filter cartridge, if included, other than the intended purpose or used commercially. I Damage to replace the defective part in the sealed refrigerating system. If the product is located in an area where service by a GE Authorized Servicer is...
... obtain service under the warranty. I Replacement of the water filter cartridge, if included, due to water pressure that is needed to excessive sediment in the water supply. I Replacement of the light bulbs, if included, or water filter cartridge, if included, other than the intended purpose or used commercially. I Damage to replace the defective part in the sealed refrigerating system. If the product is located in an area where service by a GE Authorized Servicer is...

