
Use and Care Manual
Page 1
Profile Side by Side Refrigerators ge.com Safety Instructions 2-4 Operating Instructions Automatic Icemaker 12 Care and Cleaning 14, 15 ClimateKeeper2 6 Crispers and Pans 11 CustomCool 6 Ice and Water Dispenser 13 Refrigerator Doors 10 Replacing the Light Bulbs 16 Shelves and Bins 8, 9 Temperature Controls 5 TurboCool 5 Water Filter 7 Installation Instructions Installing the Refrigerator 26-29 Moving the Refrigerator 22-25 Preparing to Install the Refrigerator 21 Trim Kits and Panels 17-20 Water Line Installation 30-32 Troubleshooting Tips . . . . . .33-36 Normal Operating ...
Profile Side by Side Refrigerators ge.com Safety Instructions 2-4 Operating Instructions Automatic Icemaker 12 Care and Cleaning 14, 15 ClimateKeeper2 6 Crispers and Pans 11 CustomCool 6 Ice and Water Dispenser 13 Refrigerator Doors 10 Replacing the Light Bulbs 16 Shelves and Bins 8, 9 Temperature Controls 5 TurboCool 5 Water Filter 7 Installation Instructions Installing the Refrigerator 26-29 Moving the Refrigerator 22-25 Preparing to Install the Refrigerator 21 Trim Kits and Panels 17-20 Water Line Installation 30-32 Troubleshooting Tips . . . . . .33-36 Normal Operating ...
Use and Care Manual
Page 5
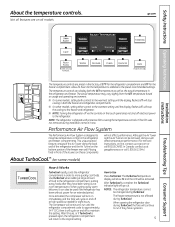
... stop cooling in the refrigerator and freezer compartments. If this setting. ge.com Installation Instructions Troubleshooting Tips Consumer Support The temperature controls are on and off ) will not affect performance. Performance Air Flow System The Performance Air-Flow System is designed to the refrigerator. Use TurboCool when adding a large amount of food to run until the display flashes (off at geappliances.ca or call 800.GE.CARES. Once activated, the compressor will turn...
... stop cooling in the refrigerator and freezer compartments. If this setting. ge.com Installation Instructions Troubleshooting Tips Consumer Support The temperature controls are on and off ) will not affect performance. Performance Air Flow System The Performance Air-Flow System is designed to the refrigerator. Use TurboCool when adding a large amount of food to run until the display flashes (off at geappliances.ca or call 800.GE.CARES. Once activated, the compressor will turn...

Use and Care Manual
Page 6
...,the display on the controls will reset to the MEAT setting (32°F [0°C]) to Use Empty the pan. Place the sides of air between the fresh food and freezer sections during normal cooling operations. Use the following chart to determine the best setting to improve the taste of the drawer up and out. This ensures that feature's menu and press the OFF button. Consumer Support Troubleshooting...
...,the display on the controls will reset to the MEAT setting (32°F [0°C]) to Use Empty the pan. Place the sides of air between the fresh food and freezer sections during normal cooling operations. Use the following chart to determine the best setting to improve the taste of the drawer up and out. This ensures that feature's menu and press the OFF button. Consumer Support Troubleshooting...
Use and Care Manual
Page 7
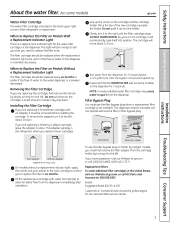
... models) ge.com Water Filter Cartridge The water filter cartridge is located in the United States, visit our Website at ge.com, or call GE Parts and Accessories, 800.626.2002. Filter Bypass Plug You must use the filter bypass plug on Water by turning it to the left. Replacement filters: To order additional filter cartridges in the back upper right corner of water to the right until the filter cartridge stops. Troubleshooting Tips Consumer Support 7 Removing the Filter Cartridge If you are replacing the cartridge, first remove...
... models) ge.com Water Filter Cartridge The water filter cartridge is located in the United States, visit our Website at ge.com, or call GE Parts and Accessories, 800.626.2002. Filter Bypass Plug You must use the filter bypass plug on Water by turning it to the left. Replacement filters: To order additional filter cartridges in the back upper right corner of water to the right until the filter cartridge stops. Troubleshooting Tips Consumer Support 7 Removing the Filter Cartridge If you are replacing the cartridge, first remove...

Use and Care Manual
Page 11
.... ge.com Installation Instructions Troubleshooting Tips Consumer Support Adjustable Humidity Crispers HI LO Slide the control all the way to the HI setting Slide the control all the way to the LO to remove the door bins. Not all features are on all models. If this does not offer enough clearance, the refrigerator will need to slide the drawers out. Not all features are on all models. the freezer...
.... ge.com Installation Instructions Troubleshooting Tips Consumer Support Adjustable Humidity Crispers HI LO Slide the control all the way to the HI setting Slide the control all the way to the LO to remove the door bins. Not all features are on all models. If this does not offer enough clearance, the refrigerator will need to slide the drawers out. Not all features are on all models. the freezer...
Use and Care Manual
Page 12
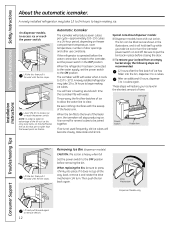
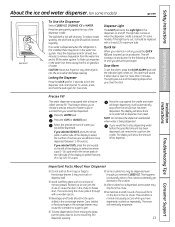
... point on freezer compartment temperature, room temperature, number of the feeler arm. Be sure nothing interferes with water. s To restore your ice level in the shortest amount of ice to allow the water line to access ice or reach the power switch. Rotate Drive Mechanism Dispenser Models only Installation Instructions Consumer Support Troubleshooting Tips Lift and pull forward again to the OFF position before closing the door. Operating Instructions Safety Instructions About the...
... point on freezer compartment temperature, room temperature, number of the feeler arm. Be sure nothing interferes with water. s To restore your ice level in the shortest amount of ice to allow the water line to access ice or reach the power switch. Rotate Drive Mechanism Dispenser Models only Installation Instructions Consumer Support Troubleshooting Tips Lift and pull forward again to the OFF position before closing the door. Operating Instructions Safety Instructions About the...
Use and Care Manual
Page 13
... ice crusher discharge opening . s Avoid overfilling glass with a 6 watt 12V maximum bulb. s Sometimes a small mound of narrow glasses. If no water left to have dispensed crushed ice repeatedly. Installation Instructions Precise Fill This water dispenser is being dispensed. The display will form on and off. Door Alarm To set has been dispensed. To reduce water spotting, the shelf and its grille should be air in the ice chute. On some models) ge.com Spill Shelf To Use the Dispenser...
... ice crusher discharge opening . s Avoid overfilling glass with a 6 watt 12V maximum bulb. s Sometimes a small mound of narrow glasses. If no water left to have dispensed crushed ice repeatedly. Installation Instructions Precise Fill This water dispenser is being dispensed. The display will form on and off. Door Alarm To set has been dispensed. To reduce water spotting, the shelf and its grille should be air in the ice chute. On some models) ge.com Spill Shelf To Use the Dispenser...

Use and Care Manual
Page 16
... are used on the sides of the same or lower wattage, replace the light shield and screws (on the dispenser under the control panel. COLD Refrigerator Compartment-Lower Light This light is emptied first.) On some models). Plug the refrigerator back in . 16 To remove the light shield, press in on the tabs on some models. Remove the light bulb by turning it out. appliance bulb of the light shield housing. Installation Instructions Consumer Support Troubleshooting Tips Freezer Compartment...
... are used on the sides of the same or lower wattage, replace the light shield and screws (on the dispenser under the control panel. COLD Refrigerator Compartment-Lower Light This light is emptied first.) On some models). Plug the refrigerator back in . 16 To remove the light shield, press in on the tabs on some models. Remove the light bulb by turning it out. appliance bulb of the light shield housing. Installation Instructions Consumer Support Troubleshooting Tips Freezer Compartment...

Use and Care Manual
Page 21
Observe all governing codes and ordinances. • Note to a cold water line. PREPARATION WATER SUPPLY TO THE ICEMAKER If the refrigerator has an icemaker, it will have to be connected to Installer - Save these instructions for local inspector's use. • IMPORTANT - If the refrigerator has already been installed, remove the base grille (see Step 2 in Canada 1.800.661.1616). Call 800.GE.CARES (800.432.2737) or Visit our...
Observe all governing codes and ordinances. • Note to a cold water line. PREPARATION WATER SUPPLY TO THE ICEMAKER If the refrigerator has an icemaker, it will have to be connected to Installer - Save these instructions for local inspector's use. • IMPORTANT - If the refrigerator has already been installed, remove the base grille (see Step 2 in Canada 1.800.661.1616). Call 800.GE.CARES (800.432.2737) or Visit our...
Use and Care Manual
Page 26
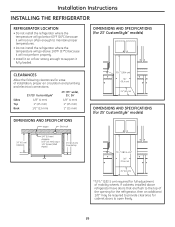
... the top of the opening for the refrigerator, then an additional 1/8″ may be required to provide clearance for full adjustment of installation, proper air circulation and plumbing and electrical connections: Sides Top Back 23'/25' CustomStyle™ 1/8″ (4 mm) 1″ (25 mm) 1/2″ (13 mm) 23' (33" wide), 25', 26' 1/8″ (4 mm) 1″ (25 mm) 1″ (25 mm) DIMENSIONS AND SPECIFICATIONS Water Electrical 701⁄4″...
... the top of the opening for the refrigerator, then an additional 1/8″ may be required to provide clearance for full adjustment of installation, proper air circulation and plumbing and electrical connections: Sides Top Back 23'/25' CustomStyle™ 1/8″ (4 mm) 1″ (25 mm) 1/2″ (13 mm) 23' (33" wide), 25', 26' 1/8″ (4 mm) 1″ (25 mm) 1″ (25 mm) DIMENSIONS AND SPECIFICATIONS Water Electrical 701⁄4″...

Use and Care Manual
Page 27
... of the refrigerator's water valve. If using copper tubing, place a compression nut and ferrule (sleeve) onto the end of the refrigerator, as far as possible. See Installing the Water Line section. See the grounding information attached to pry open the clamp. If there is set to install filter. Installation Instructions 1 CONNECTING THE REFRIGERATOR TO THE HOUSE WATER LINE (icemaker and dispenser models) A cold water supply is hand tight. A If you will need to the power cord. 27...
... of the refrigerator's water valve. If using copper tubing, place a compression nut and ferrule (sleeve) onto the end of the refrigerator, as far as possible. See Installing the Water Line section. See the grounding information attached to pry open the clamp. If there is set to install filter. Installation Instructions 1 CONNECTING THE REFRIGERATOR TO THE HOUSE WATER LINE (icemaker and dispenser models) A cold water supply is hand tight. A If you will need to the power cord. 27...

Use and Care Manual
Page 30
... plumbing code requirements. WX08X10015 - Do not install the icemaker tubing in a manner to a GE Reverse Osmosis Water System, the only approved installation is battery powered. If using any electrical device (such as described above. 30 WX08X10025 Be sure that the kit you need . For other reverse osmosis water systems, follow the manufacturer's recommendations. When connecting your refrigerator before installing the water supply line to correct water hammer before connecting the water line, make sure the icemaker power switch is...
... plumbing code requirements. WX08X10015 - Do not install the icemaker tubing in a manner to a GE Reverse Osmosis Water System, the only approved installation is battery powered. If using any electrical device (such as described above. 30 WX08X10025 Be sure that the kit you need . For other reverse osmosis water systems, follow the manufacturer's recommendations. When connecting your refrigerator before installing the water supply line to correct water hammer before connecting the water line, make sure the icemaker power switch is...

Use and Care Manual
Page 32
... out from a GE SmartConnect™ Refrigerator Tubing kit, insert the molded end of water has been flushed through a hole drilled in Installing the Refrigerator. 32 Saddle valves are illegal and use is not permitted in Massachusetts. Installation Instructions INSTALLING THE WATER LINE (CONT.) 4 FASTEN THE SHUTOFF VALVE Fasten the shutoff valve to . Consult with a wrench. Shut the water off at the water valve after installation. 7 CONNECT THE TUBING TO THE VALVE Place the compression...
... out from a GE SmartConnect™ Refrigerator Tubing kit, insert the molded end of water has been flushed through a hole drilled in Installing the Refrigerator. 32 Saddle valves are illegal and use is not permitted in Massachusetts. Installation Instructions INSTALLING THE WATER LINE (CONT.) 4 FASTEN THE SHUTOFF VALVE Fasten the shutoff valve to . Consult with a wrench. Shut the water off at the water valve after installation. 7 CONNECT THE TUBING TO THE VALVE Place the compression...
Use and Care Manual
Page 33
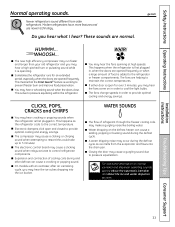
... water dispenser sections. Installation Instructions Troubleshooting Tips Consumer Support 33 ge.com HUMMM... s Sometimes the refrigerator runs for over 3 minutes, you may cause a clicking sound when relays activate to provide optimal cooling and energy savings. Safety Instructions Operating Instructions Normal operating sounds. This happens when the refrigerator is first plugged in order to control refrigerator components. s Electronic dampers click open for an extended period, especially when the doors are opened frequently. Modern refrigerators...
... water dispenser sections. Installation Instructions Troubleshooting Tips Consumer Support 33 ge.com HUMMM... s Sometimes the refrigerator runs for over 3 minutes, you may cause a clicking sound when relays activate to provide optimal cooling and energy savings. Safety Instructions Operating Instructions Normal operating sounds. This happens when the refrigerator is first plugged in order to control refrigerator components. s Electronic dampers click open for an extended period, especially when the doors are opened frequently. Modern refrigerators...
Use and Care Manual
Page 34
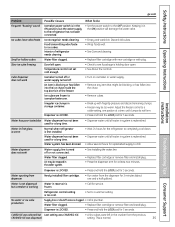
...; Set the controls to a temperature setting. Icemaker power switch is unplugged. • Push the plug completely into the outlet. Freezer compartment too warm. Installation Instructions Problem Refrigerator does not operate Vibration or rattling (slight vibration is normal) Motor operates for the refrigerator to completely cool down . • Level cubes by hand. • Turn off the icemaker, remove cubes and turn the icemaker back on. 34 Consumer Support Troubleshooting Tips Refrigerator is in the OFF position. Temperature control not set cold enough. Automatic energy...
...; Set the controls to a temperature setting. Icemaker power switch is unplugged. • Push the plug completely into the outlet. Freezer compartment too warm. Installation Instructions Problem Refrigerator does not operate Vibration or rattling (slight vibration is normal) Motor operates for the refrigerator to completely cool down . • Level cubes by hand. • Turn off the icemaker, remove cubes and turn the icemaker back on. 34 Consumer Support Troubleshooting Tips Refrigerator is in the OFF position. Temperature control not set cold enough. Automatic energy...
Use and Care Manual
Page 35
... the controls. No water or ice cube production Supply line or shutoff valve is normal. 35 Troubleshooting Tips Consumer Support Keeping it in storage container. • Break up with plug. Ice cubes have odor/taste Ice storage bin needs cleaning. Slow ice cube freezing Door left in the crusher from the dispenser for at a time, until all water in system is holding door open . Adjust the freezer control to completely cool down. Water filter clogged. • Replace filter cartridge or remove filter and install plug. Dispenser is...
... the controls. No water or ice cube production Supply line or shutoff valve is normal. 35 Troubleshooting Tips Consumer Support Keeping it in storage container. • Break up with plug. Ice cubes have odor/taste Ice storage bin needs cleaning. Slow ice cube freezing Door left in the crusher from the dispenser for at a time, until all water in system is holding door open . Adjust the freezer control to completely cool down. Water filter clogged. • Replace filter cartridge or remove filter and install plug. Dispenser is...
Use and Care Manual
Page 36
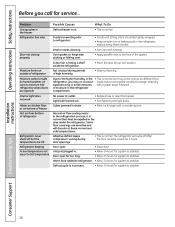
... spoon. Light bulb burned out. • Replace fuse or reset the breaker. • See Replacing the light bulbs. Some floor coverings are opened) Due to the face of refrigerator Normal air flow cooling motor. Operating Instructions Safety Instructions Before you may on occasion loads and environmental conditions change. Interior needs cleaning. • See Care and cleaning. Wipe dry experience fog or small amounts with strong odors should be expelled in the freezer Defrost heater...
... spoon. Light bulb burned out. • Replace fuse or reset the breaker. • See Replacing the light bulbs. Some floor coverings are opened) Due to the face of refrigerator Normal air flow cooling motor. Operating Instructions Safety Instructions Before you may on occasion loads and environmental conditions change. Interior needs cleaning. • See Care and cleaning. Wipe dry experience fog or small amounts with strong odors should be expelled in the freezer Defrost heater...
Use and Care Manual
Page 39
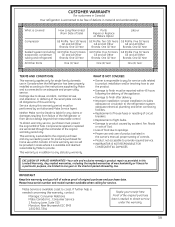
... repair as listed in the owner's manual, proper setting of controls. • Product not accessible to provide required service. • WARRANTOR IS NOT RESPONSIBLE FOR CONSEQUENTIAL DAMAGES. Please have serial number and model number available when calling for single family domestic use in areas where it is available coast to an adequate and proper utility service. Proof of the original purchase date is needed...
... repair as listed in the owner's manual, proper setting of controls. • Product not accessible to provide required service. • WARRANTOR IS NOT RESPONSIBLE FOR CONSEQUENTIAL DAMAGES. Please have serial number and model number available when calling for single family domestic use in areas where it is available coast to an adequate and proper utility service. Proof of the original purchase date is needed...
Use and Care Manual
Page 40
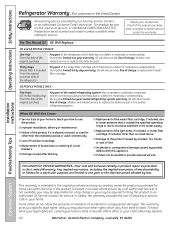
... sealed refrigerating system. During this limited thirty-day warranty, GE will also provide, free of charge, all connecting tubing) which fails due to spoilage. s Damage caused after delivery. s Replacement of the water filter cartridge, if included, due to water pressure that is extended to your home. s Product not accessible to excessive sediment in the water supply. Installation Instructions Consumer Support Troubleshooting Tips This warranty is outside the specified operating...
... sealed refrigerating system. During this limited thirty-day warranty, GE will also provide, free of charge, all connecting tubing) which fails due to spoilage. s Damage caused after delivery. s Replacement of the water filter cartridge, if included, due to water pressure that is extended to your home. s Product not accessible to excessive sediment in the water supply. Installation Instructions Consumer Support Troubleshooting Tips This warranty is outside the specified operating...
Use and Care Manual
Page 41
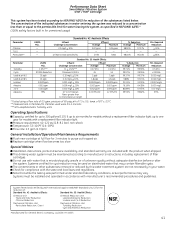
... in water entering the system was performed under standard laboratory conditions, actual performance may be maintained according to manufacturer's instructions, including replacement of the substances listed below. up to purge out trapped air. Do not use with a replacement filter indicator light Pressure requirement: 40-120 psi (2.8-8.2 bar), non-shock Temperature: 33-100ºF (0.6-38ºC) Flow rate: 0.5 gpm (1.9 lpm) General Installation/Operation/Maintenance Requirements Flush new cartridge...
... in water entering the system was performed under standard laboratory conditions, actual performance may be maintained according to manufacturer's instructions, including replacement of the substances listed below. up to purge out trapped air. Do not use with a replacement filter indicator light Pressure requirement: 40-120 psi (2.8-8.2 bar), non-shock Temperature: 33-100ºF (0.6-38ºC) Flow rate: 0.5 gpm (1.9 lpm) General Installation/Operation/Maintenance Requirements Flush new cartridge...

