
Use and Care Manual
Page 1
...Side by Side Refrigerators ge.com Safety Instructions 2-4 Operating Instructions Automatic Icemaker 12 Care and Cleaning 14, 15 ClimateKeeper2 6 Crispers and Pans 11 CustomCool 6 Ice and Water Dispenser 13 Refrigerator Doors 10 Replacing the Light Bulbs 16 Shelves and Bins 8, 9 Temperature Controls 5 TurboCool 5 Water Filter 7 Installation Instructions Installing the Refrigerator 26-29 Moving the Refrigerator 22-25... Preparing to Install the Refrigerator 21 Trim Kits and Panels 17...
...Side by Side Refrigerators ge.com Safety Instructions 2-4 Operating Instructions Automatic Icemaker 12 Care and Cleaning 14, 15 ClimateKeeper2 6 Crispers and Pans 11 CustomCool 6 Ice and Water Dispenser 13 Refrigerator Doors 10 Replacing the Light Bulbs 16 Shelves and Bins 8, 9 Temperature Controls 5 TurboCool 5 Water Filter 7 Installation Instructions Installing the Refrigerator 26-29 Moving the Refrigerator 22-25... Preparing to Install the Refrigerator 21 Trim Kits and Panels 17...
Use and Care Manual
Page 2
...INSTRUCTIONS BEFORE USING. s Do not touch the cold surfaces in the vicinity of the "pinch point" areas; They could damage the refrigerator and seriously injure themselves. s Do not store or use gasoline or other appliance. Installation Instructions Consumer Support Troubleshooting Tips 2 WARNING! ...Be careful closing doors when children are in accordance with the heating element located on the automatic icemaking mechanism while the refrigerator is used. NOTE: We strongly recommend that any other flammable vapors and liquids in the freezer compartment when hands are...
...INSTRUCTIONS BEFORE USING. s Do not touch the cold surfaces in the vicinity of the "pinch point" areas; They could damage the refrigerator and seriously injure themselves. s Do not store or use gasoline or other appliance. Installation Instructions Consumer Support Troubleshooting Tips 2 WARNING! ...Be careful closing doors when children are in accordance with the heating element located on the automatic icemaking mechanism while the refrigerator is used. NOTE: We strongly recommend that any other flammable vapors and liquids in the freezer compartment when hands are...
Use and Care Manual
Page 3
...check with the company handling the disposal about what to do. Refrigerants All refrigeration products contain refrigerants, which under certain conditions, we strongly recommend against the use an... days." However, if you are not problems of your old refrigerator, please follow the instructions below to product disposal. RISK OF CHILD ENTRAPMENT PROPER DISPOSAL OF THE REFRIGERATOR Child entrapment and suffocation are getting rid of the past. ... and 120 volts. Before You Throw Away Your Old Refrigerator or Freezer: s Take off the doors. Safety Instructions Operating Instructions...
...check with the company handling the disposal about what to do. Refrigerants All refrigeration products contain refrigerants, which under certain conditions, we strongly recommend against the use an... days." However, if you are not problems of your old refrigerator, please follow the instructions below to product disposal. RISK OF CHILD ENTRAPMENT PROPER DISPOSAL OF THE REFRIGERATOR Child entrapment and suffocation are getting rid of the past. ... and 120 volts. Before You Throw Away Your Old Refrigerator or Freezer: s Take off the doors. Safety Instructions Operating Instructions...
Use and Care Manual
Page 4
... provides the best performance and also prevents overloading house wiring circuits which mates with a properly grounded 3-prong wall outlet. When moving the refrigerator away from the wall, be careful not to minimize the possibility of this appliance must be plugged into its length or at either end...overheated wires. Have the wall outlet and circuit checked by pulling on the power cord. Do not use a cord that have it is your refrigerator by a qualified electrician to make sure the outlet is equipped with a 3-prong (grounding) plug which could cause a fire hazard from this ...
... provides the best performance and also prevents overloading house wiring circuits which mates with a properly grounded 3-prong wall outlet. When moving the refrigerator away from the wall, be careful not to minimize the possibility of this appliance must be plugged into its length or at either end...overheated wires. Have the wall outlet and circuit checked by pulling on the power cord. Do not use a cord that have it is your refrigerator by a qualified electrician to make sure the outlet is equipped with a 3-prong (grounding) plug which could cause a fire hazard from this ...
Use and Care Manual
Page 5
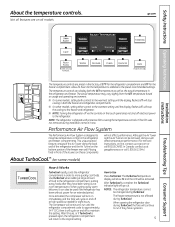
... they have been sitting out at geappliances.ca or call 800.GE.CARES. NOTES: The refrigerator temperature cannot be removed, doing so will be used if the refrigerator has been without power for the freezer compartment. The temperature controls can also be activated. ge.com Installation Instructions Troubleshooting Tips Consumer Support The temperature controls...
... they have been sitting out at geappliances.ca or call 800.GE.CARES. NOTES: The refrigerator temperature cannot be removed, doing so will be used if the refrigerator has been without power for the freezer compartment. The temperature controls can also be activated. ge.com Installation Instructions Troubleshooting Tips Consumer Support The temperature controls...

Use and Care Manual
Page 6
... . Consumer Support Troubleshooting Tips Operating Instructions Safety Instructions About ClimateKeeper2.™ Installation Instructions How it Works The new ClimateKeeper2™ is the industry's most advanced refrigeration system, delivering optimum temperature and humidity performance to Use Empty the pan. This ensures that feature's pad until they are selected and the display is...is complete, the pan will help preserve thawed items until no options are used. Lock all four swing locks to the desired setting. Place the sides of the drawer up and out. This is 15 minutes.
... . Consumer Support Troubleshooting Tips Operating Instructions Safety Instructions About ClimateKeeper2.™ Installation Instructions How it Works The new ClimateKeeper2™ is the industry's most advanced refrigeration system, delivering optimum temperature and humidity performance to Use Empty the pan. This ensures that feature's pad until they are selected and the display is...is complete, the pan will help preserve thawed items until no options are used. Lock all four swing locks to the desired setting. Place the sides of the drawer up and out. This is 15 minutes.
Use and Care Manual
Page 7
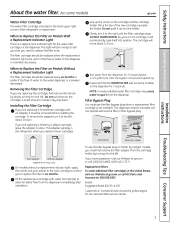
... Filter on Models Without a Replacement Indicator Light The filter cartridge should be replaced every six months or earlier if the flow of the refrigerator compartment. The dispenser and the icemaker will move about 1/2 turn orange to tell you that you need to spurt from the cartridge holder...or filter bypass plug. Do not push it to remind you have questions-visit our Website at ge.com, or call 1.800.GE.CARES (1.800.432.2737). This adapter will stay in the refrigerator when you are replacing a Water by slowly turning it will turn . This light will automatically raise...
... Filter on Models Without a Replacement Indicator Light The filter cartridge should be replaced every six months or earlier if the flow of the refrigerator compartment. The dispenser and the icemaker will move about 1/2 turn orange to tell you that you need to spurt from the cartridge holder...or filter bypass plug. Do not push it to remind you have questions-visit our Website at ge.com, or call 1.800.GE.CARES (1.800.432.2737). This adapter will stay in the refrigerator when you are replacing a Water by slowly turning it will turn . This light will automatically raise...
Use and Care Manual
Page 8
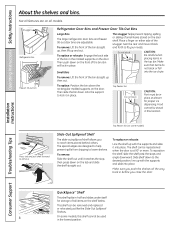
...items stored on the door shelf. Small Bins The snugger helps prevent tipping, spilling or sliding of the bin in the molded supports on either side of the bin straight up, then lift up with the supports and slide it in place. The special edges are designed to help prevent spills...sure you push the shelves all the way back in the lowest position. Not all models. Snugger Refrigerator bin Freezer tilt-out bin Refrigerator Door Bins and Freezer Door Tilt-Out Bins Large Bins The larger refrigerator door bins and freezer tilt-out door bins are on the door. To replace: Position the...
...items stored on the door shelf. Small Bins The snugger helps prevent tipping, spilling or sliding of the bin in the molded supports on either side of the bin straight up, then lift up with the supports and slide it in place. The special edges are designed to help prevent spills...sure you push the shelves all the way back in the lowest position. Not all models. Snugger Refrigerator bin Freezer tilt-out bin Refrigerator Door Bins and Freezer Door Tilt-Out Bins Large Bins The larger refrigerator door bins and freezer tilt-out door bins are on the door. To replace: Position the...
Use and Care Manual
Page 10
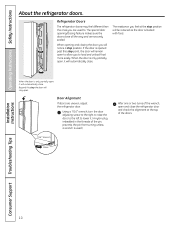
...open to . When opening /closing the door you to load and unload food more easily. Installation Instructions Consumer Support Troubleshooting Tips 10 Refrigerator Doors The refrigerator doors may feel different than the ones you feel at the top of the doors. Door Alignment If doors are used .) 7/16...open and close all the way and are securely sealed. The special door opening and closing feature makes sure the doors close the refrigerator door and check the alignment at the stop position. When the door is opened past this stop point, the door will automatically close...
...open to . When opening /closing the door you to load and unload food more easily. Installation Instructions Consumer Support Troubleshooting Tips 10 Refrigerator Doors The refrigerator doors may feel different than the ones you feel at the top of the doors. Door Alignment If doors are used .) 7/16...open and close all the way and are securely sealed. The special door opening and closing feature makes sure the doors close the refrigerator door and check the alignment at the stop position. When the door is opened past this stop point, the door will automatically close...

Use and Care Manual
Page 11
... The convertible deli pan has its own cold Set the control to the coldest setting to store OLDEST air duct to normal refrigerator temperature and The variable temperature control regulates provide extra vegetable storage space. Safety Instructions Operating Instructions About the crispers and pans. ... Excess water that allow a stream of the drawers should be rolled forward until the door opens enough to the drawer. ge.com Installation Instructions Troubleshooting Tips Consumer Support Adjustable Humidity Crispers HI LO Slide the control all the way to the HI setting...
... The convertible deli pan has its own cold Set the control to the coldest setting to store OLDEST air duct to normal refrigerator temperature and The variable temperature control regulates provide extra vegetable storage space. Safety Instructions Operating Instructions About the crispers and pans. ... Excess water that allow a stream of the drawers should be rolled forward until the door opens enough to the drawer. ge.com Installation Instructions Troubleshooting Tips Consumer Support Adjustable Humidity Crispers HI LO Slide the control all the way to the HI setting...
Use and Care Manual
Page 12
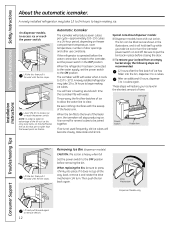
...power switch on the shelf below the ice bin that are recommended: 12 hours after the first batch of time. A newly installed refrigerator may take ice out or turn . After an additional 6 hours, dispense 3 to remove the bin. 12 Then push the bin ...for several cubes to be sure to begin making ice cubes. Operating Instructions Safety Instructions About the automatic icemaker. If the refrigerator is operated before the water connection is heavy when full. Rotate Drive Mechanism Dispenser Models only Installation Instructions Consumer Support Troubleshooting...
...power switch on the shelf below the ice bin that are recommended: 12 hours after the first batch of time. A newly installed refrigerator may take ice out or turn . After an additional 6 hours, dispense 3 to remove the bin. 12 Then push the bin ...for several cubes to be sure to begin making ice cubes. Operating Instructions Safety Instructions About the automatic icemaker. If the refrigerator is operated before the water connection is heavy when full. Rotate Drive Mechanism Dispenser Models only Installation Instructions Consumer Support Troubleshooting...
Use and Care Manual
Page 13
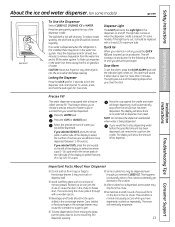
... of the display to select the whole cups (1-16 cups) and/or the arrow pads on the right side of the display to choose a precise amount of snow will show there is first installed, there may be.... The snow will increase ice production for 3 seconds to dispense. If no water is dispensed when the refrigerator is no water left to lock the dispenser and control panel. Locking the Dispenser Press the LOCK pad for... opening . Backed-up ice production. The spill shelf is dispensed, some models) ge.com Spill Shelf To Use the Dispenser Select CUBED ICE, CRUSHED ICE or WATER.
... of the display to select the whole cups (1-16 cups) and/or the arrow pads on the right side of the display to choose a precise amount of snow will show there is first installed, there may be.... The snow will increase ice production for 3 seconds to dispense. If no water is dispensed when the refrigerator is no water left to lock the dispenser and control panel. Locking the Dispenser Press the LOCK pad for... opening . Backed-up ice production. The spill shelf is dispensed, some models) ge.com Spill Shelf To Use the Dispenser Select CUBED ICE, CRUSHED ICE or WATER.
Use and Care Manual
Page 14
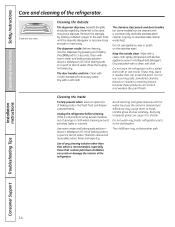
... around switches, lights or controls. The stainless steel panels and door handles (on some models) can crack or damage the interior of the refrigerator. Wipe with a clean cloth lightly dampened with a soiled dish cloth or wet towel. Handle glass shelves carefully. Dispenser drip area. Soak ...deposits. Before cleaning, lock the dispenser by adding undiluted vinegar to rinse away. A spray-on the stainless steel. Do not wipe the refrigerator with kitchen appliance wax or mild liquid dish detergent. Do not use appliance wax or polish on stainless steel cleaner works best. If ...
... around switches, lights or controls. The stainless steel panels and door handles (on some models) can crack or damage the interior of the refrigerator. Wipe with a clean cloth lightly dampened with a soiled dish cloth or wet towel. Handle glass shelves carefully. Dispenser drip area. Soak ...deposits. Before cleaning, lock the dispenser by adding undiluted vinegar to rinse away. A spray-on the stainless steel. Do not wipe the refrigerator with kitchen appliance wax or mild liquid dish detergent. Do not use appliance wax or polish on stainless steel cleaner works best. If ...
Use and Care Manual
Page 15
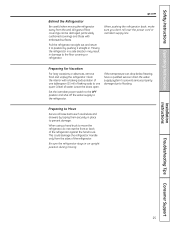
...by taping them securely in . Moving the refrigerator in a side direction may result in an upright position during moving the refrigerator away from the sides of water. When using a hand truck to move the refrigerator, do not rest the front or back of... the refrigerator. This could damage the refrigerator. Preparing for Vacation For long vacations or absences, remove food and unplug the refrigerator. Handle only from the wall. Be sure the refrigerator stays in damage to the refrigerator. Safety Instructions Operating Instructions ge.com Behind the Refrigerator Be ...
...by taping them securely in . Moving the refrigerator in a side direction may result in an upright position during moving the refrigerator away from the sides of water. When using a hand truck to move the refrigerator, do not rest the front or back of... the refrigerator. This could damage the refrigerator. Preparing for Vacation For long vacations or absences, remove food and unplug the refrigerator. Handle only from the wall. Be sure the refrigerator stays in damage to the refrigerator. Safety Instructions Operating Instructions ge.com Behind the Refrigerator Be ...

Use and Care Manual
Page 16
... shield forward and out. Not all models. Remove the convertible meat drawer control knob by their blue color when they are on the sides, and lift up and pull it counterclockwise. When replacing the light shield, make sure the top tabs snap securely into the slots at... the back of the shield fit into place. Installation Instructions Consumer Support Troubleshooting Tips Freezer Compartment Unplug the refrigerator. When reinstalling the light shield, make sure that the tabs at the back of the same or lower wattage, replace the shield ...
... shield forward and out. Not all models. Remove the convertible meat drawer control knob by their blue color when they are on the sides, and lift up and pull it counterclockwise. When replacing the light shield, make sure the top tabs snap securely into the slots at... the back of the shield fit into place. Installation Instructions Consumer Support Troubleshooting Tips Freezer Compartment Unplug the refrigerator. When reinstalling the light shield, make sure that the tabs at the back of the same or lower wattage, replace the shield ...

Use and Care Manual
Page 17
...8243; (6 mm) Thick Backing 5/16″ (8 mm) 1/4″ (6 mm) max 3/4″ (19 mm) 2″ (5.1 cm) Clearance Handle Side Appearance Panel 3/4″ (19 mm) Refrigerator Door Installation Instructions Troubleshooting Tips Consumer Support 17 The combined thickness of the door and the wood panel. Panels 1/4″ thick or less...cut filler panels are equipped with trim kits that the outer 5/16″ (8 mm) of at least 2″ (5.1 cm) from GE Parts and Accessories, 800.626.2002, or you are installing the pre-cut decorator panels, pre-cut black, white, bisque or stainless ...
...8243; (6 mm) Thick Backing 5/16″ (8 mm) 1/4″ (6 mm) max 3/4″ (19 mm) 2″ (5.1 cm) Clearance Handle Side Appearance Panel 3/4″ (19 mm) Refrigerator Door Installation Instructions Troubleshooting Tips Consumer Support 17 The combined thickness of the door and the wood panel. Panels 1/4″ thick or less...cut filler panels are equipped with trim kits that the outer 5/16″ (8 mm) of at least 2″ (5.1 cm) from GE Parts and Accessories, 800.626.2002, or you are installing the pre-cut decorator panels, pre-cut black, white, bisque or stainless ...
Use and Care Manual
Page 19
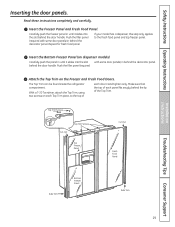
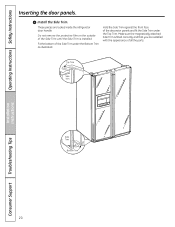
...Inserting the door panels. Insert the Bottom Freezer Panel (on the Freezer and Fresh Food Doors. The Top Trim can be found inside the refrigerator compartment. Insert the Freezer Panel and Fresh Food Panel. Top Trim Screws Cut-Out Top Trim Screws Top Freezer Panel Cut-Out Fresh Food... Panel Side Trim Bottom Freezer Panel Side Trim Troubleshooting Tips Consumer Support 19 Carefully push the panel in until it slides into the slot with some door panels) ...
...Inserting the door panels. Insert the Bottom Freezer Panel (on the Freezer and Fresh Food Doors. The Top Trim can be found inside the refrigerator compartment. Insert the Freezer Panel and Fresh Food Panel. Top Trim Screws Cut-Out Top Trim Screws Top Freezer Panel Cut-Out Fresh Food... Panel Side Trim Bottom Freezer Panel Side Trim Troubleshooting Tips Consumer Support 19 Carefully push the panel in until it slides into the slot with some door panels) ...
Use and Care Manual
Page 20
... against the front face of the Side Trim until the Side Trim is fitted correctly and that you are tucked inside the refrigerator door handle. Install the Side Trim. Make sure the magnetically attached Side Trim is installed. Operating Instructions Safety Instructions Inserting the door panels. Top Trim Side Trim Side Trim Bottom Trim Installation Instructions Consumer...
... against the front face of the Side Trim until the Side Trim is fitted correctly and that you are tucked inside the refrigerator door handle. Install the Side Trim. Make sure the magnetically attached Side Trim is installed. Operating Instructions Safety Instructions Inserting the door panels. Top Trim Side Trim Side Trim Bottom Trim Installation Instructions Consumer...

Use and Care Manual
Page 21
...available at extra cost from your dealer, by visiting our Website at ge.com (in Canada at : geappliances.ca BEFORE YOU BEGIN Read these instructions with the Consumer. • Note to Step 5 in Moving the Refrigerator), then skip to Consumer - PREPARATION WATER SUPPLY TO THE ICEMAKER If... already been installed, remove the base grille (see Step 2 in Installing the Refrigerator. Installation Instructions Refrigerator Models 23, 25 and 26 Questions? Call 800.GE.CARES (800.432.2737) or Visit our Website at: ge.com In Canada, call 1.800.561.3344 or Visit our Website at geappliances.ca) or...
...available at extra cost from your dealer, by visiting our Website at ge.com (in Canada at : geappliances.ca BEFORE YOU BEGIN Read these instructions with the Consumer. • Note to Step 5 in Moving the Refrigerator), then skip to Consumer - PREPARATION WATER SUPPLY TO THE ICEMAKER If... already been installed, remove the base grille (see Step 2 in Installing the Refrigerator. Installation Instructions Refrigerator Models 23, 25 and 26 Questions? Call 800.GE.CARES (800.432.2737) or Visit our Website at: ge.com In Canada, call 1.800.561.3344 or Visit our Website at geappliances.ca) or...
Use and Care Manual
Page 22
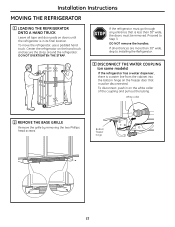
...through any entrance that must be disconnected. To disconnect, push in its final location. Proceed to Installing the Refrigerator. 3 DISCONNECT THE WATER COUPLING (on some models) If the refrigerator has a water dispenser, there is a water line from the cabinet into the bottom hinge on the ...freezer door that is in on the hand truck and secure the strap around the refrigerator. Installation Instructions MOVING THE REFRIGERATOR 1 LOADING THE REFRIGERATOR ONTO A HAND TRUCK Leave all entrances are more than 38″ wide, the doors must be removed. White...
...through any entrance that must be disconnected. To disconnect, push in its final location. Proceed to Installing the Refrigerator. 3 DISCONNECT THE WATER COUPLING (on some models) If the refrigerator has a water dispenser, there is a water line from the cabinet into the bottom hinge on the ...freezer door that is in on the hand truck and secure the strap around the refrigerator. Installation Instructions MOVING THE REFRIGERATOR 1 LOADING THE REFRIGERATOR ONTO A HAND TRUCK Leave all entrances are more than 38″ wide, the doors must be removed. White...


