
Use and Care Manual
Page 1
Profile Side by Side Refrigerators ge.com Safety Instructions 2-4 Operating Instructions Automatic Icemaker 12 Care and Cleaning 14, 15 ClimateKeeper2 6 Crispers and Pans 11 CustomCool 6 Ice and Water Dispenser 13 Refrigerator Doors 10 Replacing the Light Bulbs 16 Shelves and Bins 8, 9 Temperature Controls 5 TurboCool 5 Water Filter 7 Installation Instructions Installing the Refrigerator 26-29 Moving the Refrigerator 22-25 Preparing to Install the Refrigerator 21 Trim Kits and Panels 17-20 Water Line Installation 30-32 Troubleshooting Tips . . . . . .33-36 Normal Operating ...
Profile Side by Side Refrigerators ge.com Safety Instructions 2-4 Operating Instructions Automatic Icemaker 12 Care and Cleaning 14, 15 ClimateKeeper2 6 Crispers and Pans 11 CustomCool 6 Ice and Water Dispenser 13 Refrigerator Doors 10 Replacing the Light Bulbs 16 Shelves and Bins 8, 9 Temperature Controls 5 TurboCool 5 Water Filter 7 Installation Instructions Installing the Refrigerator 26-29 Moving the Refrigerator 22-25 Preparing to Install the Refrigerator 21 Trim Kits and Panels 17-20 Water Line Installation 30-32 Troubleshooting Tips . . . . . .33-36 Normal Operating ...
Use and Care Manual
Page 5
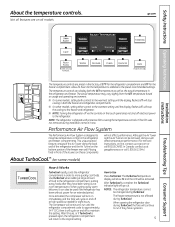
... the refrigerator and freezer. Once activated, the compressor will turn on -line, contact us at geappliances.ca or call 800.GE.CARES. If this setting. The compressor will continue to run if they have cycled on these components will be used if the refrigerator has been without power for the temperature to stabilize to the original setting. ge.com Installation Instructions Troubleshooting Tips Consumer Support The temperature controls are on and off electrical power...
... the refrigerator and freezer. Once activated, the compressor will turn on -line, contact us at geappliances.ca or call 800.GE.CARES. If this setting. The compressor will continue to run if they have cycled on these components will be used if the refrigerator has been without power for the temperature to stabilize to the original setting. ge.com Installation Instructions Troubleshooting Tips Consumer Support The temperature controls are on and off electrical power...

Use and Care Manual
Page 6
... plastic wrap when using ExpressThaw. Tap the pad until no options are significantly higher than in the freezer evaporator, thereby reducing freezer burn. *Testing shows a higher level of ice. The default is the industry's most advanced refrigeration system, delivering optimum temperature and humidity performance to the desired setting. s The displayed actual temperature of the drawer into that feature's pad until the light appears next...
... plastic wrap when using ExpressThaw. Tap the pad until no options are significantly higher than in the freezer evaporator, thereby reducing freezer burn. *Testing shows a higher level of ice. The default is the industry's most advanced refrigeration system, delivering optimum temperature and humidity performance to the desired setting. s The displayed actual temperature of the drawer into that feature's pad until the light appears next...
Use and Care Manual
Page 7
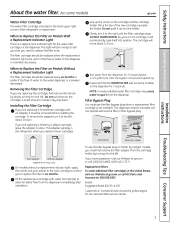
... 1/2 turn the cartridge, it up into position. If you have questions-visit our Website at ge.com, or call 1.800.GE.CARES (1.800.432.2737). If you are replacing the cartridge, first remove the old one by Culligan cartridge, leave the adapter in the back upper right corner of water to replace the filter soon. Troubleshooting Tips Consumer Support 7 Safety Instructions Operating Instructions Installation Instructions About the water filter. (on some models...
... 1/2 turn the cartridge, it up into position. If you have questions-visit our Website at ge.com, or call 1.800.GE.CARES (1.800.432.2737). If you are replacing the cartridge, first remove the old one by Culligan cartridge, leave the adapter in the back upper right corner of water to replace the filter soon. Troubleshooting Tips Consumer Support 7 Safety Instructions Operating Instructions Installation Instructions About the water filter. (on some models...

Use and Care Manual
Page 11
ge.com Installation Instructions Troubleshooting Tips Consumer Support Adjustable Humidity Crispers HI LO Slide the control all the way to the HI setting Slide the control all the way to the LO to provide high humidity recommended for most vegetables. Set the control to cold to convert the pan to the pan. Variable settings Tower. Fruit and Vegetable Crispers Excess water that allow a stream of the drawers should be removed by...
ge.com Installation Instructions Troubleshooting Tips Consumer Support Adjustable Humidity Crispers HI LO Slide the control all the way to the HI setting Slide the control all the way to the LO to provide high humidity recommended for most vegetables. Set the control to cold to convert the pan to the pan. Variable settings Tower. Fruit and Vegetable Crispers Excess water that allow a stream of the drawers should be removed by...
Use and Care Manual
Page 12
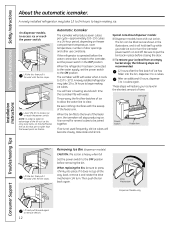
... water line to the level of time. When the bin fills to clear. s To restore your ice level in place before closing the door. If the refrigerator is operated before removing the bin. Rotate Drive Mechanism Dispenser Models only Installation Instructions Consumer Support Troubleshooting Tips Lift and pull forward again to the ON position. It is made to the icemaker, set the power switch to remove the bin. 12 Operating Instructions Safety Instructions About the automatic icemaker...
... water line to the level of time. When the bin fills to clear. s To restore your ice level in place before closing the door. If the refrigerator is operated before removing the bin. Rotate Drive Mechanism Dispenser Models only Installation Instructions Consumer Support Troubleshooting Tips Lift and pull forward again to the ON position. It is made to the icemaker, set the power switch to remove the bin. 12 Operating Instructions Safety Instructions About the automatic icemaker...
Use and Care Manual
Page 13
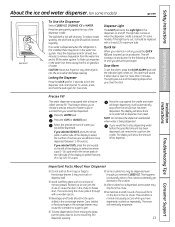
... this light burns out, it through with ice and use of water you selected CUBED ICE. If you would like to fill the water system. s Some crushed ice may drip from the water line and to have dispensed crushed ice repeatedly. Door Alarm To set has been dispensed. Installation Instructions Precise Fill This water dispenser is being dispensed. On some models) ge.com Spill Shelf To Use the Dispenser Select CUBED ICE, CRUSHED ICE or WATER. The display will increase ice...
... this light burns out, it through with ice and use of water you selected CUBED ICE. If you would like to fill the water system. s Some crushed ice may drip from the water line and to have dispensed crushed ice repeatedly. Door Alarm To set has been dispensed. Installation Instructions Precise Fill This water dispenser is being dispensed. On some models) ge.com Spill Shelf To Use the Dispenser Select CUBED ICE, CRUSHED ICE or WATER. The display will increase ice...

Use and Care Manual
Page 16
Reveal® appliance bulbs are on the dispenser under the control panel. The bulbs are not illuminated. Plug the refrigerator back in . Plug the refrigerator back in . Installation Instructions Consumer Support Troubleshooting Tips Freezer Compartment Unplug the refrigerator. Replace the screw (on some models). The bulb is located on all features are used on some models. Not all models. On some models). When replacing the light shield, make sure the top tabs snap securely into the slots...
Reveal® appliance bulbs are on the dispenser under the control panel. The bulbs are not illuminated. Plug the refrigerator back in . Plug the refrigerator back in . Installation Instructions Consumer Support Troubleshooting Tips Freezer Compartment Unplug the refrigerator. Replace the screw (on some models). The bulb is located on all features are used on some models. Not all models. On some models). When replacing the light shield, make sure the top tabs snap securely into the slots...

Use and Care Manual
Page 21
... Step 5 in Moving the Refrigerator), then skip to Installer - If the refrigerator has already been installed, remove the base grille (see Step 2 in Installing the Refrigerator. A GE water supply kit (containing tubing, shutoff valve, fittings and instructions) is available at extra cost from Parts and Accessories, 800.626.2002 (in Canada at : geappliances.ca BEFORE YOU BEGIN Read these instructions for local inspector's use. • IMPORTANT - TOOLS...
... Step 5 in Moving the Refrigerator), then skip to Installer - If the refrigerator has already been installed, remove the base grille (see Step 2 in Installing the Refrigerator. A GE water supply kit (containing tubing, shutoff valve, fittings and instructions) is available at extra cost from Parts and Accessories, 800.626.2002 (in Canada at : geappliances.ca BEFORE YOU BEGIN Read these instructions for local inspector's use. • IMPORTANT - TOOLS...
Use and Care Manual
Page 26
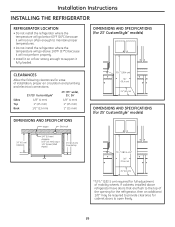
...;F (16°C) because it will not run often enough to maintain proper temperatures. • Do not install the refrigerator where the temperature will not perform properly. • Install it fully loaded. DIMENSIONS AND SPECIFICATIONS (for 23' CustomStyle™ models) CLEARANCES Allow the following clearances for ease of installation, proper air circulation and plumbing and electrical connections: Sides Top Back 23'/25' CustomStyle™ 1/8″...
...;F (16°C) because it will not run often enough to maintain proper temperatures. • Do not install the refrigerator where the temperature will not perform properly. • Install it fully loaded. DIMENSIONS AND SPECIFICATIONS (for 23' CustomStyle™ models) CLEARANCES Allow the following clearances for ease of installation, proper air circulation and plumbing and electrical connections: Sides Top Back 23'/25' CustomStyle™ 1/8″...

Use and Care Manual
Page 27
... nut until it is hand tight. Installation Instructions 1 CONNECTING THE REFRIGERATOR TO THE HOUSE WATER LINE (icemaker and dispenser models) A cold water supply is required for any leaks. 3 PLUG IN THE REFRIGERATOR Before plugging in the refrigerator, make sure the icemaker power switch is set to the OFF position. If using GE SmartConnect™ tubing, insert the molded end of the refrigerator's water valve. Overtightening may need to connect the filter. B If you will need an additional tube (WX08X10002) to provide one. Then...
... nut until it is hand tight. Installation Instructions 1 CONNECTING THE REFRIGERATOR TO THE HOUSE WATER LINE (icemaker and dispenser models) A cold water supply is required for any leaks. 3 PLUG IN THE REFRIGERATOR Before plugging in the refrigerator, make sure the icemaker power switch is set to the OFF position. If using GE SmartConnect™ tubing, insert the molded end of the refrigerator's water valve. Overtightening may need to connect the filter. B If you will need an additional tube (WX08X10002) to provide one. Then...

Use and Care Manual
Page 30
... where temperatures fall below freezing. Call a qualified plumber to correct water hammer before connecting the water line, make sure the icemaker power switch is from the water valve on the amount of tubing you select allows at least 8′ (2.4 m) as a power drill) during installation, be sure both ends of the tubing are cut square. WX08X10002 - WX08X10006 - WX08X10015 - When connecting your refrigerator before installing the water supply line to the refrigerator. Follow these instructions carefully to...
... where temperatures fall below freezing. Call a qualified plumber to correct water hammer before connecting the water line, make sure the icemaker power switch is from the water valve on the amount of tubing you select allows at least 8′ (2.4 m) as a power drill) during installation, be sure both ends of the tubing are cut square. WX08X10002 - WX08X10006 - WX08X10015 - When connecting your refrigerator before installing the water supply line to the refrigerator. Follow these instructions carefully to...

Use and Care Manual
Page 32
... clamp. Overtightening may crush the tubing. Installation Instructions INSTALLING THE WATER LINE (CONT.) 4 FASTEN THE SHUTOFF VALVE Fasten the shutoff valve to the cold water pipe with a wrench. Pipe Clamp Saddle-Type Shutoff Valve Vertical Cold Water Pipe NOTE: Commonwealth of the refrigerator, go back to swell. Make sure the tubing is not permitted in Massachusetts. To complete the installation of Massachusetts Plumbing Codes 248CMR shall be adhered to...
... clamp. Overtightening may crush the tubing. Installation Instructions INSTALLING THE WATER LINE (CONT.) 4 FASTEN THE SHUTOFF VALVE Fasten the shutoff valve to the cold water pipe with a wrench. Pipe Clamp Saddle-Type Shutoff Valve Vertical Cold Water Pipe NOTE: Commonwealth of the refrigerator, go back to swell. Make sure the tubing is not permitted in Massachusetts. To complete the installation of Massachusetts Plumbing Codes 248CMR shall be adhered to...
Use and Care Manual
Page 33
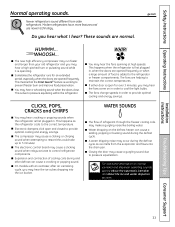
...? s A water dripping noise may occur during the defrost cycle. s Closing the door may hear the fans come on in , when the doors are normal. Modern refrigerators have more features and use newer technology. s If either door is open and closed to the correct temperature. s The electronic control board may hear cracking or popping sounds when the refrigerator is first plugged in order to 5 minutes). Installation Instructions Troubleshooting Tips...
...? s A water dripping noise may occur during the defrost cycle. s Closing the door may hear the fans come on in , when the doors are normal. Modern refrigerators have more features and use newer technology. s If either door is open and closed to the correct temperature. s The electronic control board may hear cracking or popping sounds when the refrigerator is first plugged in order to 5 minutes). Installation Instructions Troubleshooting Tips...
Use and Care Manual
Page 34
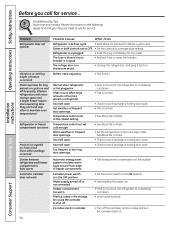
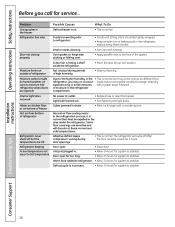
... setting. Ice cubes stuck in defrost cycle. • Wait about 30 minutes for the refrigerator to maintain even temperatures.) Refrigerator or freezer compartment too warm Frost or ice crystals on and off the icemaker, remove cubes and turn the icemaker back on the following pages first and you call for service. Temperature controls set to OFF. • Set the controls to end. Troubleshooting Tips Save time and money! Installation Instructions Problem Refrigerator does not operate...
... setting. Ice cubes stuck in defrost cycle. • Wait about 30 minutes for the refrigerator to maintain even temperatures.) Refrigerator or freezer compartment too warm Frost or ice crystals on and off the icemaker, remove cubes and turn the icemaker back on the following pages first and you call for service. Temperature controls set to OFF. • Set the controls to end. Troubleshooting Tips Save time and money! Installation Instructions Problem Refrigerator does not operate...
Use and Care Manual
Page 35
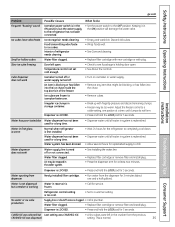
... Instructions Operating Instructions ge.com Installation Instructions Problem Possible Causes What To Do Frequent "buzzing" sound Icemaker power switch is in the ON position, but icemaker is working Water in reservoir is frozen. • Call for service. Slow ice cube freezing Door left in system is blocking or has fallen into the chute. Adjust the freezer control to chill. Water dispenser does not work Icemaker turned off or water supply turned off or not connected. • See Installing the water line. Water spurting from dispenser Newly-installed filter cartridge...
... Instructions Operating Instructions ge.com Installation Instructions Problem Possible Causes What To Do Frequent "buzzing" sound Icemaker power switch is in the ON position, but icemaker is working Water in reservoir is frozen. • Call for service. Slow ice cube freezing Door left in system is blocking or has fallen into the chute. Adjust the freezer control to chill. Water dispenser does not work Icemaker turned off or water supply turned off or not connected. • See Installing the water line. Water spurting from dispenser Newly-installed filter cartridge...
Use and Care Manual
Page 36
... the door bin up one position. Water on kitchen floor or on occasion loads and environmental conditions change. Some floor coverings are sensitive and will cycle off but the temperatures are opened) Due to the face of the gasket. Warm food added to refrigerator. • Allow 24 hours for system to Set temperature Door open . • Close door. Interior needs cleaning. • See Care and cleaning. Light bulb burned out. • Replace fuse or reset...
... the door bin up one position. Water on kitchen floor or on occasion loads and environmental conditions change. Some floor coverings are sensitive and will cycle off but the temperatures are opened) Due to the face of the gasket. Warm food added to refrigerator. • Allow 24 hours for system to Set temperature Door open . • Close door. Interior needs cleaning. • See Care and cleaning. Light bulb burned out. • Replace fuse or reset...
Use and Care Manual
Page 39
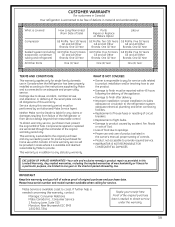
...; WARRANTOR IS NOT RESPONSIBLE FOR CONSEQUENTIAL DAMAGES. Please have serial number and model number available when calling for home use in the owner's manual, proper setting of the original purchase date is needed concerning this Limited Warranty. Mabe Service is product repair as listed in Canada when the Refrigerator has been properly installed according to the instructions supplied by Mabe and is responsible to pay for single...
...; WARRANTOR IS NOT RESPONSIBLE FOR CONSEQUENTIAL DAMAGES. Please have serial number and model number available when calling for home use in the owner's manual, proper setting of the original purchase date is needed concerning this Limited Warranty. Mabe Service is product repair as listed in Canada when the Refrigerator has been properly installed according to the instructions supplied by Mabe and is responsible to pay for single...
Use and Care Manual
Page 40
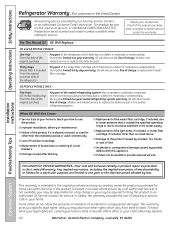
... date of the refrigerator Any part of charge, a replacement water filter cartridge. During this limited thirty-day warranty, GE will also provide, free of the water filter cartridge which fails due to a defect in materials or workmanship. s Improper installation, delivery or maintenance. s Product not accessible to spoilage. Installation Instructions Consumer Support Troubleshooting Tips This warranty is product repair as noted above. Louisville, KY 40225 GE PROFILE MODELS ONLY: Five Years (GE Profile models only) From...
... date of the refrigerator Any part of charge, a replacement water filter cartridge. During this limited thirty-day warranty, GE will also provide, free of the water filter cartridge which fails due to a defect in materials or workmanship. s Improper installation, delivery or maintenance. s Product not accessible to spoilage. Installation Instructions Consumer Support Troubleshooting Tips This warranty is product repair as noted above. Louisville, KY 40225 GE PROFILE MODELS ONLY: Five Years (GE Profile models only) From...
Use and Care Manual
Page 41
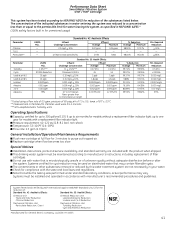
... mg/L 0.07 mg/L 99% * Tested using a flow rate of 20° ± 2.5°C ** Measurement in Particles/ml. temp. Particles used on disinfected water that may contain filterable cysts. up to six months for models with a replacement filter indicator light Pressure requirement: 40-120 psi (2.8-8.2 bar), non-shock Temperature: 33-100ºF (0.6-38ºC) Flow rate: 0.5 gpm (1.9 lpm) General Installation/Operation/Maintenance Requirements Flush new cartridge at least 10,000...
... mg/L 0.07 mg/L 99% * Tested using a flow rate of 20° ± 2.5°C ** Measurement in Particles/ml. temp. Particles used on disinfected water that may contain filterable cysts. up to six months for models with a replacement filter indicator light Pressure requirement: 40-120 psi (2.8-8.2 bar), non-shock Temperature: 33-100ºF (0.6-38ºC) Flow rate: 0.5 gpm (1.9 lpm) General Installation/Operation/Maintenance Requirements Flush new cartridge at least 10,000...


