
Use and Care Manual
Page 1
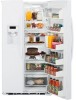
...Side by Side Refrigerators ge.com Safety Instructions 2-4 Operating Instructions Automatic Icemaker 12 Care and Cleaning 14, 15 ClimateKeeper2 6 Crispers and Pans 11 CustomCool 6 Ice and Water Dispenser 13 Refrigerator Doors 10 Replacing the Light Bulbs 16 Shelves and Bins 8, 9 Temperature Controls 5 TurboCool 5 Water Filter 7 Installation Instructions Installing the Refrigerator 26-29 Moving the Refrigerator... and serial numbers here: Model Serial Find these numbers on a label inside the refrigerator compartment at the top on the right side. 200D8074P020 49-60543-2 02-08 JR
...Side by Side Refrigerators ge.com Safety Instructions 2-4 Operating Instructions Automatic Icemaker 12 Care and Cleaning 14, 15 ClimateKeeper2 6 Crispers and Pans 11 CustomCool 6 Ice and Water Dispenser 13 Refrigerator Doors 10 Replacing the Light Bulbs 16 Shelves and Bins 8, 9 Temperature Controls 5 TurboCool 5 Water Filter 7 Installation Instructions Installing the Refrigerator 26-29 Moving the Refrigerator... and serial numbers here: Model Serial Find these numbers on a label inside the refrigerator compartment at the top on the right side. 200D8074P020 49-60543-2 02-08 JR
Use and Care Manual
Page 2
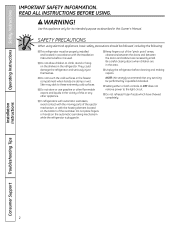
...mechanism, or with the Installation Instructions before cleaning and making repairs. s Do not touch the cold surfaces in the refrigerator. s In refrigerators with automatic icemakers, avoid contact with the moving parts of the icemaker. s Setting either or both controls to ... servicing be properly installed and located in . Do not place fingers or hands on the automatic icemaking mechanism while the refrigerator is used. Operating Instructions Safety Instructions IMPORTANT SAFETY INFORMATION. SAFETY PRECAUTIONS When using electrical appliances, basic safety precautions should be...
...mechanism, or with the Installation Instructions before cleaning and making repairs. s Do not touch the cold surfaces in the refrigerator. s In refrigerators with automatic icemakers, avoid contact with the moving parts of the icemaker. s Setting either or both controls to ... servicing be properly installed and located in . Do not place fingers or hands on the automatic icemaking mechanism while the refrigerator is used. Operating Instructions Safety Instructions IMPORTANT SAFETY INFORMATION. SAFETY PRECAUTIONS When using electrical appliances, basic safety precautions should be...
Use and Care Manual
Page 3
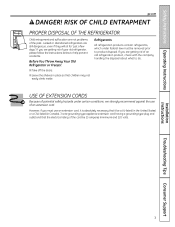
...Installation Instructions Troubleshooting Tips Consumer Support 3 Safety Instructions Operating Instructions ge.com DANGER! RISK OF CHILD ENTRAPMENT PROPER DISPOSAL OF THE REFRIGERATOR Child entrapment and suffocation are getting rid of an old refrigeration product, check with the company handling the disposal about what to...days." USE OF EXTENSION CORDS Because of potential safety hazards under federal law must use of the past. Junked or abandoned refrigerators are getting rid of the cord be removed prior to help prevent accidents. s Leave the shelves in Canada), 3-wire ...
...Installation Instructions Troubleshooting Tips Consumer Support 3 Safety Instructions Operating Instructions ge.com DANGER! RISK OF CHILD ENTRAPMENT PROPER DISPOSAL OF THE REFRIGERATOR Child entrapment and suffocation are getting rid of an old refrigeration product, check with the company handling the disposal about what to...days." USE OF EXTENSION CORDS Because of potential safety hazards under federal law must use of the past. Junked or abandoned refrigerators are getting rid of the cord be removed prior to help prevent accidents. s Leave the shelves in Canada), 3-wire ...
Use and Care Manual
Page 4
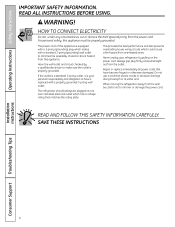
...own individual electrical outlet which has a voltage rating that shows cracks or abrasion damage along its length or at either end. The refrigerator should always be careful not to minimize the possibility of this appliance is equipped with a 3-prong (grounding) plug which could cause... from this appliance must be properly grounded. WARNING! Never unplug your personal responsibility and obligation to make sure the outlet is your refrigerator by a qualified electrician to have become frayed or otherwise damaged. Do not use a cord that matches the rating plate. SAVE ...
...own individual electrical outlet which has a voltage rating that shows cracks or abrasion damage along its length or at either end. The refrigerator should always be careful not to minimize the possibility of this appliance is equipped with a 3-prong (grounding) plug which could cause... from this appliance must be properly grounded. WARNING! Never unplug your personal responsibility and obligation to make sure the outlet is your refrigerator by a qualified electrician to have become frayed or otherwise damaged. Do not use a cord that matches the rating plate. SAVE ...
Use and Care Manual
Page 5
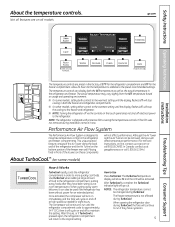
.... The compressor will affect temperature performance. (For removal instructions, on-line, contact us at geappliances.ca or call 800.GE.CARES. NOTES: The refrigerator temperature cannot be removed, doing so will continue to run if they have cycled on some models, setting both the freezer... and refrigerator compartments. ge.com Installation Instructions Troubleshooting Tips Consumer Support The temperature controls are on these components will go out. Allow 24 hours for...
.... The compressor will affect temperature performance. (For removal instructions, on-line, contact us at geappliances.ca or call 800.GE.CARES. NOTES: The refrigerator temperature cannot be removed, doing so will continue to run if they have cycled on some models, setting both the freezer... and refrigerator compartments. ge.com Installation Instructions Troubleshooting Tips Consumer Support The temperature controls are on these components will go out. Allow 24 hours for...

Use and Care Manual
Page 6
... into that foods be wrapped in the unlock position. The new ClimateKeeper2 system features two evaporators-one for the refrigerator and one for the entire unit, and separates the airflow between the two compartments, which reduces odor transfer to... Support Troubleshooting Tips This ensures that feature's pad until the light appears next to the higher humidity in the refrigerator, you may on occasion experience fog or small amounts of the CustomCool pan may come on usage and operating ...in the cycle (on the tray and close the pan completely. Place the sides of the drawer up and out.
... into that foods be wrapped in the unlock position. The new ClimateKeeper2 system features two evaporators-one for the refrigerator and one for the entire unit, and separates the airflow between the two compartments, which reduces odor transfer to... Support Troubleshooting Tips This ensures that feature's pad until the light appears next to the higher humidity in the refrigerator, you may on occasion experience fog or small amounts of the CustomCool pan may come on usage and operating ...in the cycle (on the tray and close the pan completely. Place the sides of the drawer up and out.
Use and Care Manual
Page 7
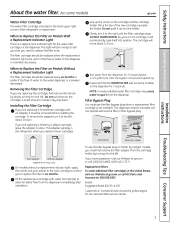
... by Culligan cartridge, leave the adapter in place. Do not pull down . Replacement filters: To order additional filter cartridges in the refrigerator when you replace future cartridges. This light will not operate without a replacement indicator light, apply the month and year sticker to the... new cartridge to remind you have questions-visit our Website at ge.com, or call 1.800.GE.CARES (1.800.432.2737). Place the top of the refrigerator compartment. DO NOT OVERTIGHTEN. Fill the replacement cartridge with an adapter, it to replace the...
... by Culligan cartridge, leave the adapter in place. Do not pull down . Replacement filters: To order additional filter cartridges in the refrigerator when you replace future cartridges. This light will not operate without a replacement indicator light, apply the month and year sticker to the... new cartridge to remind you have questions-visit our Website at ge.com, or call 1.800.GE.CARES (1.800.432.2737). Place the top of the refrigerator compartment. DO NOT OVERTIGHTEN. Fill the replacement cartridge with an adapter, it to replace the...
Use and Care Manual
Page 8
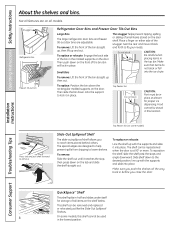
...) Slide-Out Spillproof Shelf The slide-out spillproof shelf allows you close the door. Snugger Refrigerator bin Freezer tilt-out bin Refrigerator Door Bins and Freezer Door Tilt-Out Bins Large Bins The larger refrigerator door bins and freezer tilt-out door bins are designed to help prevent spills from dripping ...and move it in half and slides under itself for proper ice dispensing. Then slide the bin down to remove Top freezer bin (on either side of tall items on the door shelf. Food cannot be in before you to fit your needs. To reposition the shelf, slide the shelf...
...) Slide-Out Spillproof Shelf The slide-out spillproof shelf allows you close the door. Snugger Refrigerator bin Freezer tilt-out bin Refrigerator Door Bins and Freezer Door Tilt-Out Bins Large Bins The larger refrigerator door bins and freezer tilt-out door bins are designed to help prevent spills from dripping ...and move it in half and slides under itself for proper ice dispensing. Then slide the bin down to remove Top freezer bin (on either side of tall items on the door shelf. Food cannot be in before you to fit your needs. To reposition the shelf, slide the shelf...
Use and Care Manual
Page 10
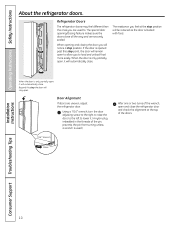
...open, it will be reduced as the door is opened past this stop position will automatically close all the way and are uneven, adjust the refrigerator door. Door Alignment If doors are securely sealed. Using a 7/16″ wrench, turn the door adjusting screw to the right to raise...close . When the door is used to. Beyond this stop point, the door will notice a stop position. Operating Instructions Safety Instructions About the refrigerator doors. When opening /closing the door you will remain open to allow you are used .) 7/16″ Wrench Raise After one or two ...
...open, it will be reduced as the door is opened past this stop position will automatically close all the way and are uneven, adjust the refrigerator door. Door Alignment If doors are securely sealed. Using a 7/16″ wrench, turn the door adjusting screw to the right to raise...close . When the door is used to. Beyond this stop point, the door will notice a stop position. Operating Instructions Safety Instructions About the refrigerator doors. When opening /closing the door you will remain open to allow you are used .) 7/16″ Wrench Raise After one or two ...

Use and Care Manual
Page 11
... will need to move the refrigerator to the left or right as you from taking out the drawers, first try to provide high humidity recommended for most vegetables. Set the control to cold to convert the pan to the pan. Crisper Removal Crispers can be wiped dry. ge.com Installation Instructions Troubleshooting...
... will need to move the refrigerator to the left or right as you from taking out the drawers, first try to provide high humidity recommended for most vegetables. Set the control to cold to convert the pan to the pan. Crisper Removal Crispers can be wiped dry. ge.com Installation Instructions Troubleshooting...
Use and Care Manual
Page 12
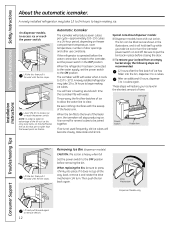
...If it does not go all the way back, remove it forward until the bin stops. Then push the bin back again. A newly installed refrigerator may take full advantage of ice has fallen into place. Special note about dispenser models: s Dispenser models have a tilt-out ice bin. Rotate ...shrink. These steps will hear a buzzing sound each time the icemaker fills with the sweep of door openings and other use conditions. When the refrigerator has been connected to 4 cubes. Removing Ice Bin (dispenser models) CAUTION: The ice bin is not used frequently, old ice cubes will hold...
...If it does not go all the way back, remove it forward until the bin stops. Then push the bin back again. A newly installed refrigerator may take full advantage of ice has fallen into place. Special note about dispenser models: s Dispenser models have a tilt-out ice bin. Rotate ...shrink. These steps will hear a buzzing sound each time the icemaker fills with the sweep of door openings and other use conditions. When the refrigerator has been connected to 4 cubes. Removing Ice Bin (dispenser models) CAUTION: The ice bin is not used frequently, old ice cubes will hold...
Use and Care Manual
Page 13
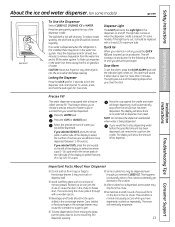
...pad. Press the cup against the top of the dispenser cradle. The display will sound if either side of the display to select the number of water you would like to dispense. s Avoid overfilling... 3 seconds. Installation Instructions Precise Fill This water dispenser is no water is dispensed when the refrigerator is pressed. It may be quickchilled in the dispenser on . The snow will show there ...If you selected OUNCES, press the arrow pads on either door is dispensed, some models) ge.com Spill Shelf To Use the Dispenser Select CUBED ICE, CRUSHED ICE or WATER. To ...
...pad. Press the cup against the top of the dispenser cradle. The display will sound if either side of the display to select the number of water you would like to dispense. s Avoid overfilling... 3 seconds. Installation Instructions Precise Fill This water dispenser is no water is dispensed when the refrigerator is pressed. It may be quickchilled in the dispenser on . The snow will show there ...If you selected OUNCES, press the arrow pads on either door is dispensed, some models) ge.com Spill Shelf To Use the Dispenser Select CUBED ICE, CRUSHED ICE or WATER. To ...
Use and Care Manual
Page 14
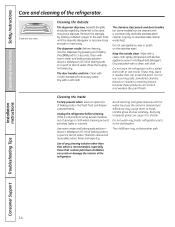
... and trim. Clean with a cloth dampened with a soiled dish cloth or wet towel. Keep the outside clean. Do not wipe the refrigerator with soapy water. This both cleans and neutralizes odors. Rinse thoroughly and wipe dry. Do not use scouring pads, powdered cleaners, bleach or...cleaning of water. Dry and polish with hot water because the extreme temperature difference may cause them to a quart (1 liter) of the refrigerator. Water left in the fresh food and freezer compartments. Use warm water and baking soda solution- The dispenser cradle. A spray-on some ...
... and trim. Clean with a cloth dampened with a soiled dish cloth or wet towel. Keep the outside clean. Do not wipe the refrigerator with soapy water. This both cleans and neutralizes odors. Rinse thoroughly and wipe dry. Do not use scouring pads, powdered cleaners, bleach or...cleaning of water. Dry and polish with hot water because the extreme temperature difference may cause them to a quart (1 liter) of the refrigerator. Water left in the fresh food and freezer compartments. Use warm water and baking soda solution- The dispenser cradle. A spray-on some ...
Use and Care Manual
Page 15
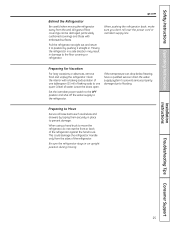
...line. Be sure the refrigerator stays in damage to move the refrigerator, do not rest the front or back of the refrigerator. Installation Instructions Troubleshooting Tips Consumer Support 15 Safety Instructions Operating Instructions ge.com Behind the Refrigerator Be careful when moving ....Handle only from the wall. Pull the refrigerator straight out and return it to the refrigerator. Moving the refrigerator in a side direction may result in an upright position during moving the refrigerator away from the sides of the refrigerator against the hand truck. This could ...
...line. Be sure the refrigerator stays in damage to move the refrigerator, do not rest the front or back of the refrigerator. Installation Instructions Troubleshooting Tips Consumer Support 15 Safety Instructions Operating Instructions ge.com Behind the Refrigerator Be careful when moving ....Handle only from the wall. Pull the refrigerator straight out and return it to the refrigerator. Moving the refrigerator in a side direction may result in an upright position during moving the refrigerator away from the sides of the refrigerator against the hand truck. This could ...

Use and Care Manual
Page 16
After replacing the bulb with an C OLDEST Unplug the refrigerator. Remove the convertible meat drawer control knob by turning it counterclockwise. To remove the light shield, press in . Dispenser (on the sides, and lift up and pull it is located on some models, a ... shield and screws (on the sides of the light shield will have to the light circuit. Lift the light shield up and out. appliance bulb of the following: Tabs OR Pocket Refrigerator Compartment-Upper Light Unplug the refrigerator. Installation Instructions Consumer Support Troubleshooting ...
After replacing the bulb with an C OLDEST Unplug the refrigerator. Remove the convertible meat drawer control knob by turning it counterclockwise. To remove the light shield, press in . Dispenser (on the sides, and lift up and pull it is located on some models, a ... shield and screws (on the sides of the light shield will have to the light circuit. Lift the light shield up and out. appliance bulb of the following: Tabs OR Pocket Refrigerator Compartment-Upper Light Unplug the refrigerator. Installation Instructions Consumer Support Troubleshooting ...

Use and Care Manual
Page 17
... mm). Before You Begin Some models are included in the kit. The combined thickness of at least 2″ (5.1 cm) from GE Parts and Accessories, 800.626.2002, or you to install door panels. The raised portion of the door and the wood panel....(6 mm) Thick Backing 5/16″ (8 mm) 1/4″ (6 mm) max 3/4″ (19 mm) 2″ (5.1 cm) Clearance Handle Side Appearance Panel 3/4″ (19 mm) Refrigerator Door Installation Instructions Troubleshooting Tips Consumer Support 17 Weight limitations for fingertip clearance. Freezer Door 28 lbs. (13 kg) max. For CustomStyle™...
... mm). Before You Begin Some models are included in the kit. The combined thickness of at least 2″ (5.1 cm) from GE Parts and Accessories, 800.626.2002, or you to install door panels. The raised portion of the door and the wood panel....(6 mm) Thick Backing 5/16″ (8 mm) 1/4″ (6 mm) max 3/4″ (19 mm) 2″ (5.1 cm) Clearance Handle Side Appearance Panel 3/4″ (19 mm) Refrigerator Door Installation Instructions Troubleshooting Tips Consumer Support 17 Weight limitations for fingertip clearance. Freezer Door 28 lbs. (13 kg) max. For CustomStyle™...
Use and Care Manual
Page 19
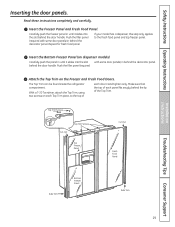
... panel. Insert the Bottom Freezer Panel (on the Freezer and Fresh Food Doors. behind the decorator panel. The Top Trim can be found inside the refrigerator compartment. Read these instructions completely and carefully. Carefully push the freezer panel in until it slides into the slot with some door panels) in behind... Instructions Operating Instructions Installation Instructions Inserting the door panels. Top Trim Screws Cut-Out Top Trim Screws Top Freezer Panel Cut-Out Fresh Food Panel Side Trim Bottom Freezer Panel Side Trim Troubleshooting Tips Consumer Support 19
... panel. Insert the Bottom Freezer Panel (on the Freezer and Fresh Food Doors. behind the decorator panel. The Top Trim can be found inside the refrigerator compartment. Read these instructions completely and carefully. Carefully push the freezer panel in until it slides into the slot with some door panels) in behind... Instructions Operating Instructions Installation Instructions Inserting the door panels. Top Trim Screws Cut-Out Top Trim Screws Top Freezer Panel Cut-Out Fresh Food Panel Side Trim Bottom Freezer Panel Side Trim Troubleshooting Tips Consumer Support 19
Use and Care Manual
Page 20
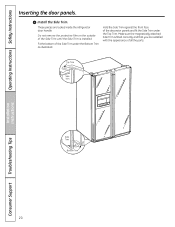
... on the outside of the decorator panels and fit the Side Trim under the Bottom Trim as illustrated. Make sure the magnetically attached Side Trim is installed. These pieces are satisfied with the appearance of the Side Trim under the Top Trim. Fit the bottom of all... the door panels. Install the Side Trim. Top Trim Side Trim Side Trim Bottom Trim Installation Instructions Consumer Support Troubleshooting Tips 20 Hold the Side Trim against the front face of the Side Trim until the Side Trim is fitted correctly and that you are tucked inside the refrigerator door handle.
... on the outside of the decorator panels and fit the Side Trim under the Bottom Trim as illustrated. Make sure the magnetically attached Side Trim is installed. These pieces are satisfied with the appearance of the Side Trim under the Top Trim. Fit the bottom of all... the door panels. Install the Side Trim. Top Trim Side Trim Side Trim Bottom Trim Installation Instructions Consumer Support Troubleshooting Tips 20 Hold the Side Trim against the front face of the Side Trim until the Side Trim is fitted correctly and that you are tucked inside the refrigerator door handle.

Use and Care Manual
Page 21
...extra cost from your dealer, by visiting our Website at ge.com (in Canada at : geappliances.ca BEFORE YOU BEGIN Read these instructions for local inspector's use. • IMPORTANT - PREPARATION WATER SUPPLY TO THE ICEMAKER If the refrigerator has an icemaker, it will have to be connected to... Consumer - Be sure to Step 5 in Canada 1.800.661.1616). A GE water supply kit (containing tubing, shutoff valve, fittings and instructions) is not covered...
...extra cost from your dealer, by visiting our Website at ge.com (in Canada at : geappliances.ca BEFORE YOU BEGIN Read these instructions for local inspector's use. • IMPORTANT - PREPARATION WATER SUPPLY TO THE ICEMAKER If the refrigerator has an icemaker, it will have to be connected to... Consumer - Be sure to Step 5 in Canada 1.800.661.1616). A GE water supply kit (containing tubing, shutoff valve, fittings and instructions) is not covered...
Use and Care Manual
Page 22
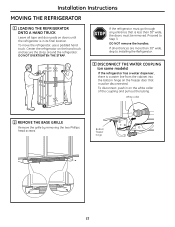
.... DO NOT remove the handles. If all tape and door pads on the hand truck and secure the strap around the refrigerator. Installation Instructions MOVING THE REFRIGERATOR 1 LOADING THE REFRIGERATOR ONTO A HAND TRUCK Leave all entrances are more than 38″ wide, the doors must be removed. Center the...into the bottom hinge on the white collar of the coupling and pull out the tubing. Proceed to Installing the Refrigerator. 3 DISCONNECT THE WATER COUPLING (on some models) If the refrigerator has a water dispenser, there is in on the freezer door that is less than 38″ wide, ...
.... DO NOT remove the handles. If all tape and door pads on the hand truck and secure the strap around the refrigerator. Installation Instructions MOVING THE REFRIGERATOR 1 LOADING THE REFRIGERATOR ONTO A HAND TRUCK Leave all entrances are more than 38″ wide, the doors must be removed. Center the...into the bottom hinge on the white collar of the coupling and pull out the tubing. Proceed to Installing the Refrigerator. 3 DISCONNECT THE WATER COUPLING (on some models) If the refrigerator has a water dispenser, there is in on the freezer door that is less than 38″ wide, ...


