Use and Care Manual
Page 1
... Automatic Icemaker 11 Care and Cleaning 12, 13 Controls 4 Crispers and Pans 8 Freezer 9, 10 Replacing the Light Bulbs 14 Shelves and Bins 7 Water Filter 5, 6 Installation Instructions Installing the Refrigerator 16-20 Installing the Water Line 30-32 Preparing to Install the Refrigerator 15 Removing and Replacing the Doors (Double Door Refrigerator Models only 27-29 Removing and Replacing the Freezer Drawer 21, 22 Reversing the Door Swing (Single Door Refrigerator Models only 23-26 Troubleshooting Tips . . . . . .33-36 Normal Operating Sounds 33 Consumer Support Consumer Support...
... Automatic Icemaker 11 Care and Cleaning 12, 13 Controls 4 Crispers and Pans 8 Freezer 9, 10 Replacing the Light Bulbs 14 Shelves and Bins 7 Water Filter 5, 6 Installation Instructions Installing the Refrigerator 16-20 Installing the Water Line 30-32 Preparing to Install the Refrigerator 15 Removing and Replacing the Doors (Double Door Refrigerator Models only 27-29 Removing and Replacing the Freezer Drawer 21, 22 Reversing the Door Swing (Single Door Refrigerator Models only 23-26 Troubleshooting Tips . . . . . .33-36 Normal Operating Sounds 33 Consumer Support Consumer Support...

Use and Care Manual
Page 2
... the shelves in this Owner's Manual. Use this or any servicing be removed prior to the light circuit. SAFETY PRECAUTIONS When using electrical appliances, basic safety precautions should be properly installed and located in accordance with the Installation Instructions before cleaning and making repairs. If you are getting rid of the cord be a UL-listed (in the United States) or a CSA certified (in the area. Refrigerants All refrigeration products contain refrigerants...
... the shelves in this Owner's Manual. Use this or any servicing be removed prior to the light circuit. SAFETY PRECAUTIONS When using electrical appliances, basic safety precautions should be properly installed and located in accordance with the Installation Instructions before cleaning and making repairs. If you are getting rid of the cord be a UL-listed (in the United States) or a CSA certified (in the area. Refrigerants All refrigeration products contain refrigerants...
Use and Care Manual
Page 4
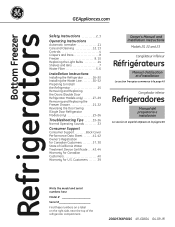
... the refrigerator control knob stops cooling in both the refrigerator and freezer compartments, but does not shut off electrical power to stabilize. If this film was not removed during installation, remove it now. Allow 24 hours for the refrigerator to reach the temperature you have set the refrigerator control at 5 and the freezer control at a time, and allow 24 hours after each adjustment for the temperature to the refrigerator. 4 Consumer Support Troubleshooting Tips Operating Instructions Safety Instructions Installation Instructions...
... the refrigerator control knob stops cooling in both the refrigerator and freezer compartments, but does not shut off electrical power to stabilize. If this film was not removed during installation, remove it now. Allow 24 hours for the refrigerator to reach the temperature you have set the refrigerator control at 5 and the freezer control at a time, and allow 24 hours after each adjustment for the temperature to the refrigerator. 4 Consumer Support Troubleshooting Tips Operating Instructions Safety Instructions Installation Instructions...
Use and Care Manual
Page 5
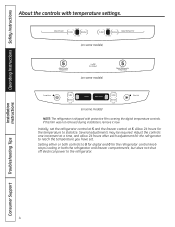
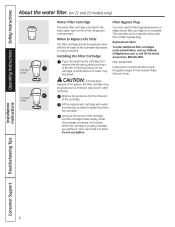
...into place. Filter Model GSWF Customers in the system, the filter cartridge may drip down . Close the cartridge cover. Filter Bypass Plug You must use the filter bypass plug when a replacement filter cartridge is properly installed, you are replacing the cartridge, first remove the old one. Safety Instructions Operating Instructions About the water filter. (on the tab at the front and pulling down . Installing the Filter Cartridge If you will not operate without the filter or filter bypass plug. Installation Instructions Troubleshooting Tips Consumer Support 5 When the...
...into place. Filter Model GSWF Customers in the system, the filter cartridge may drip down . Close the cartridge cover. Filter Bypass Plug You must use the filter bypass plug when a replacement filter cartridge is properly installed, you are replacing the cartridge, first remove the old one. Safety Instructions Operating Instructions About the water filter. (on the tab at the front and pulling down . Installing the Filter Cartridge If you will not operate without the filter or filter bypass plug. Installation Instructions Troubleshooting Tips Consumer Support 5 When the...
Use and Care Manual
Page 6
.... Installing the Filter Cartridge If you will not operate without the filter or filter bypass plug. Do not overtighten. Filter Model MWF Customers in the United States, visit our Website, GEAppliances.com, or call GE Parts and Accessories, 800.626.2002. Fill the replacement cartridge with water from the icemaker. Operating Instructions Safety Instructions About the water filter. (on 22 and 23 models only) Cartridge Holder Cartridge Holder Water Filter Cartridge The water filter cartridge is not available. DO NOT pull down . Use...
.... Installing the Filter Cartridge If you will not operate without the filter or filter bypass plug. Do not overtighten. Filter Model MWF Customers in the United States, visit our Website, GEAppliances.com, or call GE Parts and Accessories, 800.626.2002. Fill the replacement cartridge with water from the icemaker. Operating Instructions Safety Instructions About the water filter. (on 22 and 23 models only) Cartridge Holder Cartridge Holder Water Filter Cartridge The water filter cartridge is not available. DO NOT pull down . Use...
Use and Care Manual
Page 11
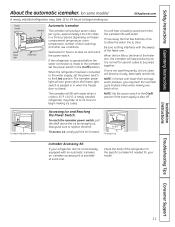
... on freezer compartment temperature, room temperature, number of door openings and other use conditions. Icemaker Accessory Kit If your model. If the refrigerator is operated before the water connection is available at extra cost. A newly installed refrigerator may take 12 to 24 hours to begin making ice cubes. Throw away the first few batches of ice. Shelf Ice Bin To reach the power switch. Shelf Ice Bin To access ice. Installation Instructions Troubleshooting Tips Consumer Support 11 Power Switch Green Power Light Icemaker Feeler Arm Automatic Icemaker The...
... on freezer compartment temperature, room temperature, number of door openings and other use conditions. Icemaker Accessory Kit If your model. If the refrigerator is operated before the water connection is available at extra cost. A newly installed refrigerator may take 12 to 24 hours to begin making ice cubes. Throw away the first few batches of ice. Shelf Ice Bin To reach the power switch. Shelf Ice Bin To access ice. Installation Instructions Troubleshooting Tips Consumer Support 11 Power Switch Green Power Light Icemaker Feeler Arm Automatic Icemaker The...
Use and Care Manual
Page 15
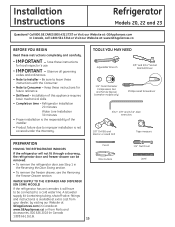
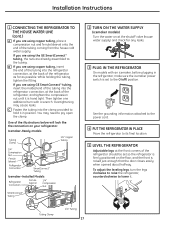
... skills. • Completion time - Installation of the installer. • Product failure due to Consumer - WATER SUPPLY TO THE ICEMAKER AND DISPENSER (ON SOME MODELS) If the refrigerator has an icemaker, it will not fit through a doorway, the refrigerator door and freezer drawer can be connected to leave these instructions for future reference. • Skill level - Be sure to a cold water line. TOOLS YOU MAY NEED Adjustable Wrench 3/8″ and 5/16″...
... skills. • Completion time - Installation of the installer. • Product failure due to Consumer - WATER SUPPLY TO THE ICEMAKER AND DISPENSER (ON SOME MODELS) If the refrigerator has an icemaker, it will not fit through a doorway, the refrigerator door and freezer drawer can be connected to leave these instructions for future reference. • Skill level - Be sure to a cold water line. TOOLS YOU MAY NEED Adjustable Wrench 3/8″ and 5/16″...
Use and Care Manual
Page 16
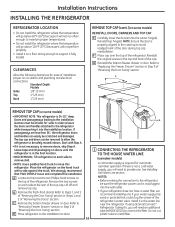
... top and back of the refrigerator. If using GE SmartConnect™ Refrigerator Tubing Kit, you will need an additional tube (WX08X10002) to connect the filter. Do not cut plastic tube to install filter. Refer to "Removing Freezer Drawer" section or Step 2 of "Reversing the Door Swing" section. A REMOVE TOP CAP (on a floor strong enough to support it fully loaded. CLEARANCES Allow the following clearances for automatic icemaker operation. Remove the two screws on...
... top and back of the refrigerator. If using GE SmartConnect™ Refrigerator Tubing Kit, you will need an additional tube (WX08X10002) to connect the filter. Do not cut plastic tube to install filter. Refer to "Removing Freezer Drawer" section or Step 2 of "Reversing the Door Swing" section. A REMOVE TOP CAP (on a floor strong enough to support it fully loaded. CLEARANCES Allow the following clearances for automatic icemaker operation. Remove the two screws on...
Use and Care Manual
Page 17
... refrigerator, make sure the icemaker power switch is raised just enough that the door closes easily when opened about halfway. Then tighten one additional turn the legs clockwise to raise the refrigerator, counterclockwise to hold it . C Fasten the tubing into the refrigerator connection, at the shutoff valve (house water supply) and check for any leaks. 3 PLUG IN THE REFRIGERATOR On models with a wrench. You may cause leaks. To adjust the leveling legs, turn...
... refrigerator, make sure the icemaker power switch is raised just enough that the door closes easily when opened about halfway. Then tighten one additional turn the legs clockwise to raise the refrigerator, counterclockwise to hold it . C Fasten the tubing into the refrigerator connection, at the shutoff valve (house water supply) and check for any leaks. 3 PLUG IN THE REFRIGERATOR On models with a wrench. You may cause leaks. To adjust the leveling legs, turn...
Use and Care Manual
Page 20
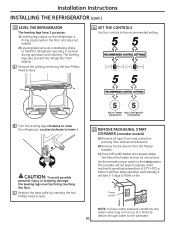
... screws. 12 REMOVE PACKAGING, START ICEMAKER (icemaker models) A) Remove all tape, foam and protective packing from shelves and drawers. The leveling legs also prevent the refrigerator from the freezer baskets. Installation Instructions INSTALLING THE REFRIGERATOR (cont.) 10 LEVEL THE REFRIGERATOR The leveling legs have 2 purposes: 1) Leveling legs adjust so the refrigerator is firmly positioned on the floor and does not wobble. 2) Leveling legs serve as a stabilizing brake to fill the ice bin. It...
... screws. 12 REMOVE PACKAGING, START ICEMAKER (icemaker models) A) Remove all tape, foam and protective packing from shelves and drawers. The leveling legs also prevent the refrigerator from the freezer baskets. Installation Instructions INSTALLING THE REFRIGERATOR (cont.) 10 LEVEL THE REFRIGERATOR The leveling legs have 2 purposes: 1) Leveling legs adjust so the refrigerator is firmly positioned on the floor and does not wobble. 2) Leveling legs serve as a stabilizing brake to fill the ice bin. It...
Use and Care Manual
Page 23
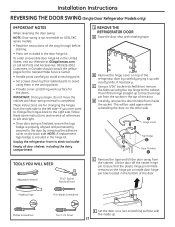
... door shut with the inside up with a putty knife, if necessary. D Carefully remove the door thimble from inside door hinge pin hole located in the wrong places. • Provide a non-scratching work surface for changing the hinges from its electrical outlet. Lift the door off the center hinge pin. This will be used again when reinstalling the door on top of the refrigerator door by their related parts to the cabinet. Installation Instructions REVERSING...
... door shut with the inside up with a putty knife, if necessary. D Carefully remove the door thimble from inside door hinge pin hole located in the wrong places. • Provide a non-scratching work surface for changing the hinges from its electrical outlet. Lift the door off the center hinge pin. This will be used again when reinstalling the door on top of the refrigerator door by their related parts to the cabinet. Installation Instructions REVERSING...
Use and Care Manual
Page 32
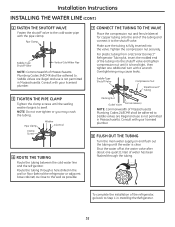
... may cause leaks. Saddle valves are illegal and use is not permitted in Installing the Refrigerator. 32 Installation Instructions INSTALLING THE WATER LINE (CONT.) 4 FASTEN THE SHUTOFF VALVE Fasten the shutoff valve to the cold water pipe with your licensed plumber. 8 FLUSH OUT THE TUBING Turn the main water supply on and flush out the tubing until the water is clear. Consult with the pipe clamp. Make sure the tubing is fully...
... may cause leaks. Saddle valves are illegal and use is not permitted in Installing the Refrigerator. 32 Installation Instructions INSTALLING THE WATER LINE (CONT.) 4 FASTEN THE SHUTOFF VALVE Fasten the shutoff valve to the cold water pipe with your licensed plumber. 8 FLUSH OUT THE TUBING Turn the main water supply on and flush out the tubing until the water is clear. Consult with the pipe clamp. Make sure the tubing is fully...
Use and Care Manual
Page 33
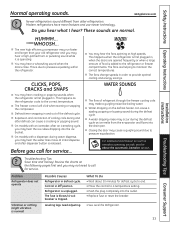
...; Replace fuse or reset the breaker. • See Level the Refrigerator. 33 Installation Instructions Troubleshooting Tips Consumer Support Troubleshooting Tips Save time and money! What To Do • Wait about 30 minutes for service... I Closing the door may hear the fans spinning at initial dispense and after defrost can cause a sizzling, popping or buzzing sound during the defrost cycle as the refrigerator cools to the refrigerator or freezer compartments. I A water dripping noise...
...; Replace fuse or reset the breaker. • See Level the Refrigerator. 33 Installation Instructions Troubleshooting Tips Consumer Support Troubleshooting Tips Save time and money! What To Do • Wait about 30 minutes for service... I Closing the door may hear the fans spinning at initial dispense and after defrost can cause a sizzling, popping or buzzing sound during the defrost cycle as the refrigerator cools to the refrigerator or freezer compartments. I A water dripping noise...
Use and Care Manual
Page 34
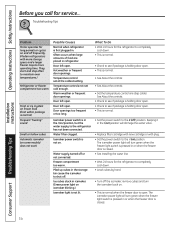
... plug. • Set the power switch to the I (on) position, but the water supply to the refrigerator has not been connected. The icemaker power light will damage the water valve. • Replace filter cartridge with new cartridge or with more storage space and a larger freezer require more operating time. Hot weather or frequent door openings. Water filter clogged. Door left open . Keeping it in the I (on) position will turn green when the freezer light switch is pressed in icemaker. (Green power light on . Operating Instructions Safety Instructions...
... plug. • Set the power switch to the I (on) position, but the water supply to the refrigerator has not been connected. The icemaker power light will damage the water valve. • Replace filter cartridge with new cartridge or with more storage space and a larger freezer require more operating time. Hot weather or frequent door openings. Water filter clogged. Door left open . Keeping it in the I (on) position will turn green when the freezer light switch is pressed in icemaker. (Green power light on . Operating Instructions Safety Instructions...
Use and Care Manual
Page 35
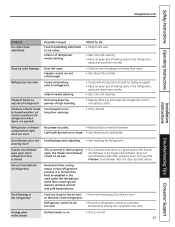
.... • Replace fuse or reset the breaker. Slow ice cube freezing Door left open box of refrigerator Normal air flow cooling motor. In the refrigeration process, it is normal that there is holding door open box of the refrigerator. Refrigerator control is normal. Safety Instructions Operating Instructions GEAppliances.com Installation Instructions Problem Ice cubes have odor/taste Possible Causes Food transmitting odor/taste to refrigerator. Freezer control not set too cold. • Move the refrigerator control to see the Problem: Door/drawer does not...
.... • Replace fuse or reset the breaker. Slow ice cube freezing Door left open box of refrigerator Normal air flow cooling motor. In the refrigeration process, it is normal that there is holding door open box of the refrigerator. Refrigerator control is normal. Safety Instructions Operating Instructions GEAppliances.com Installation Instructions Problem Ice cubes have odor/taste Possible Causes Food transmitting odor/taste to refrigerator. Freezer control not set too cold. • Move the refrigerator control to see the Problem: Door/drawer does not...
Use and Care Manual
Page 36
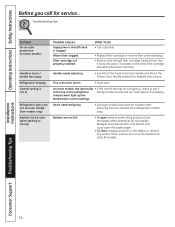
... opened as far as possible. Installation Instructions Consumer Support Troubleshooting Tips 36 Handle needs adjusting. • See Attach the Fresh Food Door Handle and Attach the Freezer Door Handle sections for service... Baskets are burned out, and replace if necessary. Readjust the products left in the basket or remove any product that it locks into place. Troubleshooting Tips Problem No ice cube production (on some models) Handle is loose / handle has a gap Refrigerator beeping Control setting...
... opened as far as possible. Installation Instructions Consumer Support Troubleshooting Tips 36 Handle needs adjusting. • See Attach the Fresh Food Door Handle and Attach the Freezer Door Handle sections for service... Baskets are burned out, and replace if necessary. Readjust the products left in the basket or remove any product that it locks into place. Troubleshooting Tips Problem No ice cube production (on some models) Handle is loose / handle has a gap Refrigerator beeping Control setting...
Use and Care Manual
Page 39
... Proof of the water filter cartridge which fails due to state. Thirty Days (Water filter, if included) From the original purchase date of the refrigerator Any part of the original purchase date is not available, you may also have serial number and model number available when calling for home use the product. What GE Will Not Cover: I Service trips to obtain service under the warranty. During this...
... Proof of the water filter cartridge which fails due to state. Thirty Days (Water filter, if included) From the original purchase date of the refrigerator Any part of the original purchase date is not available, you may also have serial number and model number available when calling for home use the product. What GE Will Not Cover: I Service trips to obtain service under the warranty. During this...
Use and Care Manual
Page 40
... to the instructions supplied by an Authorized Mabe Service Agent. Service during this warranty. This warranty is needed to abuse, accident, commercial use and care of product as provided in areas where it is product repair as listed in the owner's manual, proper setting of defects in material and workmanship. If further help is in Canada when the Refrigerator has been properly installed according to finish...
... to the instructions supplied by an Authorized Mabe Service Agent. Service during this warranty. This warranty is needed to abuse, accident, commercial use and care of product as provided in areas where it is product repair as listed in the owner's manual, proper setting of defects in material and workmanship. If further help is in Canada when the Refrigerator has been properly installed according to finish...

Use and Care Manual
Page 41
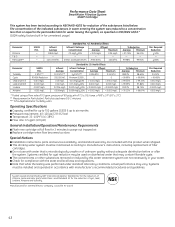
... mg/L 96.77% 94.74% T&O - - - - - - - I Installation instructions, parts and service availability, and standard warranty are not necessarily in accordance with a replacement filter indicator light I Pressure requirement: 40-120 psi (2.8-8.2 bar), non-shock I Temperature: 33-100ºF (0.6-38ºC) I Flow rate: 0.5 gpm (1.9 lpm) General Installation/Operation/Maintenance Requirements I This drinking water system must be used were 0.5-1 microns *** NTU=Nephelometric Turbidity units Operating Specifications I Chemical Reduction Unit Alachlor and Atrazine...
... mg/L 96.77% 94.74% T&O - - - - - - - I Installation instructions, parts and service availability, and standard warranty are not necessarily in accordance with a replacement filter indicator light I Pressure requirement: 40-120 psi (2.8-8.2 bar), non-shock I Temperature: 33-100ºF (0.6-38ºC) I Flow rate: 0.5 gpm (1.9 lpm) General Installation/Operation/Maintenance Requirements I This drinking water system must be used were 0.5-1 microns *** NTU=Nephelometric Turbidity units Operating Specifications I Chemical Reduction Unit Alachlor and Atrazine...
Use and Care Manual
Page 42
... to 750 gallons (2,838 l); I Installation instructions, parts and service availability, and standard warranty are not necessarily in your water. System tested and certified by this water treatment system are included with the state and local laws and regulations. Manufactured for up to manufacturer's instructions, including replacement of the substances listed below. Particles used on disinfected water that may contain filterable cysts. Special Notices I The...
... to 750 gallons (2,838 l); I Installation instructions, parts and service availability, and standard warranty are not necessarily in your water. System tested and certified by this water treatment system are included with the state and local laws and regulations. Manufactured for up to manufacturer's instructions, including replacement of the substances listed below. Particles used on disinfected water that may contain filterable cysts. Special Notices I The...

