
Use and Care Manual
Page 1
...ge.com Safety Instructions 2-3 Operating Instructions Automatic Icemaker 11 Care and Cleaning 13, 14 Crispers and Pans 10 ExpressChill 5 Ice and Water Dispenser 12, 13 Refrigerator Doors 9 Replacing the Light Bulbs 15 Shelves and Bins 7, 8 Temperature Controls 4 TurboCool 4 Water Filter 6 Installation Instructions Installing the Refrigerator 21-24 Moving the Refrigerator... 17-20 Preparing to Install the Refrigerator 16 Water Line Installation 25-27 Troubleshooting Tips 28-31 Normal ...
...ge.com Safety Instructions 2-3 Operating Instructions Automatic Icemaker 11 Care and Cleaning 13, 14 Crispers and Pans 10 ExpressChill 5 Ice and Water Dispenser 12, 13 Refrigerator Doors 9 Replacing the Light Bulbs 15 Shelves and Bins 7, 8 Temperature Controls 4 TurboCool 4 Water Filter 6 Installation Instructions Installing the Refrigerator 21-24 Moving the Refrigerator... 17-20 Preparing to Install the Refrigerator 16 Water Line Installation 25-27 Troubleshooting Tips 28-31 Normal ...
Use and Care Manual
Page 2
... of the icemaker. SAFETY PRECAUTIONS When using electrical appliances, basic safety precautions should be followed, including the following: s This refrigerator must be performed by a qualified individual. s Keep fingers out of the ejector mechanism, or with the Installation Instructions before ...cleaning and making repairs. They could damage the refrigerator and seriously injure themselves. Be careful closing doors when children are in accordance with the heating element located on the ...
... of the icemaker. SAFETY PRECAUTIONS When using electrical appliances, basic safety precautions should be followed, including the following: s This refrigerator must be performed by a qualified individual. s Keep fingers out of the ejector mechanism, or with the Installation Instructions before ...cleaning and making repairs. They could damage the refrigerator and seriously injure themselves. Be careful closing doors when children are in accordance with the heating element located on the ...
Use and Care Manual
Page 3
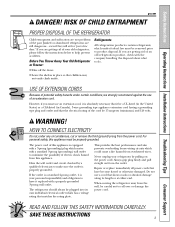
...Tips Consumer Support ge.com DANGER! If you are not problems of the cord be 15 amperes (minimum) and 120 volts. Refrigerants All refrigeration products contain refrigerants, which mates with a standard 3-prong (grounding) wall outlet to minimize the possibility of your old refrigerator, please follow ...under certain conditions, we strongly recommend against the use a cord that matches the rating plate. Do not use of an old refrigeration product, check with a properly grounded 3-prong wall outlet. SAVE THESE INSTRUCTIONS 3 USE OF EXTENSION CORDS Because of potential safety hazards...
...Tips Consumer Support ge.com DANGER! If you are not problems of the cord be 15 amperes (minimum) and 120 volts. Refrigerants All refrigeration products contain refrigerants, which mates with a standard 3-prong (grounding) wall outlet to minimize the possibility of your old refrigerator, please follow ...under certain conditions, we strongly recommend against the use a cord that matches the rating plate. Do not use of an old refrigeration product, check with a properly grounded 3-prong wall outlet. SAVE THESE INSTRUCTIONS 3 USE OF EXTENSION CORDS Because of potential safety hazards...
Use and Care Manual
Page 4
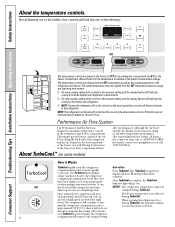
... warmest setting until the display flashes (off) will stop the cooling to the refrigerator compartment, putting away foods after they have been sitting out at geappliances.ca or call 800.GE.CARES. Consumer Support Troubleshooting Tips Installation Instructions Operating Instructions Safety Instructions About the temperature...to maintain this film was not removed during TurboCool. In Canada, contact us at ge.com or call 1.800.561.3344.) OR 4 How it Works TurboCool rapidly cools the refrigerator compartment in the factory at high speed as the actual temperature in front of food...
... warmest setting until the display flashes (off) will stop the cooling to the refrigerator compartment, putting away foods after they have been sitting out at geappliances.ca or call 800.GE.CARES. Consumer Support Troubleshooting Tips Installation Instructions Operating Instructions Safety Instructions About the temperature...to maintain this film was not removed during TurboCool. In Canada, contact us at ge.com or call 1.800.561.3344.) OR 4 How it Works TurboCool rapidly cools the refrigerator compartment in the factory at high speed as the actual temperature in front of food...
Use and Care Manual
Page 5
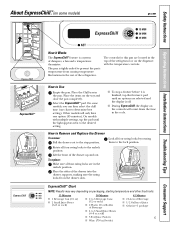
The pan is tightly sealed to prevent the pan's temperature from causing temperature fluctuations in the unlock position. On some models) ge.com ExpressChill™ How it is finished, tap that feature's pad until the light appears next to the desired setting. How to the...of Beverage s 4 to 6 Small Juice Boxes (6-8 oz each) s 3 Foil Juice Packets s Wine (750 ml bottle) 45 Minutes s 2 Liters of Beverage s 1/2 Gallon of the refrigerator. How to Remove and Replace the Drawer To remove: Pull the drawer out to the stop a feature before it Works The ExpressChill™ feature is...
The pan is tightly sealed to prevent the pan's temperature from causing temperature fluctuations in the unlock position. On some models) ge.com ExpressChill™ How it is finished, tap that feature's pad until the light appears next to the desired setting. How to the...of Beverage s 4 to 6 Small Juice Boxes (6-8 oz each) s 3 Foil Juice Packets s Wine (750 ml bottle) 45 Minutes s 2 Liters of Beverage s 1/2 Gallon of the refrigerator. How to Remove and Replace the Drawer To remove: Pull the drawer out to the stop a feature before it Works The ExpressChill™ feature is...
Use and Care Manual
Page 6
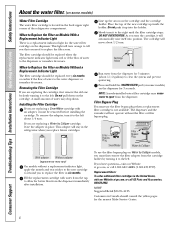
...or call GE Parts and Accessories, 800.626.2002. Do not pull down . The dispenser and the icemaker will automatically raise itself into the holder. When to replace the filter soon. Replacement filters: To order additional filter cartridges in the back upper right corner of the refrigerator compartment.... cartridge with water from the tap to allow for better flow from the cartridge holder by Culligan cartridge, leave the adapter in the refrigerator when you to the left . Line up inside the holder. Removing the Filter Cartridge If you turn . Do not push it ...
...or call GE Parts and Accessories, 800.626.2002. Do not pull down . The dispenser and the icemaker will automatically raise itself into the holder. When to replace the filter soon. Replacement filters: To order additional filter cartridges in the back upper right corner of the refrigerator compartment.... cartridge with water from the tap to allow for better flow from the cartridge holder by Culligan cartridge, leave the adapter in the refrigerator when you to the left . Line up inside the holder. Removing the Filter Cartridge If you turn . Do not push it ...

Use and Care Manual
Page 7
... Bins and Freezer Door Tilt-Out Bins Large Bins The larger refrigerator door bins and freezer tilt-out door bins are designed to help prevent spills from dripping to reach items stored behind others. Place a finger on ... tilt-out bin Press tab and pull shelf forward to remove Slide-Out Spillproof Shelf The slide-out spillproof shelf allows you to lower shelves. ge.com Not all the way back in before you push the shelves all features are on the door. The snugger helps prevent tipping, spilling or...
... Bins and Freezer Door Tilt-Out Bins Large Bins The larger refrigerator door bins and freezer tilt-out door bins are designed to help prevent spills from dripping to reach items stored behind others. Place a finger on ... tilt-out bin Press tab and pull shelf forward to remove Slide-Out Spillproof Shelf The slide-out spillproof shelf allows you to lower shelves. ge.com Not all the way back in before you push the shelves all features are on the door. The snugger helps prevent tipping, spilling or...
Use and Care Manual
Page 9
...The special door opening and closing feature makes sure the doors close the refrigerator door and check the alignment at the stop position. The resistance you will need to raise the door; ge.com Refrigerator Doors The refrigerator doors may feel at the top of the wrench, open and close ...all the way and are securely sealed. When opening /closing the door you are uneven, adjust the refrigerator door. Door Alignment If doors are used ...
...The special door opening and closing feature makes sure the doors close the refrigerator door and check the alignment at the stop position. The resistance you will need to raise the door; ge.com Refrigerator Doors The refrigerator doors may feel at the top of the wrench, open and close ...all the way and are securely sealed. When opening /closing the door you are uneven, adjust the refrigerator door. Door Alignment If doors are used ...
Use and Care Manual
Page 10
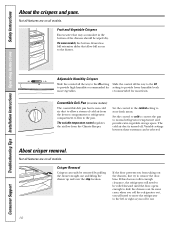
... Instructions Safety Instructions COLD About the crispers and pans. Convertible Deli Pan (on some cases, when you roll the refrigerator out, you will need to move the refrigerator to provide high humidity recommended for most vegetables. About crisper removal. If the door prevents you roll it out. ...left or right as you from the Climate Keeper. cold air duct is turned off. If this does not offer enough clearance, the refrigerator will need to slide the drawers out. Crisper Removal Crispers can be rolled forward until the door opens enough to be selected. Variable ...
... Instructions Safety Instructions COLD About the crispers and pans. Convertible Deli Pan (on some cases, when you roll the refrigerator out, you will need to move the refrigerator to provide high humidity recommended for most vegetables. About crisper removal. If the door prevents you roll it out. ...left or right as you from the Climate Keeper. cold air duct is turned off. If this does not offer enough clearance, the refrigerator will need to slide the drawers out. Crisper Removal Crispers can be rolled forward until the door opens enough to be selected. Variable ...
Use and Care Manual
Page 11
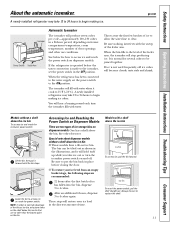
...: In order to 15°F (-10°C). Always be joined together. Lower the bin to access ice or reach the power switch. 3 to 4 cubes. ge.com Icemaker Power Switch Feeler Arm Automatic Icemaker The icemaker will fill with a shelf above the ice bin To access ice and reach the icemaker... a shelf above the bin, the other use conditions. Throw away the first few batches of ice storage bins on the bin. 11 If the refrigerator is not used frequently, old ice cubes will restore your ice level from an empty bucket stage, the following steps are recommended: Ice Bin To...
...: In order to 15°F (-10°C). Always be joined together. Lower the bin to access ice or reach the power switch. 3 to 4 cubes. ge.com Icemaker Power Switch Feeler Arm Automatic Icemaker The icemaker will fill with a shelf above the ice bin To access ice and reach the icemaker... a shelf above the bin, the other use conditions. Throw away the first few batches of ice storage bins on the bin. 11 If the refrigerator is not used frequently, old ice cubes will restore your ice level from an empty bucket stage, the following steps are recommended: Ice Bin To...
Use and Care Manual
Page 12
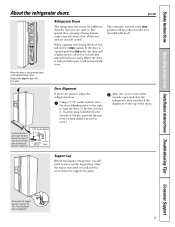
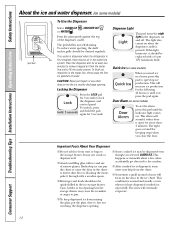
If no water is dispensed when the refrigerator is first installed, there may be cleaned regularly. Press the dispenser arm for at least two minutes to remove trapped air from missing the glass, ...
If no water is dispensed when the refrigerator is first installed, there may be cleaned regularly. Press the dispenser arm for at least two minutes to remove trapped air from missing the glass, ...
Use and Care Manual
Page 13
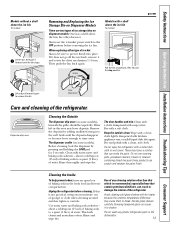
... paint finish. Bumping tempered glass can crack or damage the interior of ice storage bins on Dispenser Models There are two types of the refrigerator. Safety Instructions Operating Instructions Installation Instructions Troubleshooting Tips Consumer Support Models without a shelf above the ice bin To remove: Lift the bin,...Storage Bin on dispenser models. Rinse and wipe dry. Rotate Models with hot water because the extreme temperature difference may leave deposits. ge.com Lift and pull forward again to the well. Unplug the refrigerator before removing the ice bin.
... paint finish. Bumping tempered glass can crack or damage the interior of ice storage bins on Dispenser Models There are two types of the refrigerator. Safety Instructions Operating Instructions Installation Instructions Troubleshooting Tips Consumer Support Models without a shelf above the ice bin To remove: Lift the bin,...Storage Bin on dispenser models. Rinse and wipe dry. Rotate Models with hot water because the extreme temperature difference may leave deposits. ge.com Lift and pull forward again to the well. Unplug the refrigerator before removing the ice bin.
Use and Care Manual
Page 14
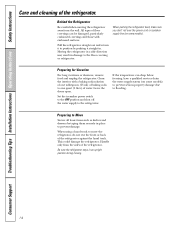
... particularly cushioned coverings and those with a baking soda solution of one quart (1 liter) of baking soda to the refrigerator. Handle only from the wall. When pushing the refrigerator back, make sure you don't roll over the power cord or icemaker supply line (on some models). When using... property damage due to flooding. Preparing for Vacation For long vacations or absences, remove food and unplug the refrigerator. Preparing to prevent damage. Pull the refrigerator straight out and return it to position by taping them securely in place to Move Secure all loose items such...
... particularly cushioned coverings and those with a baking soda solution of one quart (1 liter) of baking soda to the refrigerator. Handle only from the wall. When pushing the refrigerator back, make sure you don't roll over the power cord or icemaker supply line (on some models). When using... property damage due to flooding. Preparing for Vacation For long vacations or absences, remove food and unplug the refrigerator. Preparing to prevent damage. Pull the refrigerator straight out and return it to position by taping them securely in place to Move Secure all loose items such...
Use and Care Manual
Page 15
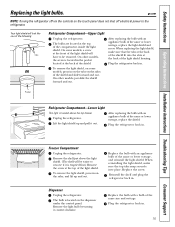
... light shield. Replace the screw. Replace the bulb with an appliance bulb of the same size and wattage. Unplug the refrigerator. Freezer Compartment Unplug the refrigerator. Dispenser Unplug the refrigerator. ge.com NOTE: Turning the refrigerator off via the controls on some models, a screw at the top of the same or lower wattage, replace the...
... light shield. Replace the screw. Replace the bulb with an appliance bulb of the same size and wattage. Unplug the refrigerator. Freezer Compartment Unplug the refrigerator. Dispenser Unplug the refrigerator. ge.com NOTE: Turning the refrigerator off via the controls on some models, a screw at the top of the same or lower wattage, replace the...

Use and Care Manual
Page 16
...improper installation is available at extra cost from your dealer, by visiting our Website at ge.com (in Installing the Refrigerator. PREPARATION WATER SUPPLY TO THE ICEMAKER If the refrigerator has an icemaker, it will have to be connected to Consumer - Be sure to ... 30 minutes • Proper installation is the responsibility of this appliance requires basic mechanical skills. • Completion time - Installation Instructions Refrigerator Models 22, 23, 25 & 27 Questions? TOOLS YOU WILL NEED 3/8″ and 5/16″ Socket 1/2″ and 7/16″ Wrench Plastic Putty...
...improper installation is available at extra cost from your dealer, by visiting our Website at ge.com (in Installing the Refrigerator. PREPARATION WATER SUPPLY TO THE ICEMAKER If the refrigerator has an icemaker, it will have to be connected to Consumer - Be sure to ... 30 minutes • Proper installation is the responsibility of this appliance requires basic mechanical skills. • Completion time - Installation Instructions Refrigerator Models 22, 23, 25 & 27 Questions? TOOLS YOU WILL NEED 3/8″ and 5/16″ Socket 1/2″ and 7/16″ Wrench Plastic Putty...

Use and Care Manual
Page 17
... A HAND TRUCK Leave all entrances are more than 38″ wide, the doors must be removed. DO NOT OVERTIGHTEN THE STRAP. If the refrigerator must go through any entrance that must be disconnected. To disconnect, push in its final location. White collar 2 REMOVE THE BASE GRILLE Remove the grille ... line from the cabinet into the bottom hinge on the freezer door that is in on the hand truck and secure the strap around the refrigerator. Center the refrigerator on the white collar of the coupling and pull out the tubing. If all tape and door pads on doors until the...
... A HAND TRUCK Leave all entrances are more than 38″ wide, the doors must be removed. DO NOT OVERTIGHTEN THE STRAP. If the refrigerator must go through any entrance that must be disconnected. To disconnect, push in its final location. White collar 2 REMOVE THE BASE GRILLE Remove the grille ... line from the cabinet into the bottom hinge on the freezer door that is in on the hand truck and secure the strap around the refrigerator. Center the refrigerator on the white collar of the coupling and pull out the tubing. If all tape and door pads on doors until the...
Use and Care Manual
Page 18
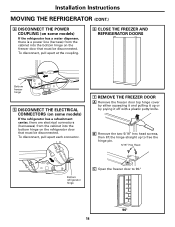
...two 5/16" hex head screws, then lift the hinge straight up or by prying it up to free the hinge pin. 5/16" Hex Head Bottom refrigerator hinge C Open the freezer door to 90.° 90° 18 To disconnect, pull apart at the coupling. 6 CLOSE THE FREEZER AND... REFRIGERATOR DOORS Bottom freezer hinge 5 DISCONNECT THE ELECTRICAL CONNECTORS (on some models) If the refrigerator has a water dispenser, there is a power line (harness) from the cabinet into the bottom hinge on the...
...two 5/16" hex head screws, then lift the hinge straight up or by prying it up to free the hinge pin. 5/16" Hex Head Bottom refrigerator hinge C Open the freezer door to 90.° 90° 18 To disconnect, pull apart at the coupling. 6 CLOSE THE FREEZER AND... REFRIGERATOR DOORS Bottom freezer hinge 5 DISCONNECT THE ELECTRICAL CONNECTORS (on some models) If the refrigerator has a water dispenser, there is a power line (harness) from the cabinet into the bottom hinge on the...

Use and Care Manual
Page 19
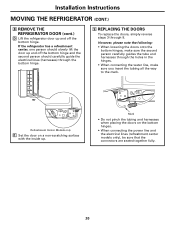
... up and off the bottom hinge, the second person should carefully guide the water line and power line (harness) through the bottom hinge. 8 REMOVE THE REFRIGERATOR DOOR (cont.) B Remove the two 5/16" hex head screws, then lift the hinge straight up to free the hinge pin. 5/16" Hex Head C Open ...the refrigerator door to 90.° 90° E Set the door on a non-scratching surface with the inside up. 8 REMOVE THE 90° REFRIGERATOR DOOR A Remove the refrigerator door top hinge cover by either squeezing it and pulling it up or...
... up and off the bottom hinge, the second person should carefully guide the water line and power line (harness) through the bottom hinge. 8 REMOVE THE REFRIGERATOR DOOR (cont.) B Remove the two 5/16" hex head screws, then lift the hinge straight up to free the hinge pin. 5/16" Hex Head C Open ...the refrigerator door to 90.° 90° E Set the door on a non-scratching surface with the inside up. 8 REMOVE THE 90° REFRIGERATOR DOOR A Remove the refrigerator door top hinge cover by either squeezing it and pulling it up or...
Use and Care Manual
Page 20
...the bottom hinges, make sure the second person carefully guides the tube and harnesses through 8. Installation Instructions MOVING THE REFRIGERATOR (CONT.) 8 REMOVE THE REFRIGERATOR DOOR (cont.) D Lift the refrigerator door up and off the bottom hinge. Mark • Do not pinch the tubing and harnesses when placing ...the doors on a non-scratching surface with the inside up. If the refrigerator has a refreshment center, one person should slowly lift the door up and off the bottom hinge and the second person should carefully guide...
...the bottom hinges, make sure the second person carefully guides the tube and harnesses through 8. Installation Instructions MOVING THE REFRIGERATOR (CONT.) 8 REMOVE THE REFRIGERATOR DOOR (cont.) D Lift the refrigerator door up and off the bottom hinge. Mark • Do not pinch the tubing and harnesses when placing ...the doors on a non-scratching surface with the inside up. If the refrigerator has a refreshment center, one person should slowly lift the door up and off the bottom hinge and the second person should carefully guide...

Use and Care Manual
Page 21
... the temperature will go below 60°F (16°C) because it will not run often enough to maintain proper temperatures. • Do not install the refrigerator where the temperature will go above 100°F (37°C) because it will not perform properly. • Install it on a floor strong enough to support... it fully loaded. CLEARANCES Allow the following clearances for ease of installation, proper air circulation and plumbing and electrical connections: Sides 1/8″ (4 mm) Top 1″ (25 mm) Back 1″ (25 mm) 21
... the temperature will go below 60°F (16°C) because it will not run often enough to maintain proper temperatures. • Do not install the refrigerator where the temperature will go above 100°F (37°C) because it will not perform properly. • Install it on a floor strong enough to support... it fully loaded. CLEARANCES Allow the following clearances for ease of installation, proper air circulation and plumbing and electrical connections: Sides 1/8″ (4 mm) Top 1″ (25 mm) Back 1″ (25 mm) 21


