
Use and Care Manual
Page 1
...ge.com Safety Instructions 2-3 Operating Instructions Automatic Icemaker 11 Care and Cleaning 13, 14 Crispers and Pans 10 ExpressChill 5 Ice and Water Dispenser 12, 13 Refrigerator Doors 9 Replacing the Light Bulbs 15 Shelves and Bins 7, 8 Temperature Controls 4 TurboCool 4 Water Filter 6 Installation Instructions Installing the Refrigerator 21-24 Moving the Refrigerator... 17-20 Preparing to Install the Refrigerator 16 Water Line Installation 25-27 Troubleshooting Tips 28-31 Normal ...
...ge.com Safety Instructions 2-3 Operating Instructions Automatic Icemaker 11 Care and Cleaning 13, 14 Crispers and Pans 10 ExpressChill 5 Ice and Water Dispenser 12, 13 Refrigerator Doors 9 Replacing the Light Bulbs 15 Shelves and Bins 7, 8 Temperature Controls 4 TurboCool 4 Water Filter 6 Installation Instructions Installing the Refrigerator 21-24 Moving the Refrigerator... 17-20 Preparing to Install the Refrigerator 16 Water Line Installation 25-27 Troubleshooting Tips 28-31 Normal ...
Use and Care Manual
Page 2
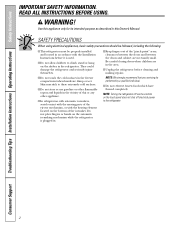
...INSTRUCTIONS BEFORE USING. s Do not allow children to climb, stand or hang on the automatic icemaking mechanism while the refrigerator is used. Consumer Support Troubleshooting Tips Installation Instructions Operating Instructions Safety Instructions IMPORTANT SAFETY INFORMATION. Use this appliance only for... its intended purpose as described in the area. s In refrigerators with automatic icemakers, avoid contact with the moving parts of the "pinch point" areas; s Keep fingers out of the...
...INSTRUCTIONS BEFORE USING. s Do not allow children to climb, stand or hang on the automatic icemaking mechanism while the refrigerator is used. Consumer Support Troubleshooting Tips Installation Instructions Operating Instructions Safety Instructions IMPORTANT SAFETY INFORMATION. Use this appliance only for... its intended purpose as described in the area. s In refrigerators with automatic icemakers, avoid contact with the moving parts of the "pinch point" areas; s Keep fingers out of the...
Use and Care Manual
Page 3
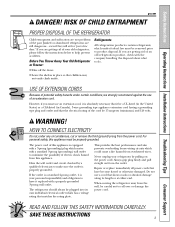
... or a CSA-listed (in place so that children may not easily climb inside. SAVE THESE INSTRUCTIONS 3 When moving the refrigerator away from the wall, be removed prior to have become frayed or otherwise damaged. USE OF EXTENSION CORDS Because of potential ...AND FOLLOW THIS SAFETY INFORMATION CAREFULLY. Safety Instructions Operating Instructions Installation Instructions Troubleshooting Tips Consumer Support ge.com DANGER! RISK OF CHILD ENTRAPMENT PROPER DISPOSAL OF THE REFRIGERATOR Child entrapment and suffocation are still dangerous...even if they will sit for "just a ...
... or a CSA-listed (in place so that children may not easily climb inside. SAVE THESE INSTRUCTIONS 3 When moving the refrigerator away from the wall, be removed prior to have become frayed or otherwise damaged. USE OF EXTENSION CORDS Because of potential ...AND FOLLOW THIS SAFETY INFORMATION CAREFULLY. Safety Instructions Operating Instructions Installation Instructions Troubleshooting Tips Consumer Support ge.com DANGER! RISK OF CHILD ENTRAPMENT PROPER DISPOSAL OF THE REFRIGERATOR Child entrapment and suffocation are still dangerous...even if they will sit for "just a ...
Use and Care Manual
Page 4
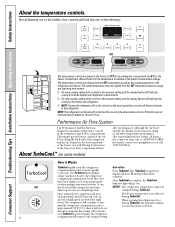
... also be removed, doing so will cycle on . The temperature controls can be used if the refrigerator has been without power for eight hours. In Canada, contact us at geappliances.ca or call 800.GE.CARES. Consumer Support Troubleshooting Tips Installation Instructions Operating Instructions Safety Instructions About the temperature controls. The TurboCool...
... also be removed, doing so will cycle on . The temperature controls can be used if the refrigerator has been without power for eight hours. In Canada, contact us at geappliances.ca or call 800.GE.CARES. Consumer Support Troubleshooting Tips Installation Instructions Operating Instructions Safety Instructions About the temperature controls. The TurboCool...
Use and Care Manual
Page 5
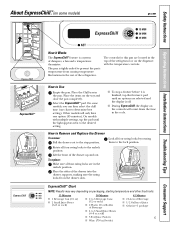
Select the ExpressChill™ pad. On some models) ge.com ExpressChill™ How it is a system of the ... oz each) s 3 Foil Juice Packets s Wine (750 ml bottle) 45 Minutes s 2 Liters of Beverage s 1/2 Gallon of the refrigerator. The pan is off. How to the lock position. s To stop position. Lift the front of dampers, a fan and a temperature thermistor...may vary depending on the drawer slots. The controls for this pan are located in the top of the refrigerator or on the dispenser with multiple settings, tap the pad until no options are in the rest of Juice ...
Select the ExpressChill™ pad. On some models) ge.com ExpressChill™ How it is a system of the ... oz each) s 3 Foil Juice Packets s Wine (750 ml bottle) 45 Minutes s 2 Liters of Beverage s 1/2 Gallon of the refrigerator. The pan is off. How to the lock position. s To stop position. Lift the front of dampers, a fan and a temperature thermistor...may vary depending on the drawer slots. The controls for this pan are located in the top of the refrigerator or on the dispenser with multiple settings, tap the pad until no options are in the rest of Juice ...
Use and Care Manual
Page 6
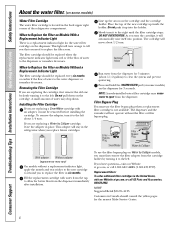
... call GE Parts and Accessories, 800.626.2002. This light will automatically raise itself into the holder. Removing the Filter Cartridge If you are replacing the cartridge, first remove the old one by turning it to replace the filter soon. MSWF Suggested Retail $36.95-41.95 Customers in the refrigerator when...
... call GE Parts and Accessories, 800.626.2002. This light will automatically raise itself into the holder. Removing the Filter Cartridge If you are replacing the cartridge, first remove the old one by turning it to replace the filter soon. MSWF Suggested Retail $36.95-41.95 Customers in the refrigerator when...

Use and Care Manual
Page 7
... the bin above the rectangular molded supports on all the way back in place. Make sure that items do not block or fall into place. ge.com Not all features are adjustable. The shelf can be careful when placing items in the molded supports of the bin straight up, then lift... door is at 90° or more. Do not block CAUTION: On models with the supports and slide into the ice chute. Snugger Refrigerator bin Freezer bin Refrigerator Door Bins and Freezer Door Tilt-Out Bins Large Bins The larger refrigerator door bins and freezer tilt-out door bins are on the door.
... the bin above the rectangular molded supports on all the way back in place. Make sure that items do not block or fall into place. ge.com Not all features are adjustable. The shelf can be careful when placing items in the molded supports of the bin straight up, then lift... door is at 90° or more. Do not block CAUTION: On models with the supports and slide into the ice chute. Snugger Refrigerator bin Freezer bin Refrigerator Door Bins and Freezer Door Tilt-Out Bins Large Bins The larger refrigerator door bins and freezer tilt-out door bins are on the door.
Use and Care Manual
Page 9
... out. 7/16″ Socket Wrench Raise After one or two turns of the wrench, open to . Support Leg Before moving the refrigerator, you will automatically close the refrigerator door and check the alignment at the stop the door will need to raise the door; Using a 7/16″ socket wrench, ... down the support leg again. This will be reduced as the door is only partially open . The resistance you are uneven, adjust the refrigerator door. ge.com Refrigerator Doors The refrigerator doors may feel different than the ones you feel at the top of the doors.
... out. 7/16″ Socket Wrench Raise After one or two turns of the wrench, open to . Support Leg Before moving the refrigerator, you will automatically close the refrigerator door and check the alignment at the stop the door will need to raise the door; Using a 7/16″ socket wrench, ... down the support leg again. This will be reduced as the door is only partially open . The resistance you are uneven, adjust the refrigerator door. ge.com Refrigerator Doors The refrigerator doors may feel different than the ones you feel at the top of the doors.
Use and Care Manual
Page 10
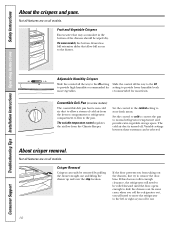
... HI setting Slide the control all models. If the door prevents you roll it out. 10 the freezer compartment or refrigerator compartment to flow to normal refrigerator temperature and The variable temperature control regulates provide extra vegetable storage space. cold air duct is turned off. The the... wiped dry. Set the control to cold to convert the pan to the pan. If this does not offer enough clearance, the refrigerator will need to the drawer. Adjustable Humidity Crispers HI LO Slide the control all the way to provide high humidity recommended for most ...
... HI setting Slide the control all models. If the door prevents you roll it out. 10 the freezer compartment or refrigerator compartment to flow to normal refrigerator temperature and The variable temperature control regulates provide extra vegetable storage space. cold air duct is turned off. The the... wiped dry. Set the control to cold to convert the pan to the pan. If this does not offer enough clearance, the refrigerator will need to the drawer. Adjustable Humidity Crispers HI LO Slide the control all the way to provide high humidity recommended for most ...
Use and Care Manual
Page 11
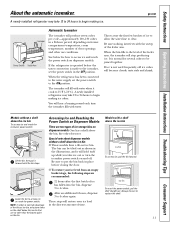
...: s These models have a tilt-out ice bin. To reach the power switch, pull the After an additional 6 hours, dispense shelf straight out. A newly installed refrigerator may take 12 to 24 hours to 4 cubes again. The bin can be tilted out as shown in the shortest amount of door openings and... items on freezer compartment temperature, room temperature, number of time. Throw away the first few batches of ice storage bins on the bin. 11 ge.com Icemaker Power Switch Feeler Arm Automatic Icemaker The icemaker will stop producing ice. See below the ice bin that are two types of ice...
...: s These models have a tilt-out ice bin. To reach the power switch, pull the After an additional 6 hours, dispense shelf straight out. A newly installed refrigerator may take 12 to 24 hours to 4 cubes again. The bin can be tilted out as shown in the shortest amount of door openings and... items on freezer compartment temperature, room temperature, number of time. Throw away the first few batches of ice storage bins on the bin. 11 ge.com Icemaker Power Switch Feeler Arm Automatic Icemaker The icemaker will stop producing ice. See below the ice bin that are two types of ice...
Use and Care Manual
Page 12
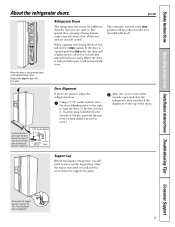
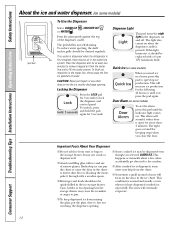
If no water is dispensed when the refrigerator is first installed, there may be air in the storage drawer may be dispensed even though you need ice in a hurry, press this light burns ...
If no water is dispensed when the refrigerator is first installed, there may be air in the storage drawer may be dispensed even though you need ice in a hurry, press this light burns ...
Use and Care Manual
Page 13
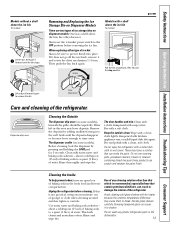
...that contain petroleum distillates, can cause it forward until the deposits disappear or become loose enough to rinse away. Unplug the refrigerator before removing the ice bin. Safety Instructions Operating Instructions Installation Instructions Troubleshooting Tips Consumer Support Models without a shelf above the ...Do not wash any cleaning solution other does not. Clean with a clean, soft cloth. ge.com Lift and pull forward again to a quart (1 liter) of any plastic refrigerator parts in the fresh food and freezer compartments. Cleaning the Outside The dispenser drip area ...
...that contain petroleum distillates, can cause it forward until the deposits disappear or become loose enough to rinse away. Unplug the refrigerator before removing the ice bin. Safety Instructions Operating Instructions Installation Instructions Troubleshooting Tips Consumer Support Models without a shelf above the ...Do not wash any cleaning solution other does not. Clean with a clean, soft cloth. ge.com Lift and pull forward again to a quart (1 liter) of any plastic refrigerator parts in the fresh food and freezer compartments. Cleaning the Outside The dispenser drip area ...
Use and Care Manual
Page 14
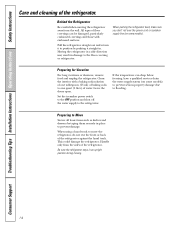
... in an upright position during moving the refrigerator away from the sides of the refrigerator. Clean the interior with embossed surfaces. When using a hand truck to flooding. Be sure the refrigerator stays in place to the refrigerator. All types of water. If the ...Support Troubleshooting Tips Installation Instructions Operating Instructions Safety Instructions Care and cleaning of the refrigerator against the hand truck. Behind the Refrigerator Be careful when moving . 14 When pushing the refrigerator back, make sure you don't roll over the power cord or icemaker supply ...
... in an upright position during moving the refrigerator away from the sides of the refrigerator. Clean the interior with embossed surfaces. When using a hand truck to flooding. Be sure the refrigerator stays in place to the refrigerator. All types of water. If the ...Support Troubleshooting Tips Installation Instructions Operating Instructions Safety Instructions Care and cleaning of the refrigerator against the hand truck. Behind the Refrigerator Be careful when moving . 14 When pushing the refrigerator back, make sure you don't roll over the power cord or icemaker supply ...
Use and Care Manual
Page 15
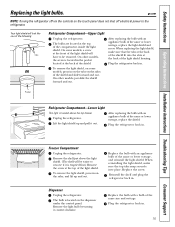
ge.com NOTE: Turning the refrigerator off via the controls on the touch panel does not shut off electrical power to be easier to remove if it counterclockwise. On other models, ... first.) Remove the screw at the top of the shield. Replace the bulb with an appliance bulb of the same size and wattage. Plug the refrigerator back in on some models, a screw at the back of the light shield. Safety Instructions Operating Instructions Installation Instructions Troubleshooting Tips Consumer Support Replacing the...
ge.com NOTE: Turning the refrigerator off via the controls on the touch panel does not shut off electrical power to be easier to remove if it counterclockwise. On other models, ... first.) Remove the screw at the top of the shield. Replace the bulb with an appliance bulb of the same size and wattage. Plug the refrigerator back in on some models, a screw at the back of the light shield. Safety Instructions Operating Instructions Installation Instructions Troubleshooting Tips Consumer Support Replacing the...

Use and Care Manual
Page 16
...the refrigerator has already been installed, remove the base grille (see Step 2 in Installing the Refrigerator. ...TOOLS YOU WILL NEED 3/8″ and 5/16″ Socket 1/2″ and 7/16″ Wrench Plastic Putty Knife Phillips Head Screwdriver 16 Call 800.GE.CARES (800.432.2737) or Visit our Website at: ge...ge.com (in Canada 1.800.661.1616). PREPARATION WATER SUPPLY TO THE ICEMAKER If the refrigerator... has an icemaker, it will have to be connected to a cold water line. Installation of the installer. • Product failure due to Consumer - A GE...
...the refrigerator has already been installed, remove the base grille (see Step 2 in Installing the Refrigerator. ...TOOLS YOU WILL NEED 3/8″ and 5/16″ Socket 1/2″ and 7/16″ Wrench Plastic Putty Knife Phillips Head Screwdriver 16 Call 800.GE.CARES (800.432.2737) or Visit our Website at: ge...ge.com (in Canada 1.800.661.1616). PREPARATION WATER SUPPLY TO THE ICEMAKER If the refrigerator... has an icemaker, it will have to be connected to a cold water line. Installation of the installer. • Product failure due to Consumer - A GE...

Use and Care Manual
Page 17
...disconnected. To disconnect, push in its final location. Bottom freezer hinge 17 DO NOT remove the handles. Installation Instructions MOVING THE REFRIGERATOR 1 LOADING THE REFRIGERATOR ONTO A HAND TRUCK Leave all entrances are more than 38″ wide, the doors must be removed. If all tape... the two Phillips head screws. DO NOT OVERTIGHTEN THE STRAP. To move the refrigerator, use a padded hand truck. Proceed to Installing the Refrigerator. 3 DISCONNECT THE WATER COUPLING (on some models) If the refrigerator has a water dispenser, there is a water line from the cabinet into the...
...disconnected. To disconnect, push in its final location. Bottom freezer hinge 17 DO NOT remove the handles. Installation Instructions MOVING THE REFRIGERATOR 1 LOADING THE REFRIGERATOR ONTO A HAND TRUCK Leave all entrances are more than 38″ wide, the doors must be removed. If all tape... the two Phillips head screws. DO NOT OVERTIGHTEN THE STRAP. To move the refrigerator, use a padded hand truck. Proceed to Installing the Refrigerator. 3 DISCONNECT THE WATER COUPLING (on some models) If the refrigerator has a water dispenser, there is a water line from the cabinet into the...
Use and Care Manual
Page 18
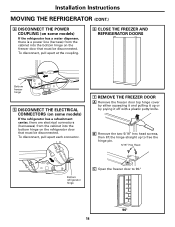
... door top hinge cover by either squeezing it and pulling it up to free the hinge pin. 5/16" Hex Head Bottom refrigerator hinge C Open the freezer door to 90.° 90° 18 To disconnect, pull apart at the coupling. 6 CLOSE THE FREEZER AND... is a power line (harness) from the cabinet into the bottom hinge on the refrigerator door that must be disconnected. Installation Instructions MOVING THE REFRIGERATOR (CONT.) 4 DISCONNECT THE POWER COUPLING (on some models) If the refrigerator has a refreshment center, there are electrical connectors (harnesses) from the cabinet into the...
... door top hinge cover by either squeezing it and pulling it up to free the hinge pin. 5/16" Hex Head Bottom refrigerator hinge C Open the freezer door to 90.° 90° 18 To disconnect, pull apart at the coupling. 6 CLOSE THE FREEZER AND... is a power line (harness) from the cabinet into the bottom hinge on the refrigerator door that must be disconnected. Installation Instructions MOVING THE REFRIGERATOR (CONT.) 4 DISCONNECT THE POWER COUPLING (on some models) If the refrigerator has a refreshment center, there are electrical connectors (harnesses) from the cabinet into the...

Use and Care Manual
Page 19
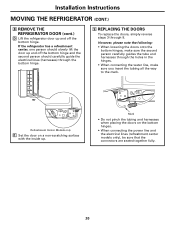
... up and off the bottom hinge, the second person should carefully guide the water line and power line (harness) through the bottom hinge. 8 REMOVE THE REFRIGERATOR DOOR (cont.) B Remove the two 5/16" hex head screws, then lift the hinge straight up to free the hinge pin. 5/16" Hex Head C Open ...the refrigerator door to 90.° 90° E Set the door on a non-scratching surface with the inside up. 8 REMOVE THE 90° REFRIGERATOR DOOR A Remove the refrigerator door top hinge cover by either squeezing it and pulling it up or...
... up and off the bottom hinge, the second person should carefully guide the water line and power line (harness) through the bottom hinge. 8 REMOVE THE REFRIGERATOR DOOR (cont.) B Remove the two 5/16" hex head screws, then lift the hinge straight up to free the hinge pin. 5/16" Hex Head C Open ...the refrigerator door to 90.° 90° E Set the door on a non-scratching surface with the inside up. 8 REMOVE THE 90° REFRIGERATOR DOOR A Remove the refrigerator door top hinge cover by either squeezing it and pulling it up or...
Use and Care Manual
Page 20
..., make sure the second person carefully guides the tube and harnesses through 8. If the refrigerator has a refreshment center, one person should slowly lift the door up . Installation Instructions MOVING THE REFRIGERATOR (CONT.) 8 REMOVE THE REFRIGERATOR DOOR (cont.) D Lift the refrigerator door up and off the bottom hinge and the second person should carefully guide...
..., make sure the second person carefully guides the tube and harnesses through 8. If the refrigerator has a refreshment center, one person should slowly lift the door up . Installation Instructions MOVING THE REFRIGERATOR (CONT.) 8 REMOVE THE REFRIGERATOR DOOR (cont.) D Lift the refrigerator door up and off the bottom hinge and the second person should carefully guide...

Use and Care Manual
Page 21
... for ease of installation, proper air circulation and plumbing and electrical connections: Sides 1/8″ (4 mm) Top 1″ (25 mm) Back 1″ (25 mm) 21 Installation Instructions INSTALLING THE REFRIGERATOR REFRIGERATOR LOCATION • Do not install the refrigerator where the temperature will go below 60°F (16°C) because it will not run often enough to...
... for ease of installation, proper air circulation and plumbing and electrical connections: Sides 1/8″ (4 mm) Top 1″ (25 mm) Back 1″ (25 mm) 21 Installation Instructions INSTALLING THE REFRIGERATOR REFRIGERATOR LOCATION • Do not install the refrigerator where the temperature will go below 60°F (16°C) because it will not run often enough to...


