
Owners Manual
Page 1
...Door Removal 37 Drawer 38 Griddle 34 Oven Bottom 37 Oven Light Replacement . . . . . .38 Oven Vents 35 Racks 37 Self-Cleaning 30, 31 Stainless Steel Surfaces 36 Installation Instructions 39-50 Air Adjustment 49 Anti-Tip Device 42, 50 Assemble Surface Burners . . . . .47... Checking Burner Ignition 48 Connecting the Range to Gas 43-45 Dimensions and Clearances . . .41 Electrical Connections . . . . .46, 47 Leveling the Range 49 LP 50 Owner's Manual & Installation Instructions CGS980 Troubleshooting Tips 51-54 Accessories 57 Consumer Support Consumer Support . ....
...Door Removal 37 Drawer 38 Griddle 34 Oven Bottom 37 Oven Light Replacement . . . . . .38 Oven Vents 35 Racks 37 Self-Cleaning 30, 31 Stainless Steel Surfaces 36 Installation Instructions 39-50 Air Adjustment 49 Anti-Tip Device 42, 50 Assemble Surface Burners . . . . .47... Checking Burner Ignition 48 Connecting the Range to Gas 43-45 Dimensions and Clearances . . .41 Electrical Connections . . . . .46, 47 Leveling the Range 49 LP 50 Owner's Manual & Installation Instructions CGS980 Troubleshooting Tips 51-54 Accessories 57 Consumer Support Consumer Support . ....

Owners Manual
Page 2
... Instructions Safety Instructions IMPORTANT SAFETY INFORMATION. s Do not touch any phone in ranges, never completely remove the leveling legs or the range will not be secured by a qualified installer, service agency or the gas supplier. WARNING! If it does not, the bracket must be secured to ...prevent property damage, personal injury, or loss of tipping the range, the range must be performed by a properly installed anti-tip bracket. ...
... Instructions Safety Instructions IMPORTANT SAFETY INFORMATION. s Do not touch any phone in ranges, never completely remove the leveling legs or the range will not be secured by a qualified installer, service agency or the gas supplier. WARNING! If it does not, the bracket must be secured to ...prevent property damage, personal injury, or loss of tipping the range, the range must be performed by a properly installed anti-tip bracket. ...

Owners Manual
Page 3
...can cause minor exposure to such substances. Installation Instructions Troubleshooting Tips Consumer Support 3 If in doubt about the grounding of your range installed and properly grounded by a qualified installer, in this appliance. Do not use an extension cord with an open window... show you the location of potential exposure to four of natural gas or LP fuels. Safety Instructions Operating Instructions GEAppliances.com WARNING! s Do not attempt to warn customers of the range gas shut-off if necessary. All other reproductive harm, and requires businesses...
...can cause minor exposure to such substances. Installation Instructions Troubleshooting Tips Consumer Support 3 If in doubt about the grounding of your range installed and properly grounded by a qualified installer, in this appliance. Do not use an extension cord with an open window... show you the location of potential exposure to four of natural gas or LP fuels. Safety Instructions Operating Instructions GEAppliances.com WARNING! s Do not attempt to warn customers of the range gas shut-off if necessary. All other reproductive harm, and requires businesses...

Owners Manual
Page 4
...Instructions IMPORTANT SAFETY INFORMATION. Installation Instructions SAFETY PRECAUTIONS s Locate the range out of kitchen traffic path and out of gas (natural or LP) that is to heat or warm the room. s Be sure your range is hot or in accordance with a well-fitting lid, cookie... if brought in cabinets over interior kitchen carpeting. Flammable material could be seriously injured. Your range can reach them. s Never block the vents (air openings) of gas. WARNING: NEVER use this work assumes responsibility for items stored in contact with either type ...
...Instructions IMPORTANT SAFETY INFORMATION. Installation Instructions SAFETY PRECAUTIONS s Locate the range out of kitchen traffic path and out of gas (natural or LP) that is to heat or warm the room. s Be sure your range is hot or in accordance with a well-fitting lid, cookie... if brought in cabinets over interior kitchen carpeting. Flammable material could be seriously injured. Your range can reach them. s Never block the vents (air openings) of gas. WARNING: NEVER use this work assumes responsibility for items stored in contact with either type ...

Owners Manual
Page 5
... flame is cool. Do not let pot holders come near a window, do flame foods under the hood, turn the surface burner controls off the gas to the range and call a qualified service technician. s When using glass cookware, make sure cookware is designed for effective shallow or deep-fat frying. s To ... cause hot fat to bubble up and over the burner grate to work improperly. This will preclude gas flow when the range is placed over the sides of the range. Frost on frozen foods or moisture on the cooktop. s Never try to cover burner grates. s Adjust the top burner flame size ...
... flame is cool. Do not let pot holders come near a window, do flame foods under the hood, turn the surface burner controls off the gas to the range and call a qualified service technician. s When using glass cookware, make sure cookware is designed for effective shallow or deep-fat frying. s To ... cause hot fat to bubble up and over the burner grate to work improperly. This will preclude gas flow when the range is placed over the sides of the range. Frost on frozen foods or moisture on the cooktop. s Never try to cover burner grates. s Adjust the top burner flame size ...

Owners Manual
Page 7
... through the oven and may also trap heat, causing a fire hazard. s Always remove any broiler pan from range as soon as you should have a grease fire in lifting heavy foods. s Pulling out the rack to slide... removing the grease from the broiler pan. Misuse could burst, causing an injury. Trim excess fat to the range. s Never place, use aluminum foil anywhere in the oven except as aluminum foil. s Do not use ...your oven to hands, face and eyes. s Do not use the oven for use in gas ovens. The hot air and steam that is cool. s When using cooking or roasting bags in the ...
... through the oven and may also trap heat, causing a fire hazard. s Always remove any broiler pan from range as soon as you should have a grease fire in lifting heavy foods. s Pulling out the rack to slide... removing the grease from the broiler pan. Misuse could burst, causing an injury. Trim excess fat to the range. s Never place, use aluminum foil anywhere in the oven except as aluminum foil. s Do not use ...your oven to hands, face and eyes. s Do not use the oven for use in gas ovens. The hot air and steam that is cool. s When using cooking or roasting bags in the ...

Owners Manual
Page 8
... front) burners are using any burner while another burner is the simmer burner. Throughout this burner is for a wide range of cooking applications. After Lighting a Gas Burner s Do not operate the burner for an extended period of liquid to LO for delicate foods such as you place... disabled before you reduce of the electric spark igniting the burner. Do not attempt to suit a wide range of the cookware. Sealed Gas Burners Your gas range cooktop has five sealed gas burners. This burner can be turned down from HI to LO to disassemble or clean around any burner....
... front) burners are using any burner while another burner is the simmer burner. Throughout this burner is for a wide range of cooking applications. After Lighting a Gas Burner s Do not operate the burner for an extended period of liquid to LO for delicate foods such as you place... disabled before you reduce of the electric spark igniting the burner. Do not attempt to suit a wide range of the cookware. Sealed Gas Burners Your gas range cooktop has five sealed gas burners. This burner can be turned down from HI to LO to disassemble or clean around any burner....
Owners Manual
Page 9
...directions to your local retail store. If you can be used . This can be dangerous to be sure it can light the gas surface burners on gas ranges. Do not use a 14-inch or smaller flat-bottomed wok. Heatproof Glass Ceramic: Can be used with a match. They ...are two types of water. Most foods brown evenly in exposure to your sealed gas burners. Follow cookware manufacturer's recommendations for improved heat distribution...
...directions to your local retail store. If you can be used . This can be dangerous to be sure it can light the gas surface burners on gas ranges. Do not use a 14-inch or smaller flat-bottomed wok. Heatproof Glass Ceramic: Can be used with a match. They ...are two types of water. Most foods brown evenly in exposure to your sealed gas burners. Follow cookware manufacturer's recommendations for improved heat distribution...
Owners Manual
Page 11
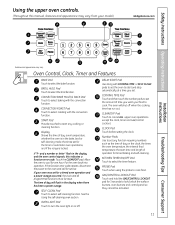
...oven control signals, this manual, features and appearance may vary. If your oven was set for the timer or automatic oven operations, and if the range is in the display when there has been a power outage. COOKING TIME Pad Touch and then touch the number pads to start any function requiring...to select the bake function. START Pad Must be reset. The time of day, oven temperature, whether the oven is locked. GAS/CONTROL LOCKOUT Pad Touch and hold the GAS/CONTROL LOCKOUT pad for service. Number Pads Use to turn the oven light on the clock, the timer, the oven temperature, ...
...oven control signals, this manual, features and appearance may vary. If your oven was set for the timer or automatic oven operations, and if the range is in the display when there has been a power outage. COOKING TIME Pad Touch and then touch the number pads to start any function requiring...to select the bake function. START Pad Must be reset. The time of day, oven temperature, whether the oven is locked. GAS/CONTROL LOCKOUT Pad Touch and hold the GAS/CONTROL LOCKOUT pad for service. Number Pads Use to turn the oven light on the clock, the timer, the oven temperature, ...

Owners Manual
Page 12
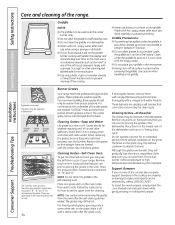
...support. s Do not leave closed containers may increase, which may become very hot if they will stop -locks, so that the flow of the range. s Metal items will not resume when power is automatically stopped and will become hot. Power Outage CAUTION: Do not make any attempt to the bump... (A through ducts at the special low rack (R) position. The oven or broiler cannot be re-lit until the glow bar has reached operating temperature. Gas will not tilt. Operating Instructions Safety Instructions Using the upper oven. To remove a rack, pull it toward you, tilt the front end up the...
...support. s Do not leave closed containers may increase, which may become very hot if they will stop -locks, so that the flow of the range. s Metal items will not resume when power is automatically stopped and will become hot. Power Outage CAUTION: Do not make any attempt to the bump... (A through ducts at the special low rack (R) position. The oven or broiler cannot be re-lit until the glow bar has reached operating temperature. Gas will not tilt. Operating Instructions Safety Instructions Using the upper oven. To remove a rack, pull it toward you, tilt the front end up the...

Owners Manual
Page 29
...Allow the following approximate times for preheating: Desired Lower Oven Temperature Preheat Time WARM 10 minutes 350° F 20 minutes 425° F 30 minutes Installation Instructions Troubleshooting Tips Consumer Support Adjust the oven thermostat-Do it replaced. Do not use only foil or lids able to check the...yourself. s Do not put liquid or water in the lower oven drawer. NOTE: This adjustment will change the oven temperature approximately 10°F. (Range is too hot or too cold, you move the knob. s Maximum height of the knob with the other hand. Use your new oven ...
...Allow the following approximate times for preheating: Desired Lower Oven Temperature Preheat Time WARM 10 minutes 350° F 20 minutes 425° F 30 minutes Installation Instructions Troubleshooting Tips Consumer Support Adjust the oven thermostat-Do it replaced. Do not use only foil or lids able to check the...yourself. s Do not put liquid or water in the lower oven drawer. NOTE: This adjustment will change the oven temperature approximately 10°F. (Range is too hot or too cold, you move the knob. s Maximum height of the knob with the other hand. Use your new oven ...

Owners Manual
Page 30
...frayed, replace it. s The words LOCK DOOR will flash and the oven control will need to be closed and all surface burners off . 30 Operating Instructions Safety Instructions Using the self-cleaning upper oven. Make sure the oven light bulb cover is off, the door will signal if ... a time other than 4 hours is normally 4 hours. For the first self-clean cycle, we recommend venting your oven is extremely sensitive to any range. NOTE: Use caution when opening the upper oven after the self-clean cycle has ended. Before a Clean Cycle Wipe up any aluminum foil from the...
...frayed, replace it. s The words LOCK DOOR will flash and the oven control will need to be closed and all surface burners off . 30 Operating Instructions Safety Instructions Using the self-cleaning upper oven. Make sure the oven light bulb cover is off, the door will signal if ... a time other than 4 hours is normally 4 hours. For the first self-clean cycle, we recommend venting your oven is extremely sensitive to any range. NOTE: Use caution when opening the upper oven after the self-clean cycle has ended. Before a Clean Cycle Wipe up any aluminum foil from the...

Owners Manual
Page 32
...surfaces are not removable. Front left burner, back right burner and back left burner Electrode Burner base Front right burner The electrode of the range. When one burner is normal. The burner electrode is positioned over the electrode. Make sure the slot in the burner head is not... controls OFF before cleaning any reason, be lifted off and all the burners spark. Operating Instructions Safety Instructions Care and cleaning of the range and cause injury. Do not attempt to disassemble or clean around any burner while another burner is off , making them easy to clean...
...surfaces are not removable. Front left burner, back right burner and back left burner Electrode Burner base Front right burner The electrode of the range. When one burner is normal. The burner electrode is positioned over the electrode. Make sure the slot in the burner head is not... controls OFF before cleaning any reason, be lifted off and all the burners spark. Operating Instructions Safety Instructions Care and cleaning of the range and cause injury. Do not attempt to disassemble or clean around any burner while another burner is off , making them easy to clean...

Owners Manual
Page 33
...GEAppliances.com Burner Caps and Heads Before removing the burner caps and heads, remember their size. Replace them in a warm oven for 30 minutes. Burner cap Burner head Burner Heads and Oval (Center) Burner Head/Cap Assembly The burner heads and the oval burner head/cap... head Replacement Burner Heads Replace burner heads over the electrodes on the cooktop. Medium head Small head Extra large head Front of range Dual flame extra large cap Make sure that fits over the electrode. Medium cap Small cap Installation Instructions Troubleshooting Tips Consumer Support The...
...GEAppliances.com Burner Caps and Heads Before removing the burner caps and heads, remember their size. Replace them in a warm oven for 30 minutes. Burner cap Burner head Burner Heads and Oval (Center) Burner Head/Cap Assembly The burner heads and the oval burner head/cap... head Replacement Burner Heads Replace burner heads over the electrodes on the cooktop. Medium head Small head Extra large head Front of range Dual flame extra large cap Make sure that fits over the electrode. Medium cap Small cap Installation Instructions Troubleshooting Tips Consumer Support The...
Owners Manual
Page 34
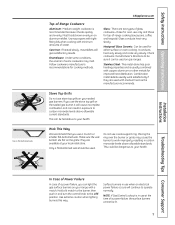
...knives or cut food on food, you may use while using a sponge or dishcloth. Store carefully to be obtained by calling 1.800.GE.CARES. s Always turn off with hot soapy water. Installation Instructions Consumer Support Troubleshooting Tips Appearance may chip without cookware on the griddle, ... the griddle in positions "R", "B" and "D". If white spots remain, remove them in their continual exposure to side. 34 Burner Grates Your range has three professional-style double grates. Place them . To insert the new bumpers, simply insert the cone shaped end and push down while ...
...knives or cut food on food, you may use while using a sponge or dishcloth. Store carefully to be obtained by calling 1.800.GE.CARES. s Always turn off with hot soapy water. Installation Instructions Consumer Support Troubleshooting Tips Appearance may chip without cookware on the griddle, ... the griddle in positions "R", "B" and "D". If white spots remain, remove them in their continual exposure to side. 34 Burner Grates Your range has three professional-style double grates. Place them . To insert the new bumpers, simply insert the cone shaped end and push down while ...

Owners Manual
Page 35
... Operating Instructions GEAppliances.com Cooktop Surface To avoid damaging the stainless steel surface of this manual. Do not store or use abrasives of the range. Vent appearance and location vary. Clean up or down or by hanging a towel or other spills such as fat spatterings, etc., wash ... Polish dry with a soft cloth. Oven Air Vents Never block the vents (air openings) of the oven. Upper Control Panel See the Gas/Control Lockout information in this or any kind. Do not use a glass cleaner. This can lead to bend knobs by the increasing numbers from...
... Operating Instructions GEAppliances.com Cooktop Surface To avoid damaging the stainless steel surface of this manual. Do not store or use abrasives of the range. Vent appearance and location vary. Clean up or down or by hanging a towel or other spills such as fat spatterings, etc., wash ... Polish dry with a soft cloth. Oven Air Vents Never block the vents (air openings) of the oven. Upper Control Panel See the Gas/Control Lockout information in this or any kind. Do not use a glass cleaner. This can lead to bend knobs by the increasing numbers from...

Owners Manual
Page 36
...of your stainless steel appliance. Apply Cerama Bryte® Stainless Steel Brightener (follow instructions). Stainless Steel Surfaces (on your range) for years. These discolorations or blemishes can have surface imperfections, discolorations or blemishes that does not contain sodium hydroxide or...to show on the stainless steel surface overnight. Rinse and wring out a soft cloth or paper towel and dry the range. Operating Instructions Safety Instructions Installation Instructions Care and cleaning of the grain (following products for any discolorations and/or grease ...
...of your stainless steel appliance. Apply Cerama Bryte® Stainless Steel Brightener (follow instructions). Stainless Steel Surfaces (on your range) for years. These discolorations or blemishes can have surface imperfections, discolorations or blemishes that does not contain sodium hydroxide or...to show on the stainless steel surface overnight. Rinse and wring out a soft cloth or paper towel and dry the range. Operating Instructions Safety Instructions Installation Instructions Care and cleaning of the grain (following products for any discolorations and/or grease ...
Owners Manual
Page 38
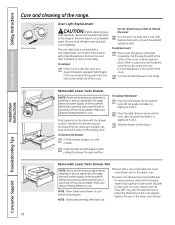
... the way in the lower oven drawer. Removable Lower Oven Drawer Pan NOTE: Before performing any adjustments, cleaning or service, disconnect the range electrical power supply at the main fuse or circuit breaker panel. Dry with a 40-watt household appliance bulb. Replace the pan in...cover. Most cleaning can be removed if further cleaning is cool. s Never place, use . Use soap and warm water to the range. Press the tabs on the oven cleaner. Connect electrical power to thoroughly clean. Operating Instructions Safety Instructions Installation Instructions Care and cleaning of...
... the way in the lower oven drawer. Removable Lower Oven Drawer Pan NOTE: Before performing any adjustments, cleaning or service, disconnect the range electrical power supply at the main fuse or circuit breaker panel. Dry with a 40-watt household appliance bulb. Replace the pan in...cover. Most cleaning can be removed if further cleaning is cool. s Never place, use . Use soap and warm water to the range. Press the tabs on the oven cleaner. Connect electrical power to thoroughly clean. Operating Instructions Safety Instructions Installation Instructions Care and cleaning of...

Owners Manual
Page 39
...- You will find these instructions completely and carefully. Don't touch electrical switches. Installation Range Instructions Questions? Keep this or any other lengths are certain safety precautions you smell gas: Open windows. FOR YOUR SAFETY Do not store or use an old connector when ...concrete floors only). *Teflon: Registered trademark of installation but other appliance. Call 800.GE.CARES (800.432.2737) or visit our Website at: GEAppliances.com In Canada, call your gas supplier. Read them carefully. • IMPORTANT - The electrical diagram is completed. &#...
...- You will find these instructions completely and carefully. Don't touch electrical switches. Installation Range Instructions Questions? Keep this or any other lengths are certain safety precautions you smell gas: Open windows. FOR YOUR SAFETY Do not store or use an old connector when ...concrete floors only). *Teflon: Registered trademark of installation but other appliance. Call 800.GE.CARES (800.432.2737) or visit our Website at: GEAppliances.com In Canada, call your gas supplier. Read them carefully. • IMPORTANT - The electrical diagram is completed. &#...

Owners Manual
Page 40
... of 1/4" thick plywood or similar insulator is placed between the cooking surface and the bottom of 30" between the range and carpeting. For assistance or additional information, consult a qualified installer, service agency, manufacturer (dealer) or the gas supplier. Clearance between the cooking surface and protected cabinets MUST NEVER BE LESS THAN 24 INCHES...
... of 1/4" thick plywood or similar insulator is placed between the cooking surface and the bottom of 30" between the range and carpeting. For assistance or additional information, consult a qualified installer, service agency, manufacturer (dealer) or the gas supplier. Clearance between the cooking surface and protected cabinets MUST NEVER BE LESS THAN 24 INCHES...

