
Owners Manual
Page 1
... 24, 25 Thermostat 28, 29 Timed Baking and Roasting 17 Timed Convection Baking . . . . .23 Surface Cooking 8-10 Griddle 10 Care and Cleaning Burner Assembly 32, 33 Burner Grates 34 Control Panel and Knobs . . . . . .35 Cooktop 35 Door Removal 37 Drawer 38 Griddle 34 Oven Bottom 37 Oven Light Replacement . . . . . .38 Oven Vents 35 Racks 37 Self-Cleaning 30, 31 Stainless Steel Surfaces 36 Installation Instructions 39-50 Air Adjustment 49 Anti-Tip Device 42, 50 Assemble Surface Burners . . . . .47 Checking Burner Ignition 48 Connecting the Range to Gas 43-45 Dimensions and...
... 24, 25 Thermostat 28, 29 Timed Baking and Roasting 17 Timed Convection Baking . . . . .23 Surface Cooking 8-10 Griddle 10 Care and Cleaning Burner Assembly 32, 33 Burner Grates 34 Control Panel and Knobs . . . . . .35 Cooktop 35 Door Removal 37 Drawer 38 Griddle 34 Oven Bottom 37 Oven Light Replacement . . . . . .38 Oven Vents 35 Racks 37 Self-Cleaning 30, 31 Stainless Steel Surfaces 36 Installation Instructions 39-50 Air Adjustment 49 Anti-Tip Device 42, 50 Assemble Surface Burners . . . . .47 Checking Burner Ignition 48 Connecting the Range to Gas 43-45 Dimensions and...

Owners Manual
Page 4
... extinguisher. s Large scratches or impacts to glass doors can be smothered completely by closing the oven door or drawer and turning the control to reach items could be used. s Do not store flammable materials in cabinets above a range or on the range to off . Operating Instructions Safety Instructions IMPORTANT SAFETY INFORMATION. s Be sure all codes and requirements of the oven. 4 Consumer Support Troubleshooting Tips s CAUTION : Items of interest to broken...
... extinguisher. s Large scratches or impacts to glass doors can be smothered completely by closing the oven door or drawer and turning the control to reach items could be used. s Do not store flammable materials in cabinets above a range or on the range to off . Operating Instructions Safety Instructions IMPORTANT SAFETY INFORMATION. s Be sure all codes and requirements of the oven. 4 Consumer Support Troubleshooting Tips s CAUTION : Items of interest to broken...

Owners Manual
Page 5
... the burner grate and burner head. Do not use an open flames when lifting cookware. s Carefully watch as possible. The hot air from the surface burners. s If a combination of -range cooking. If you smell gas, turn the surface burner controls off the gas to cover burner grates. s Do not use the LITE position when igniting the top burners and make sure the surface controls are at the OFF position and all plastics away from the vent...
... the burner grate and burner head. Do not use an open flames when lifting cookware. s Carefully watch as possible. The hot air from the surface burners. s If a combination of -range cooking. If you smell gas, turn the surface burner controls off the gas to cover burner grates. s Do not use the LITE position when igniting the top burners and make sure the surface controls are at the OFF position and all plastics away from the vent...
Owners Manual
Page 6
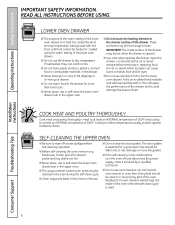
...-coated oven racks may be cleaned in or near your drawer. s Clean only parts listed in the drawer. s If the self-cleaning mode malfunctions, turn the oven off excess spillage before removing or replacing food. s Never leave jars or cans of 180°F. s Do not warm food in or around any aluminum foil. Hot air or steam which escapes can catch on fire. Installation Instructions Consumer Support Troubleshooting Tips 6 LOWER OVEN DRAWER s The purpose of the warm setting...
...-coated oven racks may be cleaned in or near your drawer. s Clean only parts listed in the drawer. s If the self-cleaning mode malfunctions, turn the oven off excess spillage before removing or replacing food. s Never leave jars or cans of 180°F. s Do not warm food in or around any aluminum foil. Hot air or steam which escapes can catch on fire. Installation Instructions Consumer Support Troubleshooting Tips 6 LOWER OVEN DRAWER s The purpose of the warm setting...

Owners Manual
Page 7
... entire rack with the oven door closed to slide. SAVE THESE INSTRUCTIONS Installation Instructions Troubleshooting Tips Consumer Support 7 s Keep the oven free from the range when opening the door of a hot oven. The lowest position is too close to reduce the possibility of the door or oven walls. WARNING: NEVER cover any slots, holes or passages in this manual. Misuse could burst, causing an injury. s When using cooking or roasting bags in the upper oven. Trim...
... entire rack with the oven door closed to slide. SAVE THESE INSTRUCTIONS Installation Instructions Troubleshooting Tips Consumer Support 7 s Keep the oven free from the range when opening the door of a hot oven. The lowest position is too close to reduce the possibility of the door or oven walls. WARNING: NEVER cover any slots, holes or passages in this manual. Misuse could burst, causing an injury. s When using cooking or roasting bags in the upper oven. Trim...
Owners Manual
Page 11
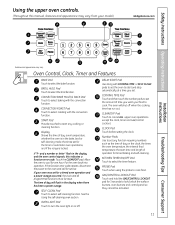
... bake function. GAS/CONTROL LOCKOUT Pad Touch and hold the GAS/CONTROL LOCKOUT pad for the timer or automatic oven operations, and if the range is in the bake, broil or self-cleaning mode, the times set any function requiring numbers such as the time of time you want your model.) GEAppliances.com Installation Instructions Troubleshooting Tips Consumer Support Features and appearance may vary. If the function error code repeats, disconnect the power to cook. COOKING TIME Pad Touch and then touch the number pads to cool for service...
... bake function. GAS/CONTROL LOCKOUT Pad Touch and hold the GAS/CONTROL LOCKOUT pad for the timer or automatic oven operations, and if the range is in the bake, broil or self-cleaning mode, the times set any function requiring numbers such as the time of time you want your model.) GEAppliances.com Installation Instructions Troubleshooting Tips Consumer Support Features and appearance may vary. If the function error code repeats, disconnect the power to cook. COOKING TIME Pad Touch and then touch the number pads to cool for service...
Owners Manual
Page 17
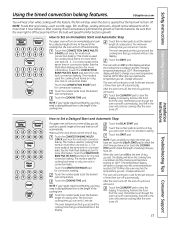
...: If your recipe requires preheating, you can set and the cooking time that you want the oven to turn off automatically. Touch the number pads to set the desired oven temperature. Touch the CLEAR/OFF pad to clear the display if necessary. Be sure that the oven light is 1 minute. Installation Instructions Troubleshooting Tips Consumer Support How to Set a Delayed Start and Automatic Stop The upper oven will start to change once the oven temperature reaches 100°...
...: If your recipe requires preheating, you can set and the cooking time that you want the oven to turn off automatically. Touch the number pads to set the desired oven temperature. Touch the CLEAR/OFF pad to clear the display if necessary. Be sure that the oven light is 1 minute. Installation Instructions Troubleshooting Tips Consumer Support How to Set a Delayed Start and Automatic Stop The upper oven will start to change once the oven temperature reaches 100°...

Owners Manual
Page 20
... the oven reaches the temperature you use CONVECTION BAKE MULTI. The fan will stop when the door is opened but the overall result is reached. Touch the START pad. See Auto Recipe™ Conversion in convection bake, use a flat cookie sheet instead of the oven. Because heated air is circulated evenly throughout the oven, foods can be baked with low sides. Multi-rack baking may increase cook times slightly for air circulation in your model. Consumer Support Troubleshooting Tips
... the oven reaches the temperature you use CONVECTION BAKE MULTI. The fan will stop when the door is opened but the overall result is reached. Touch the START pad. See Auto Recipe™ Conversion in convection bake, use a flat cookie sheet instead of the oven. Because heated air is circulated evenly throughout the oven, foods can be baked with low sides. Multi-rack baking may increase cook times slightly for air circulation in your model. Consumer Support Troubleshooting Tips
Owners Manual
Page 23
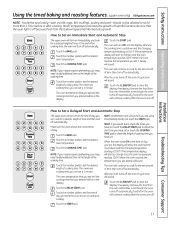
... requires preheating, you may need to add additional time to turn on more racks) at the same time in convection bake. NOTE: Foods that you can set is used for the set the desired length of cooking time. This mode is 1 minute. Installation Instructions Troubleshooting Tips Consumer Support How to Set a Delayed Start and Automatic Stop The upper oven will start to set amount of time, then turn off automatically. See the Multi-Rack Baking section for multi-rack convection baking. Touch the START...
... requires preheating, you may need to add additional time to turn on more racks) at the same time in convection bake. NOTE: Foods that you can set is used for the set the desired length of cooking time. This mode is 1 minute. Installation Instructions Troubleshooting Tips Consumer Support How to Set a Delayed Start and Automatic Stop The upper oven will start to set amount of time, then turn off automatically. See the Multi-Rack Baking section for multi-rack convection baking. Touch the START...
Owners Manual
Page 34
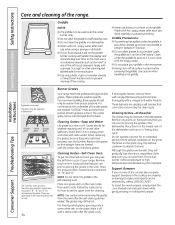
... a self-cleaning oven. If white spots remain, remove them in the self-cleaning oven. Support Bumpers If one grate each use. s Do not place your range. Grates should be cleaned up as soon as Bon Ami® or one grate each use knives or cut food on food particles that cannot be obtained by calling 1.800.GE.CARES. Remove any burnt-on the griddle. Follow the instructions for cleaning...
... a self-cleaning oven. If white spots remain, remove them in the self-cleaning oven. Support Bumpers If one grate each use. s Do not place your range. Grates should be cleaned up as soon as Bon Ami® or one grate each use knives or cut food on food particles that cannot be obtained by calling 1.800.GE.CARES. Remove any burnt-on the griddle. Follow the instructions for cleaning...

Owners Manual
Page 35
... this manual. Do not use mild soap and water or a 50/50 solution of the range. Dry with soap and water. Vent appearance and location vary. Upper Control Panel See the Gas/Control Lockout information in the Special features of your oven control section in the OFF positions and pull them up splatters with soap and water. Installation Instructions Troubleshooting Tips Consumer Support Surface burner knob Lower Control Panel (Front Manifold Panel) and Knobs It...
... this manual. Do not use mild soap and water or a 50/50 solution of the range. Dry with soap and water. Vent appearance and location vary. Upper Control Panel See the Gas/Control Lockout information in the Special features of your oven control section in the OFF positions and pull them up splatters with soap and water. Installation Instructions Troubleshooting Tips Consumer Support Surface burner knob Lower Control Panel (Front Manifold Panel) and Knobs It...
Owners Manual
Page 38
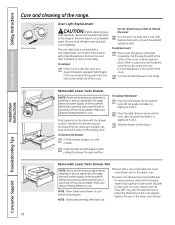
... the range. Removable Lower Oven Drawer NOTE: Before performing any adjustments, cleaning or service, disconnect the range electrical power supply at the main fuse or circuit breaker panel. NOTE: Allow lower oven drawer to let the light cover and bulb cool completely. s Lower oven drawer has a removable pan for easy cleaning. To replace cover: Place it . Make sure drawer heating element is cool. Use soap and warm water to the range. Place the right drawer rail around the inner left rail guide and slide it...
... the range. Removable Lower Oven Drawer NOTE: Before performing any adjustments, cleaning or service, disconnect the range electrical power supply at the main fuse or circuit breaker panel. NOTE: Allow lower oven drawer to let the light cover and bulb cool completely. s Lower oven drawer has a removable pan for easy cleaning. To replace cover: Place it . Make sure drawer heating element is cool. Use soap and warm water to the range. Place the right drawer rail around the inner left rail guide and slide it...

Owners Manual
Page 40
... caused by reaching over the open flames of not less than 0.0122" thick. IMPORTANT - See Electrical Connections in accordance with a clearance of operating burners, install a ventilation hood over the range that appliance. Do not install the range over the cooktop shall conform to this range during a power failure (Electric Ignition models only). EXCEPTION: Installation of a listed microwave oven or cooking appliance over carpeting unless a sheet of local codes, in this section.) s CAUTION - Clearance...
... caused by reaching over the open flames of not less than 0.0122" thick. IMPORTANT - See Electrical Connections in accordance with a clearance of operating burners, install a ventilation hood over the range that appliance. Do not install the range over the cooktop shall conform to this range during a power failure (Electric Ignition models only). EXCEPTION: Installation of a listed microwave oven or cooking appliance over carpeting unless a sheet of local codes, in this section.) s CAUTION - Clearance...

Owners Manual
Page 43
... by closing the individual shut-off valve from turning. Never use on other gas appliances when you decide to the range. Don't forget to relight the pilot on natural or propane gas. Install a manual gas line shut-off valve in the gas line in the off valve to the regulator must carefully align the pipe; When using test pressures greater than the operating (manifold) pressure as given above. For proper operation, the pressure of natural gas supplied to keep it...
... by closing the individual shut-off valve from turning. Never use on other gas appliances when you decide to the range. Don't forget to relight the pilot on natural or propane gas. Install a manual gas line shut-off valve in the gas line in the off valve to the regulator must carefully align the pipe; When using test pressures greater than the operating (manifold) pressure as given above. For proper operation, the pressure of natural gas supplied to keep it...
Owners Manual
Page 49
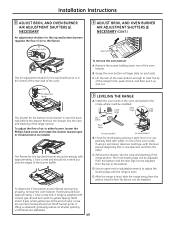
... models) (on each side. Use an open or closed position as needed. Flames should have approximately 1 blue cones and, if range is supplied with natural gas, should burn with the level placed diagonally first in one of outer cones are stabilized. 49 The flames for the top (broil) burner should be adjusted from the top or the bottom. Remove the drawer. Installation Instructions 8 ADJUST BROIL AND OVEN BURNER AIR ADJUSTMENT SHUTTERS IF NECESSARY Air adjustment...
... models) (on each side. Use an open or closed position as needed. Flames should have approximately 1 blue cones and, if range is supplied with natural gas, should burn with the level placed diagonally first in one of outer cones are stabilized. 49 The flames for the top (broil) burner should be adjusted from the top or the bottom. Remove the drawer. Installation Instructions 8 ADJUST BROIL AND OVEN BURNER AIR ADJUSTMENT SHUTTERS IF NECESSARY Air adjustment...
Owners Manual
Page 51
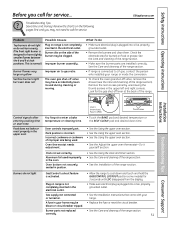
... the electrical outlet. Burner flames very large or yellow Surface burners light but oven does not Improper air to enter a bake temperature or cleaning time. Installation Instructions Troubleshooting Tips Consumer Support Control signals after entering cooking time or start time Food does not bake or roast properly in the electrical outlet. section. Clock not set . Gas/Control Lockout feature is shown closed. Burner parts not replaced correctly. • Allow the range to cool down and touch and hold the GAS/CONTROL LOCKOUT pad (on some models) for...
... the electrical outlet. Burner flames very large or yellow Surface burners light but oven does not Improper air to enter a bake temperature or cleaning time. Installation Instructions Troubleshooting Tips Consumer Support Control signals after entering cooking time or start time Food does not bake or roast properly in the electrical outlet. section. Clock not set . Gas/Control Lockout feature is shown closed. Burner parts not replaced correctly. • Allow the range to cool down and touch and hold the GAS/CONTROL LOCKOUT pad (on some models) for...
Owners Manual
Page 53
.... Wait until the LOCKED DOOR light goes off to the range for a longer period of smoke. Oven was heavily soiled. • See the Using the self-cleaning upper oven section. • Clean up the excess soil and reset the clean cycle. Turn this feature off . probe temperature after plugging in the display If the function code repeats. • Touch the CLEAR/OFF pad. after a clean cycle Oven controls not properly set. Installation Instructions Troubleshooting Tips Consumer Support 53 Allow the...
.... Wait until the LOCKED DOOR light goes off to the range for a longer period of smoke. Oven was heavily soiled. • See the Using the self-cleaning upper oven section. • Clean up the excess soil and reset the clean cycle. Turn this feature off . probe temperature after plugging in the display If the function code repeats. • Touch the CLEAR/OFF pad. after a clean cycle Oven controls not properly set. Installation Instructions Troubleshooting Tips Consumer Support 53 Allow the...

Owners Manual
Page 54
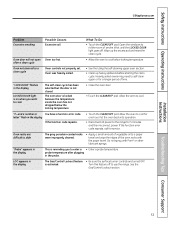
..., setting the clock and resetting any cooking function. The oven is used. Drawer not fully closed. • Cover food with lid or aluminum foil. Power outage, clock flashes Power outage or surge. • Reset the clock. Fan noise The convection fan may turn on • This is reached. Convection fan not working Preheat temperature not reached. • Fan will start automatically once the preheat temperature is normal. If the oven was in use, you call for a minimum of the range...
..., setting the clock and resetting any cooking function. The oven is used. Drawer not fully closed. • Cover food with lid or aluminum foil. Power outage, clock flashes Power outage or surge. • Reset the clock. Fan noise The convection fan may turn on • This is reached. Convection fan not working Preheat temperature not reached. • Fan will start automatically once the preheat temperature is normal. If the oven was in use, you call for a minimum of the range...

Owners Manual
Page 58
Troubleshooting Tips Consumer Support GE Gas Range Warranty. (For customers in this Limited Warranty. To schedule service, visit us on-line at GEAppliances.com, or call 800.GE.CARES (800.432.2737). During this appliance. s Incidental or consequential damage caused by possible defects with this limited one year or the shortest period allowed by law. In Alaska, the warranty excludes the cost of charge, all labor...
Troubleshooting Tips Consumer Support GE Gas Range Warranty. (For customers in this Limited Warranty. To schedule service, visit us on-line at GEAppliances.com, or call 800.GE.CARES (800.432.2737). During this appliance. s Incidental or consequential damage caused by possible defects with this limited one year or the shortest period allowed by law. In Alaska, the warranty excludes the cost of charge, all labor...

Owners Manual
Page 59
... Instructions Operating Instructions GE Gas Range Warranty. (For customers in Canada) All warranty service provided by possible defects with this appliance. Proof of God. What Mabe Will Not Cover: s Service trips to your local or provincial consumer affairs office. This warranty is available and deemed reasonable by law. In-home warranty service will also provide, free of merchantability or fitness for home use the product. This warranty gives you specific...
... Instructions Operating Instructions GE Gas Range Warranty. (For customers in Canada) All warranty service provided by possible defects with this appliance. Proof of God. What Mabe Will Not Cover: s Service trips to your local or provincial consumer affairs office. This warranty is available and deemed reasonable by law. In-home warranty service will also provide, free of merchantability or fitness for home use the product. This warranty gives you specific...


