Use and Care Manual
Page 1
Room Air Conditioners GEAppliances.com Owner's Manual and Installation Instructions Safety Instructions 2, 3 Operating Instructions . . . . . .4-9 Care and Cleaning Air Filter 11 Front Grille 10 Grille and Case 10 Outdoor Coils 10 Installation Instructions Before You Begin 12, 13 Installing a J-Model in an Existing Wall Case 14 Through-the-Wall Installation 15 Window Installation (Optional 16-21 Troubleshooting Tips 22 Normal Operating Sounds 22 Consumer Support Consumer Support Back Cover Warranty 23 *ENERGY STAR® labeled product Cool Only: Heat/Cool: AJCM 08, 10 AJCM ...
Room Air Conditioners GEAppliances.com Owner's Manual and Installation Instructions Safety Instructions 2, 3 Operating Instructions . . . . . .4-9 Care and Cleaning Air Filter 11 Front Grille 10 Grille and Case 10 Outdoor Coils 10 Installation Instructions Before You Begin 12, 13 Installing a J-Model in an Existing Wall Case 14 Through-the-Wall Installation 15 Window Installation (Optional 16-21 Troubleshooting Tips 22 Normal Operating Sounds 22 Consumer Support Consumer Support Back Cover Warranty 23 *ENERGY STAR® labeled product Cool Only: Heat/Cool: AJCM 08, 10 AJCM ...
Use and Care Manual
Page 2
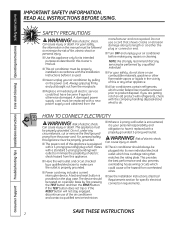
... should always be plugged into its own individual electrical outlet which could cause a fire hazard from the power cord. WARNING! This provides the best performance and also prevents overloading house wiring circuits which has a voltage rating that have it replaced with a properly grounded 3-prong wall outlet. Consumer Support Troubleshooting Tips Installation Instructions Care and Cleaning Operating Instructions Safety Instructions IMPORTANT SAFETY INFORMATION. A test and reset button is your personal...
... should always be plugged into its own individual electrical outlet which could cause a fire hazard from the power cord. WARNING! This provides the best performance and also prevents overloading house wiring circuits which has a voltage rating that have it replaced with a properly grounded 3-prong wall outlet. Consumer Support Troubleshooting Tips Installation Instructions Care and Cleaning Operating Instructions Safety Instructions IMPORTANT SAFETY INFORMATION. A test and reset button is your personal...
Use and Care Manual
Page 3
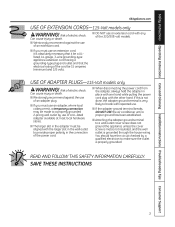
... electric shock. Safety Instructions Operating Instructions Care and Cleaning Installation Instructions Troubleshooting Tips Consumer Support GEAppliances.com USE OF EXTENSION CORDS-115-Volt models only WARNING! Can cause injury or death. ■ We strongly recommend against the use of an extension cord. ■ DO NOT use an extension cord with any of the 230/208-volt models. ■ If you must use of the power cord. ■ When disconnecting the power cord...
... electric shock. Safety Instructions Operating Instructions Care and Cleaning Installation Instructions Troubleshooting Tips Consumer Support GEAppliances.com USE OF EXTENSION CORDS-115-Volt models only WARNING! Can cause injury or death. ■ We strongly recommend against the use of an extension cord. ■ DO NOT use an extension cord with any of the 230/208-volt models. ■ If you must use of the power cord. ■ When disconnecting the power cord...
Use and Care Manual
Page 4
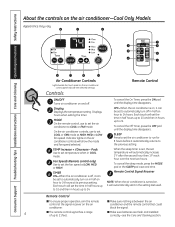
... Turns air conditioner on , it automatically returns to set temperature will automatically start in half an hour to 21 feet. ■ Make sure batteries are fresh and installed correctly-see the Care and Cleaning section. TEMP Increase + /Decrease - Each touch will show the mode and fan speed selected. Consumer Support Troubleshooting Tips Installation Instructions Care and Cleaning Operating Instructions Safety Instructions About the controls on the air conditioner control panel indicate the selected settings. Display Displays the temperature setting. Displays...
... Turns air conditioner on , it automatically returns to set temperature will automatically start in half an hour to 21 feet. ■ Make sure batteries are fresh and installed correctly-see the Care and Cleaning section. TEMP Increase + /Decrease - Each touch will show the mode and fan speed selected. Consumer Support Troubleshooting Tips Installation Instructions Care and Cleaning Operating Instructions Safety Instructions About the controls on the air conditioner control panel indicate the selected settings. Display Displays the temperature setting. Displays...

Use and Care Manual
Page 5
... FAN mode to 85°F in 1°F increments. Safety Instructions Operating Instructions Care and Cleaning Installation Instructions Troubleshooting Tips Consumer Support GEAppliances.com COOL MODE Remote Control 1. Press the INCREASE + / DECREASE - Press the MODE pad until the FAN indicator light is lit and the LOW, MED or HIGH indicator light is lit for the compressor to start and cooling to keep the room at least 3 minutes before switching back to a COOL setting. NOTE: If the air conditioner...
... FAN mode to 85°F in 1°F increments. Safety Instructions Operating Instructions Care and Cleaning Installation Instructions Troubleshooting Tips Consumer Support GEAppliances.com COOL MODE Remote Control 1. Press the INCREASE + / DECREASE - Press the MODE pad until the FAN indicator light is lit and the LOW, MED or HIGH indicator light is lit for the compressor to start and cooling to keep the room at least 3 minutes before switching back to a COOL setting. NOTE: If the air conditioner...
Use and Care Manual
Page 6
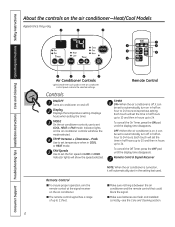
... HIGH. TEMP Increase + /Decrease - Display Displays the temperature setting. Pads Use to set the fan speed at its previous setting. Controls ON/OFF Turns air conditioner on the air conditioner-Heat/Cool Models Appearance may vary. Consumer Support Troubleshooting Tips Installation Instructions Care and Cleaning Operating Instructions Safety Instructions About the controls on and off in half an hour to 24 hours. Displays hours when setting the timer. FAN Speeds Use to automatically turn off . Each touch will automatically start in the setting last used. ■...
... HIGH. TEMP Increase + /Decrease - Display Displays the temperature setting. Pads Use to set the fan speed at its previous setting. Controls ON/OFF Turns air conditioner on the air conditioner-Heat/Cool Models Appearance may vary. Consumer Support Troubleshooting Tips Installation Instructions Care and Cleaning Operating Instructions Safety Instructions About the controls on and off in half an hour to 24 hours. Displays hours when setting the timer. FAN Speeds Use to automatically turn off . Each touch will automatically start in the setting last used. ■...
Use and Care Manual
Page 7
... the room temperature. A thermostat is used to COOL. pads to provide air circulation and filtering without cooling or heating. For Maximum Heating-Select the HEAT mode and HIGH fan with a middle set the desired temperature 60°F to 85°F in 1°F increments. Press COOL pad. 2. Control Panel Press the MODE pad until HIGH or LOW indicator light is lit for desired fan speed. 3. Safety Instructions Operating Instructions Care and Cleaning Installation Instructions Troubleshooting Tips Consumer Support GEAppliances.com COOL MODE Remote Control 1.
... the room temperature. A thermostat is used to COOL. pads to provide air circulation and filtering without cooling or heating. For Maximum Heating-Select the HEAT mode and HIGH fan with a middle set the desired temperature 60°F to 85°F in 1°F increments. Press COOL pad. 2. Control Panel Press the MODE pad until HIGH or LOW indicator light is lit for desired fan speed. 3. Safety Instructions Operating Instructions Care and Cleaning Installation Instructions Troubleshooting Tips Consumer Support GEAppliances.com COOL MODE Remote Control 1.
Use and Care Manual
Page 8
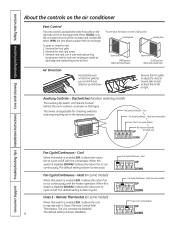
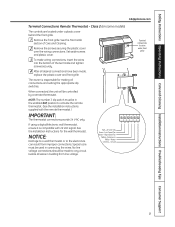
Consumer Support Troubleshooting Tips Installation Instructions Care and Cleaning Operating Instructions Safety Instructions About the controls on the air conditioner Vent Control The vent control is enabled (UP), it allows the unit to operate with a Class 2 Remote Control Wall Thermostat. Remove the vent card screw. 3. Fan Cycle/Continuous - Heat (on some models) When this switch is located behind the room cabinet-as shown in this figure. Cool Fan Cycle/Continuous - Remote Thermostat (on some models) Class 2 (on the front grille let you control the air direction up ...
Consumer Support Troubleshooting Tips Installation Instructions Care and Cleaning Operating Instructions Safety Instructions About the controls on the air conditioner Vent Control The vent control is enabled (UP), it allows the unit to operate with a Class 2 Remote Control Wall Thermostat. Remove the vent card screw. 3. Fan Cycle/Continuous - Heat (on some models) When this switch is located behind the room cabinet-as shown in this figure. Cool Fan Cycle/Continuous - Remote Thermostat (on some models) Class 2 (on the front grille let you control the air direction up ...
Use and Care Manual
Page 9
... a plastic cover behind the front grille. 1 Remove the front grille. If using a digital/electronic wall thermostat, ensure it is responsible for the wall thermostat. Safety Instructions Operating Instructions Care and Cleaning Installation Instructions Troubleshooting Tips Consumer Support GEAppliances.com Terminal Connections Remote Thermostat - When connected, the unit will be made , replace the plastic cover and front grille. No line voltage connections should be controlled by a remote thermostat. Class 2 (on some models) The controls are located under front grille 9
... a plastic cover behind the front grille. 1 Remove the front grille. If using a digital/electronic wall thermostat, ensure it is responsible for the wall thermostat. Safety Instructions Operating Instructions Care and Cleaning Installation Instructions Troubleshooting Tips Consumer Support GEAppliances.com Terminal Connections Remote Thermostat - When connected, the unit will be made , replace the plastic cover and front grille. No line voltage connections should be controlled by a remote thermostat. Class 2 (on some models) The controls are located under front grille 9
Use and Care Manual
Page 10
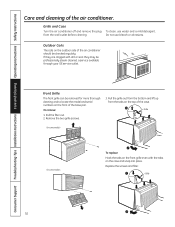
... air conditioner. Outdoor Coils The coils on the top of the base pan. If they are clogged with the tabs on the front of the case. Remove the two grille screws. 3. Pull the grille out from the bottom and lift up from the wall outlet before cleaning. To remove: 1. Do not use water and a mild detergent. Consumer Support Troubleshooting Tips Installation Instructions Care and Cleaning Operating Instructions Safety Instructions Care and cleaning...
... air conditioner. Outdoor Coils The coils on the top of the base pan. If they are clogged with the tabs on the front of the case. Remove the two grille screws. 3. Pull the grille out from the bottom and lift up from the wall outlet before cleaning. To remove: 1. Do not use water and a mild detergent. Consumer Support Troubleshooting Tips Installation Instructions Care and Cleaning Operating Instructions Safety Instructions Care and cleaning...
Use and Care Manual
Page 11
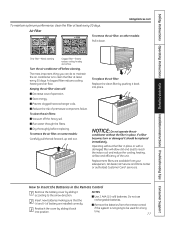
... Remote Control 1 Remove the battery cover by sliding it back into place. How to Insert the Batteries in place. Do not use rechargeable batteries. ■ Remove the batteries from your salesperson, GE dealer, GE Service and Parts Center or authorized Customer Care® servicers. Dirty filter-Needs cleaning Clogged filter-Greatly reduces cooling, heating and airflow. Turn the air conditioner off the heavy soil. ■ Run water through the filters. ■ Dry thoroughly before cleaning. If a filter...
... Remote Control 1 Remove the battery cover by sliding it back into place. How to Insert the Batteries in place. Do not use rechargeable batteries. ■ Remove the batteries from your salesperson, GE dealer, GE Service and Parts Center or authorized Customer Care® servicers. Dirty filter-Needs cleaning Clogged filter-Greatly reduces cooling, heating and airflow. Turn the air conditioner off the heavy soil. ■ Run water through the filters. ■ Dry thoroughly before cleaning. If a filter...
Use and Care Manual
Page 12
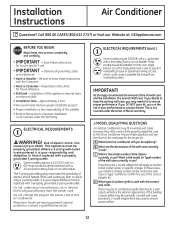
... power cord of the GE warranty. Do not change the plug on the next page for future reference. • Skill level - These models should be used with a time delay fuse or circuit breaker. GE strongly recommends the removal of the old wall case and the installation of this air conditioner. This is not covered under any circumstances, cut or remove the third (ground) prong from overheating wires. J-MODEL QUALIFYING QUESTIONS J-model air conditioners may need a kit...
... power cord of the GE warranty. Do not change the plug on the next page for future reference. • Skill level - These models should be used with a time delay fuse or circuit breaker. GE strongly recommends the removal of the old wall case and the installation of this air conditioner. This is not covered under any circumstances, cut or remove the third (ground) prong from overheating wires. J-MODEL QUALIFYING QUESTIONS J-model air conditioners may need a kit...
Use and Care Manual
Page 13
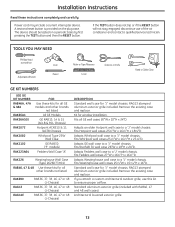
... a custom architectural outdoor grille, use of the air conditioner and contact a qualified service technician. Architectural louvered exterior grille. 13 Fits Fedders wall cases 27″W x 163⁄4″H x 163⁄4″D. Fits Westinghouse wall cases 257⁄ 8″W x 157⁄ 16″H x 16″D. Power cord may include a current interrupter device. Adapts Fedders wall case to a "J" model chassis. Remove the existing case and replace. A test and reset button is...
... a custom architectural outdoor grille, use of the air conditioner and contact a qualified service technician. Architectural louvered exterior grille. 13 Fits Fedders wall cases 27″W x 163⁄4″H x 163⁄4″D. Fits Westinghouse wall cases 257⁄ 8″W x 157⁄ 16″H x 16″D. Power cord may include a current interrupter device. Adapts Fedders wall case to a "J" model chassis. Remove the existing case and replace. A test and reset button is...

Use and Care Manual
Page 14
... COMPRESSOR 6 ATTACH FRONT GRILLE An opening for the power cord is secure. 14 Installation Instructions INSTALLING A J-MODEL IN AN EXISTING WALL CASE Read these instructions completely and carefully. 1 REMOVE LOCKING PLATE ON FRONT LEFT SIDE Locking plate Remove screw 4 REINSTALL LOCKING PLATE WITH TAB BEHIND WALL CASE FLANGE. Remove shipping pads (if present) 3 CAREFULLY SLIDE AIR CONDITIONER BACK INTO CASE Make sure that the tubing on the unit...
... COMPRESSOR 6 ATTACH FRONT GRILLE An opening for the power cord is secure. 14 Installation Instructions INSTALLING A J-MODEL IN AN EXISTING WALL CASE Read these instructions completely and carefully. 1 REMOVE LOCKING PLATE ON FRONT LEFT SIDE Locking plate Remove screw 4 REINSTALL LOCKING PLATE WITH TAB BEHIND WALL CASE FLANGE. Remove shipping pads (if present) 3 CAREFULLY SLIDE AIR CONDITIONER BACK INTO CASE Make sure that the tubing on the unit...
Use and Care Manual
Page 15
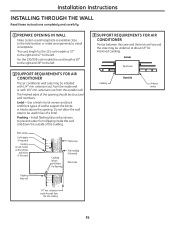
...) 3 SUPPORT REQUIREMENTS FOR AIR CONDITIONER Mortar between the case and the brick wall around the case may be installed with 1/4″ min. The cord length for improved caulking. Do not allow the wall case to the left . Inside Top of a lintel. Installation Instructions INSTALLING THROUGH THE WALL Read these instructions completely and carefully. 1 PREPARE OPENING IN WALL Make certain a wall receptacle is available close to the hole location...
...) 3 SUPPORT REQUIREMENTS FOR AIR CONDITIONER Mortar between the case and the brick wall around the case may be installed with 1/4″ min. The cord length for improved caulking. Do not allow the wall case to the left . Inside Top of a lintel. Installation Instructions INSTALLING THROUGH THE WALL Read these instructions completely and carefully. 1 PREPARE OPENING IN WALL Make certain a wall receptacle is available close to the hole location...
Use and Care Manual
Page 16
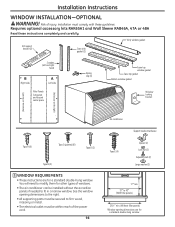
... power cord. 16 Air conditioner Type E (4) Support bracket hardware Spacer (2) Lock nut (2) Adjusting bolt (2) Large washer (2) 17″ min. 31″ to 43″ (With filler panels) 261⁄4″ min. (Without filler panels) Window opening dimensions to the right. • All supporting parts must be installed without the accordion panels if needed to fit in a narrow window. You will need to firm wood, masonry or metal. • The electrical...
... power cord. 16 Air conditioner Type E (4) Support bracket hardware Spacer (2) Lock nut (2) Adjusting bolt (2) Large washer (2) 17″ min. 31″ to 43″ (With filler panels) 261⁄4″ min. (Without filler panels) Window opening dimensions to the right. • All supporting parts must be installed without the accordion panels if needed to fit in a narrow window. You will need to firm wood, masonry or metal. • The electrical...
Use and Care Manual
Page 21
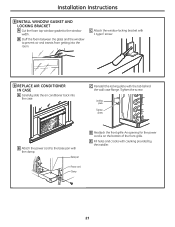
... with 1 type E screw. 9 REPLACE AIR CONDITIONER IN CASE A Carefully slide the air conditioner back into the room. Base pan Power cord Clamp D Reattach the front grille. Tighten the screw. C Reinstall the locking plate with caulking provided by the installer. 21 Installation Instructions 8 INSTALL WINDOW GASKET AND LOCKING BRACKET A Cut the foam top window gasket to the window width. C Attach the window locking bracket with the clamp. An opening for the power cord is...
... with 1 type E screw. 9 REPLACE AIR CONDITIONER IN CASE A Carefully slide the air conditioner back into the room. Base pan Power cord Clamp D Reattach the front grille. Tighten the screw. C Reinstall the locking plate with caulking provided by the installer. 21 Installation Instructions 8 INSTALL WINDOW GASKET AND LOCKING BRACKET A Cut the foam top window gasket to the window width. C Attach the window locking bracket with the clamp. An opening for the power cord is...
Use and Care Manual
Page 22
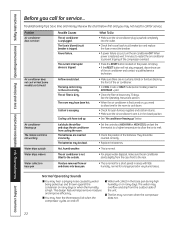
... fuse/circuit breaker box and replace the fuse or reset the breaker. • If power failure occurs, turn the air conditioner OFF. The current interrupter device is tripped. Cooling coils have been hot. Hot, humid weather. They should Air conditioner freezing up and thrown against the condenser on rainy days. The batteries may not be set the thermostat to a higher temperature to allow time for the room to the outside Water...
... fuse/circuit breaker box and replace the fuse or reset the breaker. • If power failure occurs, turn the air conditioner OFF. The current interrupter device is tripped. Cooling coils have been hot. Hot, humid weather. They should Air conditioner freezing up and thrown against the condenser on rainy days. The batteries may not be set the thermostat to a higher temperature to allow time for the room to the outside Water...
Use and Care Manual
Page 23
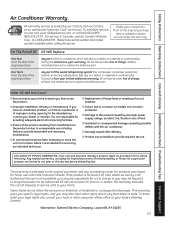
... damage caused by our Factory Service Centers, or an authorized Customer Care® technician. To schedule service, on models not corrosionprotected. ■ Damage to state. During this air conditioner. ■ Damage caused after delivery. ■ Product not accessible to obtain service under the warranty. This warranty is accessible for home use the product. ■ Improper installation, delivery or maintenance. Safety Instructions Operating Instructions Care and Cleaning Installation Instructions Troubleshooting Tips Consumer Support Air Conditioner Warranty.
... damage caused by our Factory Service Centers, or an authorized Customer Care® technician. To schedule service, on models not corrosionprotected. ■ Damage to state. During this air conditioner. ■ Damage caused after delivery. ■ Product not accessible to obtain service under the warranty. This warranty is accessible for home use the product. ■ Improper installation, delivery or maintenance. Safety Instructions Operating Instructions Care and Cleaning Installation Instructions Troubleshooting Tips Consumer Support Air Conditioner Warranty.
Quick Specs
Page 1
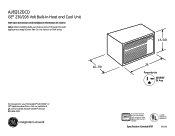
....626.2000. 26 16-7/8 Perpendicular 230/208V 20 Amp Note: When installing units in through -the-wall applic Do not restrict air flow areas. AJEQ12DCD GE® 230/208 Volt Built-In Heat and Cool Unit Wall Case Dimensions and Installation Information (in inches) Note: When installing slide-out chassis units in through -the-wall applications, keep louvers free. AJCQ12DCD Total volume and shelf area are calculated...
....626.2000. 26 16-7/8 Perpendicular 230/208V 20 Amp Note: When installing units in through -the-wall applic Do not restrict air flow areas. AJEQ12DCD GE® 230/208 Volt Built-In Heat and Cool Unit Wall Case Dimensions and Installation Information (in inches) Note: When installing slide-out chassis units in through -the-wall applications, keep louvers free. AJCQ12DCD Total volume and shelf area are calculated...

