Use and Care Manual
Page 1
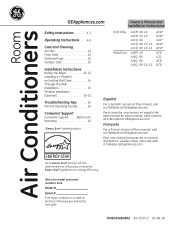
...aise de ce manuel d'utilisation, veuillez visiter notre site web à l'adresse GEAppliances.com. As an ENERGY STAR® partner, GE has determined that this manual, visit our Website at GEAppliances.com. TINSEA568JBRZ 49-7597-2 05-09 JR Française For a ...and Cleaning Air Filter 11 Front Grille 10 Grille and Case 10 Outdoor Coils 10 Installation Instructions Before You Begin 12, 13 Installing a J-Model in an Existing Wall Case 14 Through-the-Wall Installation 15 Window Installation (Optional 16-21 Troubleshooting Tips 22 Normal Operating Sounds 22 Consumer Support...
...aise de ce manuel d'utilisation, veuillez visiter notre site web à l'adresse GEAppliances.com. As an ENERGY STAR® partner, GE has determined that this manual, visit our Website at GEAppliances.com. TINSEA568JBRZ 49-7597-2 05-09 JR Française For a ...and Cleaning Air Filter 11 Front Grille 10 Grille and Case 10 Outdoor Coils 10 Installation Instructions Before You Begin 12, 13 Installing a J-Model in an Existing Wall Case 14 Through-the-Wall Installation 15 Window Installation (Optional 16-21 Troubleshooting Tips 22 Normal Operating Sounds 22 Consumer Support...
Use and Care Manual
Page 3
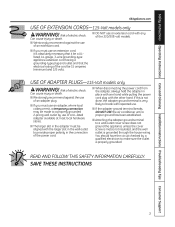
...■ We strongly recommend against the use of an extension cord. ■ DO NOT use an extension cord with any of the 230/208-volt models. ■ If you must use an adapter, where local codes permit, a temporary connection may be made to a properly grounded 2-prong wall outlet ...is properly grounded. READ AND FOLLOW THIS SAFETY INFORMATION CAREFULLY. Risk of electric shock. Risk of electric shock. USE OF ADAPTER PLUGS-115-Volt models only WARNING! Can cause injury or death. ■ We strongly recommend against the use of the power cord. ■ When disconnecting the power...
...■ We strongly recommend against the use of an extension cord. ■ DO NOT use an extension cord with any of the 230/208-volt models. ■ If you must use an adapter, where local codes permit, a temporary connection may be made to a properly grounded 2-prong wall outlet ...is properly grounded. READ AND FOLLOW THIS SAFETY INFORMATION CAREFULLY. Risk of electric shock. Risk of electric shock. USE OF ADAPTER PLUGS-115-Volt models only WARNING! Can cause injury or death. ■ We strongly recommend against the use of the power cord. ■ When disconnecting the power...
Use and Care Manual
Page 4
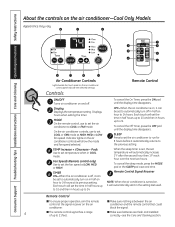
... Care and Cleaning Operating Instructions Safety Instructions About the controls on and off. Controls ON/OFF Turns air conditioner on the air conditioner-Cool Only Models Appearance may vary. Displays hours when setting the timer. On the air conditioner controls, use to set the air conditioner to set to 21 feet...
... Care and Cleaning Operating Instructions Safety Instructions About the controls on and off. Controls ON/OFF Turns air conditioner on the air conditioner-Cool Only Models Appearance may vary. Displays hours when setting the timer. On the air conditioner controls, use to set the air conditioner to set to 21 feet...
Use and Care Manual
Page 6
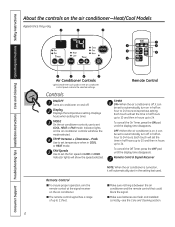
... hours up to 10 and then in hours up to 24. Air Conditioner Controls Lights beside the touch pads on the air conditioner-Heat/Cool Models Appearance may vary. To cancel the Off Timer, press the OFF pad until the display time disappears. NOTE: When the air conditioner is turned on...
... hours up to 10 and then in hours up to 24. Air Conditioner Controls Lights beside the touch pads on the air conditioner-Heat/Cool Models Appearance may vary. To cancel the Off Timer, press the OFF pad until the display time disappears. NOTE: When the air conditioner is turned on...
Use and Care Manual
Page 8
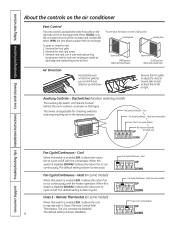
...hole Screw hole OPEN position (Mesh end toward back) Screw hole CLOSE position (Mesh end toward front) Air Direction Horizontal louvers on some models) No function (reserved for checking switches and ensuring they are disabled. 8 The default setting is enabled (UP), it allows the indoor fan... to run continuously. Fan Cycle/Continuous - Heat (on some models) Class 2 (on the front grille let you control the air direction up and down (continuous). When this figure. Fan Cycle/Continuous - Remove vent...
...hole Screw hole OPEN position (Mesh end toward back) Screw hole CLOSE position (Mesh end toward front) Air Direction Horizontal louvers on some models) No function (reserved for checking switches and ensuring they are disabled. 8 The default setting is enabled (UP), it allows the indoor fan... to run continuously. Fan Cycle/Continuous - Heat (on some models) Class 2 (on the front grille let you control the air direction up and down (continuous). When this figure. Fan Cycle/Continuous - Remove vent...
Use and Care Manual
Page 9
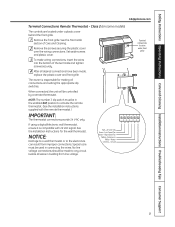
Class 2 (on some models) The controls are located under front grille 9 See the Installation Instructions for making all connections and setting the appropriate dip switches. Isolate all desired connections ...
Class 2 (on some models) The controls are located under front grille 9 See the Installation Instructions for making all connections and setting the appropriate dip switches. Isolate all desired connections ...
Use and Care Manual
Page 10
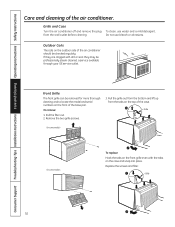
... the top of the air conditioner. Front Grille The front grille can be checked regularly. Replace the screws and filter. Grille Tab On some models On some models To replace: Hook the tabs on the front of the base pan. Pull the grille out from the bottom and lift up from the... wall outlet before cleaning. To clean, use bleach or abrasives. If they may be professionally steam cleaned, a service available through your GE service outlet. To remove...
... the top of the air conditioner. Front Grille The front grille can be checked regularly. Replace the screws and filter. Grille Tab On some models On some models To replace: Hook the tabs on the front of the base pan. Pull the grille out from the bottom and lift up from the... wall outlet before cleaning. To clean, use bleach or abrasives. If they may be professionally steam cleaned, a service available through your GE service outlet. To remove...
Use and Care Manual
Page 11
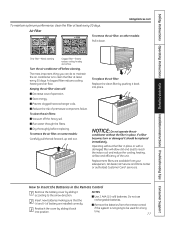
...Control 1 Remove the battery cover by pushing it should be used for a long time. 11 To remove the air filter, on other models: FRONT FRONT Pull it according to reach the indoor coil and reduce the cooling, heating, airflow and efficiency of premature component failure. NOTICE:.... Do not use rechargeable batteries. ■ Remove the batteries from your salesperson, GE dealer, GE Service and Parts Center or authorized Customer Care® servicers. Air Filter To remove the air filter, on some models: Carefully pull the tab forward, up and out. How to Insert the Batteries ...
...Control 1 Remove the battery cover by pushing it should be used for a long time. 11 To remove the air filter, on other models: FRONT FRONT Pull it according to reach the indoor coil and reduce the cooling, heating, airflow and efficiency of premature component failure. NOTICE:.... Do not use rechargeable batteries. ■ Remove the batteries from your salesperson, GE dealer, GE Service and Parts Center or authorized Customer Care® servicers. Air Filter To remove the air filter, on some models: Carefully pull the tab forward, up and out. How to Insert the Batteries ...
Use and Care Manual
Page 12
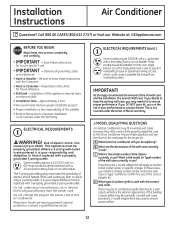
...the case to confirm the use ? If the wall outlet you need the chassis model number and/or the wall case or "type" number to the GE air conditioner. ELECTRICAL REQUIREMENTS (cont.) Some models require 230/208-volt a.c., protected with the Consumer. • Note to keep ... these instructions completely and carefully. • IMPORTANT - Can cause injury or death. Some models require a 115/120-volt a.c., 60-Hz grounded outlet protected with a properly grounded 3-prong wall outlet. GE strongly recommends the removal of the old wall case and the installation of the building. However...
...the case to confirm the use ? If the wall outlet you need the chassis model number and/or the wall case or "type" number to the GE air conditioner. ELECTRICAL REQUIREMENTS (cont.) Some models require 230/208-volt a.c., protected with the Consumer. • Note to keep ... these instructions completely and carefully. • IMPORTANT - Can cause injury or death. Some models require a 115/120-volt a.c., 60-Hz grounded outlet protected with a properly grounded 3-prong wall outlet. GE strongly recommends the removal of the old wall case and the installation of the building. However...
Use and Care Manual
Page 13
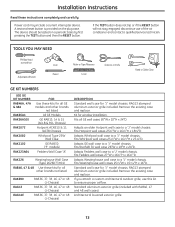
... 48 (J-Chassis) RAB36, 37, 38, 46, 47 or 48 (J-Chassis) DESCRIPTION: Standard wall case for all GE models and other brands not listed. Fits all other brands not listed All GE Models GE RAB13, 14 & 15 (ACLB & RCL Chassis) Hotpoint ACXB10 & 11 (ACTB Chassis) Whirlpool Type 23W Wall Case... GE RAB30 ("F" models) Fedders Wall Case "A" RAK126 Westinghouse Wall Case (Type 2626D73H01) RAB46, 47 & 48 Use these kits for all GE wall cases 26″W x...
... 48 (J-Chassis) RAB36, 37, 38, 46, 47 or 48 (J-Chassis) DESCRIPTION: Standard wall case for all GE models and other brands not listed. Fits all other brands not listed All GE Models GE RAB13, 14 & 15 (ACLB & RCL Chassis) Hotpoint ACXB10 & 11 (ACTB Chassis) Whirlpool Type 23W Wall Case... GE RAB30 ("F" models) Fedders Wall Case "A" RAK126 Westinghouse Wall Case (Type 2626D73H01) RAB46, 47 & 48 Use these kits for all GE wall cases 26″W x...

Use and Care Manual
Page 14
... SHIPPING PADS (IF PRESENT) INSIDE AIR CONDITIONER NEXT TO COMPRESSOR 6 ATTACH FRONT GRILLE An opening for the power cord is secure. 14 Installation Instructions INSTALLING A J-MODEL IN AN EXISTING WALL CASE Read these instructions completely and carefully. 1 REMOVE LOCKING PLATE ON FRONT LEFT SIDE Locking plate Remove screw 4 REINSTALL LOCKING PLATE...
... SHIPPING PADS (IF PRESENT) INSIDE AIR CONDITIONER NEXT TO COMPRESSOR 6 ATTACH FRONT GRILLE An opening for the power cord is secure. 14 Installation Instructions INSTALLING A J-MODEL IN AN EXISTING WALL CASE Read these instructions completely and carefully. 1 REMOVE LOCKING PLATE ON FRONT LEFT SIDE Locking plate Remove screw 4 REINSTALL LOCKING PLATE...
Use and Care Manual
Page 15
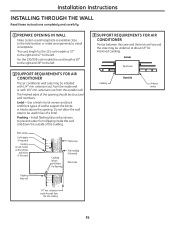
...; min. Use a lintel in lieu of the case) Plaster line Caulking (above the opening should be undercut at about 45° for the 115-volt models is 72″ to the right and 47″ to install a receptacle. Inside Top of the opening . Brick veneer Lintel angle (if required) Caulking (on... veneer and brick and block types of the building. Lintel - Flashing - extension inside the wall from dripping inside of a lintel. For the 230/208-volt models the cord length is 65″ to the right and 39″ to prevent water from the trim molding 15 Do not allow the wall...
...; min. Use a lintel in lieu of the case) Plaster line Caulking (above the opening should be undercut at about 45° for the 115-volt models is 72″ to the right and 47″ to install a receptacle. Inside Top of the opening . Brick veneer Lintel angle (if required) Caulking (on... veneer and brick and block types of the building. Lintel - Flashing - extension inside the wall from dripping inside of a lintel. For the 230/208-volt models the cord length is 65″ to the right and 39″ to prevent water from the trim molding 15 Do not allow the wall...
Use and Care Manual
Page 22
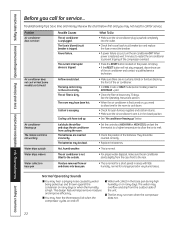
... filter at HIGH FAN or HIGH COOL and set correctly. Problem Air conditioner does not start Air conditioner does not cool or heat (some models), press the DECREASE - Hot, humid weather. The batteries are no curtains, blinds or furniture blocking the front of the air conditioner. &#...8226; In COOL mode or HEAT mode (some models) as it should be dead. The current interrupter device is in the closed position. • See "Air conditioner freezing up . Consumer Support ...
... filter at HIGH FAN or HIGH COOL and set correctly. Problem Air conditioner does not start Air conditioner does not cool or heat (some models), press the DECREASE - Hot, humid weather. The batteries are no curtains, blinds or furniture blocking the front of the air conditioner. &#...8226; In COOL mode or HEAT mode (some models) as it should be dead. The current interrupter device is in the closed position. • See "Air conditioner freezing up . Consumer Support ...
Use and Care Manual
Page 23
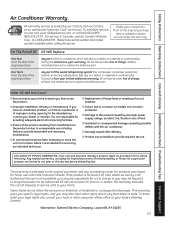
.... Any implied warranties, including the implied warranties of merchantability or fitness for a particular purpose, are limited to one -year warranty, GE will also provide, free of the sealed refrigerating system (the compressor, condenser, evaporator and all labor and related service to state. ...available, you may be responsible for service. Louisville, KY 40225 23 All warranty service provided by law. To schedule service, on models not corrosionprotected. ■ Damage to the product caused by improper power supply voltage, accident, fire, floods or acts of improper ...
.... Any implied warranties, including the implied warranties of merchantability or fitness for a particular purpose, are limited to one -year warranty, GE will also provide, free of the sealed refrigerating system (the compressor, condenser, evaporator and all labor and related service to state. ...available, you may be responsible for service. Louisville, KY 40225 23 All warranty service provided by law. To schedule service, on models not corrosionprotected. ■ Damage to the product caused by improper power supply voltage, accident, fire, floods or acts of improper ...
Quick Specs
Page 1
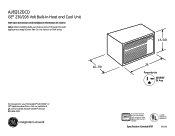
...area are calculated by Underwriters Laboratories 390166 Premium, Deluxe and Value Model Wall Case Dimensions (in inches) 15-5/8 For answers to your Monogram,® GE Profile™ or GE® appliance questions, visit our website at ge.com or call GE Answer Center® service, 800.626.2000. 26 16-7/8... Perpendicular 230/208V 20 Amp Note: When installing units in through -the-wall applic Do not restrict air flow areas. AJEQ12DCD GE® 230/208 Volt Built-In Heat and Cool Unit Wall Case Dimensions and Installation Information (in inches) Note: When installing slide-out...
...area are calculated by Underwriters Laboratories 390166 Premium, Deluxe and Value Model Wall Case Dimensions (in inches) 15-5/8 For answers to your Monogram,® GE Profile™ or GE® appliance questions, visit our website at ge.com or call GE Answer Center® service, 800.626.2000. 26 16-7/8... Perpendicular 230/208V 20 Amp Note: When installing units in through -the-wall applic Do not restrict air flow areas. AJEQ12DCD GE® 230/208 Volt Built-In Heat and Cool Unit Wall Case Dimensions and Installation Information (in inches) Note: When installing slide-out...
Quick Specs
Page 3
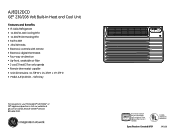
... the Association of Home Appliance Manufacturers' standards. Soft Gray For answers to your Monogram,® GE Profile™ or GE® appliance questions, visit our website at ge.com or call GE Answer Center® service, 800.626.2000. AJEQ12DCD GE® 230/208 Volt Built-In Heat and Cool Unit Features and Benefits • R-410A... air direction • Up-front, washable air filter • 2 cool/2 heat/2 fan only speeds • Remote thermostat capable • Unit dimensions: 14-7/8"W x 24-3/4"H x 19-7/8"D • Model AJEQ12DCD -
... the Association of Home Appliance Manufacturers' standards. Soft Gray For answers to your Monogram,® GE Profile™ or GE® appliance questions, visit our website at ge.com or call GE Answer Center® service, 800.626.2000. AJEQ12DCD GE® 230/208 Volt Built-In Heat and Cool Unit Features and Benefits • R-410A... air direction • Up-front, washable air filter • 2 cool/2 heat/2 fan only speeds • Remote thermostat capable • Unit dimensions: 14-7/8"W x 24-3/4"H x 19-7/8"D • Model AJEQ12DCD -


