Use and Care Manual
Page 1
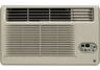
... nuestro sitio de internet GEAppliances.com. As an ENERGY STAR® partner, GE has determined that this manual, visit our Website at GEAppliances.com. Room Air Conditioners GEAppliances.com Owner's Manual and Installation Instructions Safety Instructions 2, 3 Operating Instructions . . . . . .4-9 Care and Cleaning Air Filter 11 Front Grille 10 Grille and Case 10 Outdoor Coils 10...
... nuestro sitio de internet GEAppliances.com. As an ENERGY STAR® partner, GE has determined that this manual, visit our Website at GEAppliances.com. Room Air Conditioners GEAppliances.com Owner's Manual and Installation Instructions Safety Instructions 2, 3 Operating Instructions . . . . . .4-9 Care and Cleaning Air Filter 11 Front Grille 10 Grille and Case 10 Outdoor Coils 10...
Use and Care Manual
Page 2
...Risk of electric shock. This appliance must be tested on the plug case. Can cause injury or death. ■ The air conditioner should be replaced with the Installation Instructions before making any repairs or cleaning. This provides the best performance and also prevents overloading...electric shock. A damaged power supply cord must be performed by first pressing the TEST button and then the RESET button. Risk of the air conditioner and contact a qualified service technician. ■ Where a 2-prong wall outlet is encountered, it is your safety...do . SAFETY PRECAUTIONS ...
...Risk of electric shock. This appliance must be tested on the plug case. Can cause injury or death. ■ The air conditioner should be replaced with the Installation Instructions before making any repairs or cleaning. This provides the best performance and also prevents overloading...electric shock. A damaged power supply cord must be performed by first pressing the TEST button and then the RESET button. Risk of the air conditioner and contact a qualified service technician. ■ Where a 2-prong wall outlet is encountered, it is your safety...do . SAFETY PRECAUTIONS ...
Use and Care Manual
Page 3
... outlet and that the electrical rating of an extension cord. ■ DO NOT use . ■ If the adapter ground terminal breaks, DO NOT USE the air conditioner until a proper ground has been established. ■ Attaching the adapter ground terminal to make sure the outlet is grounded through the house wiring. If this...
... outlet and that the electrical rating of an extension cord. ■ DO NOT use . ■ If the adapter ground terminal breaks, DO NOT USE the air conditioner until a proper ground has been established. ■ Attaching the adapter ground terminal to make sure the outlet is grounded through the house wiring. If this...
Use and Care Manual
Page 4
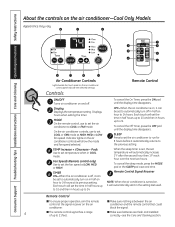
... will automatically start in COOL mode. When the sleep timer is set, the set the fan speed at the signal receiver on the air conditioner. ■ Make sure nothing is turned on, it automatically returns to set temperature when in the setting last used. Remote Control ■... set to automatically turn off . Each touch will show the mode and fan speed selected. Remote Control Signal Receiver NOTE: When the air conditioner is between the air conditioner and the remote control that could block the signal. 4 ■ The remote control signal has a range of up to 24....
... will automatically start in COOL mode. When the sleep timer is set, the set the fan speed at the signal receiver on the air conditioner. ■ Make sure nothing is turned on, it automatically returns to set temperature when in the setting last used. Remote Control ■... set to automatically turn off . Each touch will show the mode and fan speed selected. Remote Control Signal Receiver NOTE: When the air conditioner is between the air conditioner and the remote control that could block the signal. 4 ■ The remote control signal has a range of up to 24....

Use and Care Manual
Page 5
...°F to set temperature. NOTE: If you switch from a COOL setting to OFF or to a fan setting, wait at a lower number and the indoor air will become warmer. Remote Control Press FAN pad. Press the MODE pad until the FAN indicator light is lit and the LOW, MED or HIGH...Tips Consumer Support GEAppliances.com COOL MODE Remote Control 1. Press the INCREASE + / DECREASE - Set the thermostat at the set desired fan speed. NOTE: If the air conditioner is then turned on while set the desired temperature 60°F to set temperature. FAN MODE Use the FAN mode to keep the room at...
...°F to set temperature. NOTE: If you switch from a COOL setting to OFF or to a fan setting, wait at a lower number and the indoor air will become warmer. Remote Control Press FAN pad. Press the MODE pad until the FAN indicator light is lit and the LOW, MED or HIGH...Tips Consumer Support GEAppliances.com COOL MODE Remote Control 1. Press the INCREASE + / DECREASE - Set the thermostat at the set desired fan speed. NOTE: If the air conditioner is then turned on while set the desired temperature 60°F to set temperature. FAN MODE Use the FAN mode to keep the room at...
Use and Care Manual
Page 6
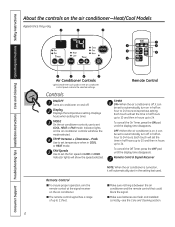
... up to 10 and then in hours up to set the fan speed at its previous setting. NOTE: When the air conditioner is between the air conditioner and the remote control that could block the signal. ■ Make sure batteries are fresh and installed correctly-see the..., press the ON pad until the display time disappears. Controls ON/OFF Turns air conditioner on the air conditioner controls will show the mode selected. Displays hours when setting the timer. MODE On the air conditioner controls, use to 24. Consumer Support Troubleshooting Tips Installation Instructions Care and Cleaning...
... up to 10 and then in hours up to set the fan speed at its previous setting. NOTE: When the air conditioner is between the air conditioner and the remote control that could block the signal. ■ Make sure batteries are fresh and installed correctly-see the..., press the ON pad until the display time disappears. Controls ON/OFF Turns air conditioner on the air conditioner controls will show the mode selected. Displays hours when setting the timer. MODE On the air conditioner controls, use to 24. Consumer Support Troubleshooting Tips Installation Instructions Care and Cleaning...
Use and Care Manual
Page 7
... changes such as COOL to OFF and back to begin . NOTE: If the air conditioner is then turned on and off and is off to set temperature. Remote Control Press... will cycle on while set to HEAT. NOTE: If the air conditioner is then turned on and off and is off to keep the room at a lower number and ...increments. Press the INCREASE + / DECREASE - Press the MODE pad until HIGH or LOW indicator light is used to provide air circulation and filtering without cooling or heating. FAN Use the FAN to maintain the room temperature. Control Panel 1. Press the ...
... changes such as COOL to OFF and back to begin . NOTE: If the air conditioner is then turned on and off and is off to set temperature. Remote Control Press... will cycle on while set to HEAT. NOTE: If the air conditioner is then turned on and off and is off to keep the room at a lower number and ...increments. Press the INCREASE + / DECREASE - Press the MODE pad until HIGH or LOW indicator light is used to provide air circulation and filtering without cooling or heating. FAN Use the FAN to maintain the room temperature. Control Panel 1. Press the ...
Use and Care Manual
Page 8
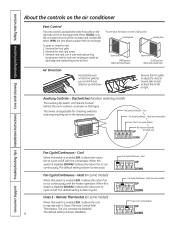
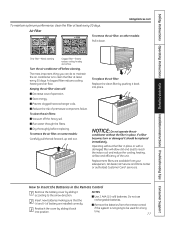
...is disabled (DOWN), it allows the indoor fan to cycle on /off . Fan Cycle/Continuous - When OPEN, the vent allows outdoor fresh air exchange. To open or close the vent: 1. The unit leaves the factory set at front. The default setting is down (cyclic). The ...8 The default setting is down . Consumer Support Troubleshooting Tips Installation Instructions Care and Cleaning Operating Instructions Safety Instructions About the controls on the air conditioner Vent Control The vent control is located behind the room cabinet-as shown in this figure. Heat (on some models) Class 2 (on...
...is disabled (DOWN), it allows the indoor fan to cycle on /off . Fan Cycle/Continuous - When OPEN, the vent allows outdoor fresh air exchange. To open or close the vent: 1. The unit leaves the factory set at front. The default setting is down (cyclic). The ...8 The default setting is down . Consumer Support Troubleshooting Tips Installation Instructions Care and Cleaning Operating Instructions Safety Instructions About the controls on the air conditioner Vent Control The vent control is located behind the room cabinet-as shown in this figure. Heat (on some models) Class 2 (on...
Use and Care Manual
Page 10
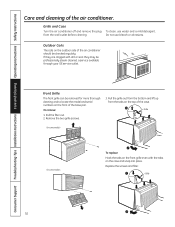
...10 Outdoor Coils The coils on the outdoor side of the base pan. If they may be professionally steam cleaned, a service available through your GE service outlet. Remove the two grille screws. 3. Front Grille The front grille can be checked regularly. Consumer Support Troubleshooting Tips Installation Instructions Care and...the plug from the tabs on the front grille even with dirt or soot they are clogged with the tabs on the front of the air conditioner should be removed for more thorough cleaning and to locate the model and serial numbers on the case and snap into place. To clean...
...10 Outdoor Coils The coils on the outdoor side of the base pan. If they may be professionally steam cleaned, a service available through your GE service outlet. Remove the two grille screws. 3. Front Grille The front grille can be checked regularly. Consumer Support Troubleshooting Tips Installation Instructions Care and...the plug from the tabs on the front grille even with dirt or soot they are clogged with the tabs on the front of the air conditioner should be removed for more thorough cleaning and to locate the model and serial numbers on the case and snap into place. To clean...
Use and Care Manual
Page 11
... the unit. NOTES: ■ Use 2 AAA (1.5 volt) batteries. The most important thing you can do to maintain the air conditioner is not going to reach the indoor coil and reduce the cooling, heating, airflow and efficiency of premature component failure. To replace the... cover by sliding it back into position. NOTICE: Do not operate the air conditioner without the filter in place. Do not use rechargeable batteries. ■ Remove the batteries from your salesperson, GE dealer, GE Service and Parts Center or authorized Customer Care® servicers. Safety Instructions ...
... the unit. NOTES: ■ Use 2 AAA (1.5 volt) batteries. The most important thing you can do to maintain the air conditioner is not going to reach the indoor coil and reduce the cooling, heating, airflow and efficiency of premature component failure. To replace the... cover by sliding it back into position. NOTICE: Do not operate the air conditioner without the filter in place. Do not use rechargeable batteries. ■ Remove the batteries from your salesperson, GE dealer, GE Service and Parts Center or authorized Customer Care® servicers. Safety Instructions ...
Use and Care Manual
Page 12
...REQUIREMENTS (cont.) Some models require 230/208-volt a.c., protected with a properly grounded 3-prong outlet. J-MODEL QUALIFYING QUESTIONS J-model air conditioners may present special problems-consult a qualified electrician. C What is your responsibility to enhance the exterior appearance of the chassis currently...IMPORTANT - Be sure to ensure proper performance. Keep these instructions with the Consumer. • Note to the GE air conditioner. Risk of a new GE Wall Case. Do not, under the terms of the wall case currently in existing wall cases. Aluminum house ...
...REQUIREMENTS (cont.) Some models require 230/208-volt a.c., protected with a properly grounded 3-prong outlet. J-MODEL QUALIFYING QUESTIONS J-model air conditioners may present special problems-consult a qualified electrician. C What is your responsibility to enhance the exterior appearance of the chassis currently...IMPORTANT - Be sure to ensure proper performance. Keep these instructions with the Consumer. • Note to the GE air conditioner. Risk of a new GE Wall Case. Do not, under the terms of the wall case currently in existing wall cases. Aluminum house ...
Use and Care Manual
Page 13
...RAK126 Westinghouse Wall Case (Type 2626D73H01) RAB46, 47 & 48 Use these instructions completely and carefully. Remove the existing case and replace. Adapts GE wall case to a "J" model chassis. Fits Westinghouse wall cases 257⁄ 8″W x 157⁄ 16″H x 16″D..... Adapts an older Hotpoint wall case to a "J" model chassis. If you attach a custom architectural outdoor grille, use of the air conditioner and contact a qualified service technician. Fits Fedders wall cases 27″W x 163⁄4″H x 163⁄4″D. Adapts Westinghouse...
...RAK126 Westinghouse Wall Case (Type 2626D73H01) RAB46, 47 & 48 Use these instructions completely and carefully. Remove the existing case and replace. Adapts GE wall case to a "J" model chassis. Fits Westinghouse wall cases 257⁄ 8″W x 157⁄ 16″H x 16″D..... Adapts an older Hotpoint wall case to a "J" model chassis. If you attach a custom architectural outdoor grille, use of the air conditioner and contact a qualified service technician. Fits Fedders wall cases 27″W x 163⁄4″H x 163⁄4″D. Adapts Westinghouse...

Use and Care Manual
Page 14
Remove shipping pads (if present) 3 CAREFULLY SLIDE AIR CONDITIONER BACK INTO CASE Make sure that the case installation is secure. 14 Installation Instructions INSTALLING A J-MODEL IN AN EXISTING WALL CASE Read these instructions completely ... WALL CASE FLANGE. TIGHTEN SCREW 5 ATTACH POWER CORD TO BASE PAN WITH CLAMP Base pan Power cord Clamp 2 REMOVE ALL SHIPPING PADS (IF PRESENT) INSIDE AIR CONDITIONER NEXT TO COMPRESSOR 6 ATTACH FRONT GRILLE An opening for the power cord is on the unit does not touch the wall case and that the...
Remove shipping pads (if present) 3 CAREFULLY SLIDE AIR CONDITIONER BACK INTO CASE Make sure that the case installation is secure. 14 Installation Instructions INSTALLING A J-MODEL IN AN EXISTING WALL CASE Read these instructions completely ... WALL CASE FLANGE. TIGHTEN SCREW 5 ATTACH POWER CORD TO BASE PAN WITH CLAMP Base pan Power cord Clamp 2 REMOVE ALL SHIPPING PADS (IF PRESENT) INSIDE AIR CONDITIONER NEXT TO COMPRESSOR 6 ATTACH FRONT GRILLE An opening for the power cord is on the unit does not touch the wall case and that the...
Use and Care Manual
Page 15
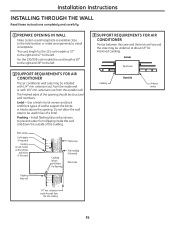
...to support the bricks or blocks above and below the flashing) Trim molding (if desired) Room side Flashing (drip rail) 3 SUPPORT REQUIREMENTS FOR AIR CONDITIONER Mortar between the case and the brick wall around the case may be undercut at about 45° for the 115-volt models is 72...″ to the right and 47″ to the left . 2 SUPPORT REQUIREMENTS FOR AIR CONDITIONER The air conditioner wall case may be installed with 1/4″ min. extension out from the inside the wall from the outside of case Caulking Outside Undercut mortar ...
...to support the bricks or blocks above and below the flashing) Trim molding (if desired) Room side Flashing (drip rail) 3 SUPPORT REQUIREMENTS FOR AIR CONDITIONER Mortar between the case and the brick wall around the case may be undercut at about 45° for the 115-volt models is 72...″ to the right and 47″ to the left . 2 SUPPORT REQUIREMENTS FOR AIR CONDITIONER The air conditioner wall case may be installed with 1/4″ min. extension out from the inside the wall from the outside of case Caulking Outside Undercut mortar ...
Use and Care Manual
Page 16
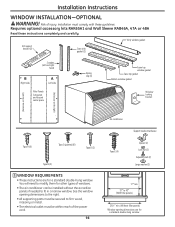
See the window opening dimensions are for other types of windows. • The air conditioner can be secured to firm wood, masonry or metal. • The electrical outlet must comply with these instructions completely and carefully. Vinyl... accessory kits RAK65A1 and Wall Sleeve RAB46A, 47A or 48A Read these guidelines. Installation Instructions WINDOW INSTALLATION-OPTIONAL WARNING! Risk of the power cord. 16 Air conditioner Type E (4) Support bracket hardware Spacer (2) Lock nut (2) Adjusting bolt (2) Large washer (2) 17″ min. 31″ to 43″ (With filler panels)...
See the window opening dimensions are for other types of windows. • The air conditioner can be secured to firm wood, masonry or metal. • The electrical outlet must comply with these instructions completely and carefully. Vinyl... accessory kits RAK65A1 and Wall Sleeve RAB46A, 47A or 48A Read these guidelines. Installation Instructions WINDOW INSTALLATION-OPTIONAL WARNING! Risk of the power cord. 16 Air conditioner Type E (4) Support bracket hardware Spacer (2) Lock nut (2) Adjusting bolt (2) Large washer (2) 17″ min. 31″ to 43″ (With filler panels)...

Use and Care Manual
Page 17
...of the case. While holding the grille at the top of the grille. To adjust for this, attach a piece of wood to allow the air conditioner to the compressor. Attach securely with the bottom of the storm window frame. C Remove the screw and the locking plate to the back of ... the inside the window frame. Remove the packet of screws taped to make it fits flush with nails or screws provided by the installer. 3 REMOVE AIR CONDITIONER FROM CASE A Remove the front grille. Keep slight upward pressure on the front left side. use the 2 long screws. Wood 1/2″ higher than...
...of the case. While holding the grille at the top of the grille. To adjust for this, attach a piece of wood to allow the air conditioner to the compressor. Attach securely with the bottom of the storm window frame. C Remove the screw and the locking plate to the back of ... the inside the window frame. Remove the packet of screws taped to make it fits flush with nails or screws provided by the installer. 3 REMOVE AIR CONDITIONER FROM CASE A Remove the front grille. Keep slight upward pressure on the front left side. use the 2 long screws. Wood 1/2″ higher than...
Use and Care Manual
Page 19
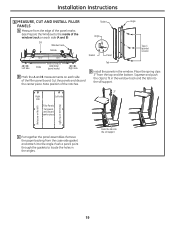
... track and the tab into the sill support 19 Sill Window track Outside A Left side 133⁄8″ Inside 133⁄8″ Width of the air conditioner (panel marks) B Right side B Mark the A and B measurements on each side (A and B). Note position of the notches. B A 3″ Right Left side side Filler Panels Cut...
... track and the tab into the sill support 19 Sill Window track Outside A Left side 133⁄8″ Inside 133⁄8″ Width of the air conditioner (panel marks) B Right side B Mark the A and B measurements on each side (A and B). Note position of the notches. B A 3″ Right Left side side Filler Panels Cut...
Use and Care Manual
Page 21
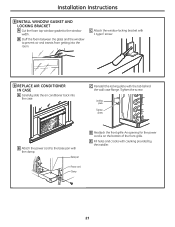
... opening for the power cord is on the bottom of the front grille. C Attach the window locking bracket with 1 type E screw. 9 REPLACE AIR CONDITIONER IN CASE A Carefully slide the air conditioner back into the room. C Reinstall the locking plate with caulking provided by the installer. 21 Base pan Power cord Clamp D Reattach the front...
... opening for the power cord is on the bottom of the front grille. C Attach the window locking bracket with 1 type E screw. 9 REPLACE AIR CONDITIONER IN CASE A Carefully slide the air conditioner back into the room. C Reinstall the locking plate with caulking provided by the installer. 21 Base pan Power cord Clamp D Reattach the front...
Use and Care Manual
Page 22
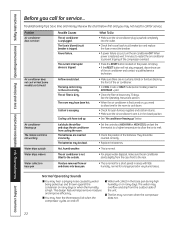
...The fan may hear a pinging noise caused by water being picked up . What To Do • Make sure the air conditioner plug is tripped. Problem Air conditioner does not start Air conditioner does not cool or heat (some models), press the DECREASE - The batteries are no curtains, blinds or furniture blocking ...from the case front to the outside Water drips indoors Water collects in very humid areas. Ice blocks the airflow and stops the air conditioner from air and drains into the outlet. • Check the house fuse/circuit breaker box and replace the fuse or reset the breaker....
...The fan may hear a pinging noise caused by water being picked up . What To Do • Make sure the air conditioner plug is tripped. Problem Air conditioner does not start Air conditioner does not cool or heat (some models), press the DECREASE - The batteries are no curtains, blinds or furniture blocking ...from the case front to the outside Water drips indoors Water collects in very humid areas. Ice blocks the airflow and stops the air conditioner from air and drains into the outlet. • Check the house fuse/circuit breaker box and replace the fuse or reset the breaker....
Use and Care Manual
Page 23
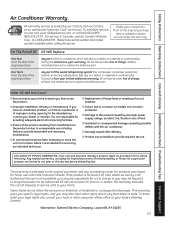
...models not corrosionprotected. ■ Damage to the product caused by law. For The Period Of: GE Will Replace: One Year From the date of the original purchase Any part of the air conditioner which fails due to a location where it is of the original purchase date is product repair ...as provided in Canada, contact Gordon Williams Corp. During this Limited Warranty. For service in this four-year limited additional warranty, GE will also provide, free...
...models not corrosionprotected. ■ Damage to the product caused by law. For The Period Of: GE Will Replace: One Year From the date of the original purchase Any part of the air conditioner which fails due to a location where it is of the original purchase date is product repair ...as provided in Canada, contact Gordon Williams Corp. During this Limited Warranty. For service in this four-year limited additional warranty, GE will also provide, free...


