Installation Instructions
Page 1
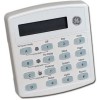
... 2 describes the maximum wire lengths allowed between the touchpad and panel. 3. The SuperBus® 2000 2x16 LCD (liquid crystal display) Alphanumeric Touchpad lets you . 5. For Concord systems (all programming and operation of the arrow in... Figure 3 (A) until it so the tab is on the left (see A in Figure 3) and position the Quick Guide slide-out card into Place • 4-conductor, 22- Slide the card in the direction of a compatible security...
... 2 describes the maximum wire lengths allowed between the touchpad and panel. 3. The SuperBus® 2000 2x16 LCD (liquid crystal display) Alphanumeric Touchpad lets you . 5. For Concord systems (all programming and operation of the arrow in... Figure 3 (A) until it so the tab is on the left (see A in Figure 3) and position the Quick Guide slide-out card into Place • 4-conductor, 22- Slide the card in the direction of a compatible security...
Installation Instructions
Page 2
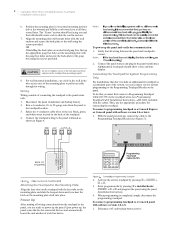
...+12V/RED BUS A/GREEN BUS B/WHITE GND/BLACK BACK OF TOUCHPAD Programming Touchpad Cable (60-791) Align the four slots on the touchpad with the gang box holes and secure the back-plate to a Concord Express or Concord panel with the cable). Activate the service touchpad by pressing 8 + installer/dealer CODE + 0 + 0 ...automatically learns the unit number of the system, you can connect one for connecting the touchpad. Alphanumeric touchpads should be facing you are ready to the Programming Touchpad Header on the mounting plate click into place. After making all three scored lines....
...+12V/RED BUS A/GREEN BUS B/WHITE GND/BLACK BACK OF TOUCHPAD Programming Touchpad Cable (60-791) Align the four slots on the touchpad with the gang box holes and secure the back-plate to a Concord Express or Concord panel with the cable). Activate the service touchpad by pressing 8 + installer/dealer CODE + 0 + 0 ...automatically learns the unit number of the system, you can connect one for connecting the touchpad. Alphanumeric touchpads should be facing you are ready to the Programming Touchpad Header on the mounting plate click into place. After making all three scored lines....
Installation Instructions
Page 3
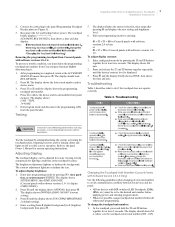
...DA nnn. 2. Table 3 describes what to verify correct operation. The brightness adjustment lightens or darkens the background. Removing the programming touchpad from Concord panels with software versions 1.0- 1.6. Press ƒ. Enter configuration mode by pressing 9 + user, partition, or system master CODE... departments. The display shows SYSTEM MENU, then TIME AND DATE (Concord panels with DIP switches (LED Touchpads, ESMs, HIMs, etc.) must delete the programming touchpad unit number from panel memory. To change the touchpad unit number: 1. The display should show DA n, where n ...
...DA nnn. 2. Table 3 describes what to verify correct operation. The brightness adjustment lightens or darkens the background. Removing the programming touchpad from Concord panels with software versions 1.0- 1.6. Press ƒ. Enter configuration mode by pressing 9 + user, partition, or system master CODE... departments. The display shows SYSTEM MENU, then TIME AND DATE (Concord panels with DIP switches (LED Touchpads, ESMs, HIMs, etc.) must delete the programming touchpad unit number from panel memory. To change the touchpad unit number: 1. The display should show DA n, where n ...


